SWATCH SUNDAY — Sally Hansen Complete Salon Manicure Berry Fancy

Good morning lovelies & happy Sunday. Unless, of course, you to where in the path of Hurricane Fiona & are also still in the post storm darkness. I come to you, from my the front of our car where I am simultaneously charging my near dead phone, & using it as a hot spot so I can write up the blog post!

Haha, Hurricane or no, the show much go on.

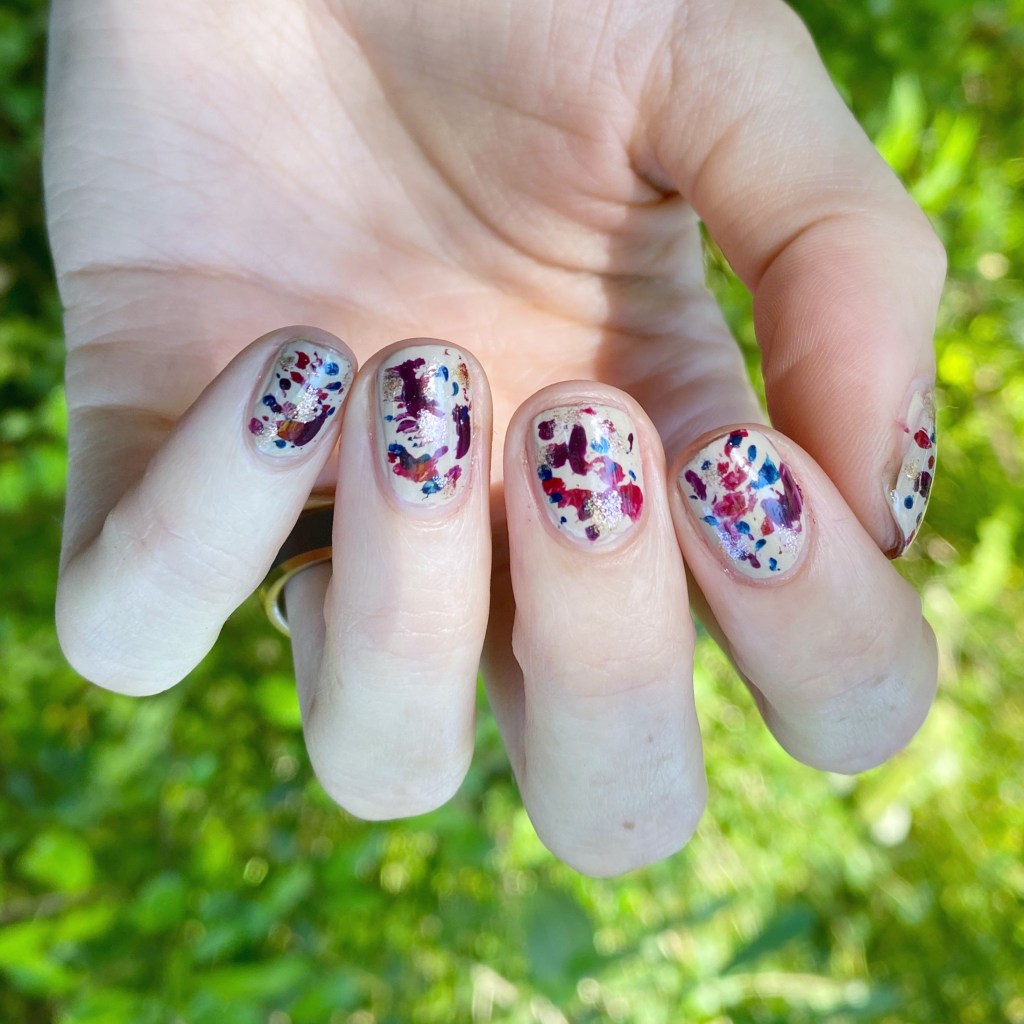
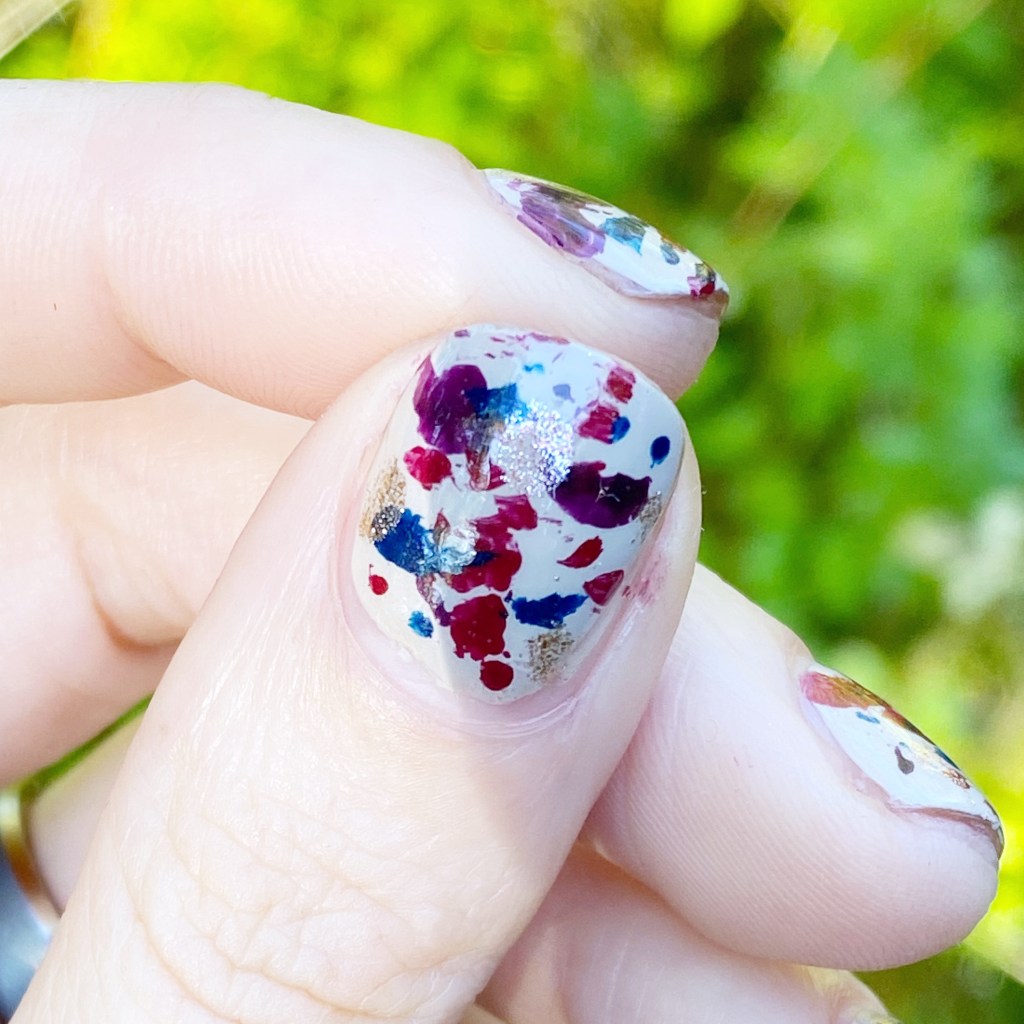
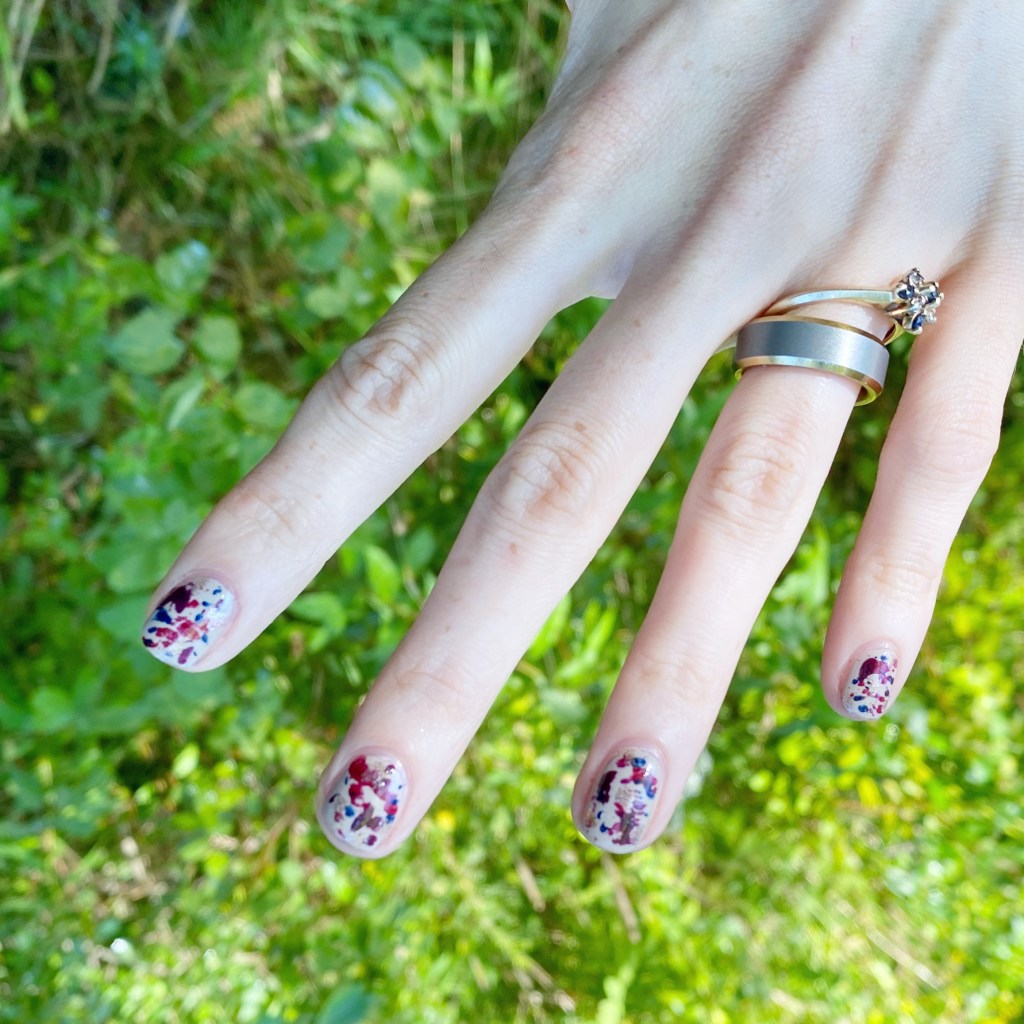
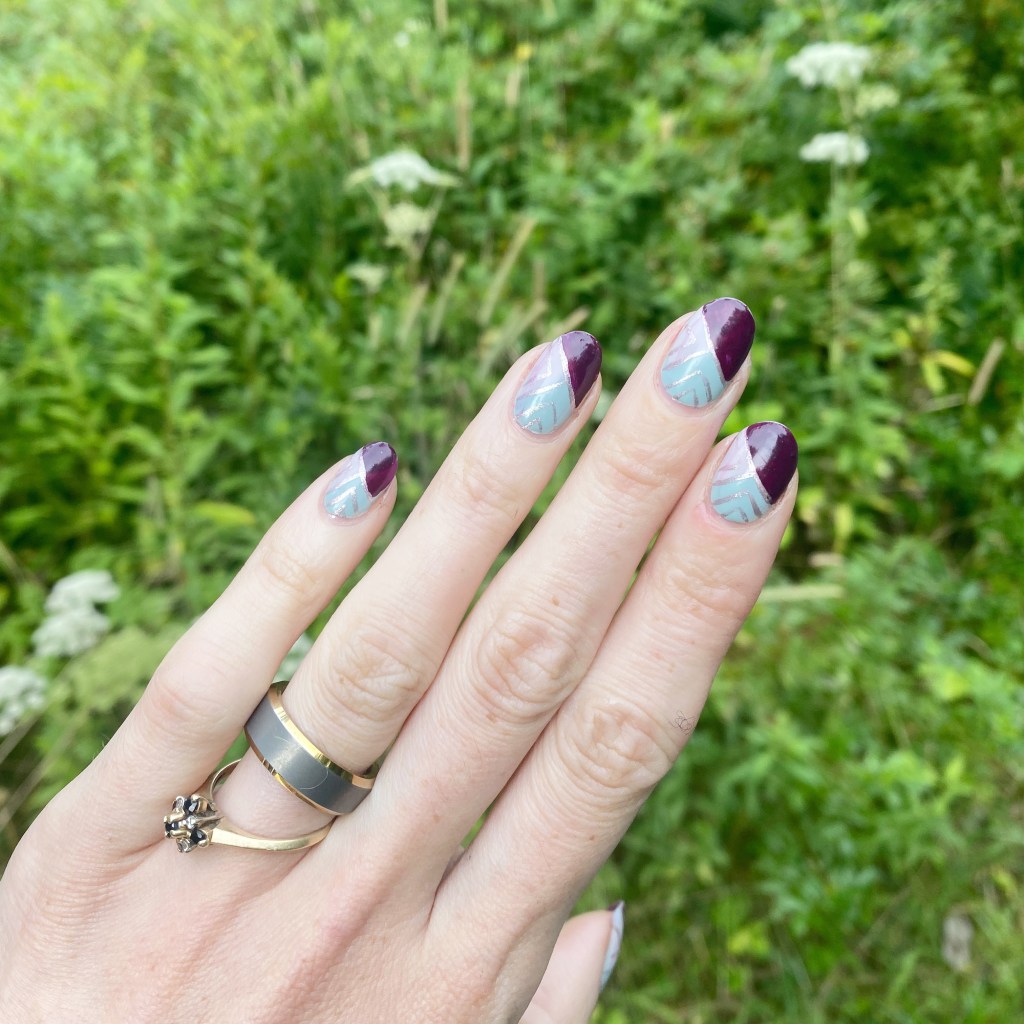
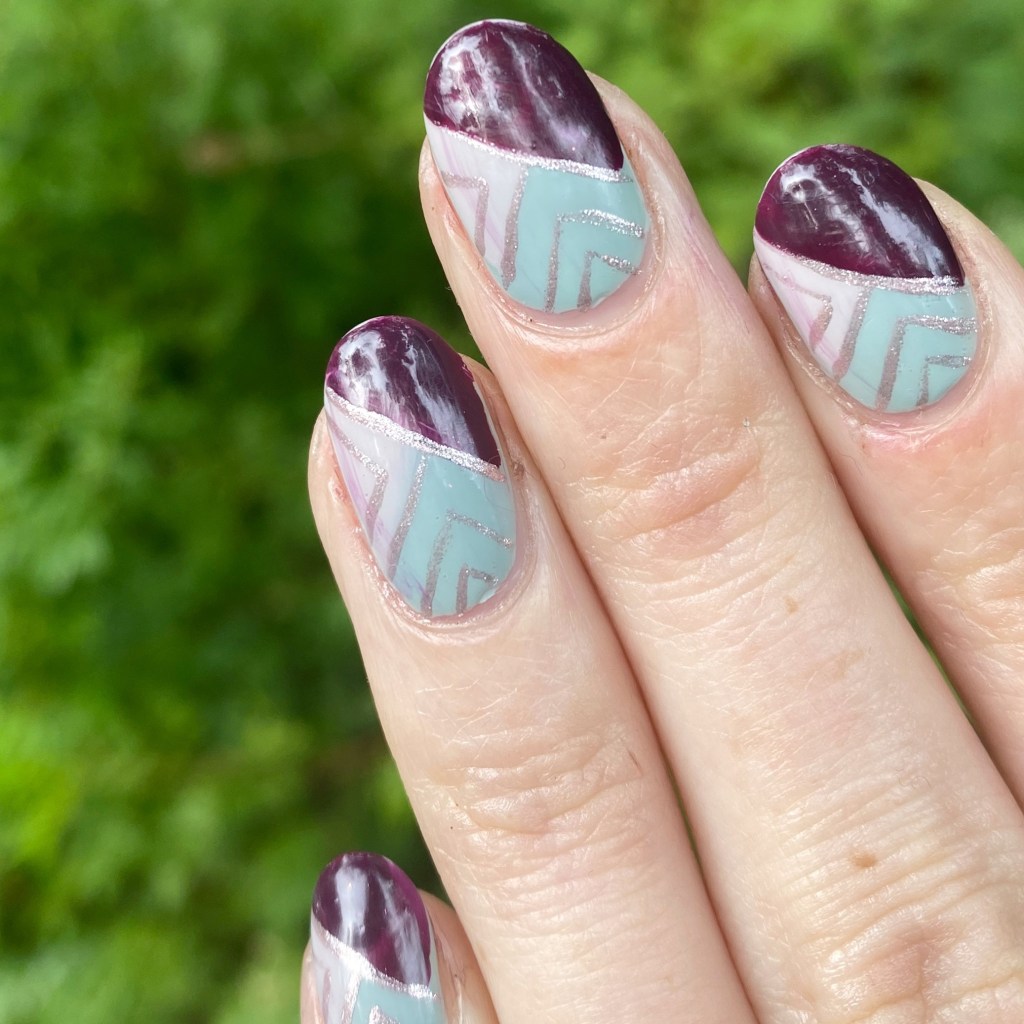
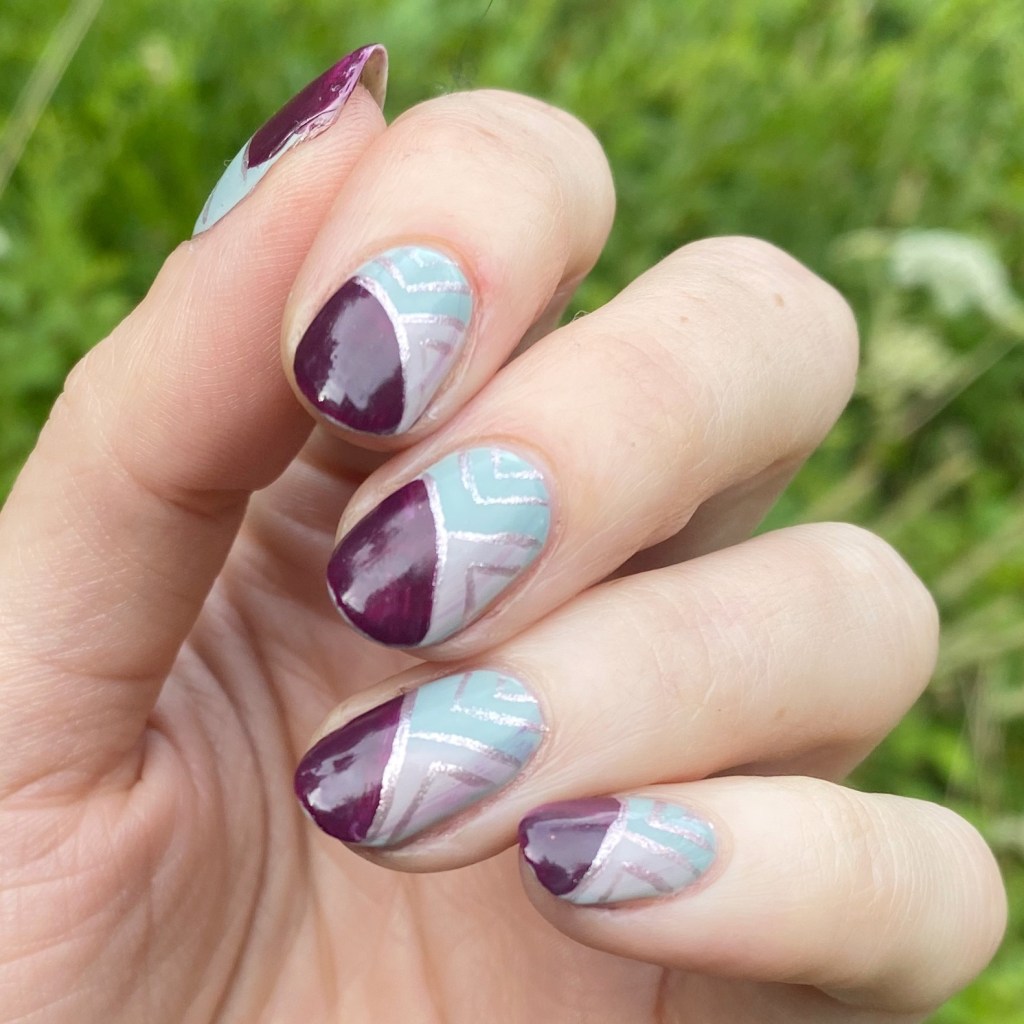
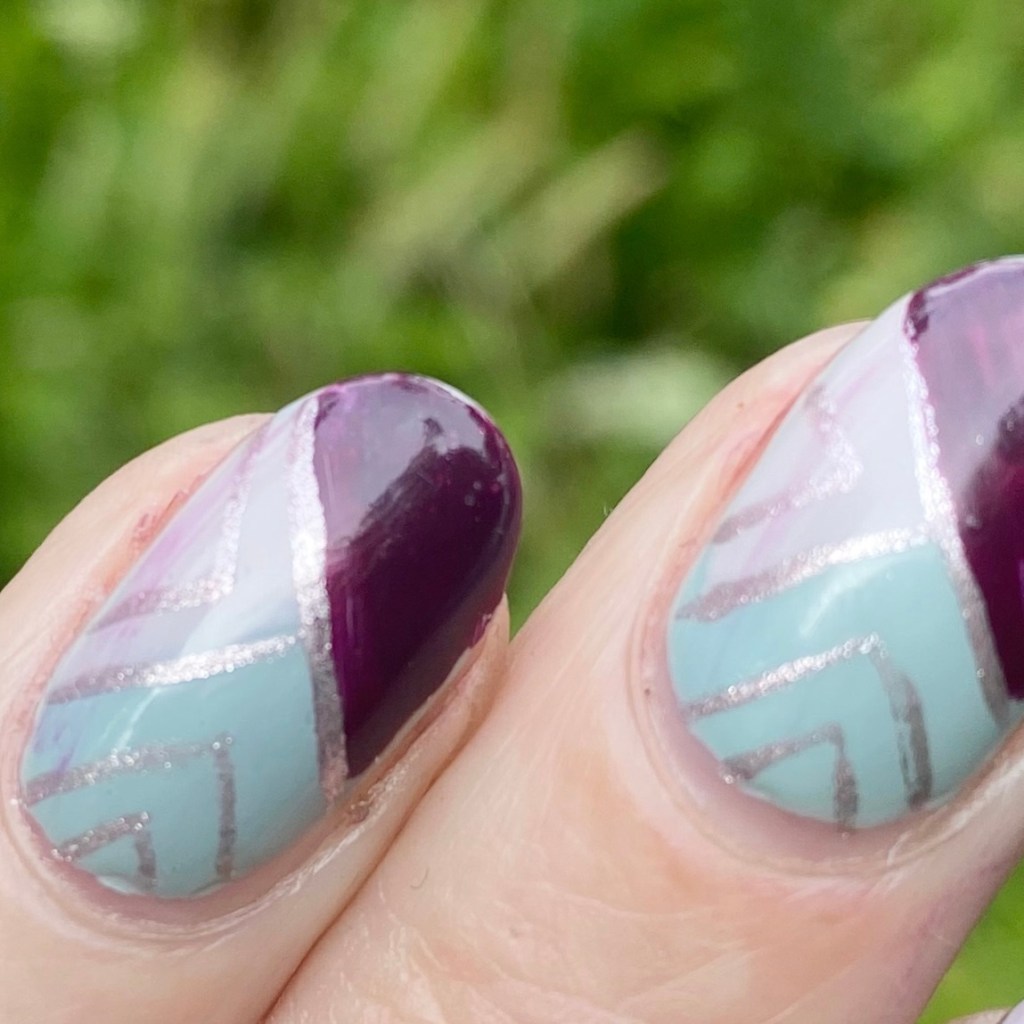
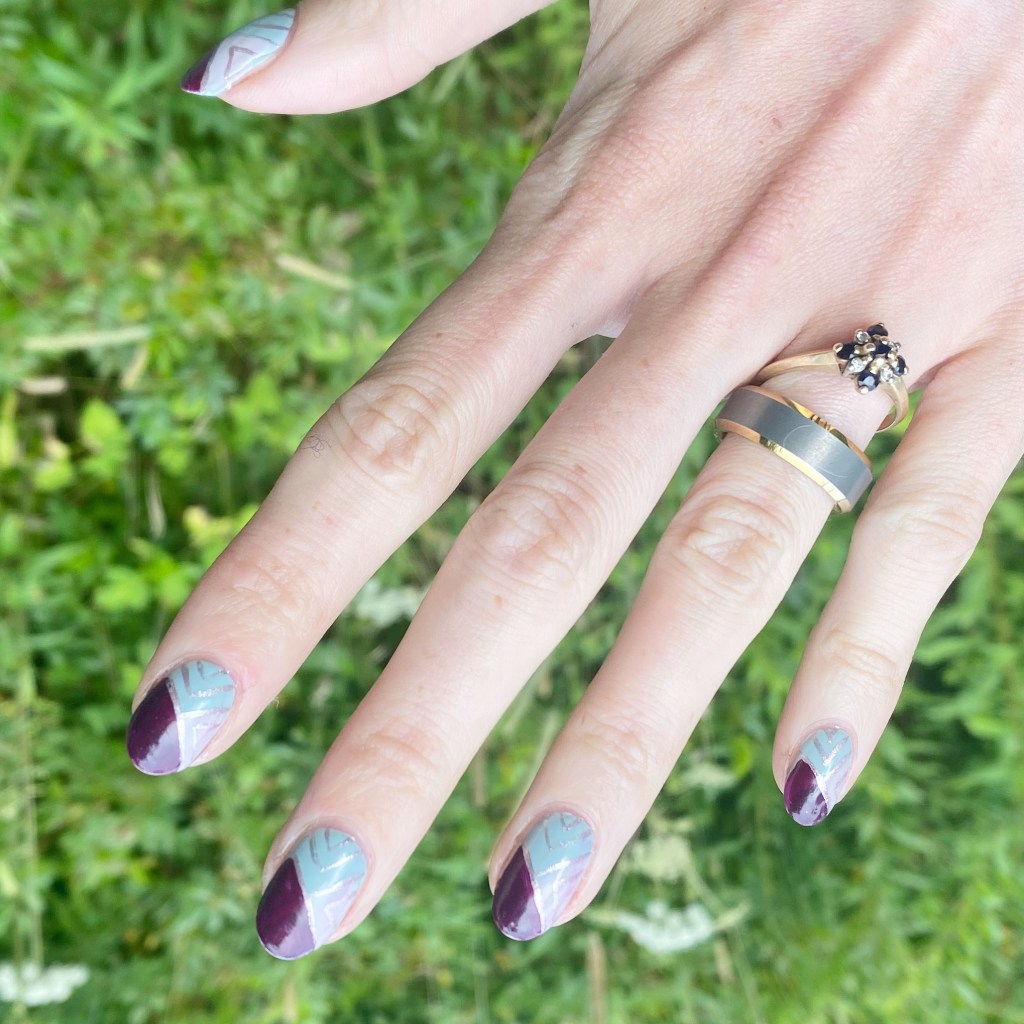
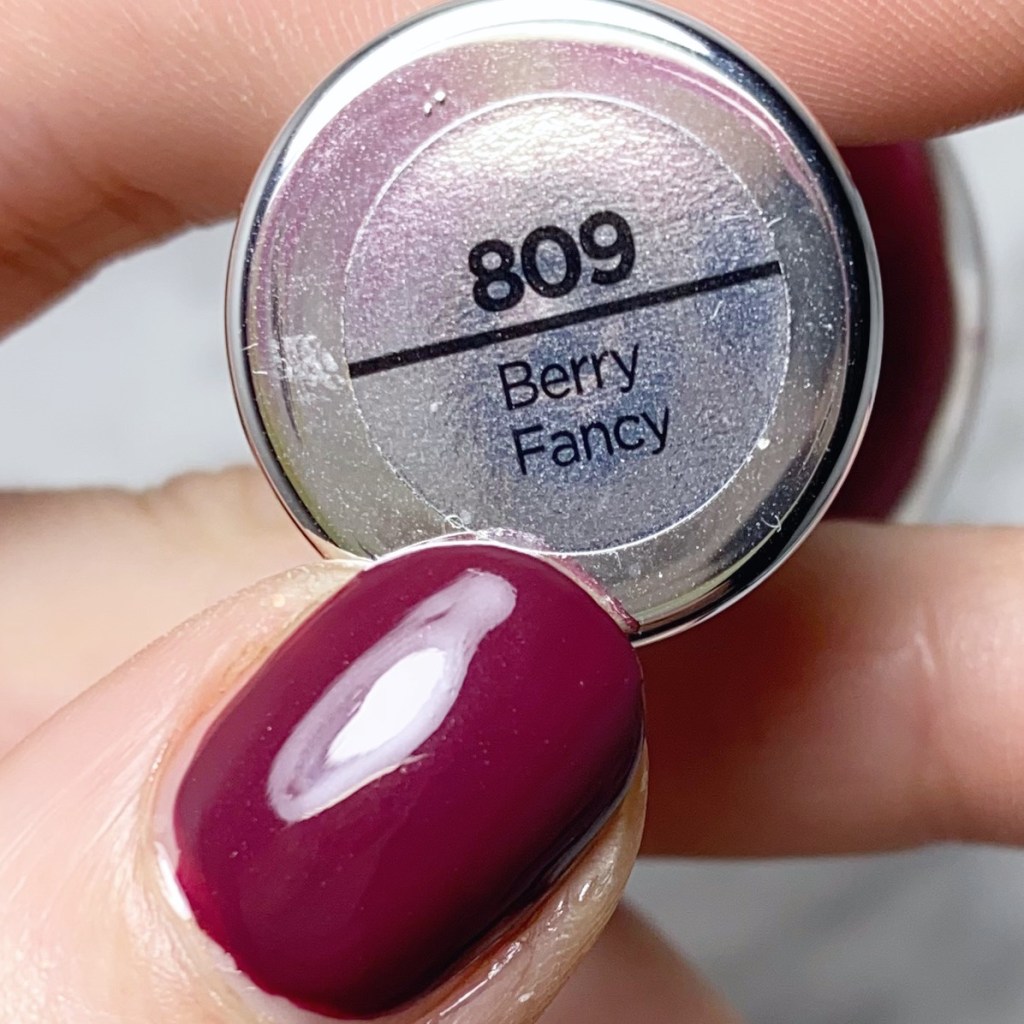
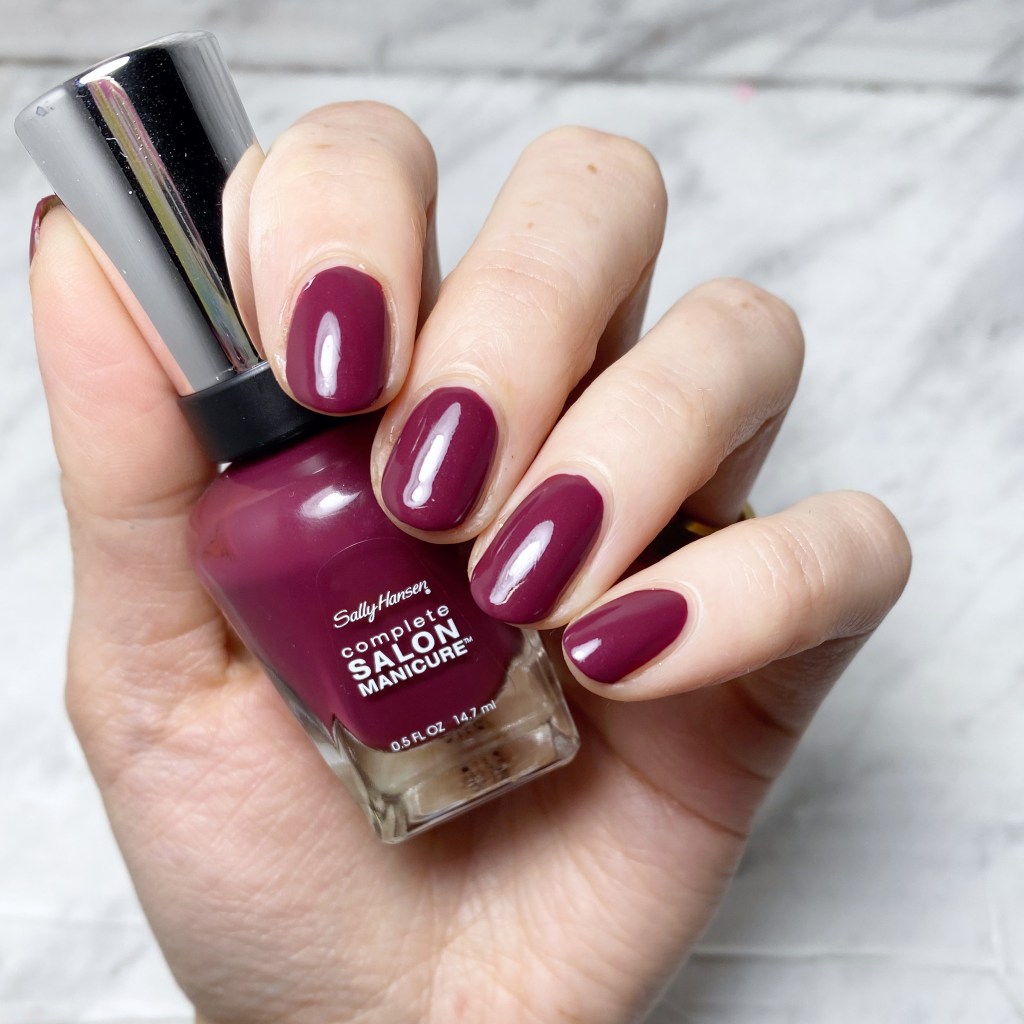
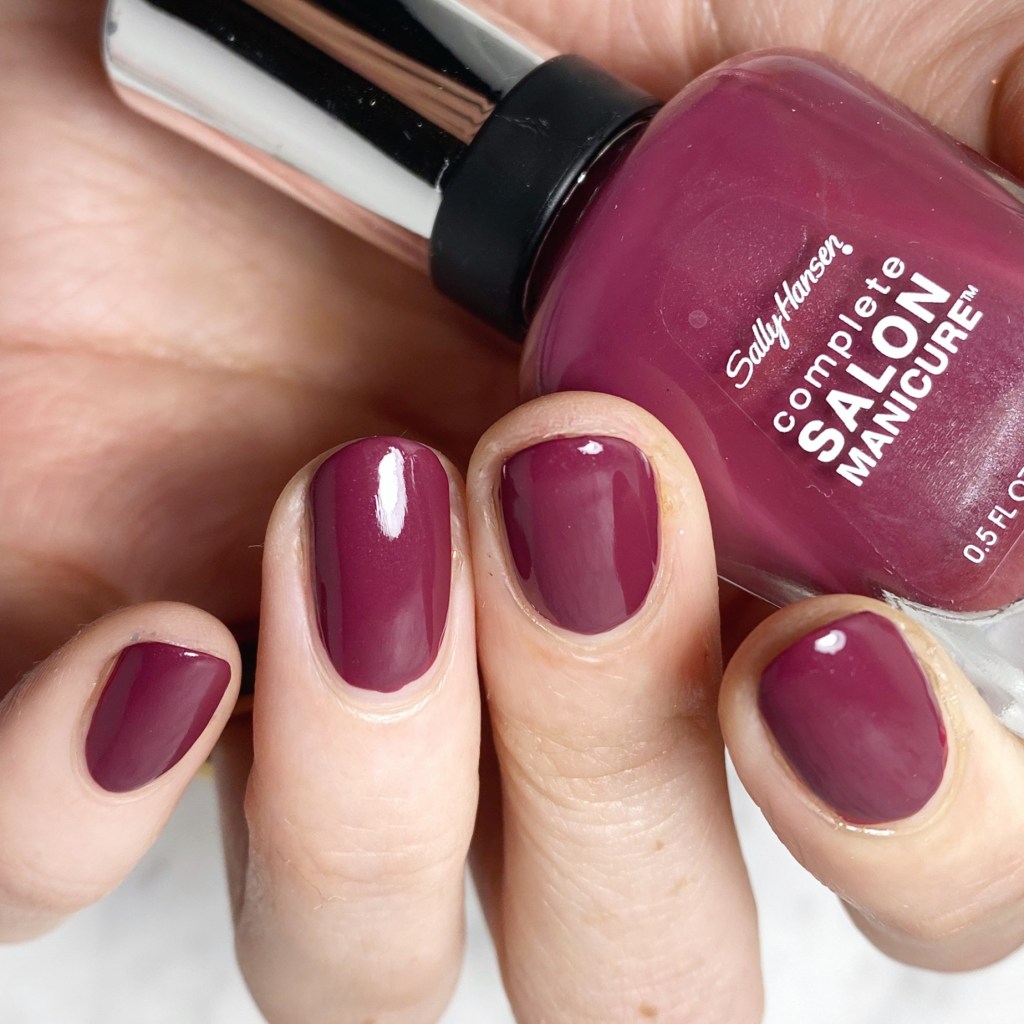
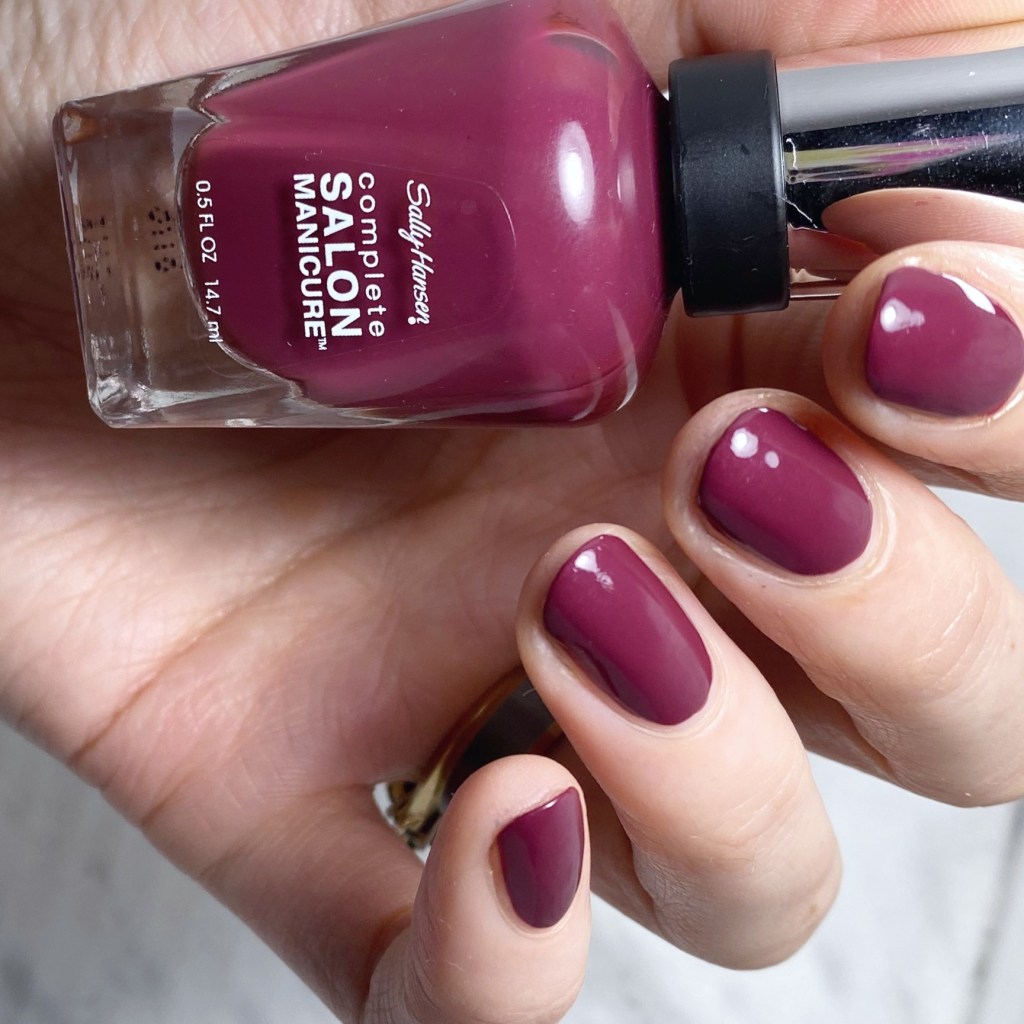
Today I reached into my stash for another pretty shade from a few years ago: Sally Hansen Complete Salon Manicure in Berry Fancy. This shade was originally released as part of the Sally Hansen Red/esign collection circa 2018, & was gifted to me from Sally Hansen in a super cute package. At the time, I was newly pregnant with my daughter (& sick all the time) so I only swatched 1/2 the collection. You can find those shades HERE.

2 coats + Sally Hansen CSM Fast Dry Top Coat

The formula on this shade is quick nice. It’s not a one coater, which would be nicer, but it does apply absolutely perfectly in 2 coats, & leaves a thick glossy finish, even before applying top coat. The colour itself is a beautiful dusty brick red, that leans a bit more berry side of things. It’s a nice change up, & definitely is 100% an Autumn shade.

Again, the application was really nice, & I like that this is a not quite red kind of shade. It’s kind of like a mix between a dark dusty rose, a brick red, & like… maybe plum? Either way, it’s a fantastic edition to my red collection, because sometimes you get a little bored with just fire engine red, you know?

This is also the shade/colour I’ve been heavily debating adding to my hair where I have it coloured. Currently it’s a not so great, extremely faded, purple-y pink colour, so I’m thinking it would be nice to go with something definitely for the ‘Ber months… since they are my favourite months, after all!

I peeked online, but it doesn’t look like Berry Fancy is still part of Sally Hansen’s regular core collection. I did find one bottle listed on eBay, used, but other thank that it doesn’t look like its an easy shade to track down. That being said, I feel like this shade probably has an easy dupe out there, so if you’re looking for a red/not-quite-red shade like this, it won’t be hard to dupe.

Let me know what you think of this shade, & have a wonderful day. Time for me to finish my camp stove made coffee, & pray we get some power soon! Have a lovely day darlings!

Gold & Plum Splatter Nails

Hello lovelies & happy Tuesday! A beautiful Autumn Tuesday at that.

Today I’m showing off yet another fun splatter look, this time inspired by a tutorial by @nailsdnt on Instagram. She used a stamper & cuticle oil to achieve a fun bubbly splatter look, & as soon as I saw her tutorial I knew I needed to give it a try! I just love a good splatter design, & this seemed like such an easy way to achieve it.

The polishes I used for this manicure are: 

  • Base Coat: Essie Hard To Resist Glow & Shine 
  • Top Coat: Essie Gel Setter
  • Matte Top Coat: Sally Hansen Miracle Gel Matte Top Coat
  • Color Club Twice Bitten
  • L’Oreal Feeling Kilty
  • Nailstuff.ca clear stamper
  • Revlon Cuticle Oil

So obviously, first thing is first: I apologize for my weird cuticle area. Between an older top coat, & some weird matte top coat effect, it kind of gave me a messy finish. I’m definitely due for a new bottle of top coat.

Second, as you can see my nails did turn out pretty cool, although there are some differences between my splatter finish & the original design. While the original tutorial used a nail cuticle pen, I chose to use my bottle of Revlon cuticle oil, which I think lead to too much oil on the stamper. Her’s had more of a bubbly effect, while mine reminds me more a classic splatter.

But either way I love the end result. It’s so pretty! & the matte top coat just makes it look even more beautiful — I think the matte top coat just completes the look.

What do you think about this look? Are you enjoying these splatter nails I’ve been wearing lately? Let me know down in the comments below.

Autumn Fan Brush Splatter Nail Art

Hello lovelies & happy Thursday! We’re officially a full week into September, & the Autumn vibes have been strong — with the perfect early September weather to match. I’ve been fully immersing myself in all things pumpkin spice, while wearing my absolute favourite knee high boots.

So obviously, I need some nail art to match.

I’ve been rocking some serious shorties lately, thanks in part to a wicked break on my middle finger (hence why it’s so wonky). So I’ve been feeling a bit… uninspired nail art wise. One nail art look I have been loving though is splatter nails! They’re easy, fun, & I’ve never done one that I didn’t love.

The polishes I used for this manicure are: 

  • Base Coat: Essie Hard To Resist Glow & Shine 
  • Top Coat: Essie Gel Setter
  • Sally Hansen Complete Salon Manicure Know The Espa-Drille
  • Sally Hansen InstaDri Cinna-snap
  • Sally Hansen InstaDri Zip Wine
  • Sally Hansen InstaDri Midnight Drive
  • Sally Hansen Miracle Gel Golden Glow
  • Fan Brush Nail Art Brush (mine was purchased at either Claire’s or Icing)

How funky are these? I just love how fun this colour combination is together, & it’s combining all the colours I love for Autumn — but on a light base. I usually go with the Saran Wrap technique for my nail art, but I thought I would try out with a fan brush, & I’m really happy with the end result. They’re just so much fun!

What do you think about these splatter nails? Do you like this fun splatter design? Let me know what Autumn nail art you’re rocking right now — or if your holding onto Summer nails as long as possible.

Autumn Vibes & Abstract Stripes 🍂

Happy September 1st! 🍂🍁

We are officially in my favourite months — the “-ber” months! & my favourite months for nail polish & nail art. We’ve got dark colours, all the knee high boots a girl could dream of, & the best season for coffee drinks! So obviously now it’s September, that means I can really dive into my favourite Fall nail art designs without feeling judged for it being “too soon”.

Today’s look is another one of those abstract stripes designs I love so much. This time, I wanted a few more Fall colours because let’s just be honest, I’m obsessed. Haha. I decided on a lighter base colour, with some darker accent stripes. & I think the combination is absolutely perfect!

The polishes I used for this manicure are: 

  • Base Coat: Essie Hard To Resist Glow & Shine 
  • Top Coat: Essie Gel Setter
  • Quo Beauty Just Peachy
  • Essie Under the Twilight
  • Sally Hansen Insta-Dri Zip Wine
  • Sally Hansen Miracle Gel Ski Bunny
  • Sally Hansen MG Black-O
  • NailStuff.ca 16mm Striper Brush
  • Teeny dotting tool (NailStuff.ca Dotting Tool Trio)

I love love love this colour combination. I know that peach is usually more of a Spring colour, but I feel like it works perfectly paired with the darkness of Zip Wine & Under the Twilight. Plus it’s a fun, easy design to do, & can pair with an assortment of outfits. For example: this cute peach dress my MIL bought for me at the thrift about a month ago. How cute do these look paired together? Who else loves parking nail art looks together with their everyday outfit choices — or is that just me?

What do you think about this Autumnal abstract stripe look? Are you happy it’s finally September? Let me know all your thoughts down in the comments below, & let me know what you’re most excited for in the coming months!

Geometric Colour Blocking (Autumn inspired)

Hello lovelies & happy Wednesday! I hope everyone is having a lovely week so far. The excessively humid heat we’ve been having here seems to have broken, & the weather has that hint of Fall weather that always starts around the end of August.

I’m so ready for Sweaters, scarves & my favourite knee high boots.

& Fall nail art, of course.

I’m already making plans for September nail art & joining in for next month’s Glam Nail Art Challenge. But, in the mean time, I’m feeling a little more creative than I’ve felt most of this Summer. & today’s nail art look is a fun nail art look that makes me feel like old school nail art Shannon (circe 2015-2016).

The polishes I used for this manicure are: 

  • Base Coat: Essie Hard To Resist Glow & Shine 
  • Top Coat: Essie Gel Setter
  • Quo Beauty Tint of Mint
  • Quo Beauty Whistler
  • Sally Hansen Insta-Dri Zip Wine
  • Sally Hansen Insta-Dri Petal to the Metal
  • NailStuff.ca 4mm Micro Detail Brush

Okay, so I’m obsessed. Originally this look started off as just a Autumn themed colour block, but I felt like something was missing — which happens a lot. I added an outline of the rose gold (Petal to the Metal) & then decided to get risky & add a few chevrons over the mint. It looked so good, I did the same thing on the block of grey, & tada! Freehand nail art perfection!

& all done completely freehand.

What do you think of this Autumn toned geometric colour block? Are you feeling the Autumn shades yet, or are your strictly Summer until September? Let me know what you think, & what nail art/nail polish collections you’re looking forward to this upcoming season!