Grey and Silver and all taped up.

IMG-20140821-02053_1408638610065_n

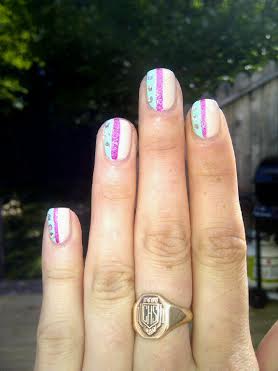
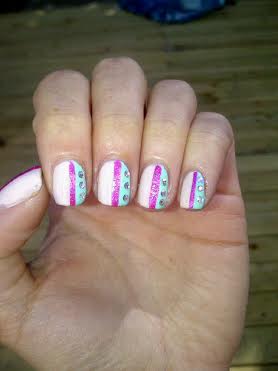
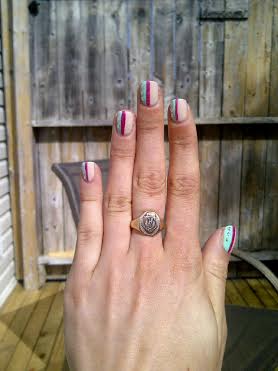
Finally! I’m feeling nail art again after a good short while of being uninspired. Does anyone else ever get like that? You want to paint your nails with something pretty, but every time you try you just hate everything? (I hope it’s not just me… I’ll feel silly!) Today’s nails were just me really, really wanting to do some nail taping, as I don’t often do it. I also really, really wanted to wear Cashmere Bathrobe by Essie, as I adore it for Fall and I don’t think I’ve worn it since last fall.

IMG-20140821-02056_1408639188756_n

The polishes I used for this manicure were:

  • Essie Cashmere Bathrobe.
  • Maybelline Color Show Lavender Luster.
  • Mariposa Striping Polish in Pink.
  • Seche Vite Quick Dry Top Coat.

As you can see, I managed to do semi straight taping. I think I’ve figured out it’s the tape I’ve been using that’s made me not want to do tape manicure. I have a roll of very thin painters tape, which I bought because I thought it would be perfect. Unfortunately, for some reason, it just doesn’t like sticking to my nails well enough and–because it’s green–I can’t see if I’ve made my lines straight enough. Oops. I think I’ll be switching back to just regular old scotch tape for manicures like this from now on.

IMG-20140821-02057_1408639217221_n

IMG-20140821-02054_1408639159187_n

IMG-20140821-02058_1408639250955_n


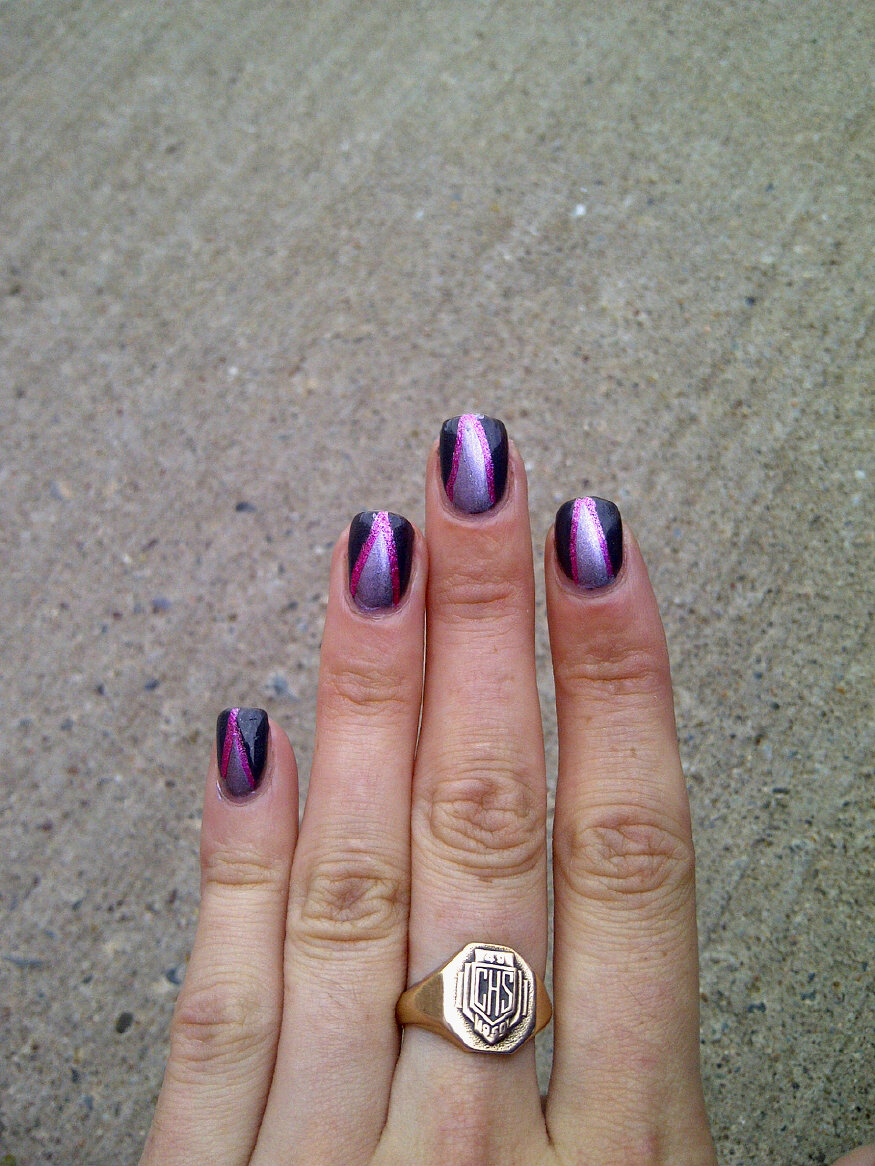
So what do you think of this manicure? I must say–I really, really like how it turned out. I’ve been feeling so blah nail art wise for a while, but now that I’ve broken out of that funk I’m hoping I can get back to playing with my polish as it makes me so happy. =)  Hopefully I’ll have a fun new manicure to share with you coming up.


Rose-y bridesmaid nails.


kristaweddingnails3

So my sister came over the other day for me to do her nails for a wedding she is in this weekend. She was telling me how all the other bridesmaids had gotten their nails professionally done, and she was bummed because she just couldn’t afford to do that. I didn’t want her to feel left out, so I told her she should come over because I wanted to make them pretty for her! =) So while the boyfriend distracted my nephew, I got her to sit down, and came up with some gorgeous nails for her to rock. She told me the wedding colors were rose pink, white, and black so I brain stormed for a while and figured that roses would be the most perfect bridesmaid nails. =)

kristaweddingnails2

The polishes I used for this manicure were:

  • Icing Beach Barbie — thumb and middle finger.
  • Bourjois Cendres de Roses — pointer and pinky fingers base color (and roses).
  • Sally Hansen Xtreme Wear Grey Area — pointer and pinky fingers polka dots.
  • OPI My Boyfriend Scales Walls — ring finger base color.
  • Bourjois Le Rouge fidele — roses.
  • Bourjois Mais Oui! — roses.
  • Mariposa shimmery pink — roses.
  • ACO by Ardene Green Peace — leaves.
  • ACO by Ardene Techno Green — leaves
  • LA Colors Palm Tree — leaves.
  • Seche Vite Quick Dry top coat.


kristaweddingnails

I thought the end result turned out really pretty. It just so happened I had a dusty rose pink (Bourjois Cendres de Roses) that perfectly matched the pink in the wedding colors! I went with dark grey polka dots, instead of black, just because I thought it would be a little more subtle–and would compliment the rose color. My sister was really excited for her nails, which made me so happy. =) I also lent her my Icing Beach Barbie so she could paint her toes sparkly to match, since they have opened toe shoes. So she’ll look pretty from head to toe. =)


So what do you think of this rose and polka dot manicure? Do you ever do other people’s nails? I’m still not 100% used to doing them, but it is fun playing around on someone else–even if she has the tiniest little nails compared to my own.

Glitter Gradient with Gwen’s Crush.

Still in my nail art rut, so simple manicures it is. Today’s manicure was a spur of the moment decision. I painted my nails with Gwen’s Crush by Revlon, but I wanted to make them a little more fancy so I decided a glitter gradient was the perfect solution. I pulled out a blue jelly Mariposa polish that my roommate gave me for Christmas, mostly because it complimented the blue shimmer in Gwen’s Crush.

glittergradient

The polishes I used for the manicure were:

  • Revlon Gwen’s Crush (from the Spiderman collection.)
  • Mariposa unnamed blue gelly glitter.
  • Color Institute silver glitter.
  • Seche Vite Quick Dry Top Coat.


glittergradient4

glittergradient2

glittergradient3

I quite like how these turned out. Plus, the blue jelly in the Mariposa glitter darkens the tips of Gwen’s Crush. Plus the Glitter has great holographic glitters which looks great. Also this Revlon polish is going to be very well used this fall, I’m guessing. I love the dark purple-pink color, with the subtle hint of blue.

And a blurry shot of my nails below, that captures the holographic glitters  in both glitter polishes. So pretty!

glittergradient5

Zig Zag accent nails.

Today I’m sharing a NOTD with you I created on a whim. I was in the mood to do something a little bit different–and keep away from doing another dotticure. Since I have some fun new stripers, I decided to give them another go. I’m also trying to work on creating straighter, cleaner freehand lines so I need all the practice I can get!

zigzag2

zigzag


The polishes I used for this manicure were:

  • Essence Bloom Me Up! in Blow my Mint.
  • OPI in Miss You-Niverse.
  • Mariposa Striping Polish in White.
  • Mariposa Striping Polish in Mint.
  • Art Club Striping Polish in Paisley Paradise.
  • Seche Vite Quick Dry Top Coat.


zigzag3

zigzag4

zigzag5

So what do you think of these zig zags? I went with colors that were a little darker, as like I’ve said I’m just craving fall colors. Also, I absolutely love Blow my Mint by Essence. I scored it for a DOLLAR earlier this year at Shoppers, and couldn’t say no. Also… my nails are getting long again! Yes! Yes! Yes!

Pastel Stripes, and a few “diamonds” for good measure.

Finally!  Something that isn’t just polka dots. 😉

I bought some new stripers last week at–of all places–the Dollarama! They’re by the brand Mariposa, whose polish I’ve featured in manicures before. I really love stripers as I’m not as good at using striping tape for manicures. Since I hadn’t had a chance to test out my new stripers yet, I decided to pull them out yesterday to see what they could do. And the end result? I’m very happy with it. The brush is thin, which is important so you don’t end up with gloopy, ugly freehand lines. Also the polish is fairly opaque which means they could be used over darker colors as well.

 stripes4

The polishes I used for this manicure were:

  • Sally Hansen Miracle Gel Birthday Suit.
  • Mariposa Striping Polish in Mint.
  • Mariposa Striping Polish in Pink.
  • OPI I Snow You Love Me.
  • Seche Vite Quick Dry Top Coat.

stripes2

 stripes3

stripes5

So what do you think of this stripey manicure? Also, I’m seriously digging I snow you love me and all the glitter placement possibilities. From a distance, it looks like you have rhinestones on your nails, as they catch the light really well. It’s only when you look up close you see that they’re flat and glitters. Love, love, love.