Rifle Paper Co Phone Case Inspired Floral

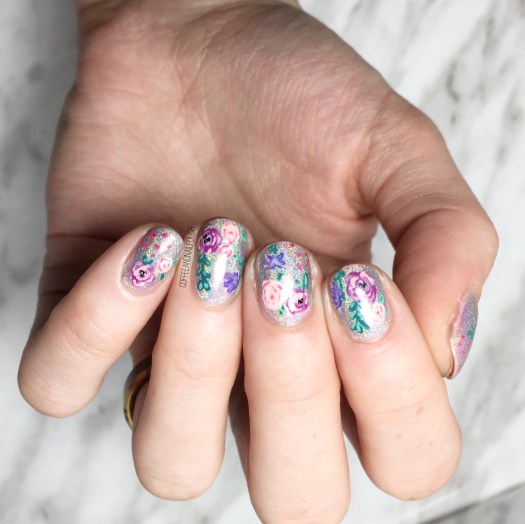
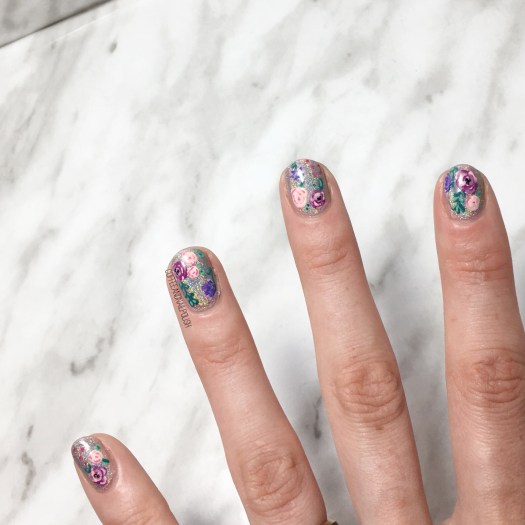
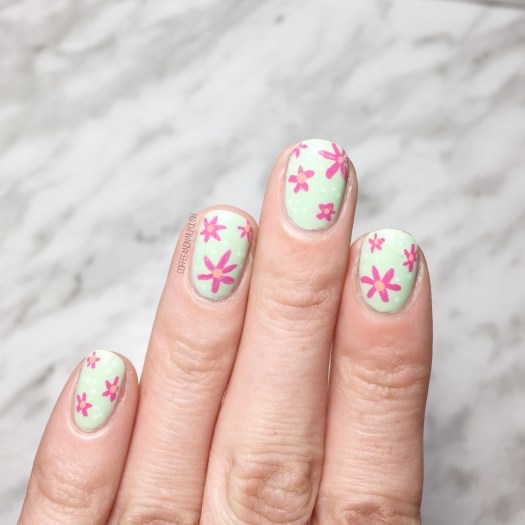
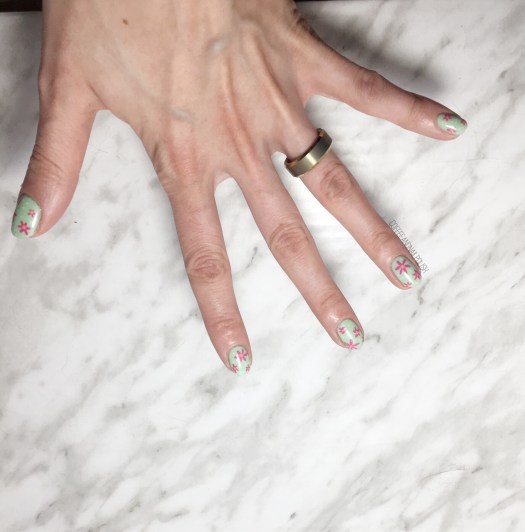
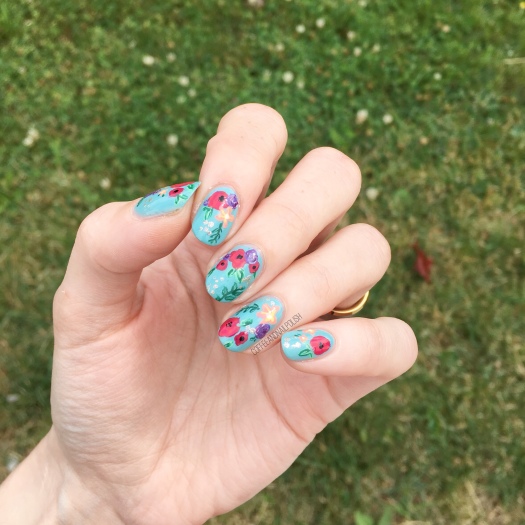
Good morning lovelies & happy Tuesday… as happy as a Tuesday can be! Today I have some floral nails from a few weeks back to share. This design was inspired by a brand new phone case I picked up at Winners recently… a Rifle Paper Co phone case! & I was so excited by the pattern that I just had to recreate it on my nails!

For this manicure, the polishes I used were:

  • Base Coat: OPI Nail Envy
  • Top Coat: Essie Speed Setter
  • Essie In the Cab-Ana
  • OPI Koala Berry
  • OPI My Chihuahua Bites
  • Essence The Green & The Grunge
  • Essie First Timer
  • Sinful Colours Amethyst
  • Essie Play Date
  • Sally Hansen Miracle Gel Sweet Tea
  • China Glaze Metro Pollen-tin
  • Sally Hansen I ♥️ Nail Art pen in black
  • Essie Jiggle Hi, Jiggle Lo
  • Small detail brush from Bundle Monster

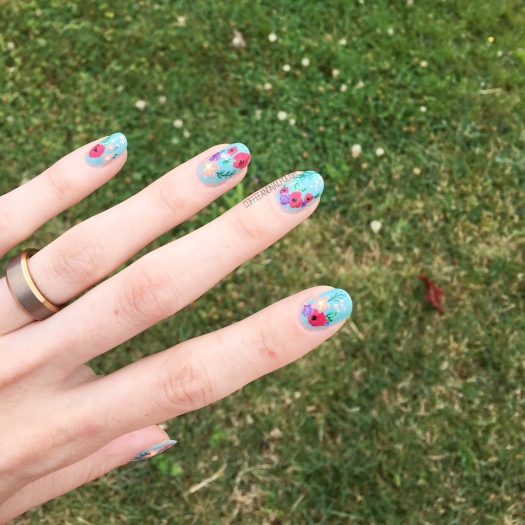
I’m really, really loving this pattern. It’s been a little while since I rocked floral, so I’m was excited to break it out again. Especially since it’s already starting a feel a little Fall like in the morning, & I feel the call of cosy sweaters & jewel toned polishes already!

So what do you think of this floral design? Have you ever been inspired by a phone case? Share down below!

Cactus Accent Nails 🌵💅🏻

Happy Thursday! It’s been a while since I rocked any cactus nails, & I was craving some vibrancy. I don’t often reach for green polish when painting my nails, but I’ve been trying to get out of my comfort zone. Keeping with that, I decided to pull a green (textured) polish from deep in my stash that I haven’t worn in too many years to count, & paired it with some cute cacti on my accent nails!

Polishes I used for this design were:

  • Base Coat: OPI Nail Envy
  • Top Coat: Essie Speed Setter
  • LA Girl Sand Blast Nail Polish in Green Island
  • China Glaze What’s She Dune?
  • Essie First Timer
  • Essie Off Tropic
  • Deborah Lippmann She Drives Me Crazy
  • Essie A-List
  • OPI I Eat Maine-ly Lobster
  • Small detail brush (from Bundle Monster)
  • Small dotting tool (from Bundle Monster)

Sadly I kind of hid the texture of LA Girl Green Island with my top coat, but it came through a bit. This was my very first textured polish, back in the very early days of my nail art. It was also the beginning of my obsession with finding nail polish deals at Lawton’s—I remember scoring it & a blue Sand Blast Polish for only a dollar. & so began my obsession with finding old polishes at awesome deals. & I still hate spending full price for polish to this day!

Also I love creating these little freehand cactus. Still on the search for some cactus nail vinyls, because I’m a little cactus obsessed, but in the meantime I don’t mind freehanding my cacti. I also just picked up a new stamping plate from Essence with a cactus on it, so stay tuned as I plan on trying it out soon (hopefully this weekend!)

What do we think of this design? Do you still have any textured polishes in your stash? Let me know down in the comment below!

Floral & Holo

Holy how is it July already? Seriously, it feels like just yesterday I was posting Christmas designs & now it’s hot & humid & I’m so excited I can finally pull out all my fun Summer dresses to wear without needing leggings underneath. I’ve been rocking a lot of floral lately… especially on the nails.

I know that it doesn’t matter what time of year it is, I’m pretty much always going to rock floral. But when the sun is shining & the temps are climbing, wearing floral just feels right!

For this manicure, the polishes I used were:

  • Base Coat: OPI Nail Envy
  • Top Coat: Essie Gel Setter
  • NailStuff.ca holo powder (applied over Sally Hansen Complete Salon Manicure Rose to the Occasion)
  • Essie Playdate
  • Color Club Pucci-licious
  • Sally Hansen CSM Killer Heels
  • Sally Hansen CSM Red It Online
  • Sally Hansen CSM Rose To the Occasion
  • Sally Hansen CSM Blush Against The World
  • Sally Hansen I ♥️ Nail Art pen in green
  • Quo by ORLY Second Hand Jade
  • Bundle Monster small detail brush
  • Bundle Monster small & large dotting tool

Oh man, this holo powder from NailStuff.ca is one of my all time favourites. Easy to apply & such a strong holo look. I never thought of using it as a base for nail art, but it was the perfect base for this floral. Plus in the sunlight…. oh, in the sunlight. I’ve been obsessing over wearing holo nails on good days because it’s so distracting! I would be lying if I said I didn’t get caught staring at my nails once or twice (or five times) while wearing this mani!

what do you think of this design? Are you a fan of a holo base for nail art? Share your thoughts in the comments below & let me know what you think. ♥️

Vintage Roses (take #17283)

You know when you did that perfect pair of jeans or shirt or outfit that looks amazing, & fits your perfectly, & just makes you look amazing? You wear it constantly (maybe more than you should), because it just looks so good? That is how I feel about floral & vintage rose nails. & that is why I have ANOTHER floral design to share with you.

This design is actually inspired by an old design of mine, this time using blues instead of pinks. Yep, I’ve done a different version of these simple roses a lot but they never get old to me, so hopefully they’re not tired to you.

For this manicure, to polishes I used were:

  • Base Coat: OPI Nail Envy
  • Top Coat: Essie Gel Setter
  • Essie Find Me an Oasis
  • OPI Angel with a Leadfoot
  • Sally Hansen Complete Salon Manicure Rose to the Occasion
  • Essie Bachelorette Bash
  • Sally Hansen Insta-dri Petal Pusher
  • YSL Beauty Vert D’Orient
  • Essie First Timer
  • NailStuff.ca Mixed Decoration Nail Wheel in Gold
  • Small dotting tool
  • Small detail brush from Bundle Monster

Oooooh these roses over white is definitely one of my favourite accent nails to do. I love all floral nails, but there is something about vintage roses that just looks so good: easy to do, but looks beautiful & complicated every time. Not to mention, roses are one of the easiest florals to do because I find (for me at least), they’re one of ten hardest florals to mess up.

My tutorial on how I do roses is Here.

So what do you think of this design? Are you a vintage roses person or do you prefer other floral? Share your thoughts down below!

Easy Pink Flower Print 🌸

Happy Wednesday loves! & it’s a floral kind of Wednesday. I mean, every single day is a floral kind of day, but with the less than seasonable weather happening outside I figured some more floral print was needed.

This is also a super simple design that I think almost anyone could do on their nails, so it’s a great design for nail art beginners. For this design, I decided to pull out my trusty Sally Hansen nail art pens.

The polishes I used for this design are:

I don’t know if you’ve used the Sally Hansen I ♥️ Nail Art pens before, but they’re one of my favourite nail art tools. I’ve been using them for years & years & I keep buying them because they are great for creating easy designs, from floral to polka dots to delicate patterns. In fact, I recently lost of my green pen (the joys of a busy 1 year old who likes to hide things!) so I will be purchasing a whole bunch of new ones on pay day.

For this design, I made sure my base was nice & dry & then went in with my magenta pen & drew the flower petals. Afterwards, I went back & dotted the middle with my secondary colour (Flip Flop Fantasy) & added some white dots with my white pen. Bam! Instant flower pattern nails with minimal effort.

What do you think of this easy flower design? Let me know your thoughts in the comments below!