GlamnailschallengeOct—Skull

673395C9-DDCC-4272-BC89-930C1C5D6DAA

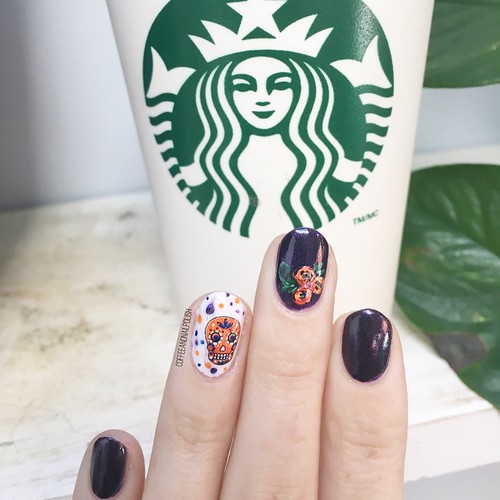
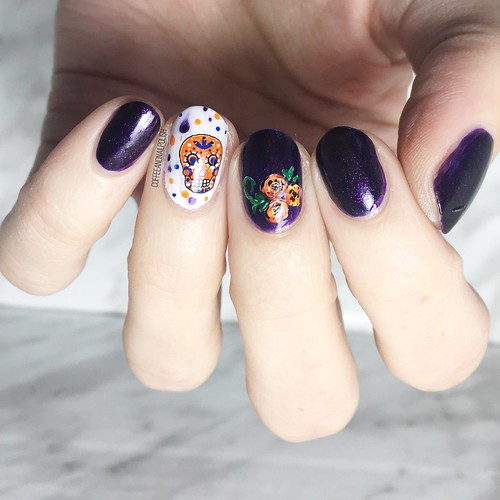
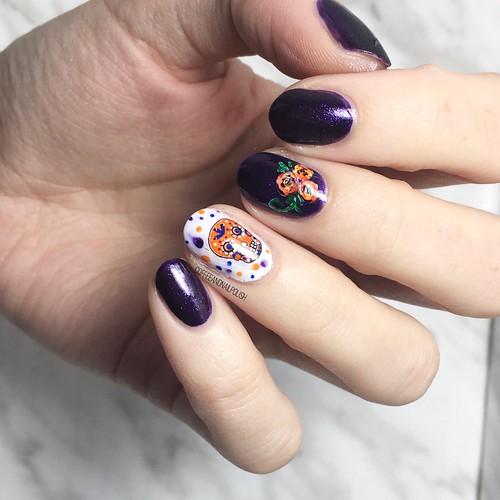
Good morning lovelies & Happy Monday! Can you believe this month is almost over? The countdown to Halloween is officially on & I’m both excited to celebrate, & sad for my favourite month to be over! But since we have a few more Halloween looks to go, I’m going to keep the excitement rolling with our second last #glamnailschallengeOct prompt which is Skull. A similar idea to skeleton, so I wanted to try & do something way different from my skeleton design.

& it was the perfect opportunity to use some nail tattoos by Maybelline that I recently purchased on extreme clearance at my local pharmacy (& favourite place for nail polish deals!) These nail tattoos were pretty cool, & I couldn’t think of a better opportunity to use them.

0840CA9C-45C1-46F2-BA50-014DB280969C

24BFF24E-3B11-48E5-A03E-2CCF4DECE8F9

For this manicure, the polishes I used were:

  • Base Coat: Sally Hansen Green Tea Bamboo Strengthener
  • Base Coat: Duri Rejuvocate
  • Top coat: YSL Beauty Quick Dry Top Coat
  • Sally Hansen Color Therapy Slicks & Stones
  • Acrylic Paint
  • NailStuff.ca 7mm detail brush
  • NailStuff.ca dotting tool trio

.

324E0048-EC0F-41F3-9186-ACB3BFD4DD4C

860C1A90-01C7-4DF1-B761-ED9E5D9BA7B8

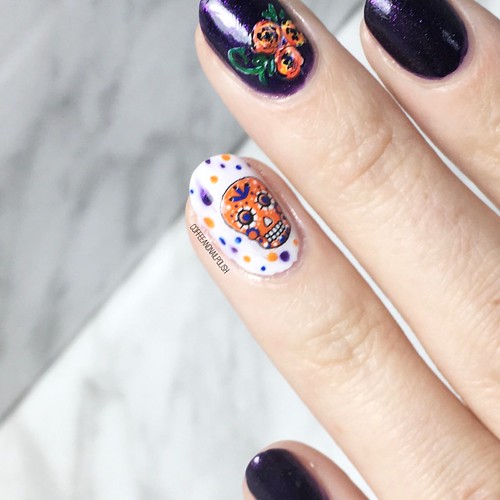
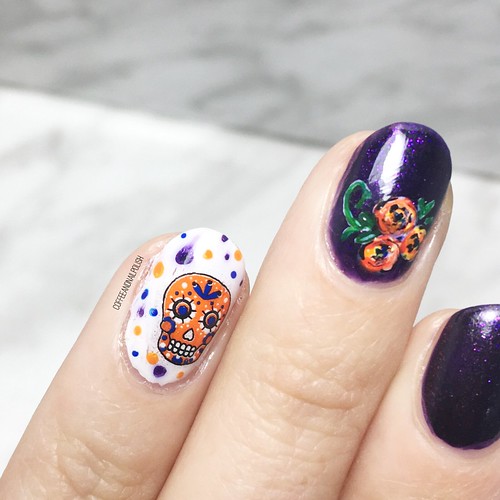
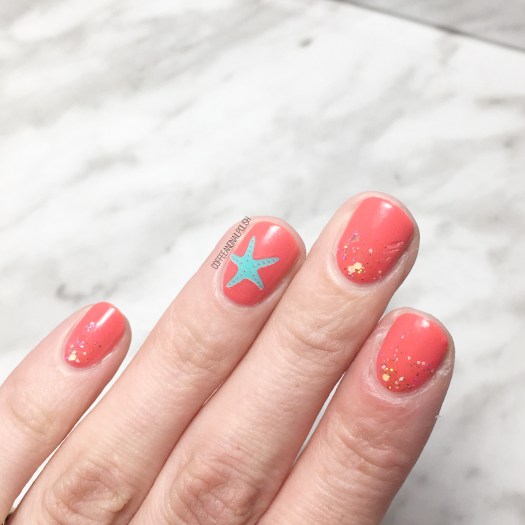
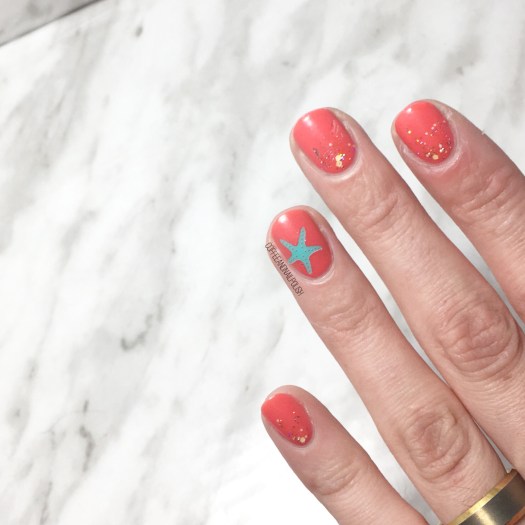
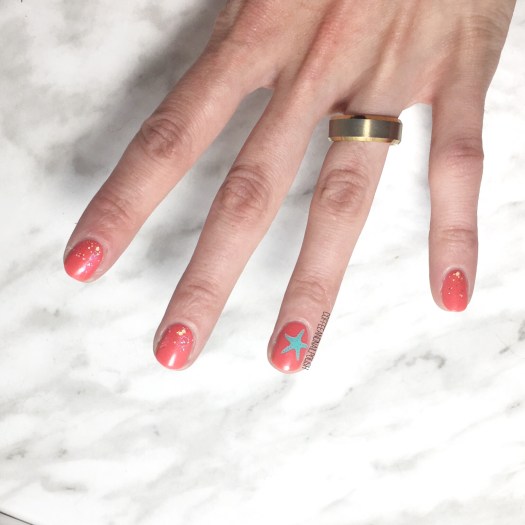
How much fun! This was also my first time in a long time wearing Sally Hansen Slicks & Stones which is just such a pretty shade for Autumn. It also goes really well with the orange & blues of my skull tattoo. It turned out more celebratory than scary, which is fun for this time of year as well. I’m digging it! & I added roses to add to the sugar skull feel.

F27C0626-8B02-4581-9E45-04551F158FC9

6835FFC3-A62F-4DAF-810C-23E36AEC59CF

Close up look at that nail tattoo. This makes me excited to use a few more of the designs that came in the packs I got. Definitely fun for fancy nails when you’re on a time limit… I definitely couldn’t draw that skull design in the 60 seconds it took me to apply that tattoo & add my top coat.

09659B8E-B7AF-4D82-8382-CF32A306D232

What do you think about these sugar skull nails?  Remember you can check out the other  #glamnailschallengeOct looks on Instagram. There is just one more prompt to go!

Gradient Cactus Nails

Good afternoon & happy May everyone! Who else excited for warmer days. I feel like I’m saying this every post, but I’m just. so. ready. This winter has felt just so darn long & I’m craving neons & brights.

I was also craving a gradient as it felt like absolute ages since I had created one, so I decided to go with a blue toned look. & to finish off the look I added these absolutely adorable cactus stickers that Victoria from NailStuff.ca sent to me because she knows my love for cacti! 🌵 Have you checked out her collection of nail stickers & nail decals? I’m obsessed. So many fun designs for easy nail art this Summer.

For this manicure, the polishes I used were:

  • Base Coat: OPI Nail Envy
  • Top Coat: Seche Vive
  • Essie Fashion Playground
  • Sally Hansen Miracle Gel Sugar Fix {PR sample}
  • China Glaze I’ve Got A Blue Attitude
  • Sally Hansen MG Make It N-Ice {PR sample}
  • Edge Perfection Cuticle Barrier {PR sample}
  • Cacti Nail Stickers {gift from Nailstuff.ca}

My gradient skills were a little rusty, but I love this look so much. The colours used almost give the gradient a thermal polish feel & obviously I couldn’t do a gradient without adding a little glitter. & finishing off the look with the stickers just made them a little more fun!

What do you think of this look? Share your thoughts down in the comments below!

Born Pretty Store 3D Nail Art Stickers (item #40422) Review

Good morning beauties & happy Tuesday. Today I’m showing off some brand new nail art stickers I recently received in a review package from Born Pretty Store. They were so kind as to send me a few nail art goodies in exchange for my honest thoughts & reviews, & I couldn’t wait to break into the package!

These nail art stickers are item #40422 & come in both gold holo & silver holo. I picked both colours, but since I was feeling a purple base, I figured the gold would pop more over top. The stickers themselves come with a large sheet of different sizes & style, which is perfect when trying to pick what kind of look you want to do. For my nails, I decided to go more simplistic using the larger size stickers.

Application was super simple. All you need to do is paint your base colour (I picked Joe Fresh Gel Gothika Blue) & let dry some. To speed up the drying process, I did apply a quick dry top coat to my base, mostly because if my nails were fully dry, I could be more selective about sticker application. When my nails were dry, I then carefully peeled my stickers off their sheet with tweezers, & applied them onto my nail. I made sure to press them down really well, & flatten any possible air bubbles. Then, when I was happy with my look, I sealed everything in with top coat.

I wore these nails for a full day of work (stock day at that!) & they lasted pretty well. I did find that my nails where the sticker went close to the edge of my nail–like my middle finger & pinky nail–had some issues with the sticker lifting but that could be because I was not as precise with my top coat to fully seal the sticker in. The best bet is to aim to make sure that the stickers are placed more centrally on the nail, or you just make sure your sealing all the edges really well.

As you can see down below, my stickers definitely seemed to stand out a bit from its base–they were for the most part sealed onto my nail, but seemed raised against my base colour. I don’t know if this was because I had used a top coat already but when I use these again I will definitely try it over just the base colour & see if it helps the issue. These stickers are definitely not the first brand I’ve had this issue with, so I’m thinking it’s more an issue with my application.

I’m definitely a fan of these stickers & the easy way you can create a nail art look using them. I even had someone ask me where I got my nails done! As I mentioned above, you can find these guys at the Born Pretty Store website (item #40422) & they come in both silver & gold. I definitely want to try pairing both colours together the next time I use them, so see what kind of look I can create.

Don’t forget, you can use my Born Pretty discount code COFFK31 to save 10% off any regular priced items.

Quick & Easy Summer Nails

Happy Summer lovelies! & Happy Friday! I hope everyone is as excited for sunny days as I am! ☀️ seriously, the last few months has felt like a never ending Winter with a little fall thrown in for good measure. I’m very excited for sunshine & beach days… even if I spend most of my time hiding out within the walls of the Mall.

I just got over a very busy couple of weeks, which meant my nail designs needed to be fairly simplistic (since I had no time to do my nails!) That means I’ve been wearing either solid colour nails or going with simple accent nails. I’ve had these nail stickers from Icing in my nail art collection for a few years now, but I felt like I haven’t worn them in a while. I really wanted to have a contrasting colour to my base shade, so I decided to pick one of these turquoise starfish stickers as my accent.

For this manicure, the polishes I used were:

  • Base Coat: Sally Hansen Green Tea + Bamboo Strength
  • Top Coat: Essie Gel Setter
  • Essie Sunday Funday
  • Deborah Lippmann Make Someone Happy
  • Icing Stores Nail Art Stickers (beach themed circa 2015/2016)

Originally I was planning on just wearing Essie Sunday Funday on its own with the starfish sticker, but it really felt like it needed something extra which I why I added the glitter gradient on my other nails…. & I LOVE how it turned out. Like, seriously love. It gives the design that Beachy feel I was hoping for without too much work. Like I said, it’s been a CRAZY few weeks with a lot of late nights at work, so nail art has taken a bit of a back seat. Thank goodness I have a huge back stock of nail art stickers & decals & other goodies to make doing my nails so much easier!

I think coral & turquoise is going to be one of my favourite colour combinations for Summer. After seeing them together here, I’m definitely going to need to do a half moon design featuring them… like now! (Or whenever I recover enough to actually function for nail art haha.)

what do you think of this simple design? Do you use nail art stickers to fancy up your nails? Share your thoughts down below!