Glam Nails Challenge September — Autumn Sunflowers 🌻

Hello lovelies & happy Thursday! It’s officially the 2nd of September & my Fall vibes are in full force. I’ve got my pumpkin spice syrup, my plaid shirts & my favourite black tights just ready for cooler temperatures.

I’m also ready for all the Fall polish colours & designs.

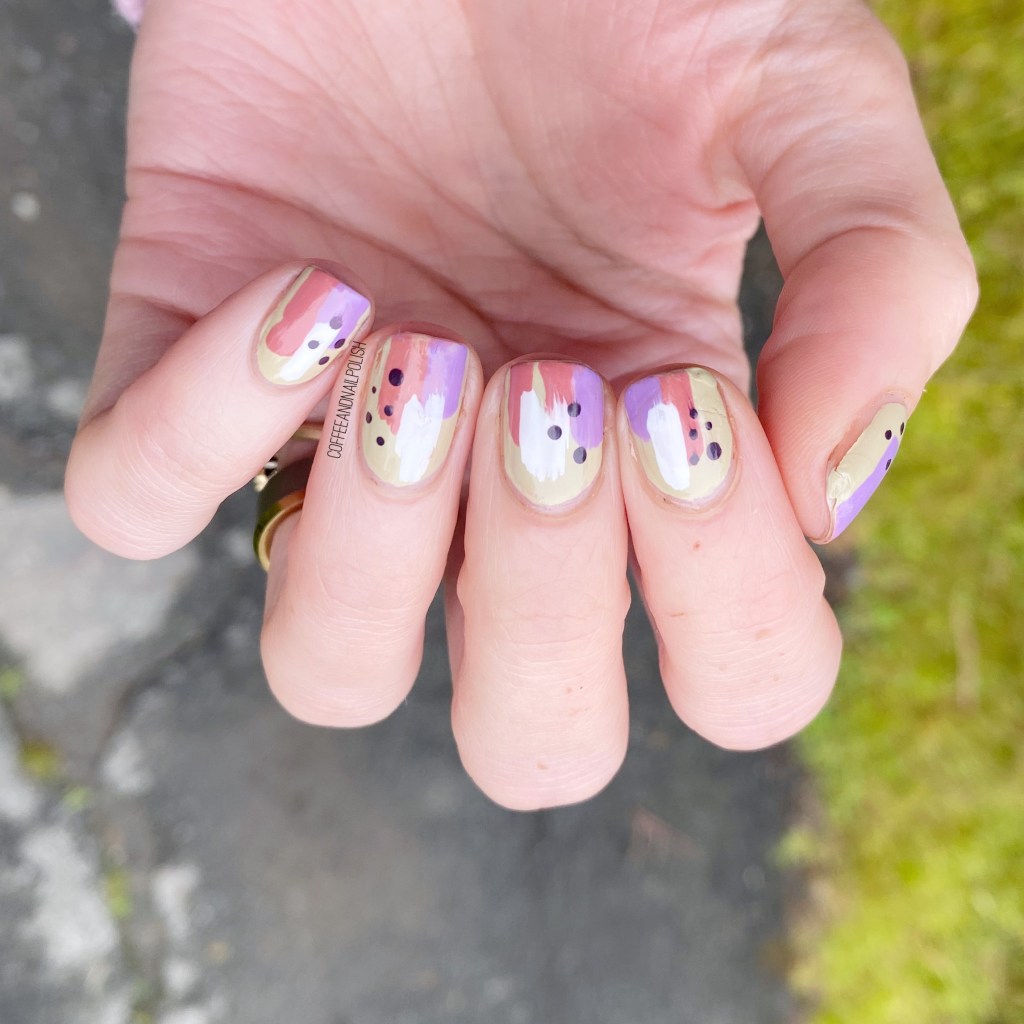
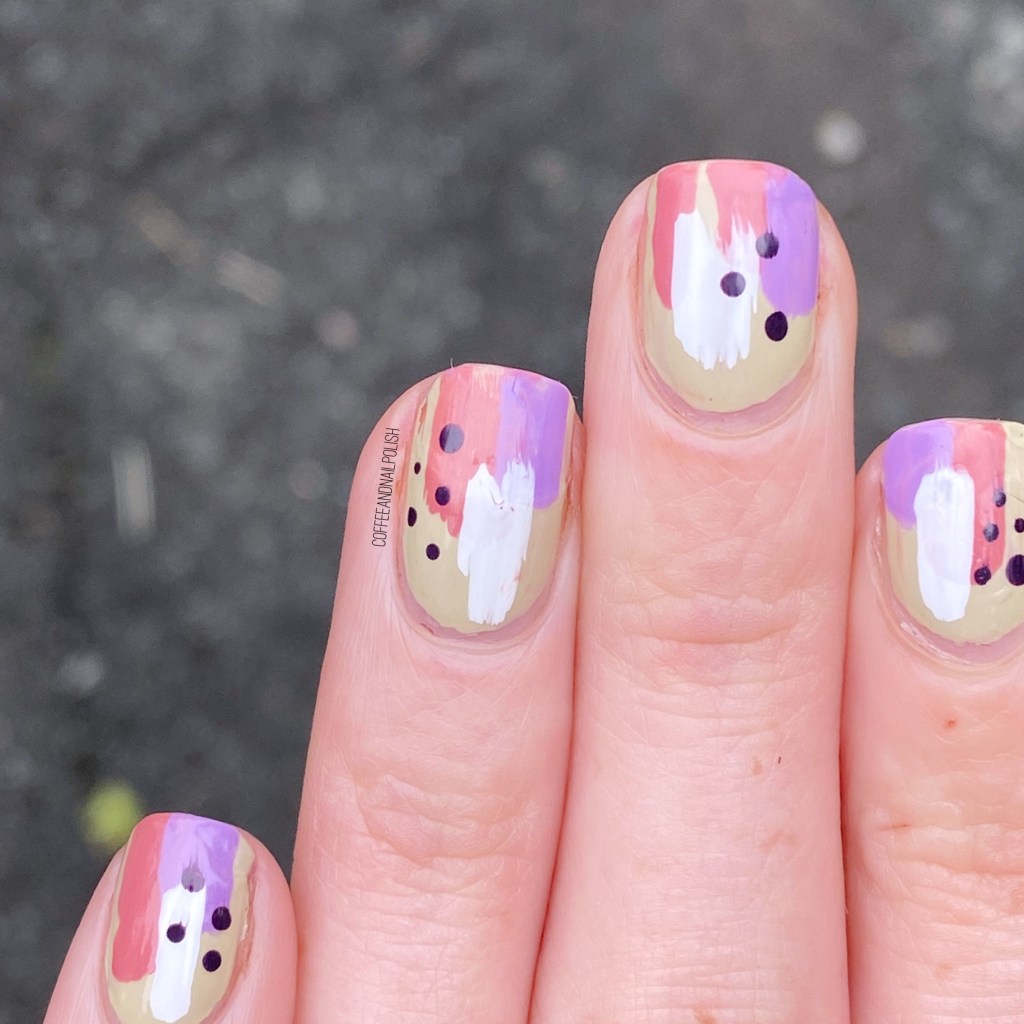
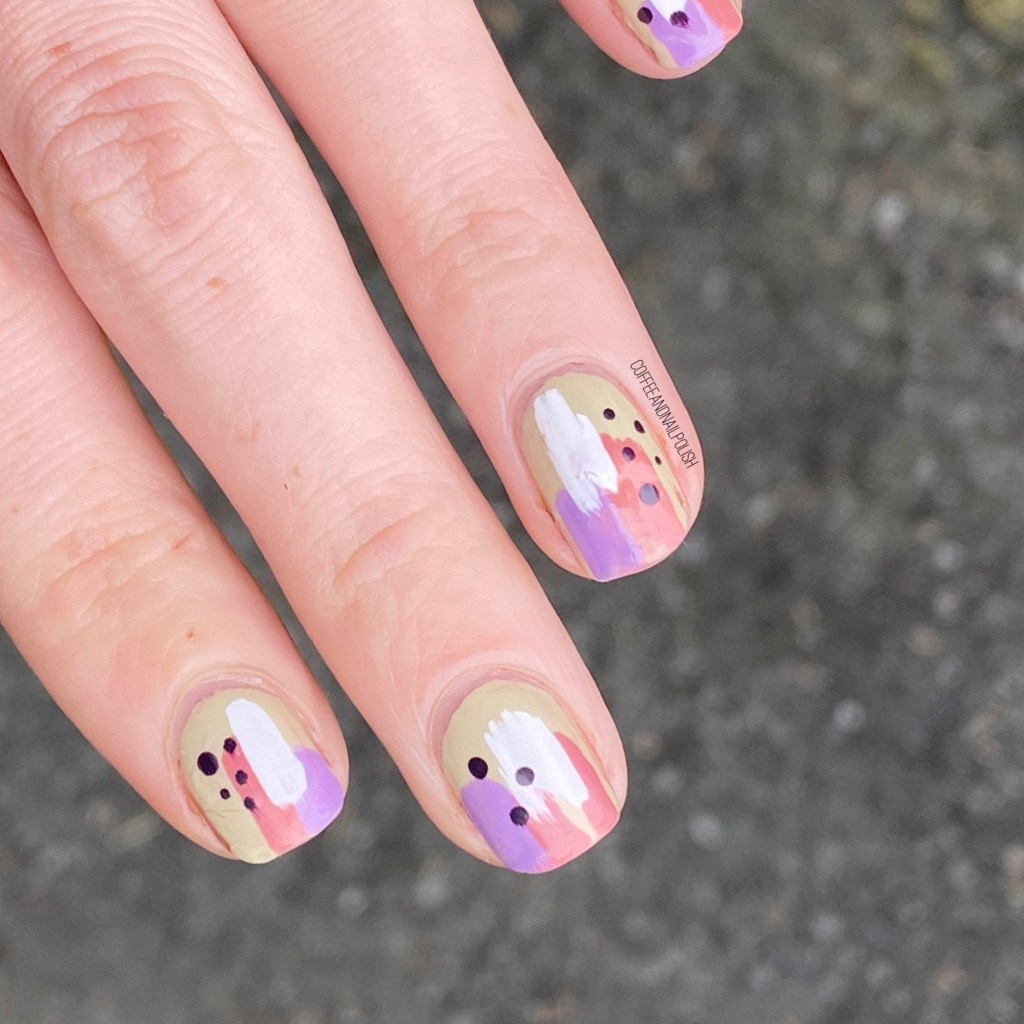
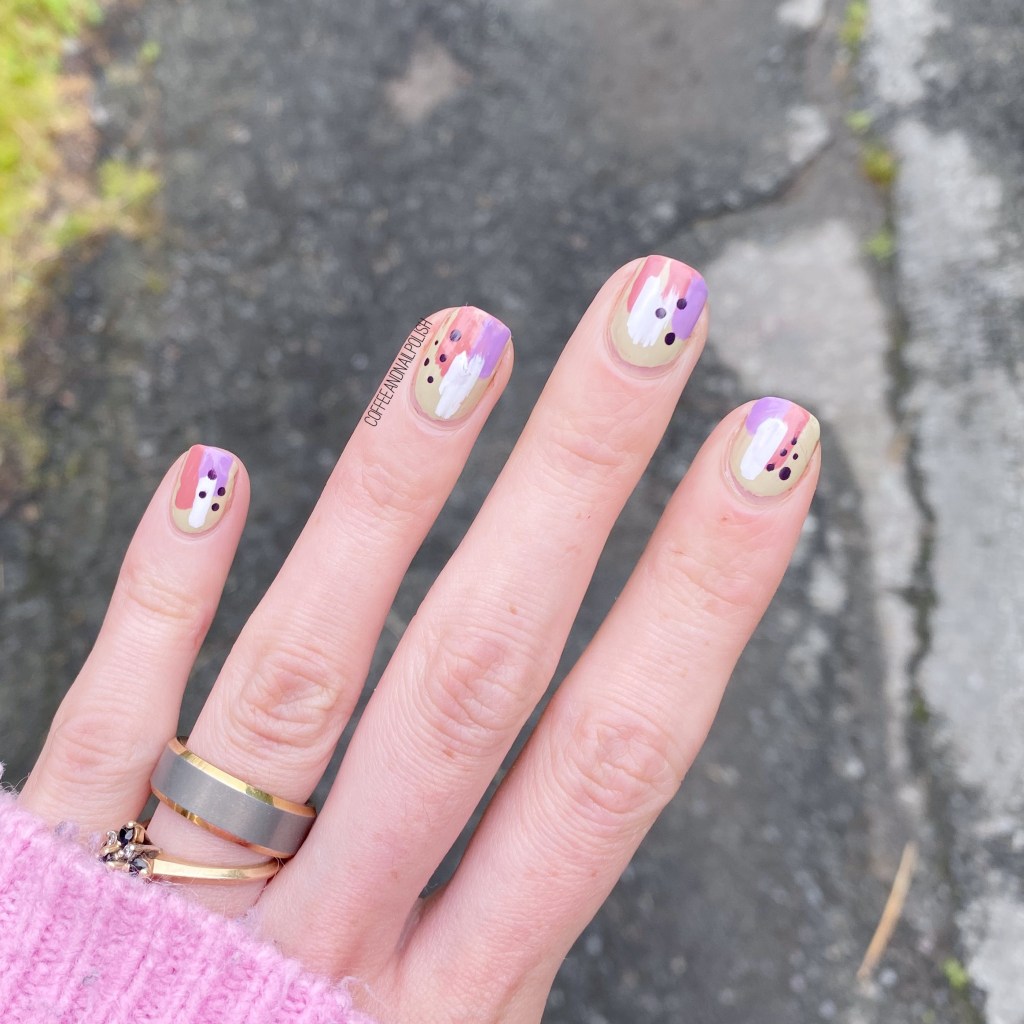
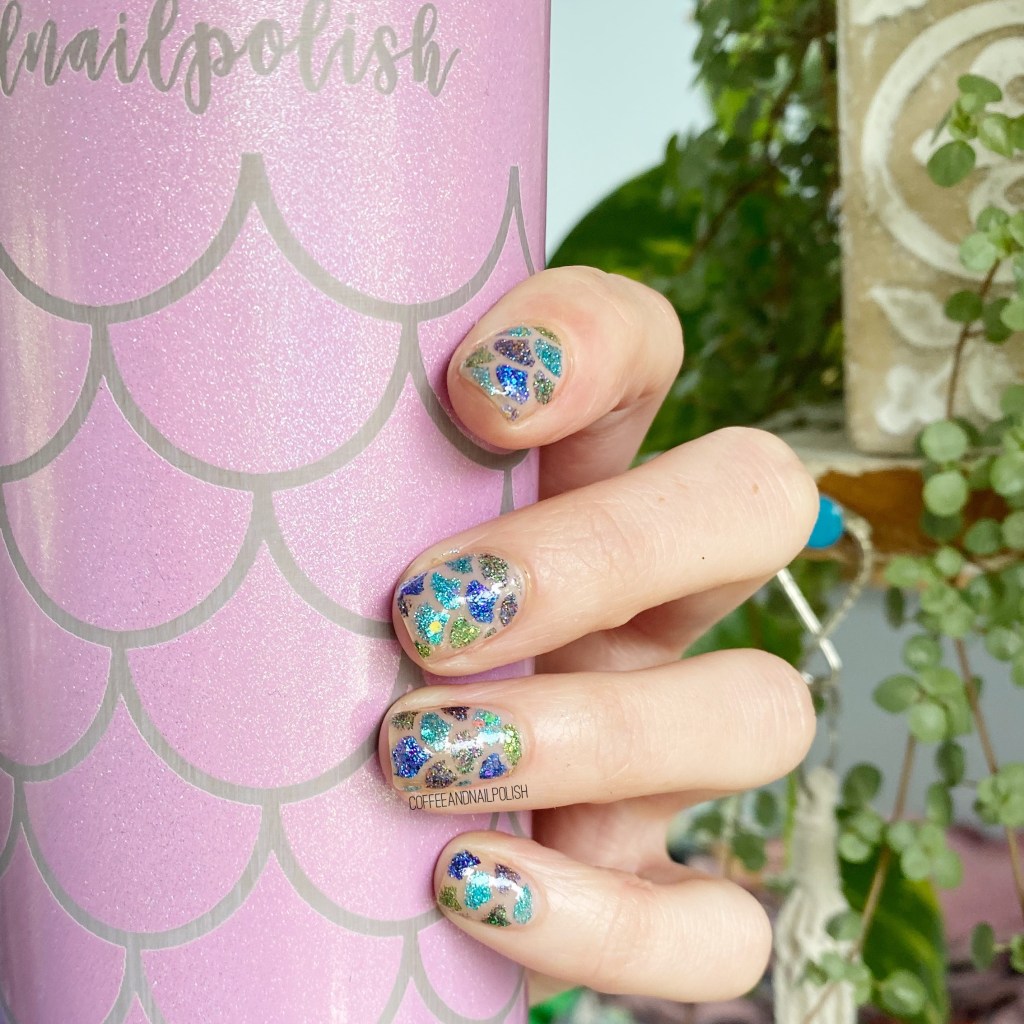
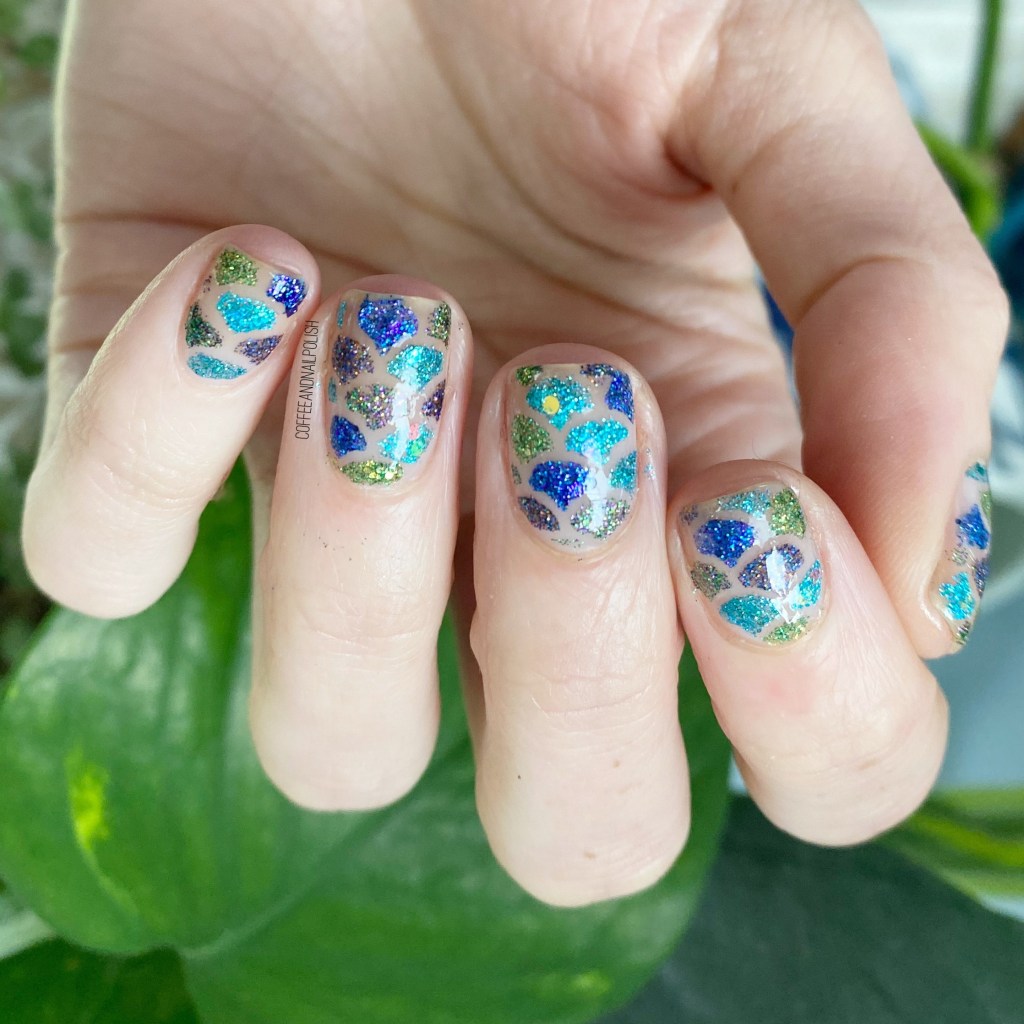
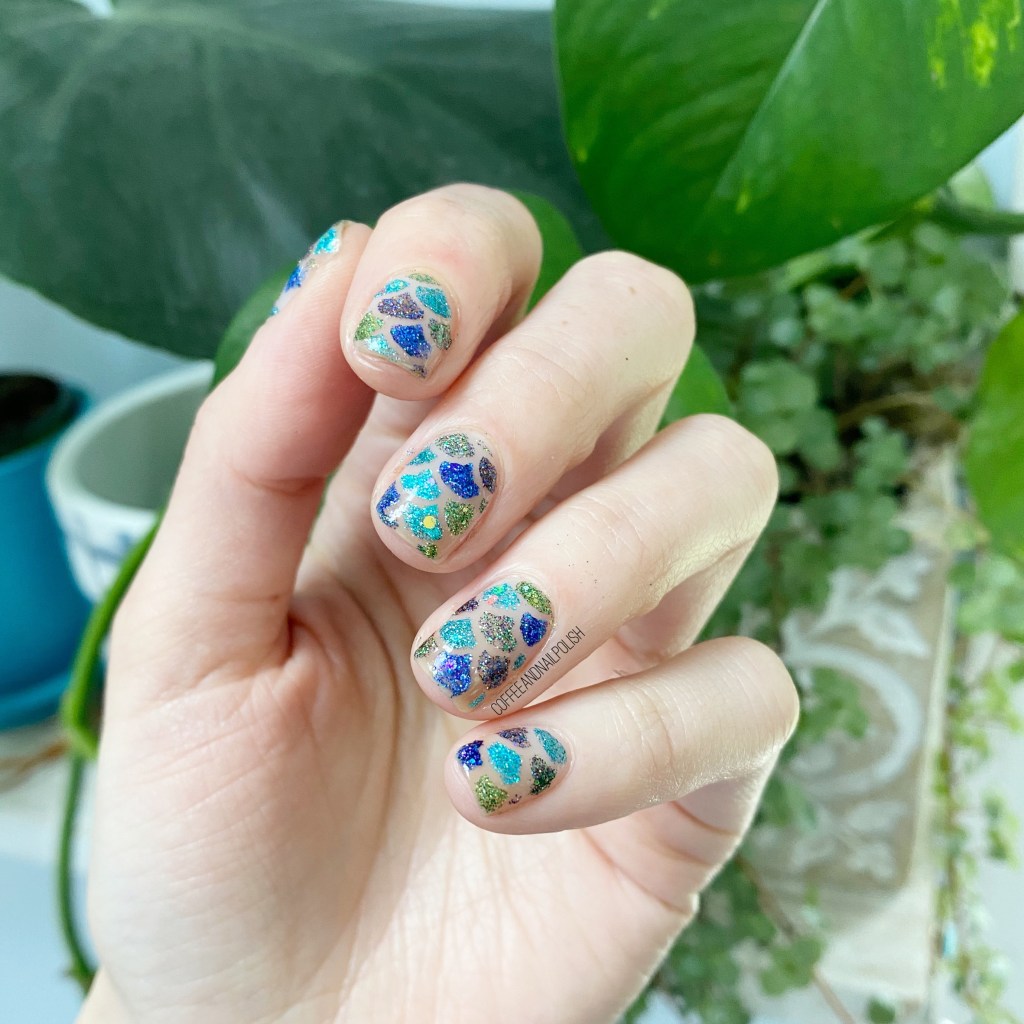
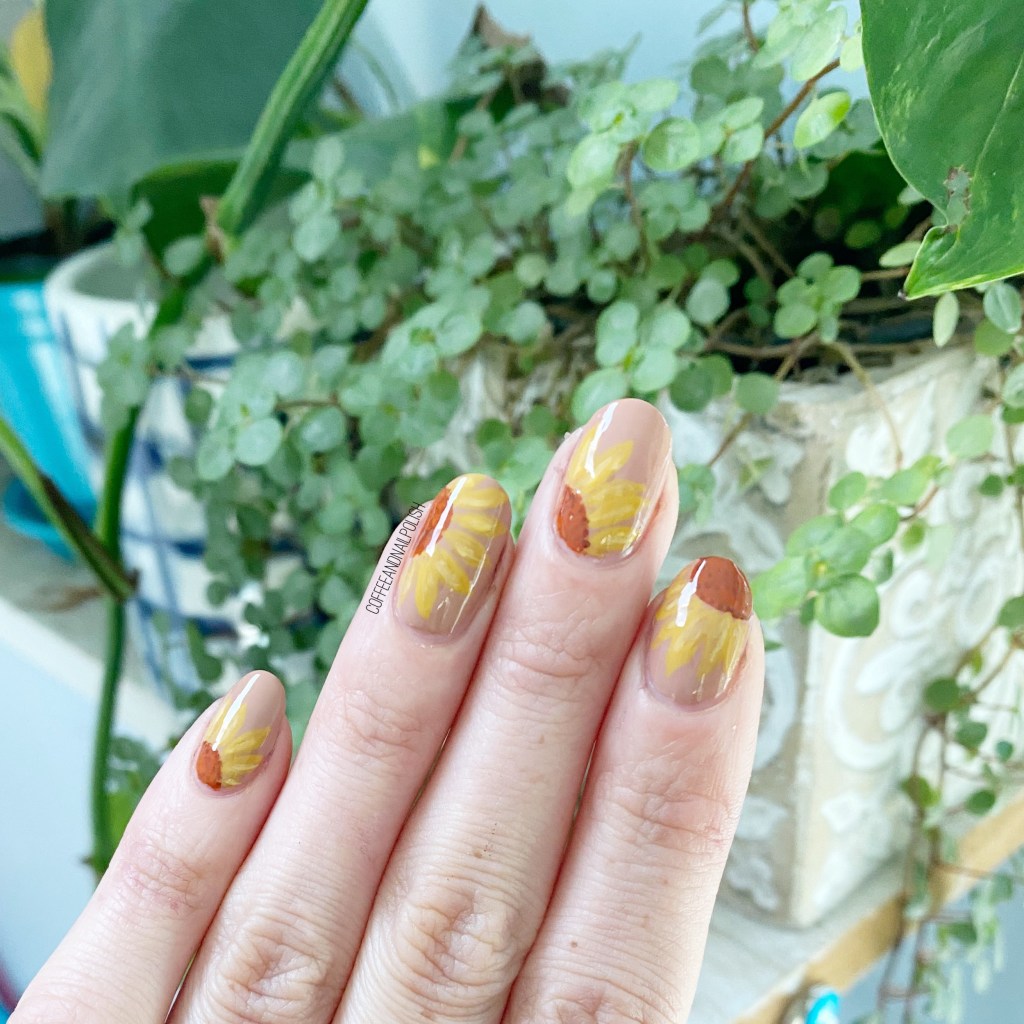
After last month’s fun designs with last month’s GlamNailsChallenge, I’ve decided to keep things going with this month’s challenge! & the first challenge is right in my wheelhouse: sunflowers 🌻.

The polishes I used for this manicure are: 

  • Base Coat: Essie First Base
  • Top Coat: Seche Vive
  • China Glaze The Snuggle is Real
  • China Glaze Autumn’s Up!
  • China Glaze Spice To Meet You
  • China Glaze Loves You A Latte
  • Essie Check Your Baggage
  • NailStuff.ca Dotting Tool Trio
  • NailStuff.ca 7mm detail brush

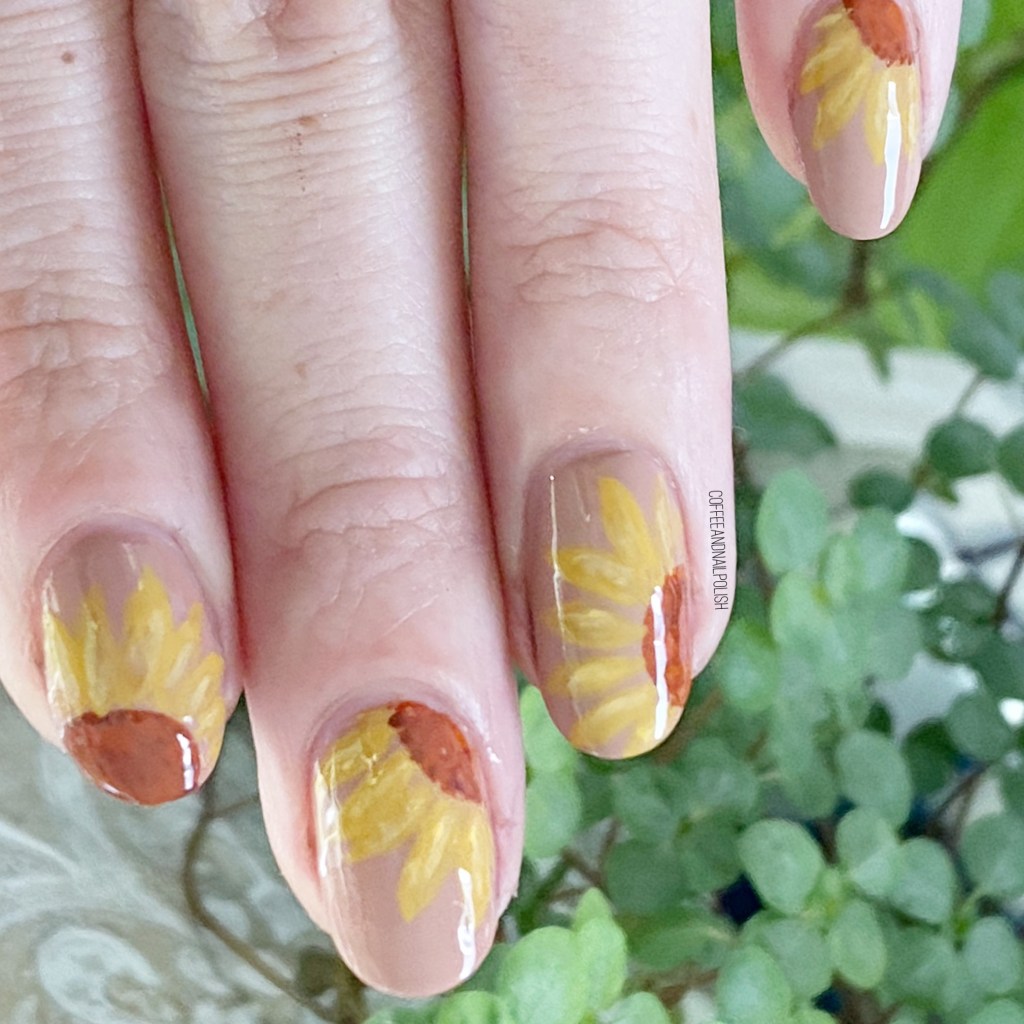
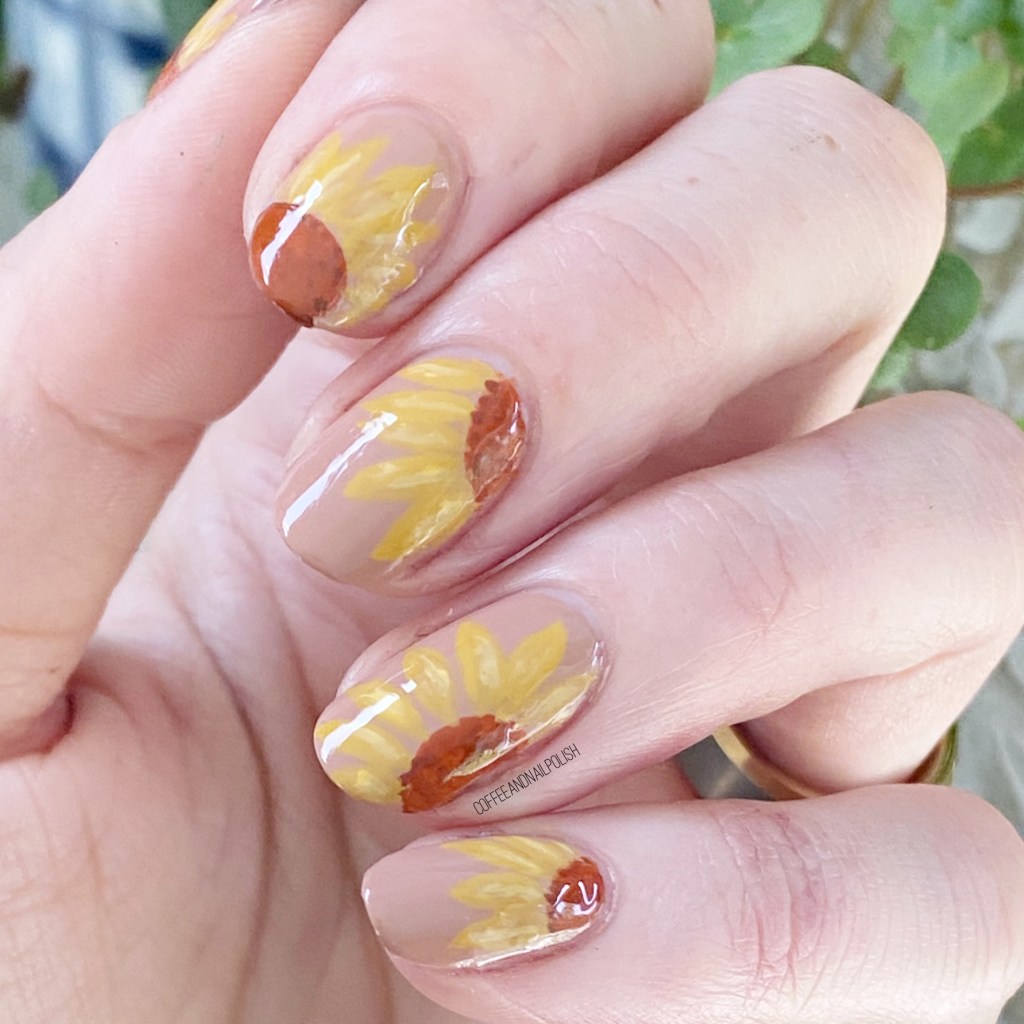
How cute did my sunflowers turn out?

I’ve actually never attempted sunflowers before, so I’m really excited with how these came together. Plus, I got to use a few of the new China Glaze Autumn Spice collection shades I just received the other day. & they were absolutely perfect for this design. I have full swatches coming Sunday, but spoiler alert: I’m absolutely obsessed with these shades so be prepared for a lot of designs using these polishes.

Are you excited for another month of Glam Nails Challenge? I feel like all the prompts for September is going to just get me even more ready for Autumn, so I’m very excited.

What are you favourite Fall designs? Let me know what Autumn vibes speak to you most?

Negative Space & Neon Leopard Print

Hello lovelies & happy Tuesday!

Today is a beautiful sunny day, & I’m excited because I have some fun nail art to share. It feels like a long time since I was truly inspired to do my nails, but I did this manicure early last week & was OBSESSED. Some nights it feels like I have no energy to come up with creative nail art looks, but I feel like this one turned out perfect.

Plus it combines some of my favourite things: neon, leopard print & negative space!

For this manicure, the polishes I used were:

  • Base Coat: Sally Hansen Nailgrowth Miracle
  • Top Coat: Essie Speed Setter
  • Sally Hansen Miracle Gel Get Mod
  • Sally Hansen Miracle Gel Blacky-O
  • Sally Hansen Miracle Gel Violet Voltage
  • Sally Hansen Miracle Gel Miami Nice
  • Sally Hansen Miracle GelElectri-Lime
  • Sally Hansen Miracle Gel Fuchsia Fever
  • Sally Hansen I ❤️ Nail Art pen in black
  • NailStuff.ca Dotting Tool Trio
  • NailStuff.ca 16mm Striper Brush

Seriously, how cute is this look? I was really feeling something involving negative space — I recently returned to rounded nails, since square nails stopped working for me — & since they’re so short right now, they’re my favourite length for negative space peak-a-boo nail art.

For this look, I started off by freehanding my white space with just the polish brush, then used my smaller sized dotting tool to create my blobs of neon. Then I used my black nail art pen to draw the leopard spots around them. Finally I finished everything off with my black stripes! A little time consuming — I think it took me an entire episode of Dr. Death — but the end result just pops so well!

What do you think of my leopard print nails? Are you still feeling bright & Summer-y shades? I’m in a weird faze right now where I am going between being obsessed with neons, & more muted shades. But for the first time, in a long time, I’m not craving Fall as August starts, so I think I’ll enjoy what is left of Summer & get out a bunch more Summer-y nail art looks too!

Have a fantastic day lovelies!

Muted Dry Brush

Hello lovelies & happy Thursday! Whoa… how is it Thursday already?! The weekend is almost here. I wish it was beautiful & sunny day but nope… 80% chance of Thundershowers haha.

Today I’m keeping up with the nail art, & sharing this brush stroke look. I haven’t done one of these in forever, but it was another case my previous mani had started to chip, & I needed something to cover it up, but didn’t have time to repaint my full nail. So bring on the sneaky nail art!

For this manicure, the polishes I used were:

  • Base Coat: Sally Hansen Nailgrowth Miracle
  • Top Coat: Essie Speed Setter
  • Essie Cacti on the Prize
  • Essie Shop Til You Drop
  • Essie Worth the Tassel
  • Essie Blanc
  • Essie Kimono Over
  • NailStuff.ca Dotting Tool Trio

This is such a simple & easy to do look! Literally anyone can do it, & it looks way more fancy than it actually is. I thought about adding a little gold flakies, but decided to just keep it more simple & muted, & I’m really glad that I did! I even ended up wearing this design for 2 whole days, which I feel like I never, ever do anymore. But it was just too pretty.

How are we feeling about this muted dry brush? Have you ever done a dry brush look like this before?

I’ve been (sort of) thinking about getting back into making short tutorial videos again — would that be something you’d be interested in seeing? Let me know in the comments below!

Summer Colour Block

Morning lovelies & happy Tuesday! Time for some more nail art!

I was feeling a bit uninspired for a while, but I think I might be breaking out of my funky fully now! Today it’s all about these funky freehand colour block nails. I love these colour combo nails, mostly because the colour combinations are endless, & they can be worn in any season.

For this manicure, the polishes I used were:

  • Base Coat: Sally Hansen Nailgrowth Miracle
  • Top Coat: Essie Speed Setter
  • Sensationail Nailtural Cactus Me Outside
  • Sensationail Nailtural Born to Explore
  • Sinful Colors Hip To Be Square

This look is super simple — no tools needed. Just three fun nail polish shades & a steady hand. I had actually been wearing Sensationail Nailtural Cactus Me Outside (how fun is that name?) the previous day, with some chipping, so I decided to add some nail art on top to hide the chipping & it turned into such a cute look! Like I said, I love love love a good colour block!

What do you think of these nails? What three colours would you combine in a colour block design? Let me know in the comments below!

Glittery Mermaid Scales

contains PR•

Hello lovelies & happy Thursday! Hope everyone is having a lovely week! I can’t believe it’s almost the weekend again — how did that happen.

Today I have a fun look to share with you featuring all six of the shades from Beyond The Nail’s Mermaid of the World collection (that I shared on Sunday.) You know all six of those shades were begging for a sparkling mermaid scale look, so that’s exactly what I did!

For this manicure, the polishes I used were:

  • Base Coat: Sally Hansen Nailgrowth Miracle
  • Top Coat: Essie Speed Setter
  • Beyond the Nail Pacific
  • Beyond the Nail Atlantic
  • Beyond the Nail Caribbean
  • Beyond the Nail Caspian
  • Beyond the Nail Arctic
  • Beyond the Nail Ontario
  • Beyond the Nail Mermaid Scale Nail Guides
  • Medium sized dotting tool (for filling in the scales)

Seriously obsessed with how sparkly these are! They were definitely time consuming — I did each nail one at a time, one colour at a time — but it was totally worth it. I also really like the neutral negative space base against the glitter. It turned out even better than how I pictured them in my head! My thumb is definitely my favourite — you can just really see all the glitter.

It’s just so pretty. Like, I couldn’t stop wiggling my fingers in the sunshine. I love sparkle.

What do you think of this mermaid look? Would you rock a glittery mermaid scale look like this? Let me know down in the comments below!