Quick & Easy Abstract Stripes

Hello lovelies… it’s been a moment!

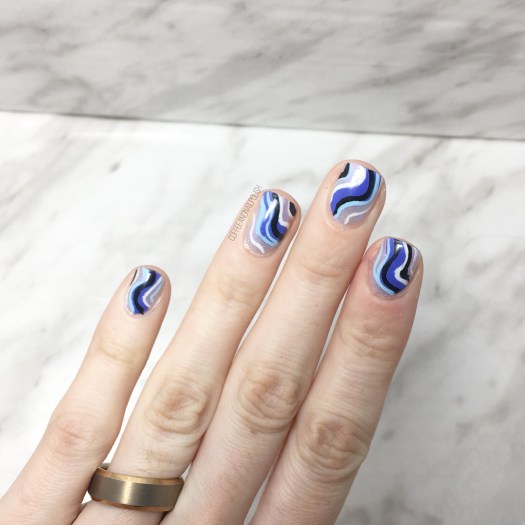
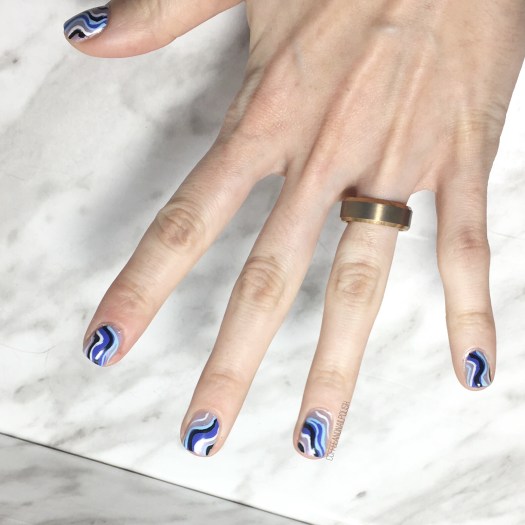
Today I’ve got some fun abstract stripes to share with you. This is one of my favourite easy designs to do when I’m struggling with inspiration. I recently picked up a few new polishes from Icing so I decided to grab them as the main polishes of choice. If you’ve been around this blog a while, you know that while I adore my big brands, there is something wonderful about polishes from non-cosmetic brands–stores like Ardene, Claires, Icing & H&M have some serious awesome polishes with awesome formulas! & even more awesome — they’re super affordable! So now that I’m back to work, I’ve been adding a lot more shades to my collection.

So I thought why not create a design using them as my feature shades!

For this manicure, the polishes I used were:

  • Base Coat: Nailtek 2
  • Top Coat: Essie Speed Setter
  • Icing 60858 Light Blue Shimmer
  • Icing Matte Effect 85900
  • Art Club Nail Art Striper in Blue Paisley
  • Quo by Orly Nail Art Striper in white
  • Quo by Orly Nail Art Striper in black

I just love how this design turned out. I wore these to work & got quite a few compliments on them! I feel like I know a design turned out well if random strangers are complimenting them (&asking if I did them myself!) That’s always a huge compliment to me!

Also this blue shade is definitely fitting in with the rainy weather outside. Blue abstract stripes always give me water vibes.

What do you think of these abstract stripes? Share you favourite quick & easy nail art design down below!

Mermaid Nails featuring Claire’s Mood Nail Polish

Happy Friday lovelies! Who is excited for the weekend to be (almost) here? I’m working all weekend but that’s okay! There is a Cheer Expo in town so that always makes it busy which in turn makes work speed by. I also just got a new smart watch & I’m so curious so see how many steps I get in on a busy day!

Today I’m showing off some mermaid nails! I actually can’t remember the last time I used my mermaid vinyls, how sad is that? Who doesn’t want to be a mermaid 🧜🏼‍♀️ after all? For this design, I decided to pull out a few of my thermal polishes! Sadly I forgot to get any pictures of it in the hot state (which isn’t often–I’m always cold!) but I did get a whole bunch of before shots!

For this manicure, the polishes I used were:

  • Base Coat: Quo by ORLY Breathable Kiss Me, I’m Kind
  • Top Coat: Seche Vive
  • Claire’s Mood Nail Polish Blue
  • Claire’s Nail Polish Mermaid
  • Layla Cosmetics Thermo Effect No. 01
  • Layla Cosmetics Thermo Effect No. 04
  • What’s Up Nails Scale Stencils
  • Pearl stud from Icing.

Gosh I love thermal/mood nail polish, even if the only time it changes is when my hands are warm first thing in the morning. I always run cold, so I feel like the effect gets lost on me a little… but I still adore them! In fact, I just bought a few more of the Mood nail polishes from Claire’s (in Spring colours) which I’m very excited to show off. I also definitely need to get my hands on some of the Indie thermals, because Indie brands make some of the most beautiful thermals I’ve EVER seen. & now that I’m back to work, I will definitely be adding them to my “must buy” list.

However I do really enjoy the fact you can find thermal nail polishes while out shopping at the mall. I’ve written before I feel in love with these polishes in early 2010 when Claire’s first released them, & I keep going back & buying more because they are just as awesome to me as they were back then! Hoping they come out with some new shades soon, maybe some neons!? That would make me so happy!

What do you think of these mermaid nails? Do you have a favourite thermal nail polish or thermal polish/brand suggestion? Share all your thoughts in the comments below!

Pink & Purple Spring Floral

img_9199

Happy Friday Lovelies! Today is my last dedicated post for floral week… at least for now! I’ve been so about Spring this week & the weather the last couple days has flipped to be somewhat agreeable & sunny & only slightly chilly. I’ve even been able to wear a few of my dresses! I mean, with tights & boots… but it still counts! It just means we’re that much closer to the days where I can wear nothing but my pretty Spring dresses.

Today’s design is another floral featuring pink & purple. This design also turned out a little tropical to me which I’m really loving. I’m still trying to practice creating other flowers than roses–I’ve been doing roses so long they’re kind of easy for me, but other flowers aren’t as easy. Hopefully with practice, it’ll be just as simple. I dream of creating florals as beautiful as my floral idols @just1nail & @polishpeach. They just make it look so easy.

For this manicure, the polishes that I used were:

  • Base Coat: Quo by ORLY Breathable Kiss Me, I’m Kind
  • Top Coat: Seche Vive
  • Essence As Long As You Love Me 
  • Icing Pink A Boo
  • Sinful Colours Amethyst
  • Essie Play Date
  • Sally Hansen I ♥ Nail Art Pen in Green
  • Essie Off Tropic
  • Sally Hansen I ♥ Nail Art Pen in Turquoise
  • Essie Strut You Stuff
  • Small & Large dotting tool from Bundle Monster
  • Small detail brush from Bundle Monster


This time of year is such a hard time for nail art inspiration which is why I think I love painting flowers. It gives me something to look forward to! Also it’s an excuse to pull out those Spring-y nail polish shades that have been sitting in my Melmer drawers all Winter, missing me. I’ve been dying over all the new Spring collections being released (especially China Glaze’s Chic Physique collection) so I can’t wait to treat myself with a few new shades… or you know, the whole collection if I happen to stumble across it at Winners.

So that’s it for floral week, although I already have a few more floral designs ready to show you in the next little while! Like I said, I just can’t get enough. I definitely had fun dedicating this whole week to my love for floral, & I can definitely see myself doing it again!


What do you think of this design? Have you enjoyed this entirely floral themed week? Would you like to see me do more of these themed posts? Let me know your thoughts below!

Remembrance Day Poppy Nails

It’s November 11th & here in Canada that is Remembrance Day. 

For those who might not know, Remembrance Day represents a day to reflect on all those who have fault & served in the military. At 11am, of the 11th day, of the 11th month we pause to remember. Growing up & coming from a military heavy family, this day has always held extra meaning to me—from a great grandfather who served as a sniper in the First World War, to cousins & family friends who served in Afghanistan, I always make sure no matter what I am doing to stop & take those moments to pause. 

In honour of today, & the poppy, I created a special design. 

For this manicure, the polishes I used were:

  • Base Coat: Essie Grow Stronger
  • Top Coat: Seche Vive
  • Icing Steel My Heart
  • ORLY Decades of Dysfunction 
  • Sally Hansen Hard As Nails Black Heart
  • L’Oréal Carmin Parisien
  • Xroma Polish & Vinyls Skinny Wave Vinyls
  • Small & large dotting tool 

I hope you too will also take a moment to Remember today.  ♥️

Feeling 90s With Neon Spotted Nails 

Too many rainy days have left me craving some neon nails, so I decided to grab some bright colours to cheer myself up. In the process I saw my bottle of Layla Bubbly in Black & thought it would look really neat over a neon-ish base colour. 

For this manicure I used:

  • Base Coat: Perfect Forumla Pink Gel Coat
  • Top Coat: Cutex Quick Dry Top Coat 
  • ORLY Scenic Route
  • Icing Breakfast at Tiffany’s 
  • China Glaze Sun Upon My Skin 
  • Icing Pink A Boo
  • Layla Cosmetics Bubbly Effect in Black

I’ve owned this bottle of Layla Bubbly effect for a while (I scored it on sale at Lawton’s in the clearence like 3 years ago) but this was the first time I really got it to work for me the way I imagine it’s supposed to work. I did wait until the next morning to add the black, so maybe that made the difference? Either way I’m super excited about how it turned out! Like crackle nails, it just offers an easy way to create nail art without excessive work (or mess). 

& incase you were interested in seeing what my base looked like before I added the Bubbly topper, here was the base. I tried to attempted @laqvid‘s wet dry brush design but I’m definitely going to need to give it more practice. 

What do you think of this design? Have you ever tried the Layla Bubbly Effect polishes before? Let me know the comments below!