SWATCH SUNDAY — Gelish Royal Temptations Spring 2018 Collection

PR Sample — sent to me free for testing & review.

Happy Sunday lovelies! I feel like it’s been ages since my last Swatch Sunday post, even though it’s only been 2 weeks. We’re currently under a snowfall warning here in Halifax (yes, in April…) so it felt like a good time to share the swatches of the Gelish Soak Off Gel Spring 2018 collection! The Royal Temptations collection is inspired by the lavish life of Marie Antionette! The colours are described as opulent pastels & according to the press release “help convey the romantic fantasy we convey with being a queen”.

Continue reading “SWATCH SUNDAY — Gelish Royal Temptations Spring 2018 Collection”

Pretty & Prom Inspired!

It’s been a long, long time since my last prom expirence (10 years!) but I always find myself reminiscing when June comes around. I’ve been seeing a whole bunch of pretty dresses around as graduates get ready for their special night, so I thought I would do some pretty prom inspired nails! Back when I went to prom, my nails were always simple: a metallic, a red, some fresh tips. If I were a teenager now, I definitely would go with something more fun! 

I think this design would be perfect for someone going to prom that wants fancy nails that aren’t too over to top (don’t want to outshine that dress!) I went with a pretty peach shade, but you could tailor it to go with whatever colour matched your dress. 

For this manicure, I used:

  • Base Coat: Perfect Formula Pink Gel Coat
  • Top Coat: Cutex Quick Dry Top Coat
  • ACO by Ardene Sorbet
  • ACO by Ardene Misty Love
  • Sally Hansen Miracle Gel Buffalo Nickel
  • Sally Hansen Miracle Gel Pretty Piggy
  • Sally Hansen Miracle Gel Little Peony
  • Sally Hansen I ❤️ Nail Art Pen in green
  • Sally Hansen X-treme Wear Kiwi Bikini
  • Xroma Polish & Vinyls Small Moroccan stencil
  • Small dotting tool from Bundle Monster 
  • Small Nail Art Brush from Bundle Monster 


I’m so excited by these, I can’t lie. My floral seriously turned out perfect. & I love the subtle bit of shimmer of the metallic Buffalo Nickel with the pastel floral. Floral is definitely my favourite go-to when it comes to special occasion nails, but I promise it’s not my only go-to! But for special occasions like prom, floral is perfect! It’s like wearing your corsage right on your nails. 

What did you wear on your nails when you went to prom? Did you stay classic, go sparkly or not wear anything at all? Let me know what you think in the comments below! 

SUNDAY SWATCH POST: OPI Living On The Bula-vard!

As I mentioned in a previous post, I recently won some contests via Instagram, & one of them was a set of 4 OPI minis from their Spring/Summer Fiji collection. I wore the other 3 colours in my tropical leaves accent nail design, but hadn’t yet shown off the 4th so I thought I would do a quick swatch for you. 

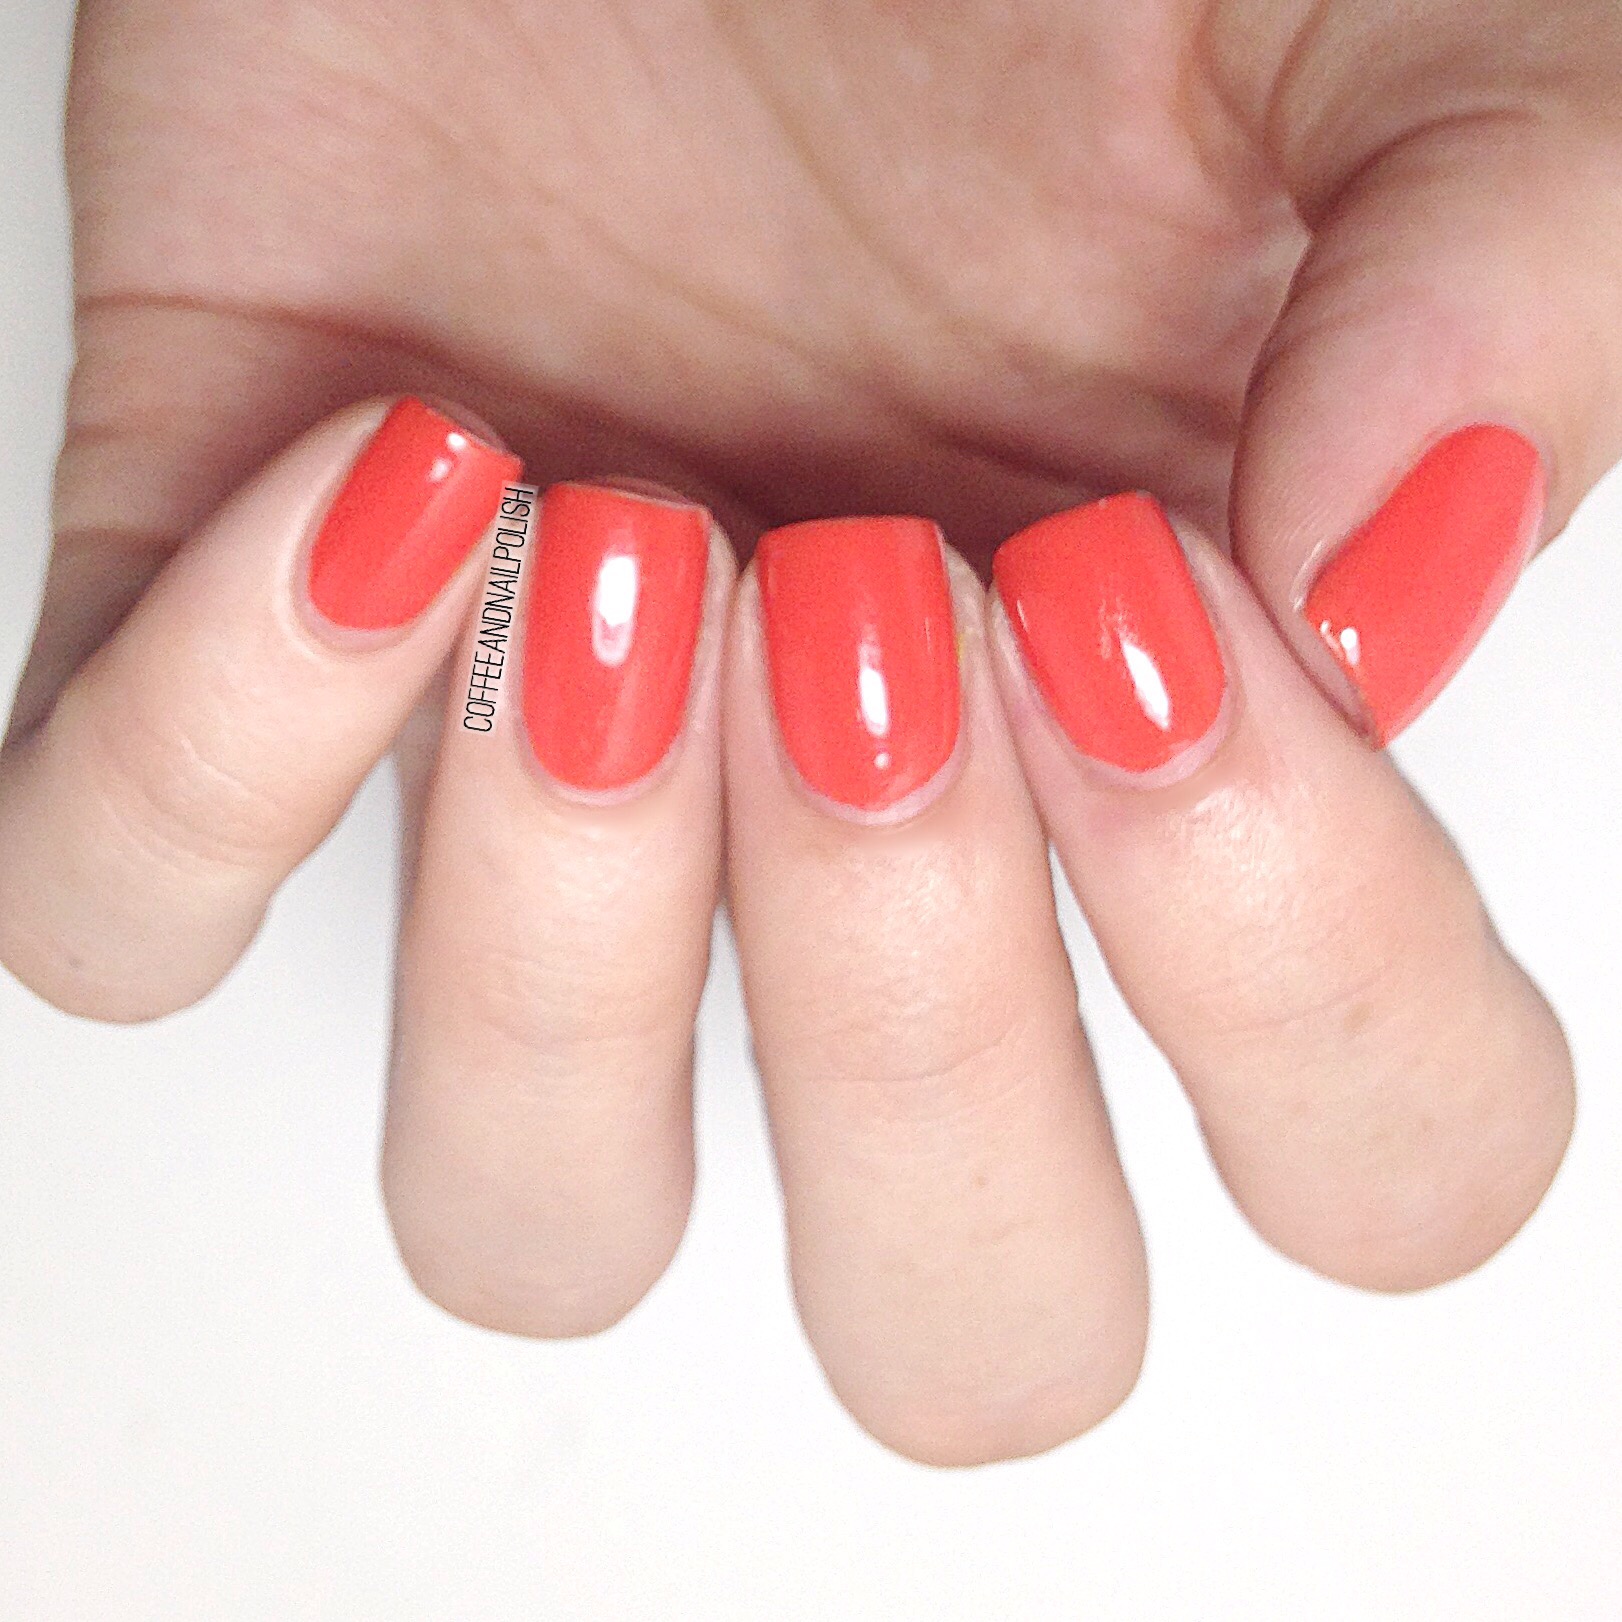
OPI Living On The Bula-vard! Is a super virbrant red leaning coral that goes on opacque in 2 coats. The first coat went on a little thin, but the second coat filled in the colour well. At first I honestly wasn’t sure how I felt about this colour, but as soon as it was on my nails I instantly fell in love. It’s not quite coral & not quite red–it’s honestly this perfect combination of the two in this weird way that makes me so happy.  

Living On The Bula-vard! definitely reminds me a lot of another OPI favourite–My Chihuahua Bites!–which is probably why I love it so much. & now I’m wishing I had checked to see if they were close to dupes before writing up this blog post… Whoops! Never the less, I will definitely be buying the large sized bottle of this colour. This is the kind of colour that brings out my olive undertones & highlights my tan so it’s perfect for Summer days! 

Do you have a favourite from the OPI Fiji collection? I’ve only tried the 4 minis, & I thought that Two Timing The Zones was my favourite, but after wearing it, Living On The Bula-vard! definitely has come out as the clear winner! 

I’m going to try & make swatch Sundays an ongoing thing. I’m always taking pictures of my solid colour manis, but never post them so I thought it would be a good time to start! This could be old favourites, new polishes, or just randoms from the stash. If you have a request, let me know in the comments below! ♥️

Drip Marble decals inspired by @SimplyNailogical 


I’ve tried water marbling, & it was… not my thing. I’ve tried drag marbling, & it’s usually hit or miss. But I really love marbled nails, so naturally when I picked up a silicone craft mat I knew I needed to try drip marbling recently done by @simplynailogical.


For this mani I used:

  • ORLY Decades of Dysfunction 
  • Sally Hansen Pretty Piggy
  • Nicole by OPI We Got Beiber Fever
  • Finger Paints Wanna Gogh Dance?
  • ACO by Ardene Base Coat
  • Cutex Quick Dry Top Coat

To create my decals, I started off by dropping my polished of choice onto the mat, starting with my lightest colour (ORLY Decades of Dysfunction) as my base, then continued with my darker colours, & finished with my metallic shade (Finger Paints Wanna Gogh Dance?). Once all my colours were down, I moved my mat around to create my marbled effect. Once I was happy with one decal, I’d let it sit & dry for a few minutes before starting on the next one. When I was happy with the amount of decals I’d made, I left them to Dry for a few hours (around 2 hours).

I’m not going to lie, trying to apply these wasn’t the easiest. I started off by painting my accent nails with a base colour (again I used ORLY Decades of Dysfunction) and let dry. I then peeled off my decal & figured out which part I wanted on my nail, trimming it down to a more manageable size. When I was ready, I applied a coat of my ACO by Ardene base coat & immediately stuck my decal onto the nail. Using a brush dipped in acetone, I cleaned up around the cuticle. This was probably the least fun part–I wish I had better nail art scissors to trim off the access instead! When the decal was fully cleaned up & my cuticles were clean I sealed everything in with top coat to finish. I also surrounded my cuticles in oil to help after all that remover. No one likes wrecked cuticles.

And how does the final result look?

Continue reading “Drip Marble decals inspired by @SimplyNailogical “

Negative Space Abstract Stripes. 


If there are two kinds of manicures I love, it’s negative space & abstract stripes. I had this crazy idea to try & combine the two together, & the end result might just be one of my favourite things ever! These also fit in really well with the geode nail art trend happening on Instagram. 

& the best part about this design? Regardless of your line skill, it’s pretty much impossible to screw up because you want them to look abstract & imperfect. 

For this design, I used: 

  • Sally Hansen Miracle Gel Pretty Peony
  • Essie Lounge Lover
  • Kiss Products Nail Art Striper in White
  • Kiss Products Nail Art Striper in Black
  • Cutex Quick Dry Top Coat

To me, it looks like a cross between a water marble & geode nails, & I couldn’t be more smitten with them. All I can think is what other colours can I do this with! I think purples would look especially amazing, and obviously holo. For the prettiest result, I find chosing two complimentary shades, one darker & one lighter, plus your black & white for detailing, turns out best. 


If I had to chose a favourite nail, it’s a tie between my ring finger, pinky & thumb. I can’t pick just one!
What do you think about this mani–do you love it as much as I do?! Let me know in the comments below what you think!