Chic Gold Stripe Nails

Hello lovelies & happy Friday! The weekend is almost here.

Today I’m sharing a quick & simple look with you I’ve been wearing for the last few days. I have posted a few different versions of this look over the years, & it just never gets boring to me. You can freehand you lines, like I did here, or use striping tape/straight nail vinyls for a little bit of ease. Either way, it’s a not too difficult design that looks chic & classic — & always eye catching.

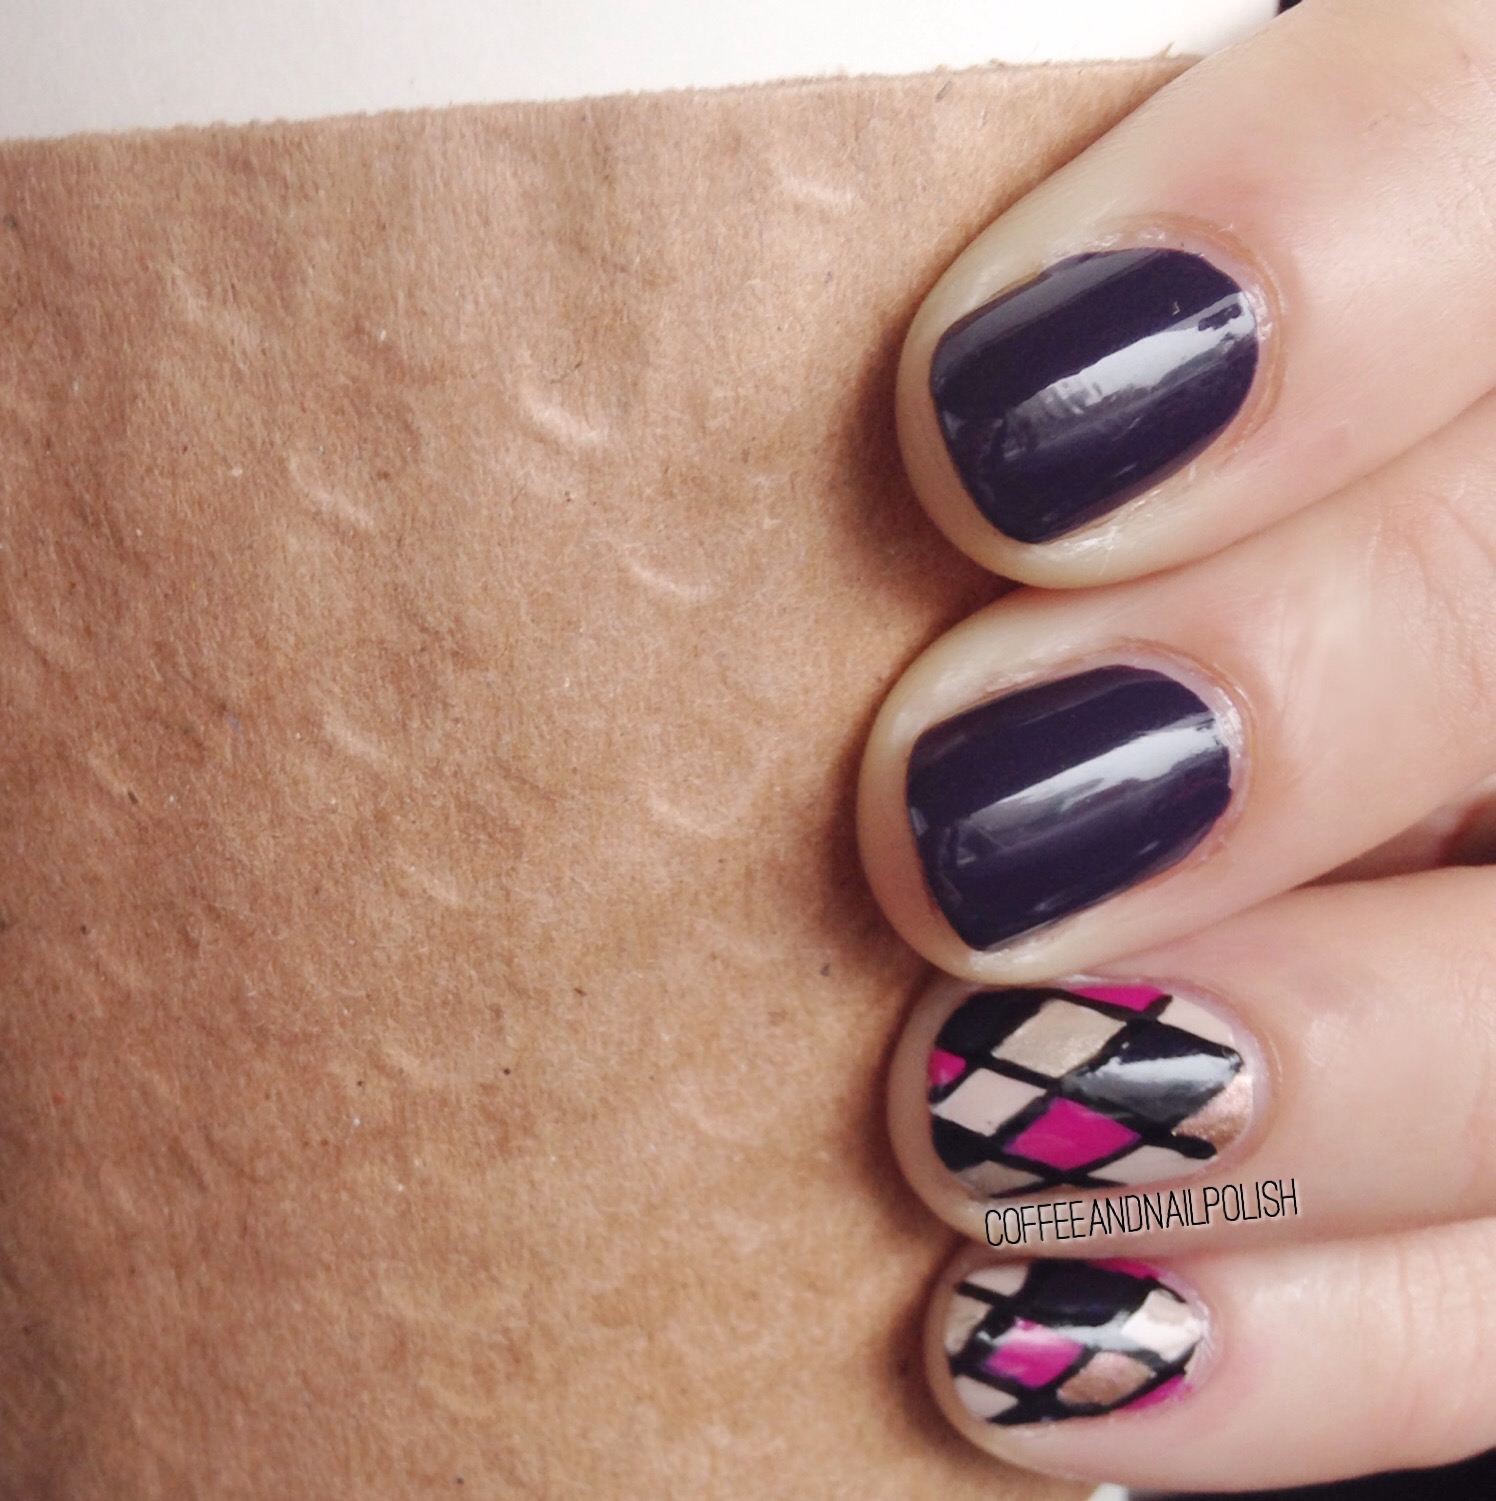
The polishes I used for this manicure are: 

  • Base Coat: China Glaze Calcium Gel Fortifer
  • Top Coat: Essie Speed Setter
  • Milani Nail Polish Deep Thoughts
  • Bourjois Paris Perle Illusion
  • Sally Hansen Five Golden Blings
  • Nailstuff.ca 16mm striper brush

You can’t really see the holo sparkle of Five Golden Blings but it’s there! I really like this simple single line. I was also really excited with how straight my lines turned out! That isn’t always the case. Even though I’ve come a long way with my straight nails, that doesn’t mean they’re always perfect! So when I do get them right… oh boy, does it make me excited!

Probably the reason why this manicure is on day three!

What do you think about these simple gold stripes? Do you like this chic design? Let me know all your thoughts down in the comments below. & share which colour combination you’d wear for a simple stripe design like this.

Have a great Friday loves ♥︎

Diamond accent nails. 

So as what usually happens every 6 months or so, I broke a nail. 😞 well technically I cracked my ring finger half way and knew it was going to break on me so preemptively trimmed them down. Either way, it’s back to nubs for this girl! 

So in order to keep my nails feeling pretty, I’ve been working extra hard on creating pretty nail art! 


 The polishes I used for this manicure were: 

  • OPI Miss You-neverse
  • OPI I Canolli Wear OPI 
  • Bourjois Paris Gold polish (can’t find a name) 
  • Revlon Cherries in the Snow
  • QUO by ORLY Striper in Black
  • Seche Vite  

  
What do you think if my diamond accent nails? How do you cope when you have a bad break? Let me know in the comments below! 

Fall floral.

First off, I apologize for being MIA the last week. Not only have I had an extremely hectic week at work, but I got struck down with the cold from hell. So while I’ve still been trying to paint my nails, I haven’t had the energy for blogging at all! I’m going to try and make up for that this week though!


I did this manicure I couple weeks ago, before fall officially hit but the weather was definitely Fall-like. I had pulled out my beloved Cashmere Bathrobe by Essie, and decided I wanted to do a pretty design with it. But what? I hadn’t done a floral in a while so I thought why not! Floral doesn’t just have to be for Spring/Summer 😉

floral


The polishes I used for this manicure were:

  • Essie Cashmere Bathrobe.
  • OPI I Snow You Love Me.
  • Bourjois Paris 1965 Le Rouge fidele
  • Bourjois Paris 1938 Mais Oui!
  • Bourjois Paris 1913 Cendres de Roses
  • ACO by Ardene Green Peace
  • Sinful Colors Strapped.
  • Nutra Nail Quick Dry Top Coat.


These turned out so well, and I had so much fun wearing these that I kept them on for almost 3 days. Who says that floral can’t be worn for fall as well. 😉

floral2


floral3

A Blast from the past with Saran Wrap Nails.

IMG-20140828-02177_1409229561553_n

Do you ever try a new nail art technique, really like it, and then just never try it again–instead falling back on them same old designs? No? Just me then….

Last Summer I tried out the saran wrap technique for nails, and really liked how it looked. Then completely forgot about that cool technique. The other day I was trying to think of something different I could do on my nails when it hit me! Saran Wrap Nails! I’d already painted my nails using Essie’s We’re in this Together. So I grab a dark pink (Bourjois Paris 2013 Bon Anniversaire), painted over the lighter pink, then dabbed with pieces of a plastic bag I had around. And tada! Pretty saran wrap nails. I applied top coat, then finished them off with some glitters from OPI’s I Snow You Love Me (which I’m actually obsessed with) and then applied Seche Vite to seal everything in. Quick and pretty nail art!

IMG-20140828-02176_1409229507313_n

IMG-20140828-02173_1409229448175_n

IMG-20140828-02170_1409229408637_n

Seriously, why have I not done saran wrap nails in over a year?! What a travesty!  It’s such a neat look!

Also, I’ll apologize for the poor lighting in my pictures–I took them out the back door of work, on a particularly cloudy day so the lighting ended up really funky.

Rose-y bridesmaid nails.


kristaweddingnails3

So my sister came over the other day for me to do her nails for a wedding she is in this weekend. She was telling me how all the other bridesmaids had gotten their nails professionally done, and she was bummed because she just couldn’t afford to do that. I didn’t want her to feel left out, so I told her she should come over because I wanted to make them pretty for her! =) So while the boyfriend distracted my nephew, I got her to sit down, and came up with some gorgeous nails for her to rock. She told me the wedding colors were rose pink, white, and black so I brain stormed for a while and figured that roses would be the most perfect bridesmaid nails. =)

kristaweddingnails2

The polishes I used for this manicure were:

  • Icing Beach Barbie — thumb and middle finger.
  • Bourjois Cendres de Roses — pointer and pinky fingers base color (and roses).
  • Sally Hansen Xtreme Wear Grey Area — pointer and pinky fingers polka dots.
  • OPI My Boyfriend Scales Walls — ring finger base color.
  • Bourjois Le Rouge fidele — roses.
  • Bourjois Mais Oui! — roses.
  • Mariposa shimmery pink — roses.
  • ACO by Ardene Green Peace — leaves.
  • ACO by Ardene Techno Green — leaves
  • LA Colors Palm Tree — leaves.
  • Seche Vite Quick Dry top coat.


kristaweddingnails

I thought the end result turned out really pretty. It just so happened I had a dusty rose pink (Bourjois Cendres de Roses) that perfectly matched the pink in the wedding colors! I went with dark grey polka dots, instead of black, just because I thought it would be a little more subtle–and would compliment the rose color. My sister was really excited for her nails, which made me so happy. =) I also lent her my Icing Beach Barbie so she could paint her toes sparkly to match, since they have opened toe shoes. So she’ll look pretty from head to toe. =)


So what do you think of this rose and polka dot manicure? Do you ever do other people’s nails? I’m still not 100% used to doing them, but it is fun playing around on someone else–even if she has the tiniest little nails compared to my own.