Blue Groovy Flowers

Hello loves & happy Thursday! & happy March 2nd. February is now behind us, & this year is already speeding by. How is it possible we’re 3 months into 2023 already?

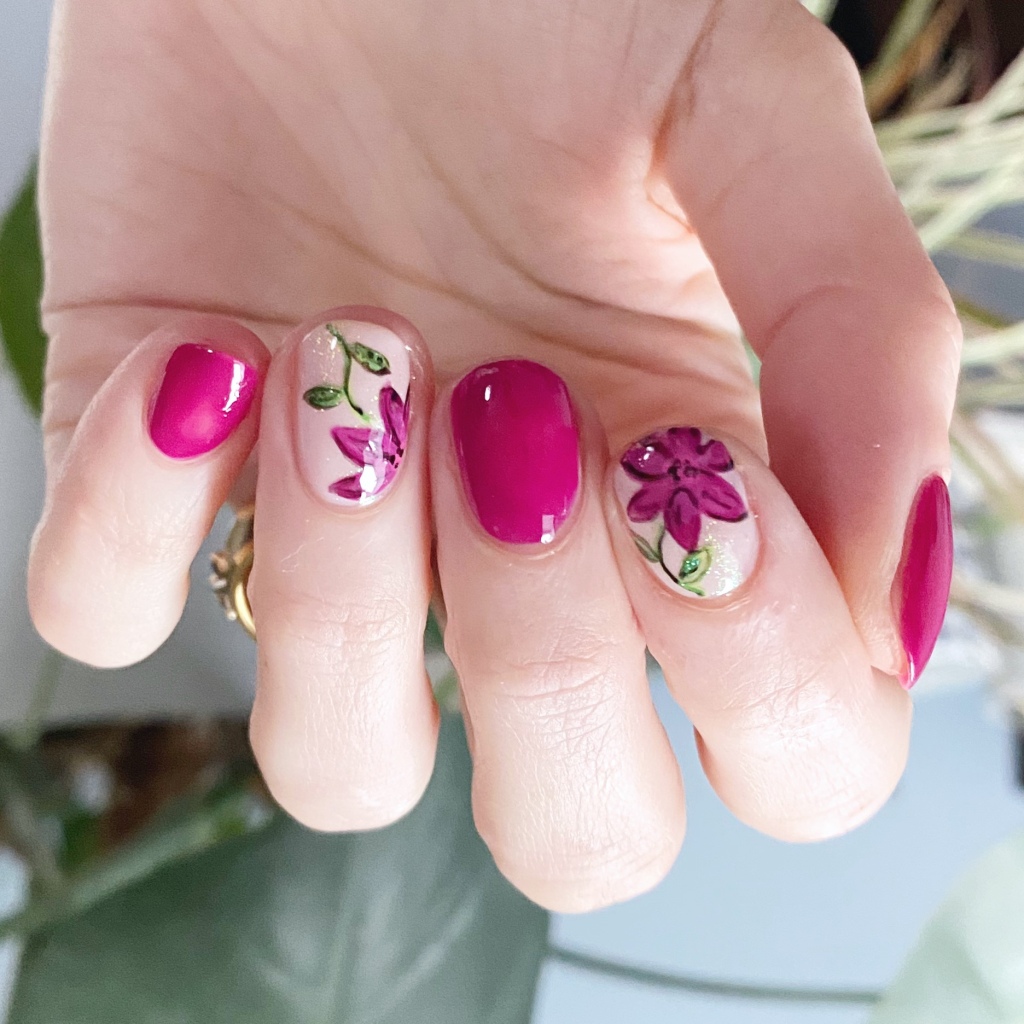
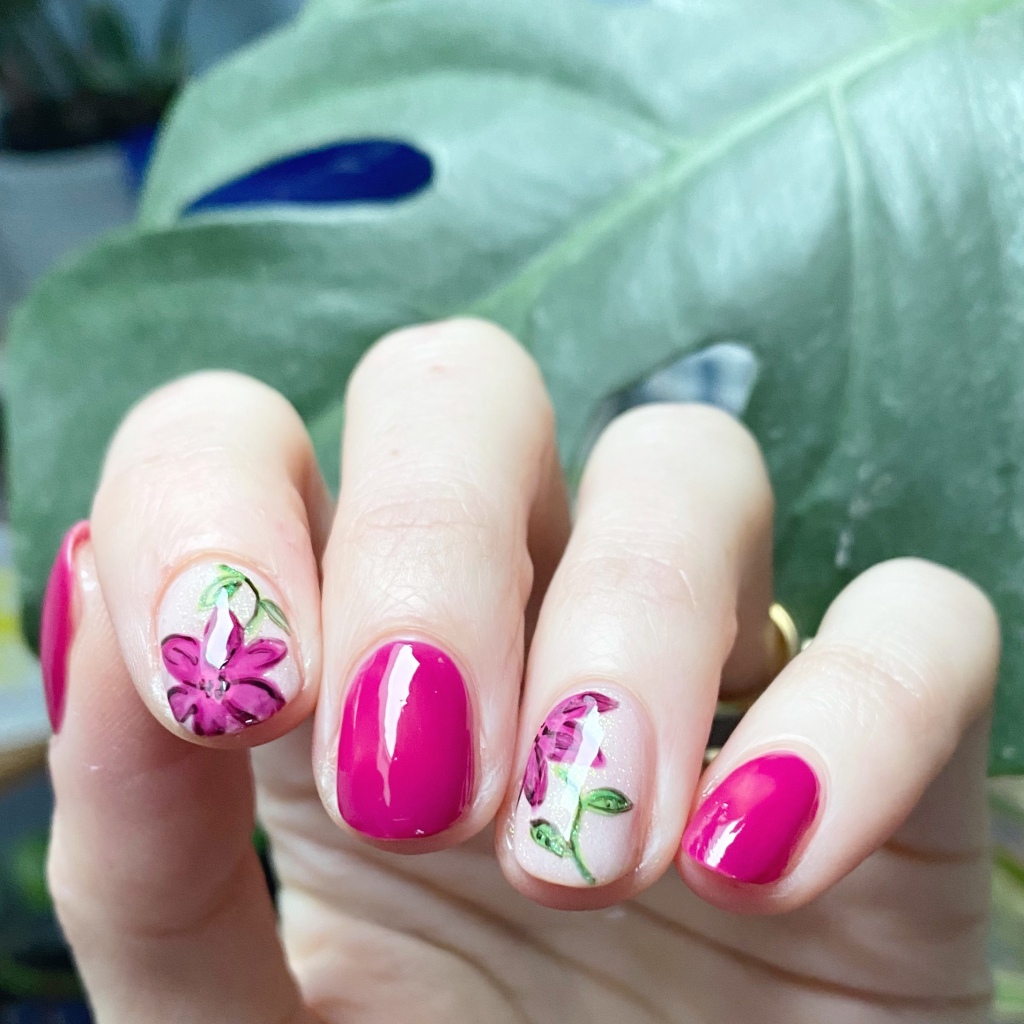
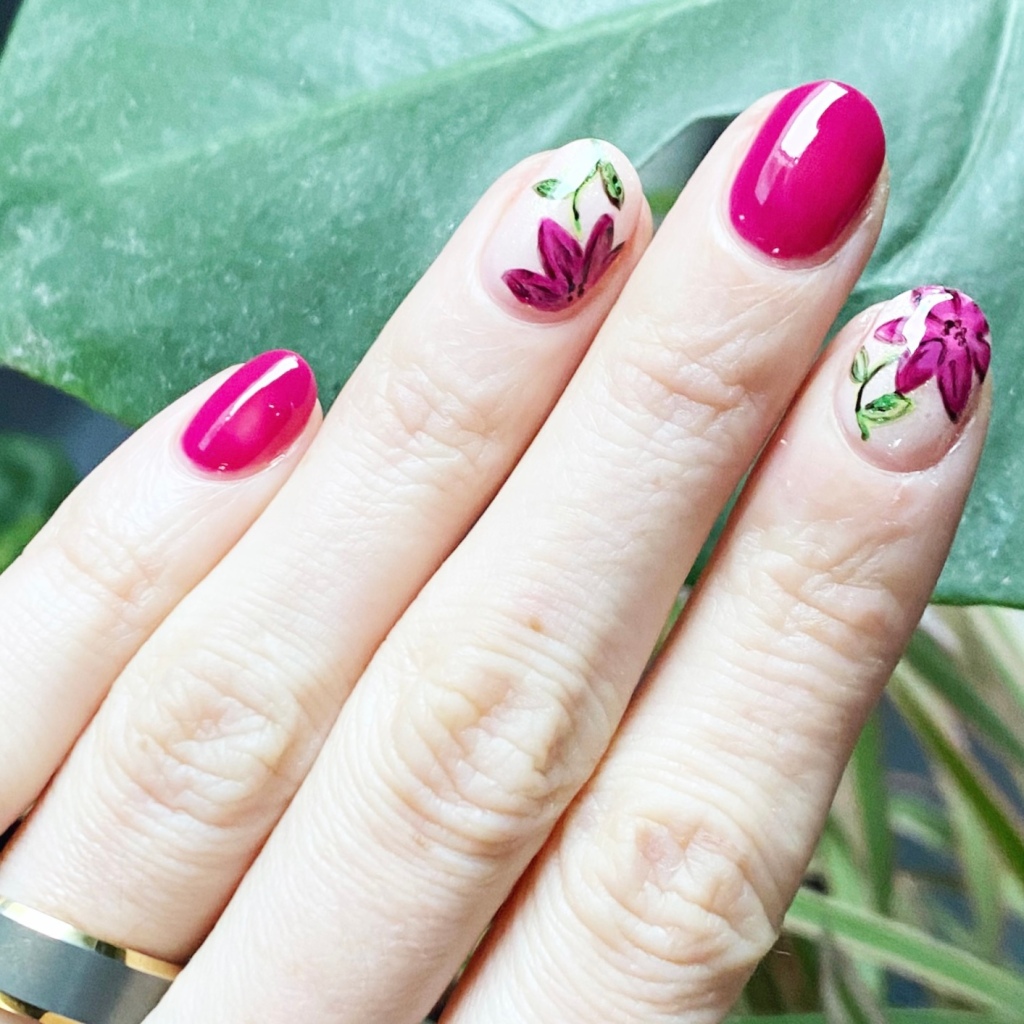
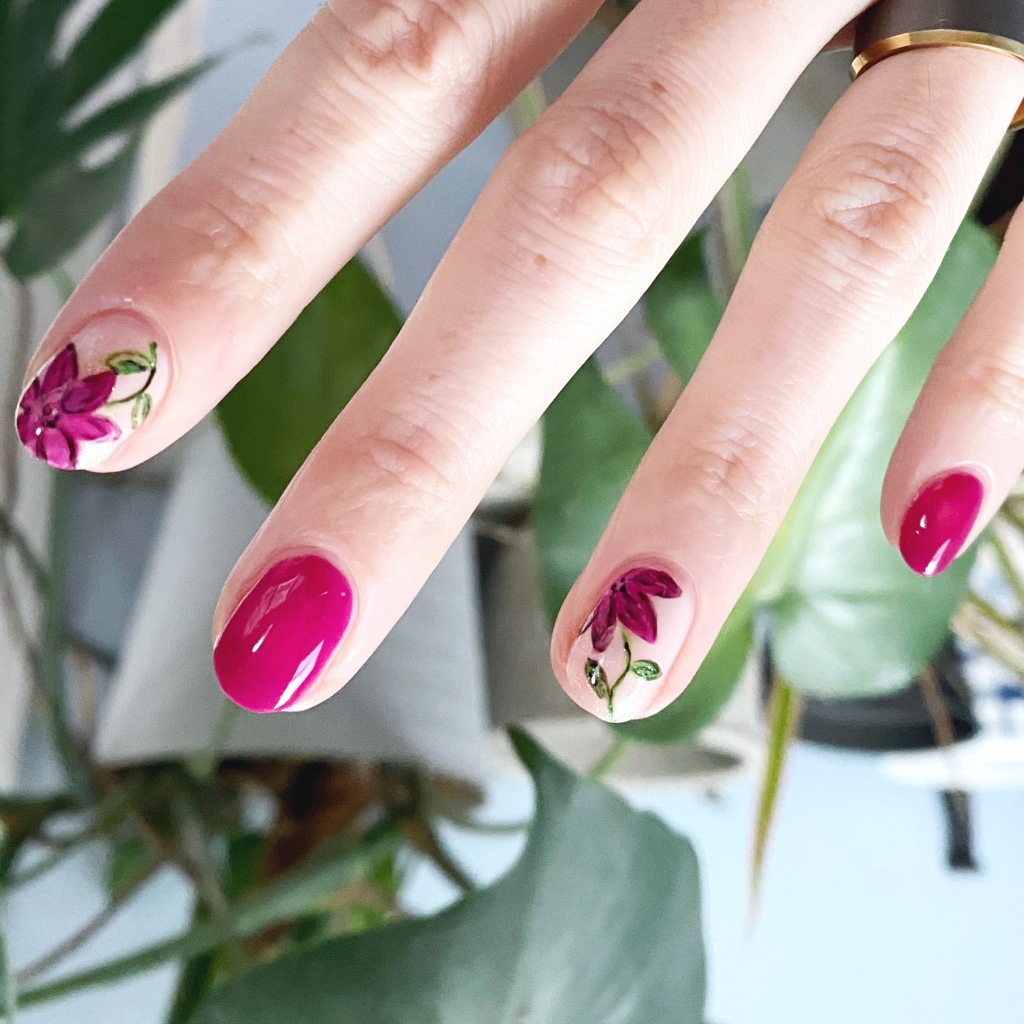
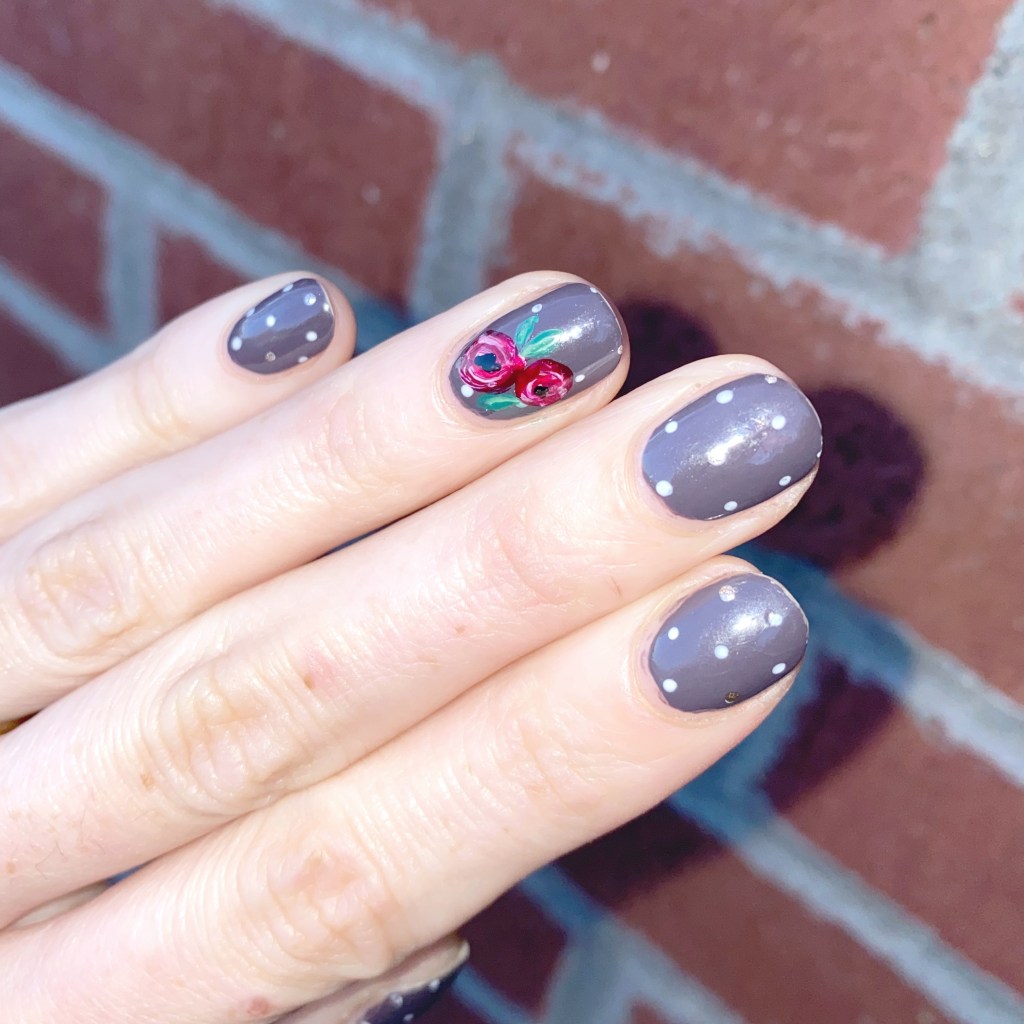
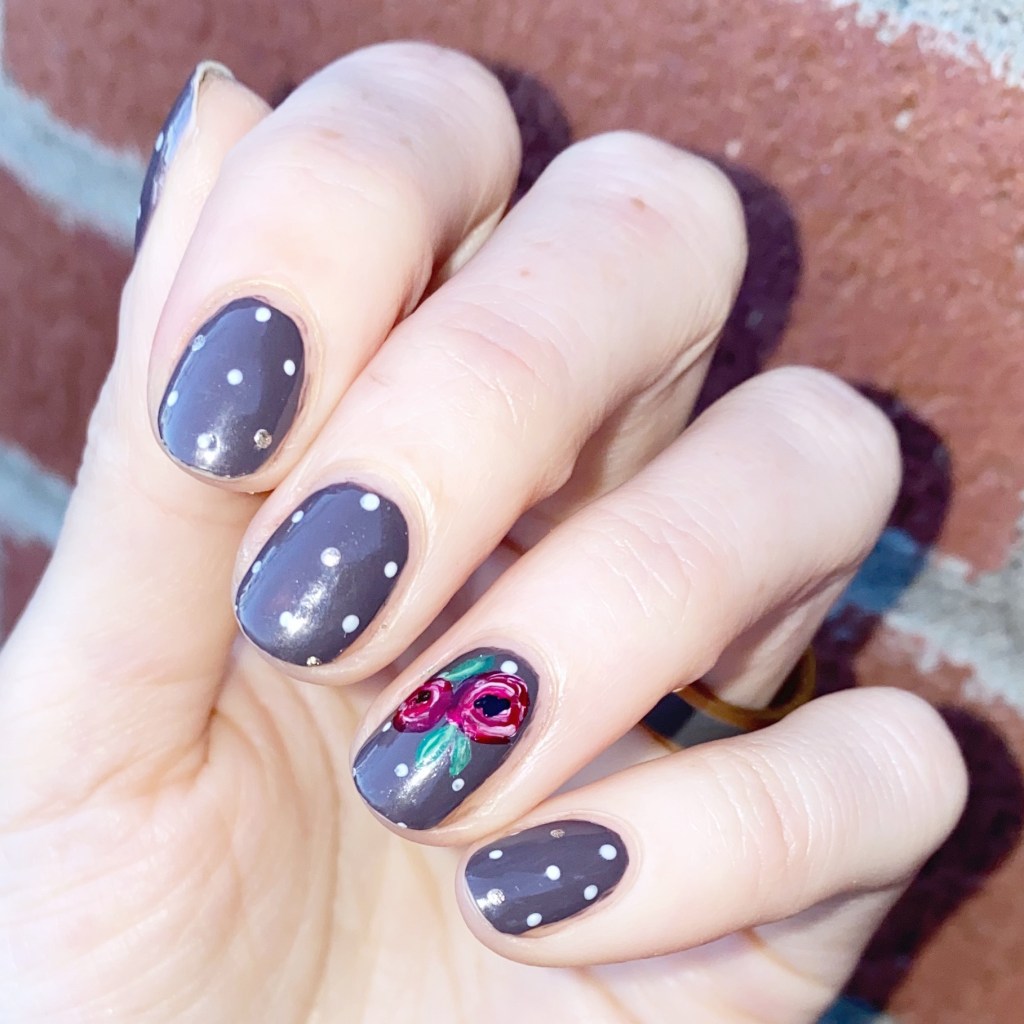
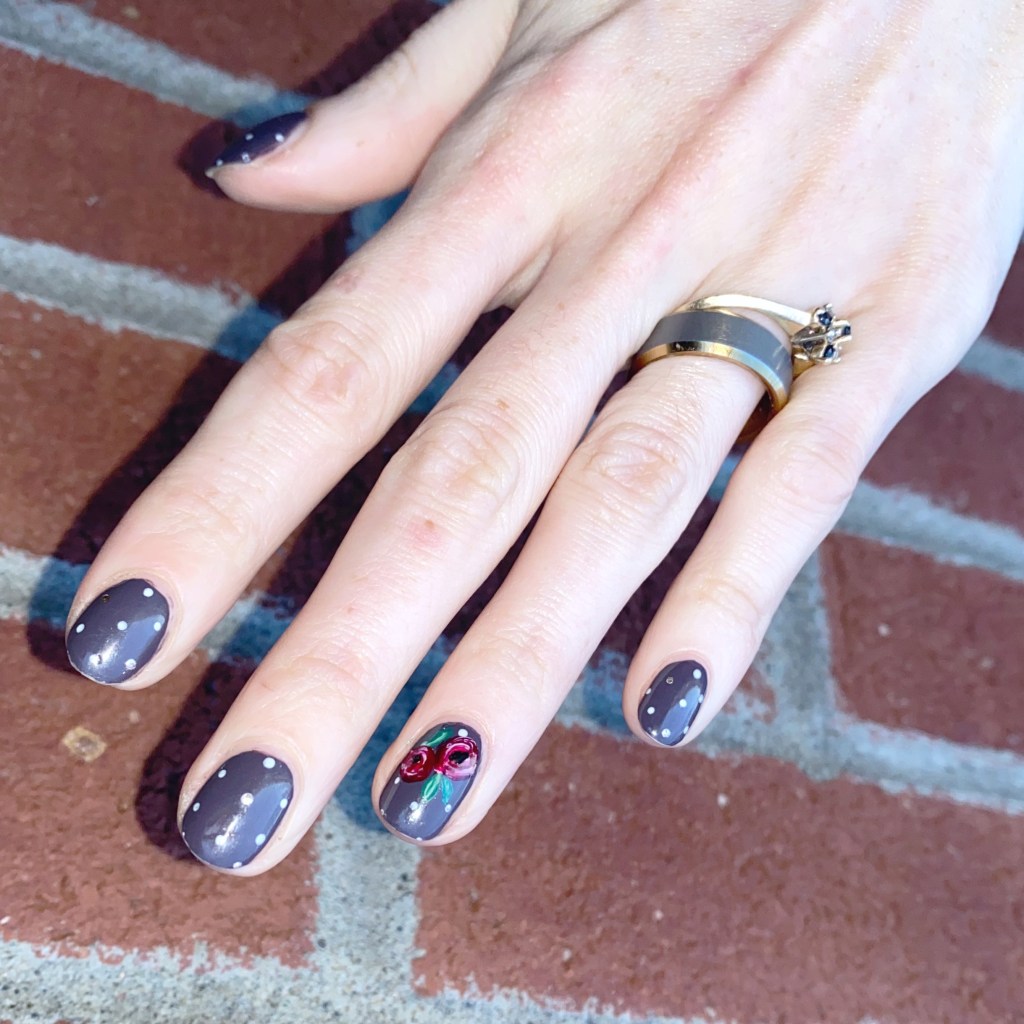
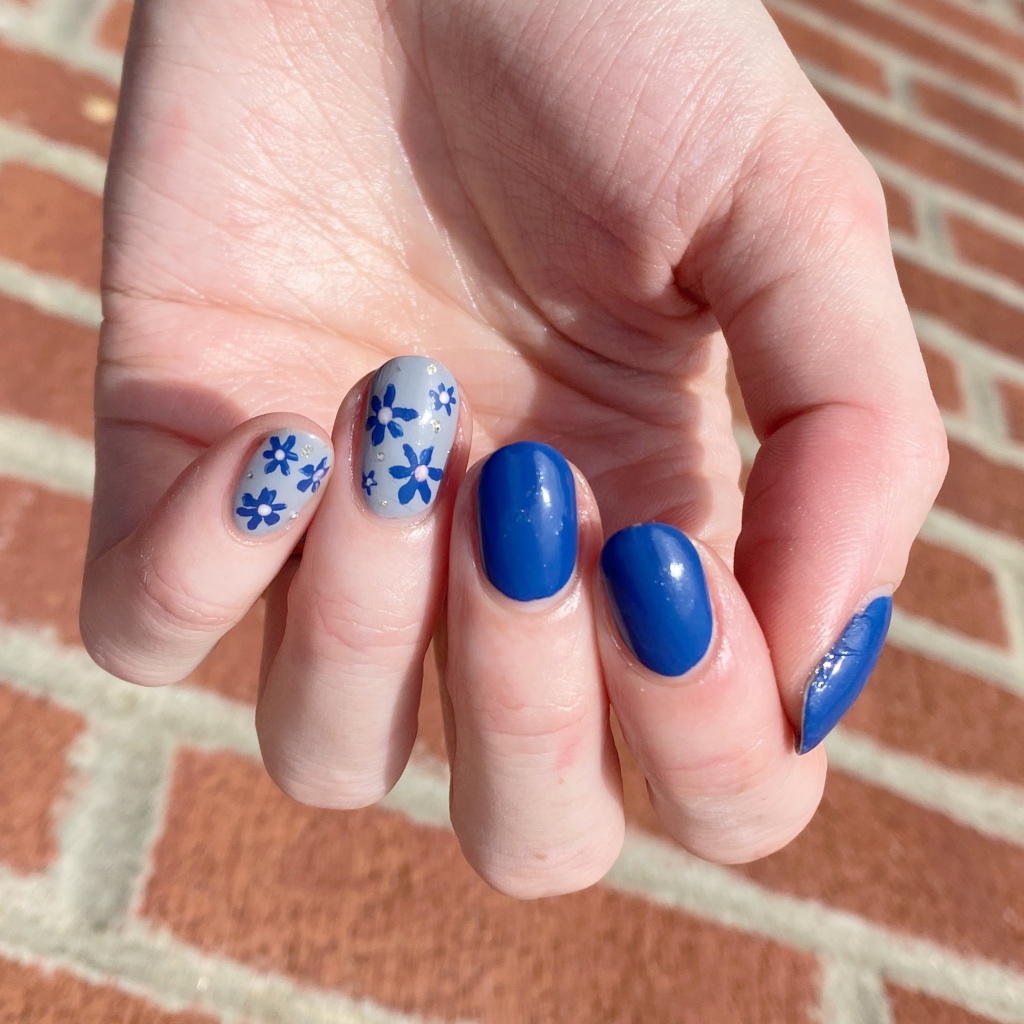
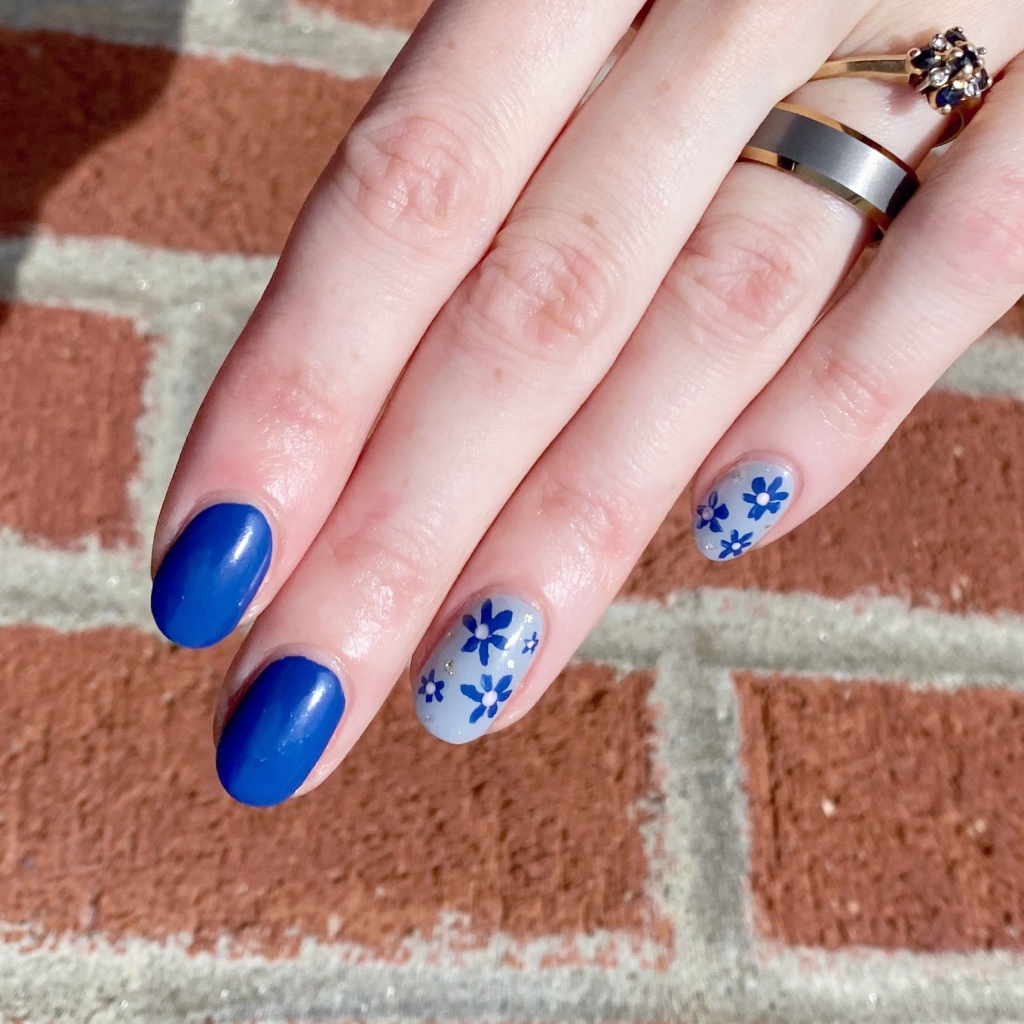
But you know what it does mean? That we’re only 18 days away from Spring! I’ll enjoy that fact while I munch on my storm chips & prepare for another 20-25cm of snow to fall here in Halifax. I’ve also decided to distract myself from the impending snowstorm with some floral on my nails. If there is one thing that can distract me from the fact that Winter has really just started here, it’s a cute simple floral nail art design.

The polishes I used for this manicure are: 

  • Base Coat: Essie Hard To Resist Glow & Shine 
  • Top Coat: Seche Vite Fast Dry Top Coat
  • Essie All the Wave
  • Essie Cocktail Bling
  • Essie Sweet Souffle
  • Essie Set in Stones
  • NailStuff.ca 4mm Micro Detail Brush
  • Dotting tool (NailStuff.ca — Dotting Tool Trio)

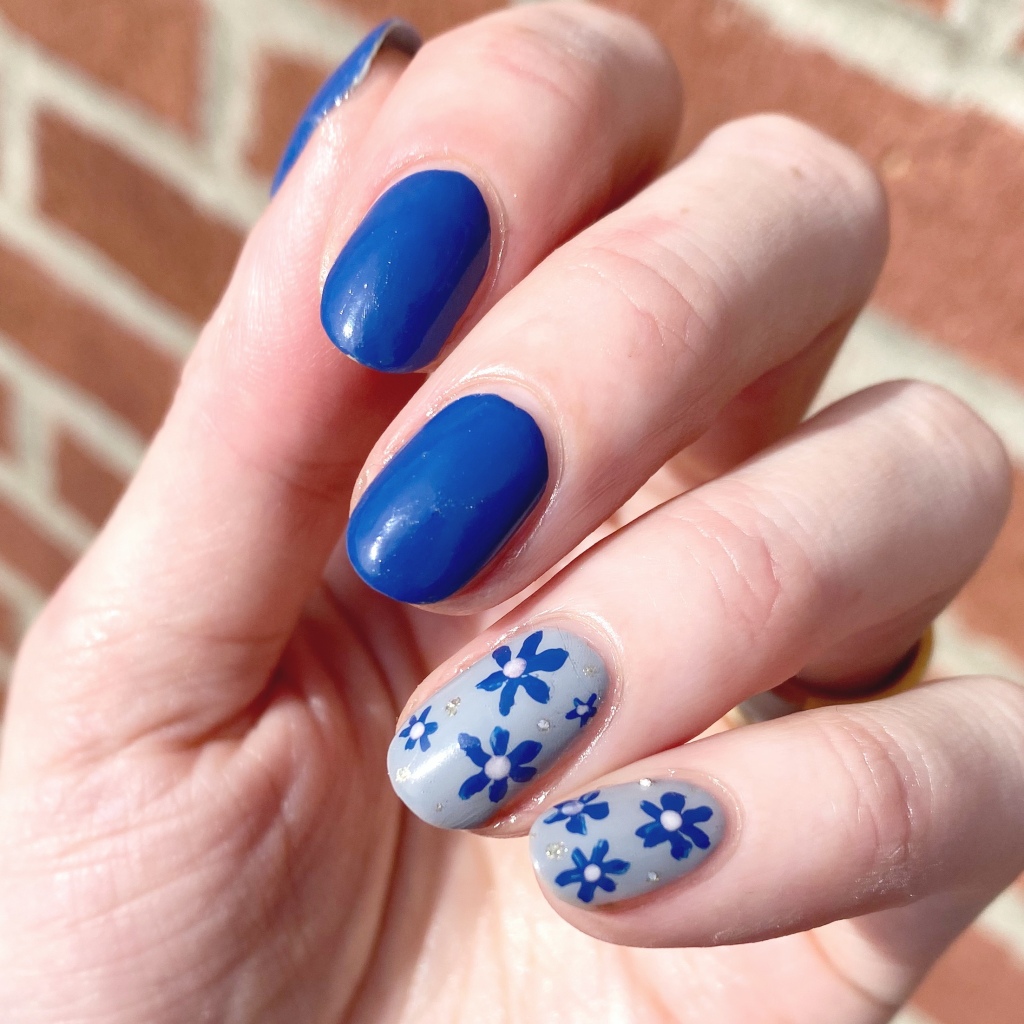
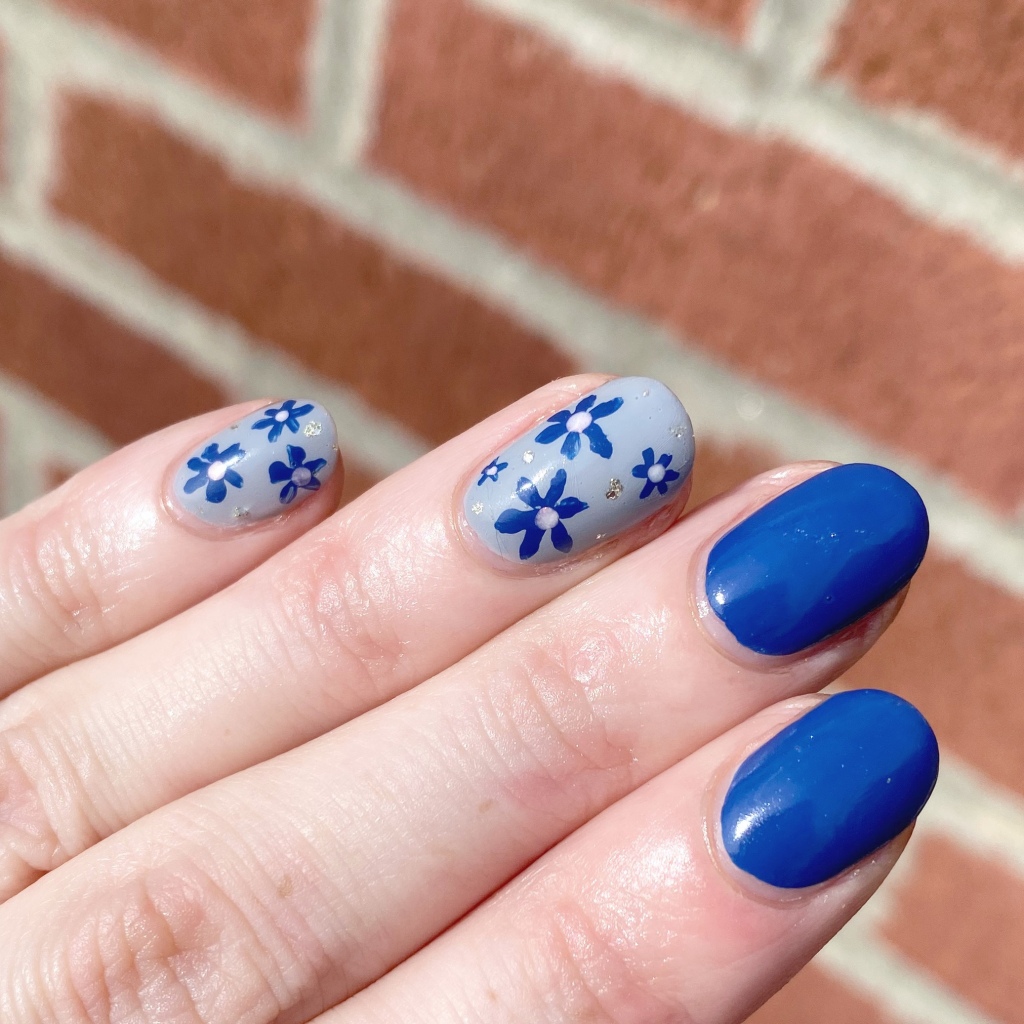
I’m a little rusty on my flower painting, as you can see, but I still think these turned out cute. I went much more simple for this look, aiming — kind of — for like a 70s wallpaper design. Not my most favourite floral ever, but still a fun look to wear. I have no doubt there is going to be a lot of floral on my nails in the near future, so I hope you’re ready.

All floral, all the time.

Well maybe not all the time.

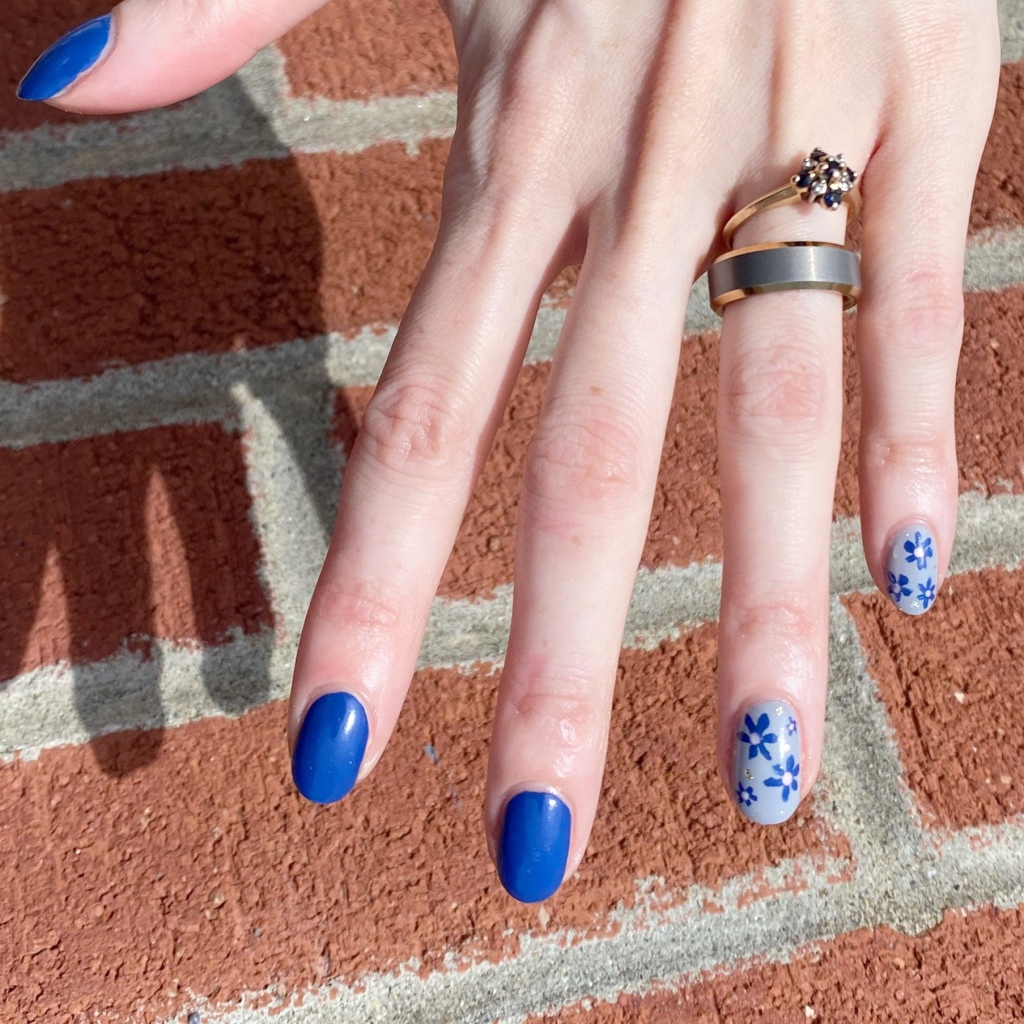
What do you think about this simple easy groovy floral look? Is this a good nail art design to usher in the new month, & hopefully Spring? Let me know all your thoughts down in the comments below, & let me know what Spring nail art trends you’re loving right now.

Fuchsia Floral Accent Nails

Hello beauties & happy Thursday! I’ve been struck down by a cold from Hell, but that doesn’t mean I can’t show off some pretty (early) Spring nails — right? Especially since it’s supposed to be relatively warm today.

It feels like ions since I last did any floral. Floral has always been one of my favourite go to nail art looks, but I think I went through a floral rut for a while, because I was not inspired to do any on my nails. But I’m back, & I’m showing off the prettiest floral in hopes that Mother Nature gets the message.

The polishes I used for this manicure are: 

  • Base Coat: Essie Hard To Resist Glow & Shine 
  • Top Coat: Seche Vite Fast Dry Top Coat
  • Sally Hansen Miracle Gel Lilac Insomniac
  • Sally Hansen Miracle Gel Ski Bunny
  • Sally Hansen Miracle Gel Unicorn Top Coat
  • Sally Hansen Miracle Gel Wet My Thistle
  • Sally Hansen Miracle Gel Me, My Elf & I
  • Sally Hansen Miracle Gel Blacky-O
  • NailStuff.ca 4mm Micro Detail Brush

Okay, first off I apologize for my shitty pictures because I’ve been having photo troubles lately. My photo quality has been dipping dramatically, so I might switch back to just using my photo box & daytime lamp for a while to see if it makes a difference. Second — I’m so happy with how this look turned out! It definitely took some time to get the colouring right on the flower. But I decided not to go super complicated in the background. & I’m so happy with how cute they look!

What do you think of this floral look? Have you missed the floral as much as I did? Let me know down in the comments below!

Vintage Inspired Polka Dot & Floral 🌹

Hello loves, I hope you’re having a beautiful start to your Thursday!

Today’s look is giving me early blog vibes, & most specifically this early design featured in the younger days of this blog. I love a good floral, & to be honest I haven’t really been inspired to paint floral on my nails in a while. I think June was the last time I posted any kind of floral, & even that was a simple daisy design. So to say I was long overdue would be an understatement.

So obviously I decided lets do a throwback inspired design, grabbed some pink & red polishes, & I ended up with this pretty look! The throwback vibes are strong, & I’m okay with that. I feel like old school nail art designs are making a comeback — heck one of the indie brands even released a whole collection of crackle nail polish — so I thought I would join in on the fun.

The polishes I used for this manicure are: 

  • Base Coat: Essie Hard To Resist Glow & Shine 
  • Top Coat: Seche Vite Fast Dry Top Coat
  • L’Oreal Vintage Vinyl
  • Sally Hansen Miracle Gel Ski Bunny
  • L’Oreal Feeling Kilty
  • Sally Hansen InstaDri Racing Rose
  • Sally Hansen InstaDri Cinnasnap
  • Sally Hansen Miracle Gel Montley Hue
  • China Glaze Shore Enuff
  • Essence Cosmetics Green is the new Grunge
  • Starrily Vantablack
  • Dotting tool (I always use mine from NailStuff.ca — Dotting Tool Trio)
  • NailStuff.ca Mermaid Tail Nail Brush Trio (11mm Liner Brush)

Ooooh it’s so pretty! I mean, being a self confessed perfectionist I can definitely see some flaws, but I’m not going to concentrate on those, & instead focus on the good things… like floral being on my nails again after far too long. It just feels good, especially during these frigid days we’ve been having. I’m not a fan of Winter once Christmas is over, so I don’t really enjoy January at all.

A girl can only drink so many extra hot coffees in a day.

So I would expect to see a few more florals popping up on my nails over the next few weeks, especially as we start inching closer to Valentine’s Day.

What do you think of this floral design? Have you missed seeing it around? What is your favourite nail art design to do of all time — or for others to do? Let me know all your thoughts in the comments below.

Dainty Present Accent Nail Art 🎁

Hello beauties & happy Friday! Can you believe we’re just a little over a week before Christmas? Where has the time gone?! We have less than 0 snow which means it doesn’t really feel like Christmas or, even, December here. But I’m hoping for a Christmas miracle, & a little bit of snow for the holiday.

Today though I have a cute Christmas design to share with you that I’ve been wearing for the last few days. I recently took a trip to the Chatters by my new work, looking for nail polish. While they don’t quite have the stash they used to have, I did find a couple cute shades including a mini bottle of OPI Green on the Runway from the 2014 Coca-Cola collection. I thought it would be a fun non-traditional Christmas colour choice.

The polishes I used for this manicure are: 

  • Base Coat: Essie Hard To Resist Glow & Shine 
  • Top Coat: Sally Hansen Insta-Dri Anti-chip Top Coat
  • Starrily Vantablack (c/o: NailStuff.ca)
  • OPI Green on the Runway
  • Sally Hansen Miracle Gel Make It N-Ice
  • China Glaze Sleigh Bells Ring
  • NailStuff.ca Mermaid Tail Nail Brush Trio (11mm Liner Brush)

I really wanted to see how Green on the Runway would look layered over black, & I like it! Obviously, I had to had some sparkle, & Sally Hansen Miracle Gel Make It N-Ice is a great topper! It adds just the right amount of sparkle to this design. It’s Christmas, so sparkle is almost mandatory!

Also I love how my teeny little bow turned out. Sometimes all you need is just a little accent nail, & I feel like this was the perfect combination of colour, with a little bit extra holiday added. It makes me so happy! My slightly dry cuticles thanks to freezing temperatures? Not so happy. But hopefully Santa has a big tin of Burt’s Bees cuticle balm for my stocking this year.

What do you think of this dainty accent nail, & colour combination? Are you a fan of simple of fancy holiday designs? Let me know all your thoughts down in the comments below! Just 8 more days until Christmas Eve, so now is the time to get the rest of my Christmas nails finalized.

Have a fantastic Friday!

GLAM NAILS CHALLENGE DECEMBER— Santa Claus 🎅

Hello lovelies! Did everyone survive the weekend & any holiday shopping they may have had to do? I certainly survived a crazy Tax Free Weekend. I forgot how crazy Christmas shopping can get, hah. I went to go get a coffee from Starbucks, & the line up was OUT THE DOOR. It was a very busy weekend.

But it’s the first prompt of Glam Nails Challenge December, & I am super excited for another fun festive month of designs. The first prompt of the month? Santa Claus.

I know I have been stamping a lot more lately, but as soon as I saw the prompt I knew just the stamping plate I wanted to use for this design featuring some super cute Santa designs.

The polishes I used for this manicure are: 

  • Base Coat: Essie Hard To Resist Glow & Shine 
  • Top Coat: Sally Hansen Insta-Dri Anti-chip Top Coat
  • Essie The A-List
  • Essie Sweet Souffle
  • Essie Glitter On Top
  • Starrily Vantablack
  • Sally Hansen Miracle Gel Red It Twice
  • Sally Hansen MG Peach Please
  • Sally Hansen MG Ski Bunny
  • w7 Gold Dazzle
  • Nailstuff.ca clear stamper & scraper set
  • Discontinued Born Pretty Christmas plate
  • Small dotting tool (I always use mine from NailStuff.ca — Dotting Tool Trio)

How cute is this little Santa face? I definitely could never be able to freehand a cute little face like that on my own! I’m always envious of people with superior free handing skills. However, thankfully I went on a stamping plate hoarding spree a few years ago, & do I have so many Christmas ones to chose from… which really helps with challenges during this month!

Are you excited for a month of Christmas themed designs? You can follow along with Glam Nails Challenge December on Instagram. There are already so many cool, & fun nail art looks that I know this month is going to be a very exciting month.