SWATCH SUNDAY — OPI My Chihuahua Bites!

Hello lovelies & happy Sunday!

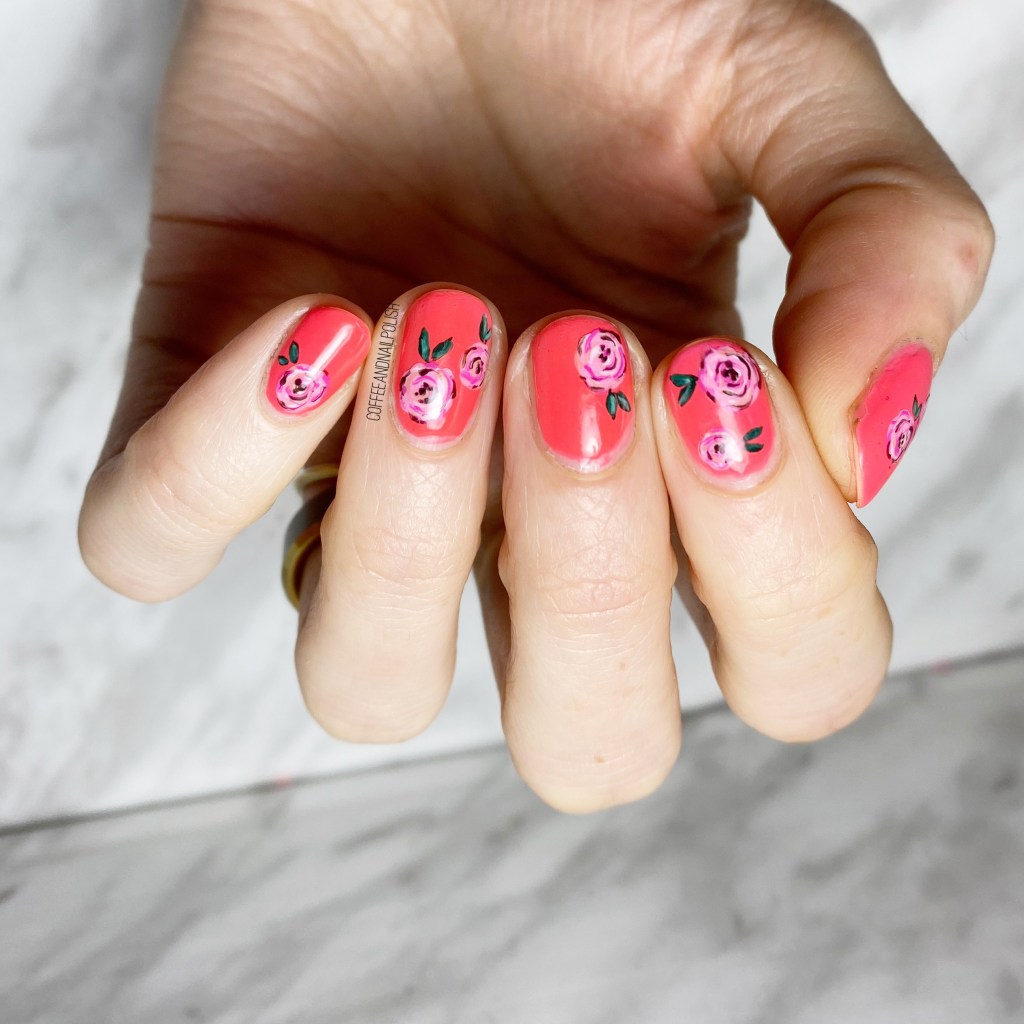
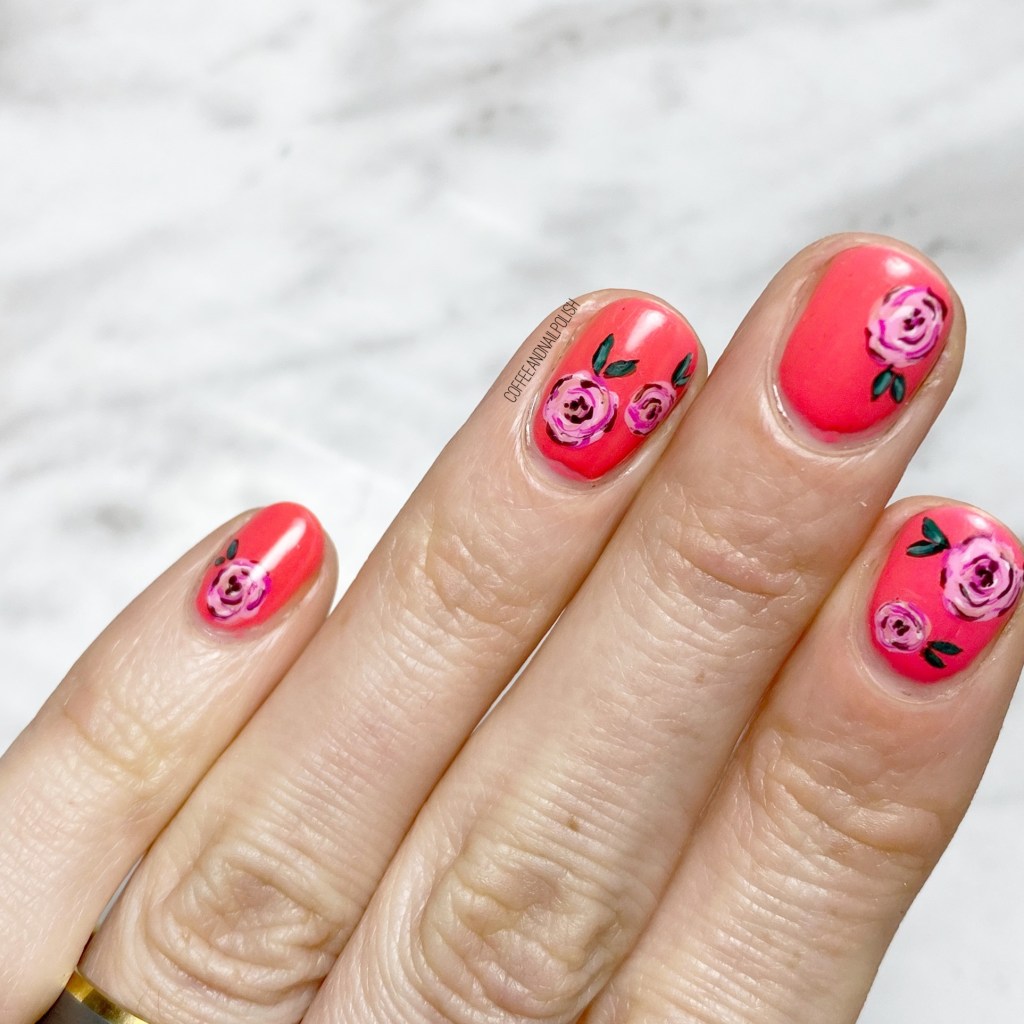
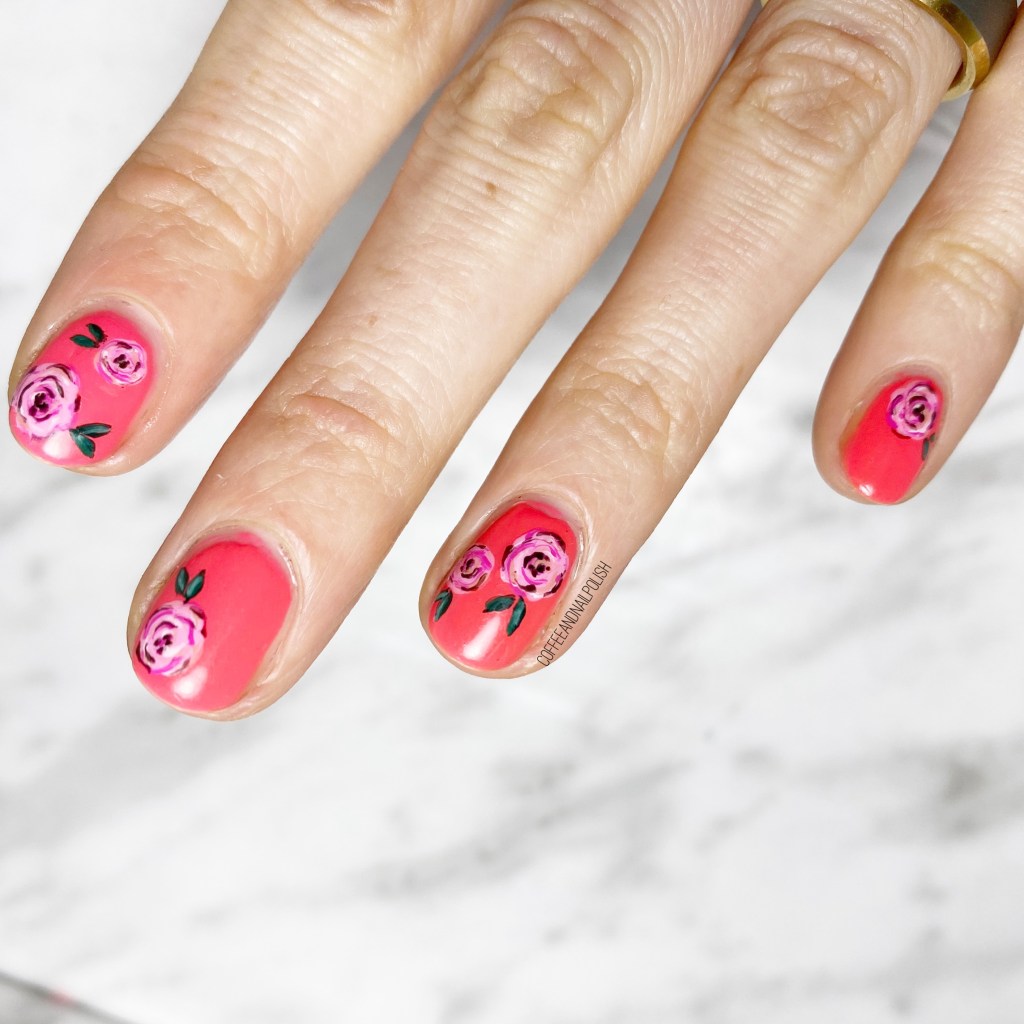
Today I’m pulling one of my favourite OPI shades out of my stash: OPI My Chihuahua Bites! As I’ve mentioned in the past, oh, a million times (roughly), this is one of absolute my favourite coral-y red shades.

2 coats, no top coat

This shade was originally released as part of the 2006 Mexico City collection. I found it at Winners a few years ago, & was very excited because it was on my nail polish wish list.

You’re looking at 2 coats of polish, no top coat. I’m really impressed with the shine without any top coat added. The formula was fantastic—easy to apply, no streakiness. There is a reason why this is my favourite. In fact, I really need to get myself another back up bottle, just in case.

This is an amazing Summer shade. It’s been while since I pulled it out, & I’m honestly glad that I did. We’ve had some seriously crappy, dull weather the last few days so this bright pop of colour is exactly what I need right now.

What do you think of this shade? Are you ready for fun Summer colours? Let me know in the comments below!

Dainty Purple Polka Dots

Hello lovelies & happy Thursday! The weekend is quickly approaching. & I don’t know where you are, but the weather here is starting to really, really feel like Spring. I might even wear a dress to work today!

But in the mean time, I’m showing off some simple & dainty polka dot design. Purple makes me happy, & I always love a dotticure whenever I need a quick, simple look.

For this manicure, the polishes I used were:

  • Base Coat: Sally Hansen Nailgrowth Miracle
  • Top Coat: Essie Good to Go
  • L’Oréal Color Riche Violet Vendome
  • Sally Hansen I ♥️ Nail Art Pen in Purple

Such a simple look, but a classic polka dot look just makes me happy. There is something about a simple look like this that is just so pleasing to the eye. Plus I feel like you can make it match any outfit or occasion—go wild with your colours, or keep it simple.

Also my favourite way to do simple dotticures like this is with my Sally Hansen nail art pens. I discovered these in the early days of my nail art journey, but I still own them, & still use them, especially for a look like this. Makes creating evenly placed polka dots, that are all the same size, so quick & easy. I kind of wish I had more colours, to be honest. I’m not even sure if they still exist to buy anymore!

What do you think about this dainty dotticure? Would you like to see me feature more of these easy manicures? What colour combination should I share next? Let me know in the comments below!

Pink Floral on Coral

Hello lovelies & happy Tuesday! Hope you’re all having a lovely, safe start to your week. Can you believe we’re almost half way through April? I can’t believe how quickly this month is going. & so far, we’ve more or less had beautiful weather.

I’ll take it!

& today I’m sharing another floral look with you! I did this look the other week after snapping off my middle finger at work. It hurt, especially because they’ve completely transformed & were getting so long! So I thought some (more) floral was in order to cheer myself up.

For this manicure, the polishes I used were:

  • Base Coat: Sally Hansen Nailgrowth Miracle
  • Top Coat: Essie Good to Go
  • Color Club Tankini (mood changing nail polish)
  • Orly Scenic Route
  • Sally Hansen Miracle Gel Orchid-ing Aside
  • Sally Hansen CSM Cherry Cherry Bang Bang
  • Sally Hansen Get Mod!
  • Essie Off Tropic
  • Essence The Green & the Grunge
  • Starrily Vantablack
  • NailStuff.ca 7mm detail brush
  • NailStuff.ca Dotting Tool Trio

First off, I love, love, LOVE this Color Club shade. It was another one of those amazing Winners (or, possibly Marshall’s) find. I’ve been absolutely obsessed with these mood (thermal) changing polishes since my late 2009 Claire’s days when I had to buy all of them! The shift on this shade is subtle, but either way the colour is GORGEOUS & I’m kind of obsessed. Very perfect for Summer.

Second, this floral turned out so pretty. Nothing like a little bit of girlie nail art to cheer yourself up after a bad break. I was going for a bit of a cartoon-y floral, & I think I achieved what I was trying to do!

What do you think about this floral on my new shorties? how do you cope with a bad, bad break? Let me know in the comments below!

Pretty & Bright Spring Floral

Hello lovelies & happy Tuesday! Can you believe it’s Tuesday already? Hope everyone had the most lovely weekend. I was so into family time this weekend, that I totally forgot that yesterday was Coffee & Nail Polishes’ 7th birthday! So happy birthday to this fun little blog of mine. 🥳👑🎂

I would say I celebrated with cake, but all I wanted after the last 4 days was a huge salad.

But today I have another Spring floral to share with you! Will floral ever get boring to me? Nope! It’s still my absolute favourite design to do, & that hasn’t changed in 7 years.

For this manicure, the polishes I used were:

  • Base Coat: Sally Hansen Nailgrowth Miracle
  • Top Coat: Essie Good to Go
  • Icing Matte Effect 60217
  • Sally Hansen Good Kind Pure Peony Origins
  • Sally Hansen Good Kind Pure Eco-Rose
  • Sally Hansen Insta-Dri Racing Rose
  • Essie Check Your Baggage
  • Sally Hansen Miracle Gel Get Mod
  • Sally Hansen I ♥️ Nail Art pen in Purple
  • Essie Go Ginza
  • Essie Off Tropic
  • Essie First Timer
  • Essence The Green & The Grunge
  • NailStuff.ca 7mm detail brush
  • NailStuff.ca Dotting Tool Trio

So, so many polishes but the end result is absolutely perfect. The colours are so bright & eye catching, which is my favourite kind of floral. We’ve had way, way too many days of clouds & rain, so we could really use some bright & sunny days. Maybe this manicure will encourage Mother Nature a little bit to send some sunshine our way.

&, if not, at least there is a little bit of sunshine on my nails to cheer me up.

What do you think about this design? Are you sick of the floral yet? (I hope not!) let me know all your thoughts down in the comments below! & share what Spring nail art trends you’re loving right now.

Negative Space Colour Blocking

Hello lovelies & happy Thursday! 💜Hope everyone is enjoying their week (& hopefully everyone is ready for the Easter bunny this weekend).

Today’s look is one I did last week on a whim, which I actually totally ended up loving. I used to do these negative space colour block designs a lot around Spring/Summer 2016, & I think it’s about time I bring them back!

For this manicure, the polishes I used were:

  • Base Coat: Sally Hansen Nailgrowth Miracle
  • Top Coat: Essie Good to Go
  • Sally Hansen Miracle Gel Get Mod!
  • ORLY Scenic Route
  • Starrily Vantablack
  • NailStuff.ca 16mm Striper Brush

Like I had mentioned, I did this manicure on a whim. I had started another design, mucked it up, & then had needed something quick to do. & I’m so glad I decided on these! I ended up getting so, so many compliments on them while at work, which is kind of the reason I’m thinking I should start rocking them more!

I did everything freehand—mostly because I was short on time, & didn’t feel like waiting for multiple layers to dry. & I really really love the end result. Just a fun, simple look that anyone can wear, with any length nails. & I’m going to prove it because I just had a major nail catastrophe, I’m back to itty bitty short nails.

So stay tuned!

What do you think about this nail art look? Would you wear a colour block design like this? What colours would you pair together? Let me know all your thoughts in the comments below!