Neon Saran Wrap Splatter

Hello lovelies!

It’s Thursday—almost the weekend. Unless of course your entire province is in lockdown & time no longer has any meaning. But that just means more time to paint my nails, right?

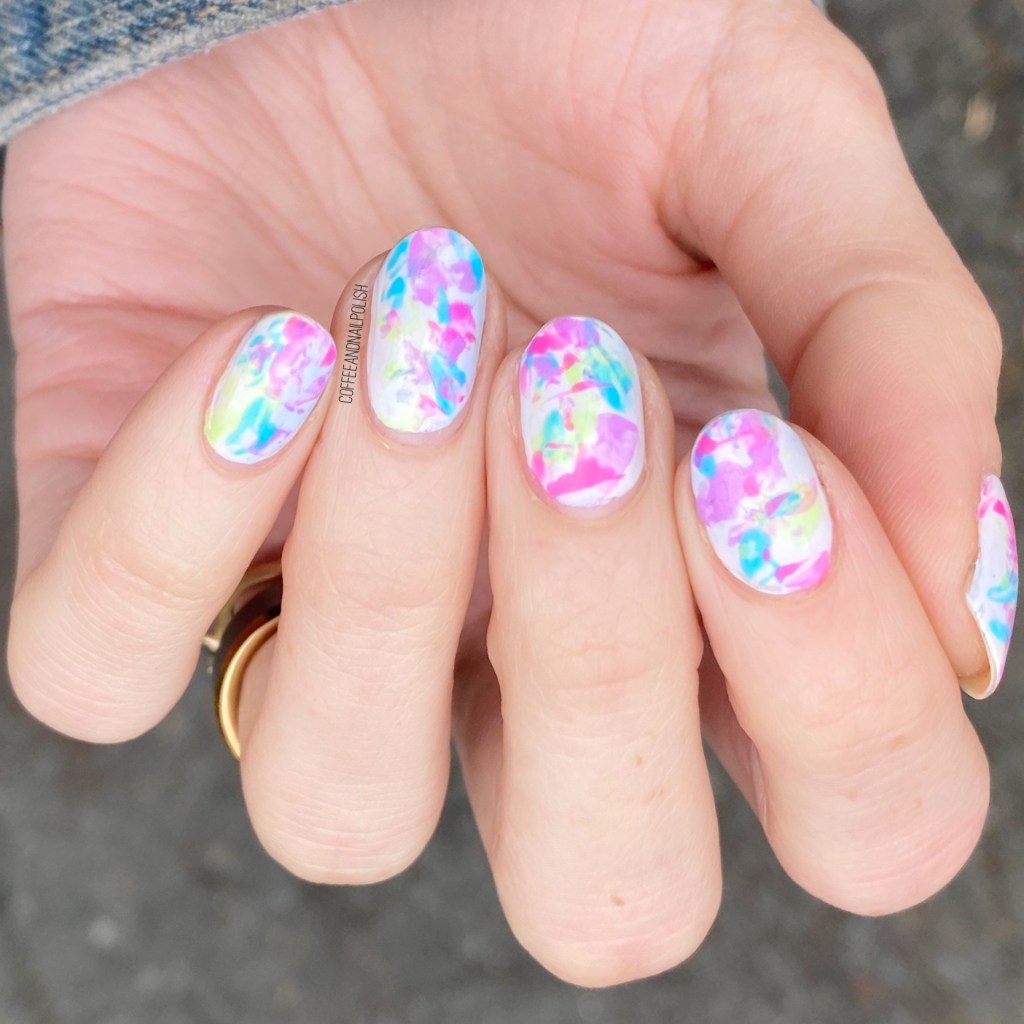
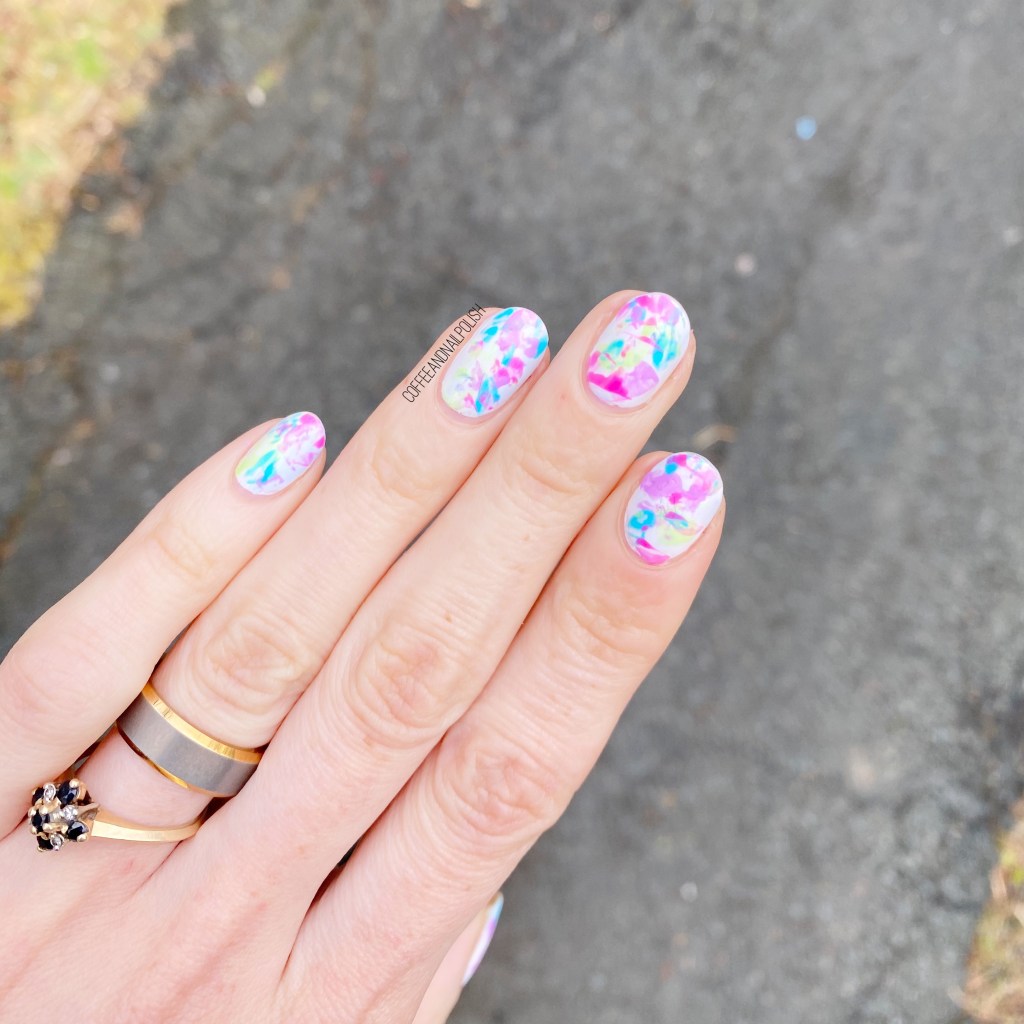
Today’s look is a throwback to one of my favourite styles — the Saran Wrap splatter. It’s no secret how much I LOVE this style, & since our days are feeling a bit more Spring-like, I needed some neon!

For this manicure, the polishes I used were:

  • Base Coat: Sally Hansen Nailgrowth Miracle
  • Top Coat: Essie Gel Setter
  • Sally Hansen Miracle Gel Pretty Peony
  • Sally Hansen Miracle Gel Violet Voltage
  • Sally Hansen Miracle Gel Miami Nice
  • Sally Hansen Miracle GelElectri-Lime
  • Sally Hansen Miracle Gel Fuchsia Fever
  • Crinkled up plastic wrap

Oh man, I know this neon collection is 2 years old, but holy it is one of my all time favourite Sally Hansen collections. It’s just so bright & beautiful & I adore it. I never get tired of creating looks with it, & I’m actually shocked I hadn’t done a splatter look with it yet. Definitely an oversight. Also I like how this splatter reminds me of tie dye — I know the tie dye nail hype kind of died down a bit (no pun intended), but I still love all things tie dye. In fact, I’ve very recently found TWO tie dye shirts in the kids section at the thrift store that fit me, & I’ve been wearing them non-stop.

What do you think about this neon saran wrap splatter design? Are you feeling these neons? Do you own this neon collection from Sally Hansen, & if not, which neon nail polish collection is your favourite? Let me know in the comments below!

Rainbow 🌈 Nails

Good Morning Lovelies & Happy Monday. Today I have a special manicure to share with you in honour of it being Pride Week in Halifax right now — some rainbow nails. This past weekend, I went out to celebrate & attended my very first Drag Show ever! So in honour of that, I wanted to create a design bright & colourful, & with a touch of glitter.

For this design, the polishes used were:

  • Base Coat: OPI Nail Envy
  • Top Coat: Essie Speed Setter
  • Sally Hansen CSM Let’s Snow
  • Sally Hansen MG Just Maui’d
  • Sally Hansen MG Bourbon Belle
  • Sally Hansen Xtreme Wear Mellow Yellow
  • Essie First Timer
  • Quo by ORLY Pep in Your Step
  • China Glaze Fairy Dust
  • Latex Free Make Up Sponge
  • Wet n Wild Clear Polish
  • This design was super simple to create. I started off with a plain white base (my current favourite White polish!) & then sponged each colour over top of the white. Next I took a clear nail polish that would streak the colours together & repeatedly brushed over the nail so they blended. This is a trick I like to use with gradients, sponged looks & dry brushes because it blends them together really well (especially good with gradients!) & then I finish with actual top coat after. I also felt like this design needed a little bit of glitter, so I added some fairy dust as well.

    I really love this combination of colours & the rainbow-ness of it. It was the perfect design for the awesome night I had out dancing! I’m very proud to live in a city which can celebrate Pride with such festivity & inclusivity. There really is an event for everyone!

    What do you think of my rainbow nails? 🌈 Have you ever attended a drag show before? Share you comments down below & let me know what you think!

    31 Day Nail Art Challenge — Day 9: Rainbow nails.

    I’ll start by saying this nail art was inspired by my three year old nephew.

    I was babysitting the other night, trying to decide what I was going to do for my rainbow nail art challenge. I thought about doing just rainbows, but as you might have noticed, I don’t always going typical with my challenge prompts. My little nephew was looking at my stash the other night–he is adorable when it comes to my nails. He always asks to look at my nails, and is very vocal when he doesn’t like them haha–and asked him what colors I should do on my nails. And he listed them off–blue, yellow, pink, red, green. He might have just been listing off the colors he knew, but never the less I did what he told me!

    rainbow nails

    The polishes used were:

    • OPI’s My Boyfriend Scales Walls — the white base.
    • Sally Hansen Xtreme Wear in Mellow Yellow— the yellow.
    • ACO by Ardene in Techno Green — the green
    • ACO by Ardene in Lagoon –the blue
    • ACO by Ardene in Sunkissed –the orange.
    • ACO by Ardene in Strawberry Blush — the red
    • ACO by Ardene in Ardene’s Secret — the pink.
    • Stripe Rite striping brush in Black — the black outline.
    • Sally Hansen Diamond Flash top coat.

    I love these nails because it looks like a coloring book to me.

    This manicure was not as difficult as you’d think. After applying my base coat, I started with a blank canvas of My Boyfriend Scales Walls, then added top coat. After that had dried, I started with my black striping polish, creating a different pattern on each nail (you could also do the same pattern on each nail, but I like to shake things up a bit.

    mosaic

    After my outline was created, I then went with a small nail art brush (from Icing), and colored in some of the shapes with my variety of chosen colors. I did have to go back with my black, and touch up some of the lines were the colors had bled a little bit. When that was all finished, I topped with my trusty top coat and tada! Rainbow coloring book nails!

    I think my nephew would be proud.