GlamnailschallengeDec— Snowflakes ❄️

295D3F82-9BCB-4A72-B323-B61C9863E1F9

Good morning lovelies & Happy Wednesday! We’re already halfway through our week, how crazy is that?! & even crazier we’re almost half way to Christmas! (I haven’t even begun to process the fact this year, no DECADE, is almost over…) Today I have another manicure to share with you as part of #glamnailschallengeDec — Snowflakes!

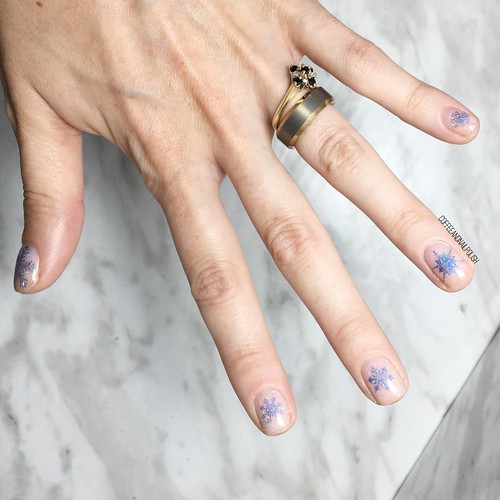
Snowflake designs are actually one of my favourite nail art looks for this time of year, because there are so many ways to create snowflakes: stamping, stickers, freehand, & even just glitter! For today’s look, I decided some more stamping was in order because I have about 5 different stamping plates with snowflakes on them. I really wanted to feature one snowflake per each nail & I love how these turned out because they remind me a lot of Frozen. ❄️

30922547-10AF-4821-8253-B5E14F868D79

656FC76D-444E-4F24-BDFB-1A4DFC92BD9C

For this manicure, the polishes I used were:

  • Base Coat: Sally Hansen Complete Salon Manicure Strengthening Base Coat
  • Top Coat: Essie Speed Setter
  • Quo by ORLY Breathable Kiss Me I’m Kind
  • Sally Hansen Xtreme Wear Ice Pop
  • ACO by Ardene Style Icon
  • Superchic Lacquer Throwing Shade (c/o: NailStuff.ca — COFFEE10 to save 10%)
  • Nailstuff.ca clear stamper & scraper set 
  • Assortment of BornPretty stamping platesthis one has an assortment of similar snowflake images.

.

20866F10-C3D4-45F0-BA6E-C6CE21C837EF

63583769-6AFD-4338-8C11-791FCD5E0B91

B5590443-2DBB-4488-8D4D-9ADB83892420

I started this look off by creating a glitter sandwich using Kiss Me I’m Kind, Ice Pop & Style Icon. I wanted a really soft, delicate base for my snowflakes. If you don’t know what a glitter sandwich is, basically you start off by applying a layer of jelly/sheer polish, a layer or two of glitter & then finishing it with another layer of your jelly/sheer polish over your glitter. It really gives the glitter a softer look, which I love. It looks really beautiful all on it’s own or as the base for nail art. I thought it would be perfect for this particular design because it gives the effect of snow in the background (or at least that’s what it reminds me of.)

EE2C064B-596F-42C4-AAFD-FA775BF0AB3A

1CB11F12-791C-44E5-B92E-24A72B5AC10E

Victoria (aka @nailstuffca) was the one who told me how amazing the Superchic polishes were for stamping, which is why I grabbed Throwing Shade for my snowflakes, & she was so right! I was very impressed with how well it showed up on my nail, especially because I had such a light base to start. I can’t wait to try again over a darker base colour (a navy blue such as Essie Bobbing for Baubles perhaps? Stay turned!)

Seriously though, can you go wrong with holo snowflakes? I really don’t think you can! Who doesn’t want to feel like an Ice Queen.

A07541D0-8E44-4597-AE10-5DBDEC97C659

Who else loves a good snowflake design? I really really love wearing snowflakes on my nails, especially when the actual white stuff seems to be keeping its distance. It just doesn’t really feel like Christmas to me, until there is a little snow on the ground.

As always, don’t forget to check out #glamnailschallengeDec over on Instagram to see everyone’s fun snowflake looks. & stay tuned, because there are still a ton of fun designs to come!

SWATCH SUNDAY — Sally Hansen Miracle Gel Holiday 2019 {Oh My Gold}

5389D1C1-7179-4690-8E26-854150A632A5

{PR sample}

Hello lovelies! Not only is it one of my favourite days of the week — Swatch Sunday — but even more exciting… the Holiday nail polish collections have started popping up! & Sally Hansen Canada, bring the sweethearts that they are, sent me their brand new Holiday 2019 Oh My Gold! Collection.

The Oh My Gold! Collection is a limited edition collection consisting of 3 gold polishes — one metallic gold with chunky Holo glitter (Goldie Rocks), one dense gold glitter (Good as Gold) in a clear base & finally a sheer gold base with a scattered holo glitter (Five Golden Blings).

60621799-97C5-40CA-A6A9-2C493E8C0778

& now onto the swatches!

Continue reading “SWATCH SUNDAY — Sally Hansen Miracle Gel Holiday 2019 {Oh My Gold}”

SWATCH SUNDAY — OPI DS Extravagance

F7BBADF5-D27C-4297-8B16-09289C5D3B74

C8633C1B-B50A-402D-8A3B-1653B7FB724E

Hello lovelies & happy Sunday. This is my first swatch post since my disastrous nail break last week, so obviously I need to pick something stunning to share. & Today I’ve got one of the most beautiful polishes I own, & one I always pull out this time of year–OPI Designer Series Extravagance. This polish was a birthday gift given to me 5 years ago, & I love to wear it in October on or around my birthday.

The OPI Designer Series was a collection of polishes (that are now discontinued I do believe) that were a step above OPI’s regular polish line. A lot of them had holo glitter & flakies to give them a special touch. Extravagance was my first polish from this line, so it holds a special place in my heart. It was also one of the first holos I ever owned, & helped me fall in love with holographic nail polish.

B3F2CF27-3F7D-47CF-9571-FFA80135AE5B

44FCF879-8038-4EBF-B72B-BB05048B7A8F

For my swatches, I did base coat, 2 coats of polish & finished it off with YSL Beauty Quick Dry Top Coat. I’m planning on doing a full post on this top coat, but oh boy am I loving it so far. It dries SO QUICK you guys, like I almost can’t believe it. It might actually be the quickest quick dry top coat I’ve ever used.

The formula on this polish is pretty damn awesome. First coat goes on not quite opaque, & the second coat gives your nail a beautiful sparkly finish. It’s slightly jelly like, but not quite as much as say China Glaze Private Side-Eye. The glitters are so dense though, which is what makes this shade just so beautiful. Literally, it turns your actual nails into gemstones & I love it.

0B53773A-F34C-4DF4-AE15-5295A81CCB93

E123B330-10D4-4A34-9700-769AD14E07F1

Even though I do believe this collection has been discontinued, you can see find the polishes available in some places like nailpolishcanada.com & amazon, as well as a few other places they sell OPI I’m sure.

I must say, I don’t officially have a list of all time favourite polishes but if I were actually to sit down & compile one (which I’ve been thinking about doing), this shade would definitely be on it! There are only a few polishes I’ll ever truly wear on their own without even thinking about nail art, but Extravagance is definitely one. It’s just too perfect. 💗

C3574DF1-560D-4A97-AB45-985DEEA21E78

What do you think about OPI DS Extravagance? Do you own any shades from the Designer Series collection & which is your favourite? Let me know all your thoughts down in the comments below!

Holo Geode Nails for #glamnailschallengeaug

9019B4B4-162E-4C6F-9482-29BAFF101F08

Good morning lovelies! Hope everyone is having a fantastic Wednesday. I can’t believe how quickly August is speeding by… Pumpkin Spice season isn’t so far off now. & we’re slowly creeping towards the end of the Glam Nails Challenge for August with only 3 prompts left!

Today’s prompt: Geode.

There are a ton of ways to do geode style nails, so I wanted to think about which one I wanted to use. I decided my abstract stripe design was my favourite way to create geode looking nails, & I decided that I wanted to use a fun holo powder that I bought from Born Pretty Store, & had totally lost in my nail polish room.

C03AD979-32CD-42D8-9EEB-25933C0EA563

F5CC8490-D612-4F2C-ADA1-809B17FF74F2

For this manicure, the polishes I used were:

  • Base Coat: OPI Gel Break
  • Base Coat: Quo by ORLY Bonder
  • Top Coat: Essie Gel Setter
  • Finger Paints Peel Off Base Coat
  • ACO by Ardene Nearly Nude
  • Born Pretty Store holo powder (no longer available)
  • Kiss Products Nail Art Striper in Black
  • Kiss Products Nail Art Striper in White

084DF46D-1C30-4588-8683-7328D7D6E003

40EBC830-7B98-4479-B51E-FFAD7529C2FB

I had an idea in my head for how I wanted this design to look, with the pink holo popping against the black & white lines, with a nude-ish background, & I think it turned out pretty much like I imagined. I really, really like this holo powder too–sad that it’s no longer available on the Born Pretty Store site–although they do have a few similar ones like this & this.

I seriously always forget just how much I love nail art powders until I start playing with them again. Also this was my first excitement with applying the powder in just sections of the nails using my usual technique with using Finger Paints Peel Off Base Coat & it turned our perfectly!

8D33C16E-DF0B-4F30-B5C0-FDED0E7F5551

445F2DA0-4523-4D98-B787-14DFD5C98A38

Ooooh, I can’t stop starting at that holo. It’s especially impressive in motion with the holo flakies & pink sparkle. So much fun to wear! Also I feel like this pink is also still very Summery, which is a nice change from the darker Fall shades I’ve been craving lately.

& they’re even more beautiful in the sunshine!

8852F53F-3247-4C74-86AE-1C10DE94949F

What do you think of this design? Do these look like geode to you? Remember to check out #glamnailschallengeaug to see everyone’s amazing manicures!

My Nails & My Cup — Holo Gradient Nails

Are you guys sick of the holo yet? I certainly hope not because I have another mani to share–this time I created a Holo gradient to match my new-ish tumbler that I picked up at Claire’s on clearance for $2. It came with cute little manicure tools inside, so I had to have it!

I posted on Instagram the other day what nail art I should do on my naked nails, while holding the above cup, & received an overwhelming amount of responses saying I should match my cup… so that’s what I decided to do!

For this manicure, the polishes I used were:

  • Base Coat: Sally Hansen Green Tea & Bamboo Strengthener
  • Top Coat: Seche Vive
  • China Glaze BFF
  • Color Club Eternal Beauty
  • China Glaze 2Nite
  • Quo by ORLY Falling Star
  • Latex free make up sponge
  • Creating the holo gradient may have been one of the easiest gradients I’ve ever done! I don’t know if it’s the sparkle or formula or what, but I was as to sponge on each colour separately (which kept from making a big old mess around my cuticles) & they blended together seamlessly!
  • I know the cup has a whole bunch of rhinestones, but I definitely did not have enough on hand to apply to my fingers (or enough colours that would match) so I decided a couple coats of a scattered holo top coat could give a similar look, so I grabbed Quo by Orly Falling Star because I find the glitters larger than some of my other holo toppers (like China Glaze Fairy Dust). Gave off just enough extra sparkle on the nail without being distracting!
  • so what do you think of the holo gradient? Which colour combination do you think I should try out next? Share your thoughts down in the comments below!