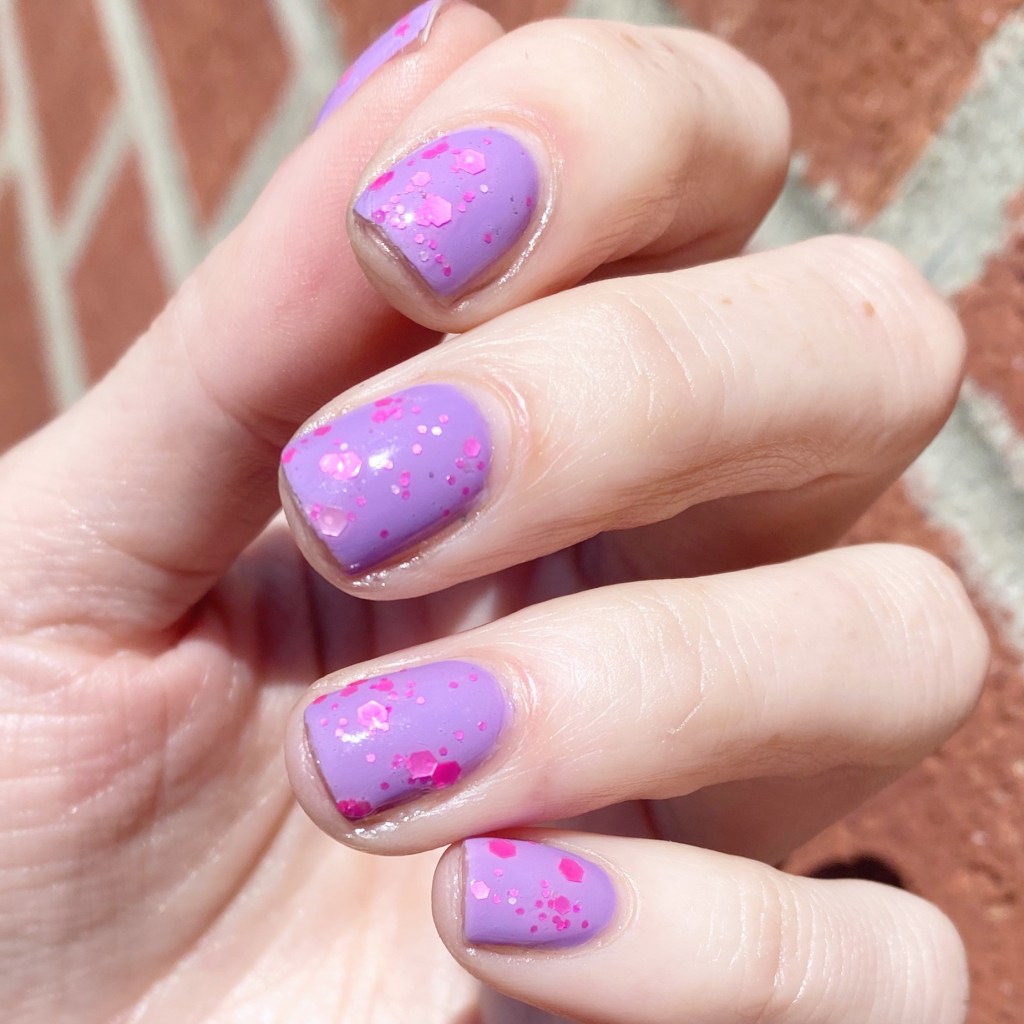
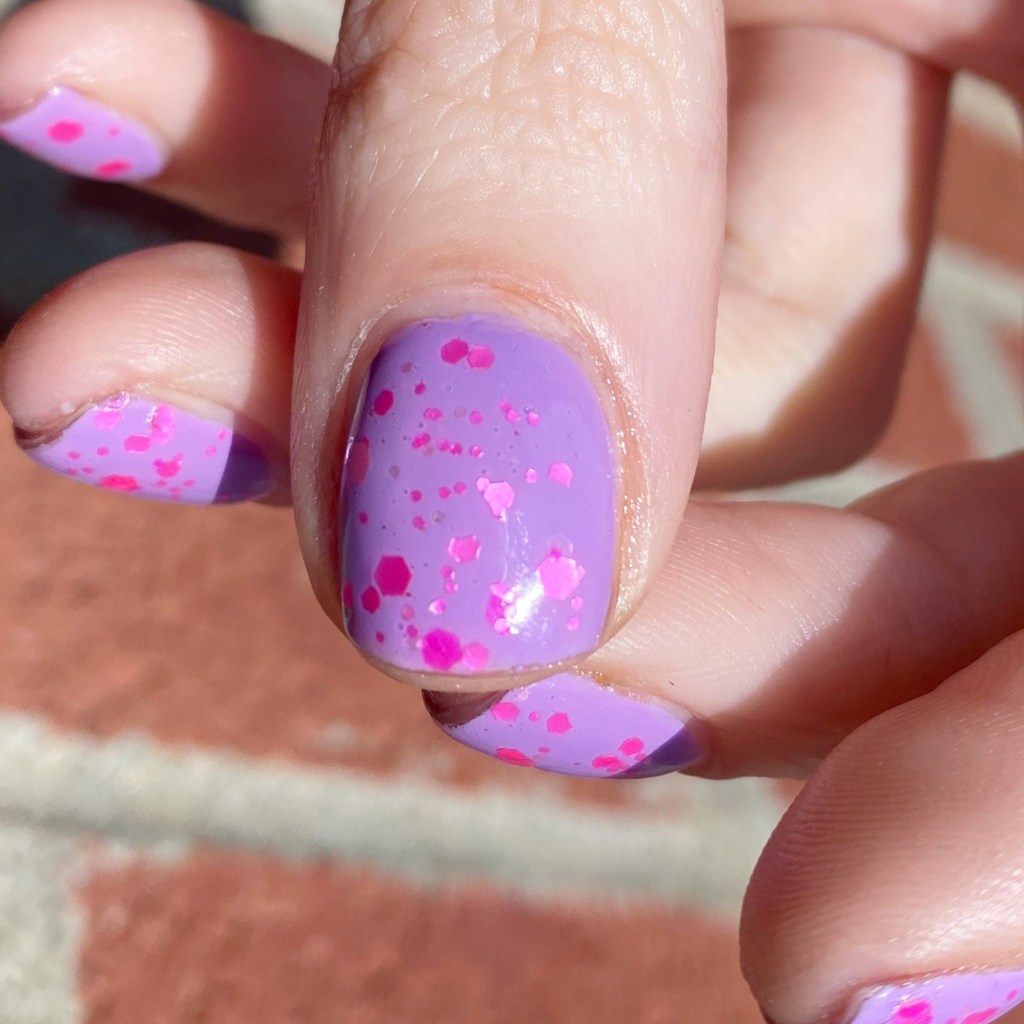
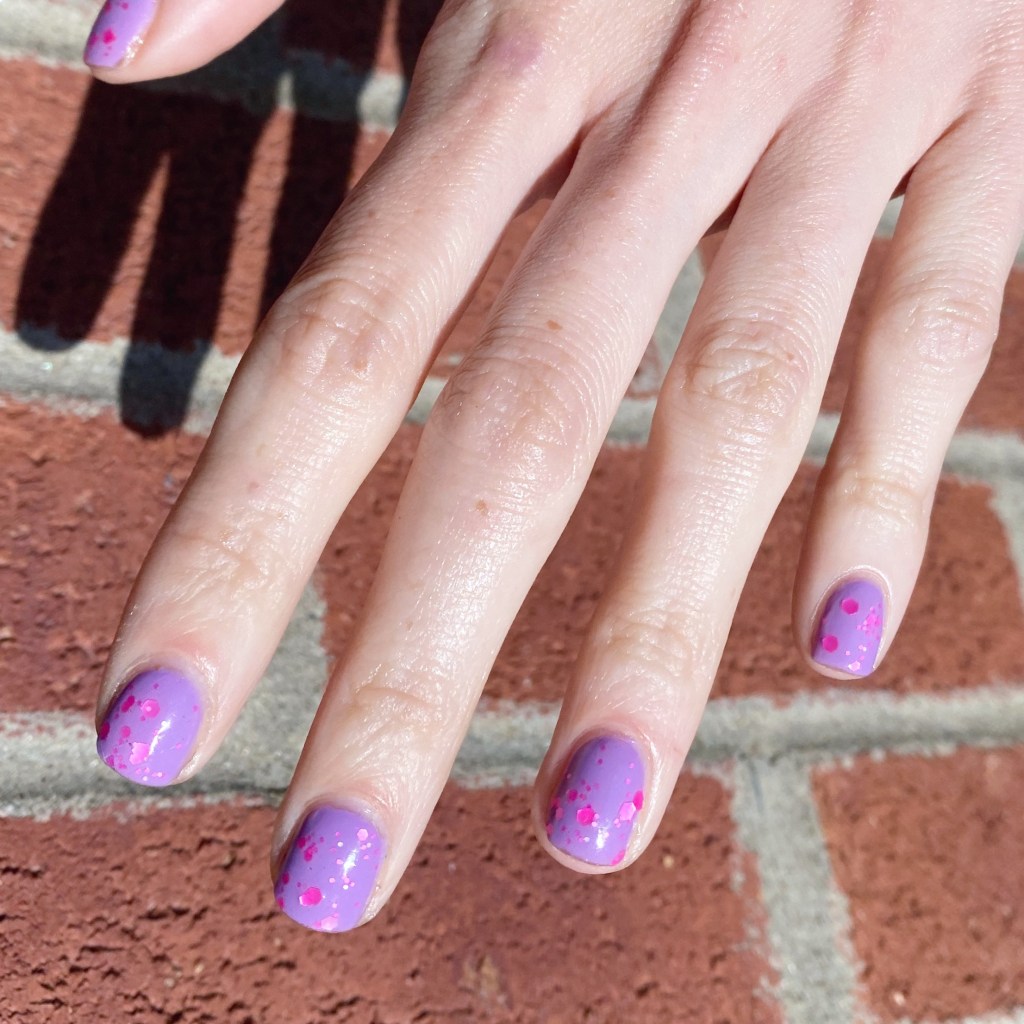
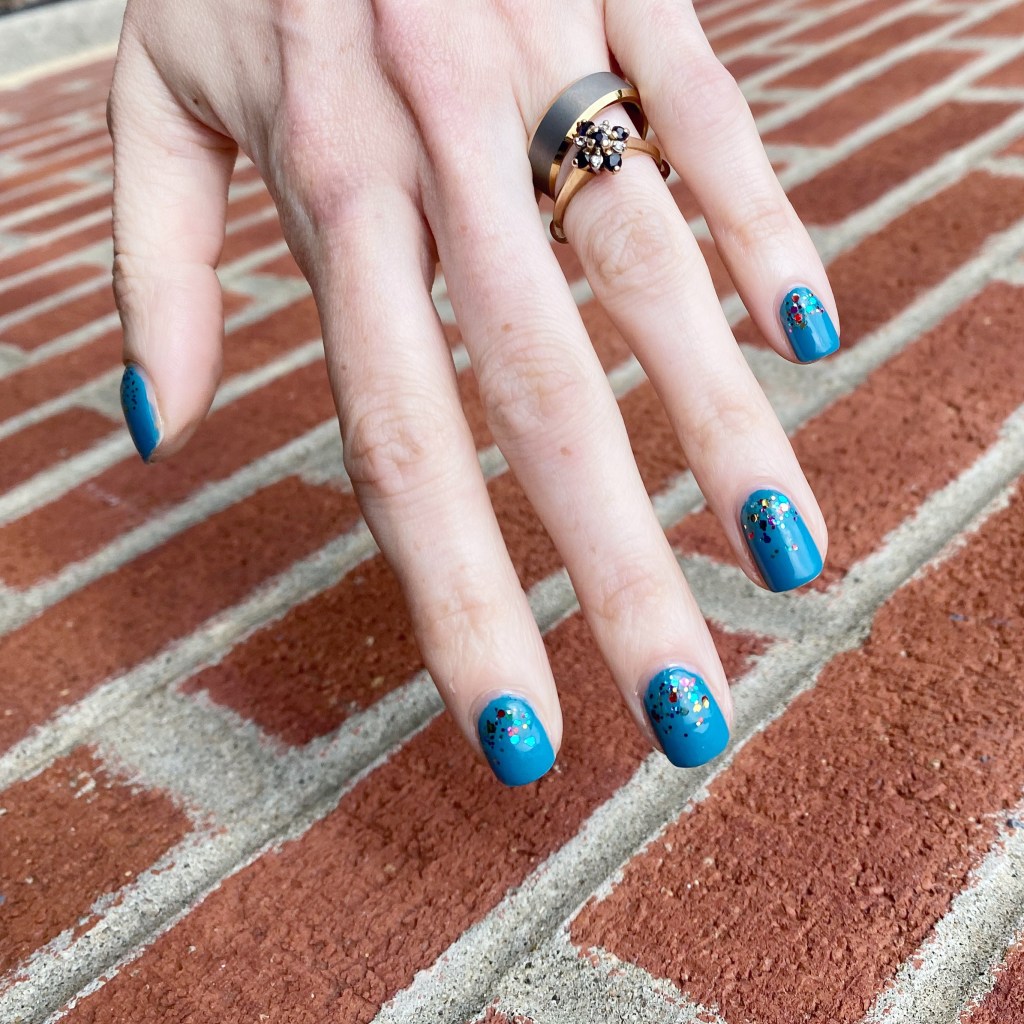
It’s a beautiful sunny Summer day here, & I feel like these nails are perfect for a Summer day. I actually wore this look most of the week, which is very unusual for me, so I figured I had to share! It’s a simple look, but also is a little extra fancy compared to just a plain design. & it’s giving me serious Barbie vibes.
The polishes I used for this manicure are:
Base Coat: Londontown KUR Nail Hardener & Base Coat
Top Coat: Seche Vive Fast Dry
Essie Worth the Tassel
ACO by Ardene Pop To It
I was actually debating which glitter I should apply over Worth the Tassel, as I have a few neon glitters from Ardene. But as soon as I applied this pink, I knew I made the right decision. & come on, you can totally picture Malibu Barbie wearing this manicure!
What do you think of this glitter look? Would you rock a Barbie-esque manicure like this? Let me know your thoughts down in the comments below.
Good morning lovelies & happy Monday! A beautiful, sunny & warm Monday. It’s feeling like Summer today, & I’m loving every moment of it.
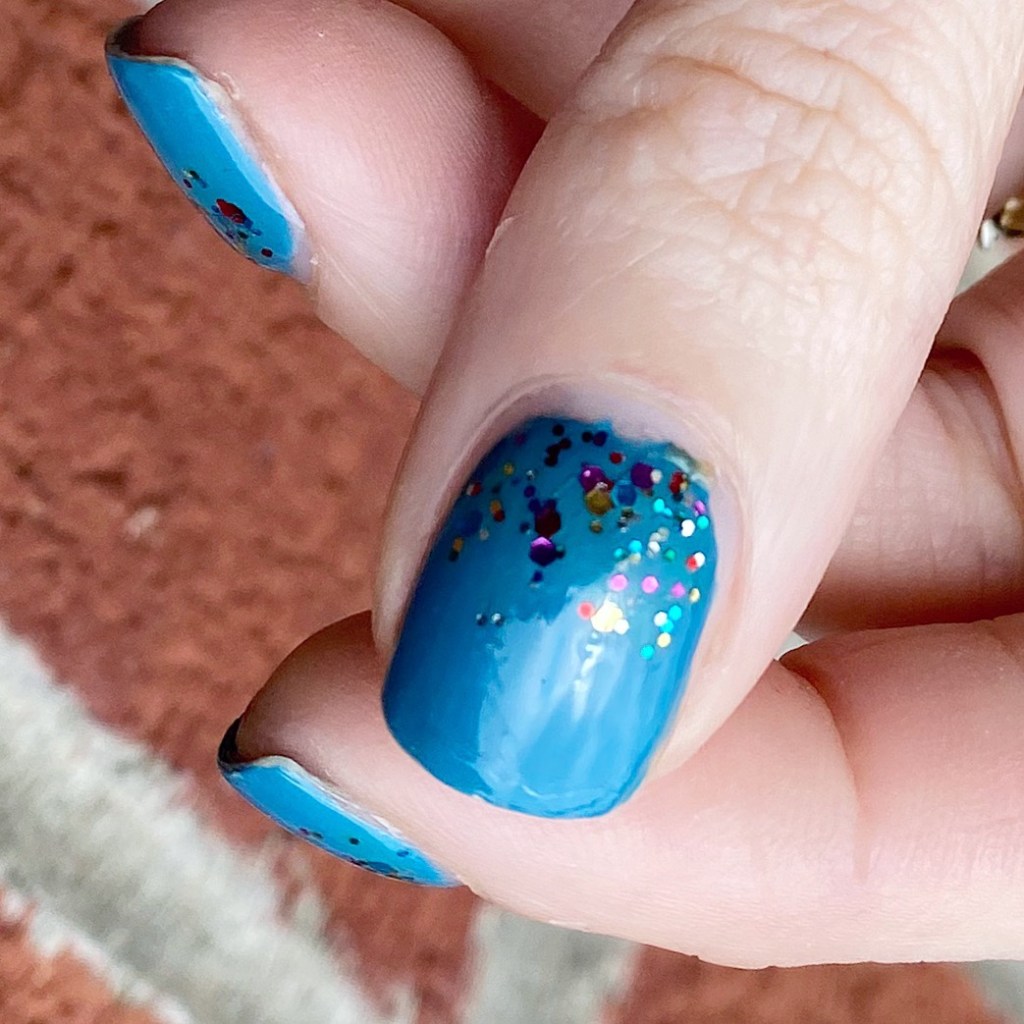
Today I gave a super simple, easy nail art look that anyone can do! I love a good glitter gradient, & it is such an easy way to spruce up a relatively plain manicure.
The polishes I used for this manicure are:
Base Coat: Londontown KUR Nail Hardener & Base Coat
Top Coat: Seche Vive Fast Dry
Essie Revenge’s A Beach
Sinful Colors Pride
What I love most about a glitter gradient is you don’t really need any tools. Obviously, you can sponge on the glitter, but I usually just apply it using the brush as I find it easiest (& least messy).
These are definitely the look you need to do if you have a special occasion you want fancy nails for, but aren’t too comfortable with nail art. I swear, anyone can rock this look easily! In fact, I’m already planning another one in my head featuring a few glitters I don’t use too often — stay tuned!
What do you think about this fun glitter gradient? Also yes — that is the same polish from yesterday’s Swatch Sunday post. Crazy how different lighting can make it look different! Natural light vs Light Box.
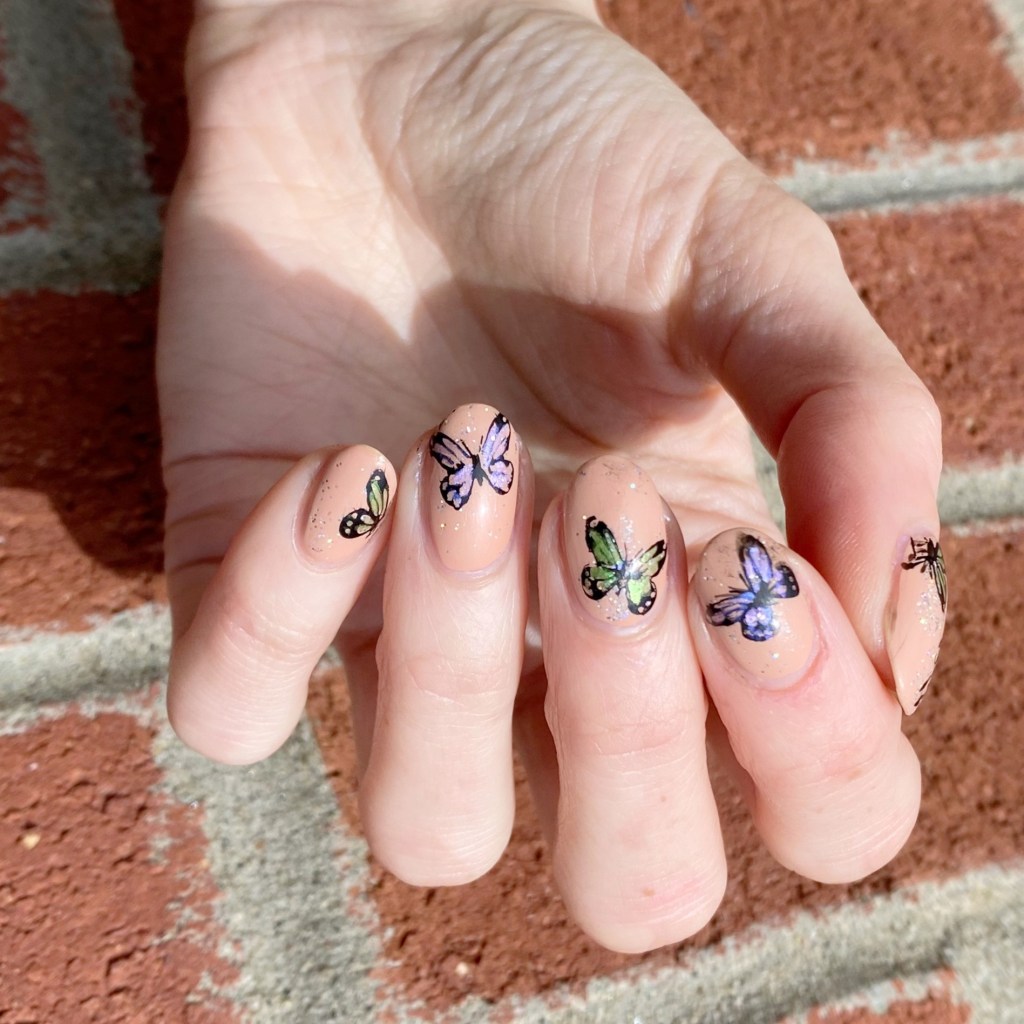
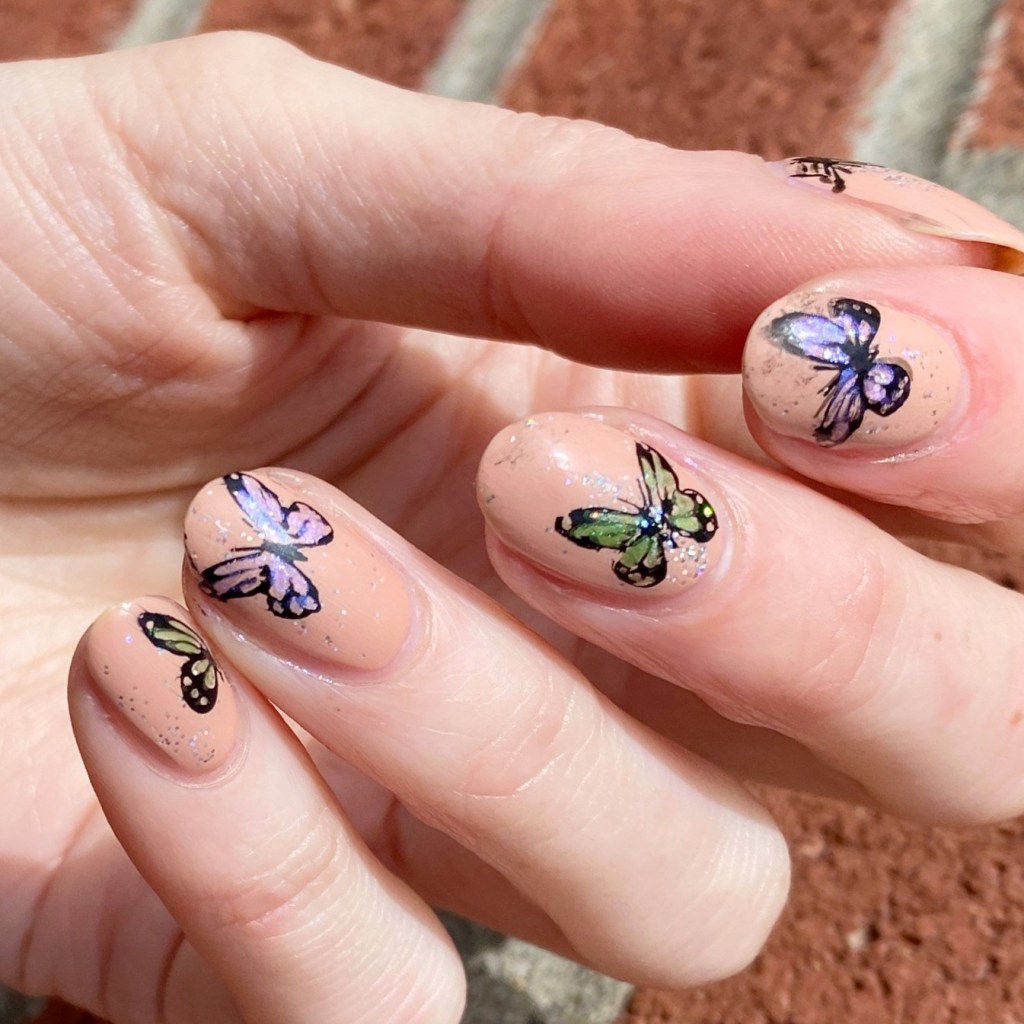
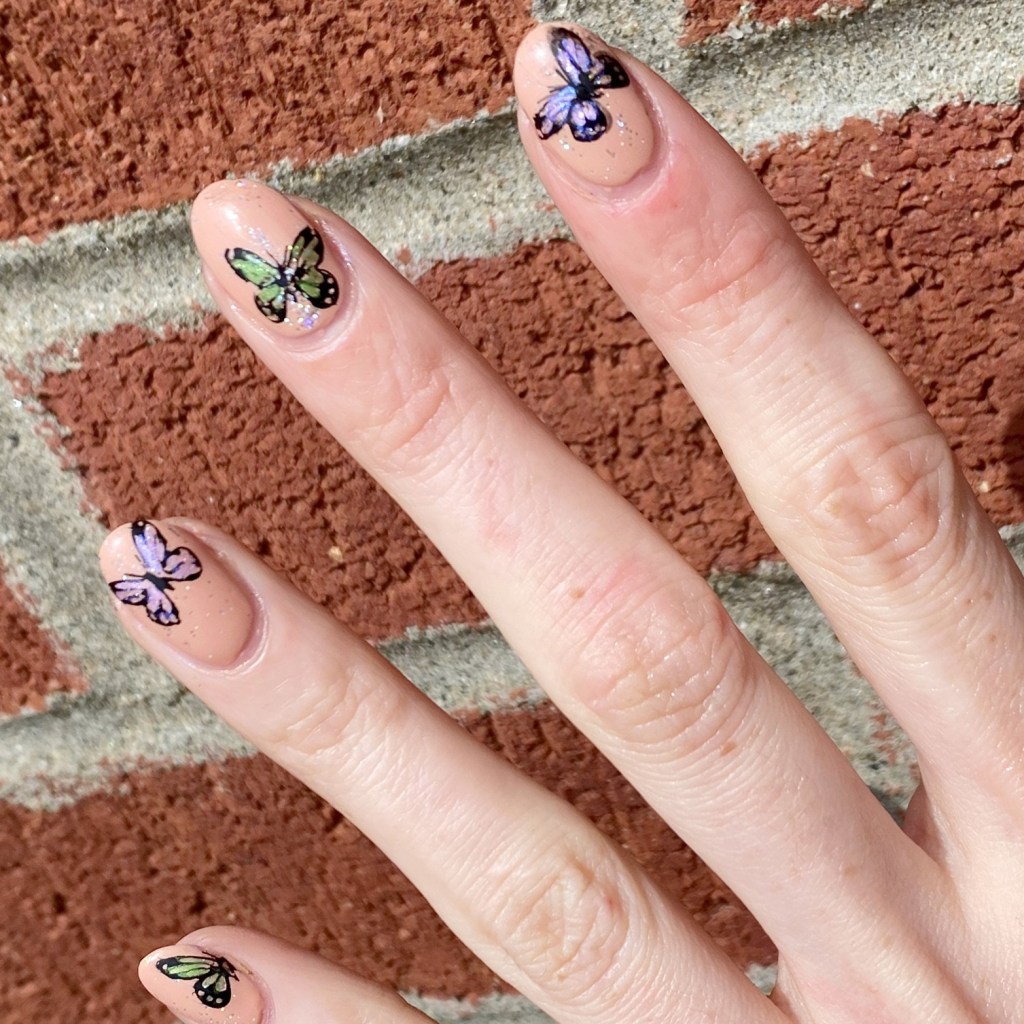
Hello lovelies & happy May 1st! Can you believe we’re almost half way into this year? It’s crazy. But before I jump head first into a new month, I want to finish off Glam Nails Challenge April with the last prompt — Butterfly.
There were so many ideas that popped into my head with this prompt, but in the end I decided I wanted to do a neutral, almost naked, base with a little sparkle & shimmery butterflies. & I’m so beyond happy with the end result.
Unknown stamping plate (which I bought as part of a set at Dollarama years ago.)
How pretty did these turn out. I just knew I wanted my butterflies to have a little bit of colour & I adore the shimmery purple & green together. It’s a very pretty combination. Works very well with the little bit of holographic glitter on the base shade. It’s subtle but also eye catching at the same time.
I’m kind of obsessed!
I can’t believe another month is behind us! Kind of crazy. I had so much fun with the challenge this month, & I hope you enjoyed all the manicures too!
Did you have a favourite design? Let me know in the comments below.
Hello lovelies & happy Sunday! The first Sunday of April at that — can you believe it? I mean, I feel like I’m always saying this, but I can’t get over how quickly this year is passing. I’m happy that we’re that much closer to Summer dress weather, but wow… this year is already 1/4 over! That is crazy.
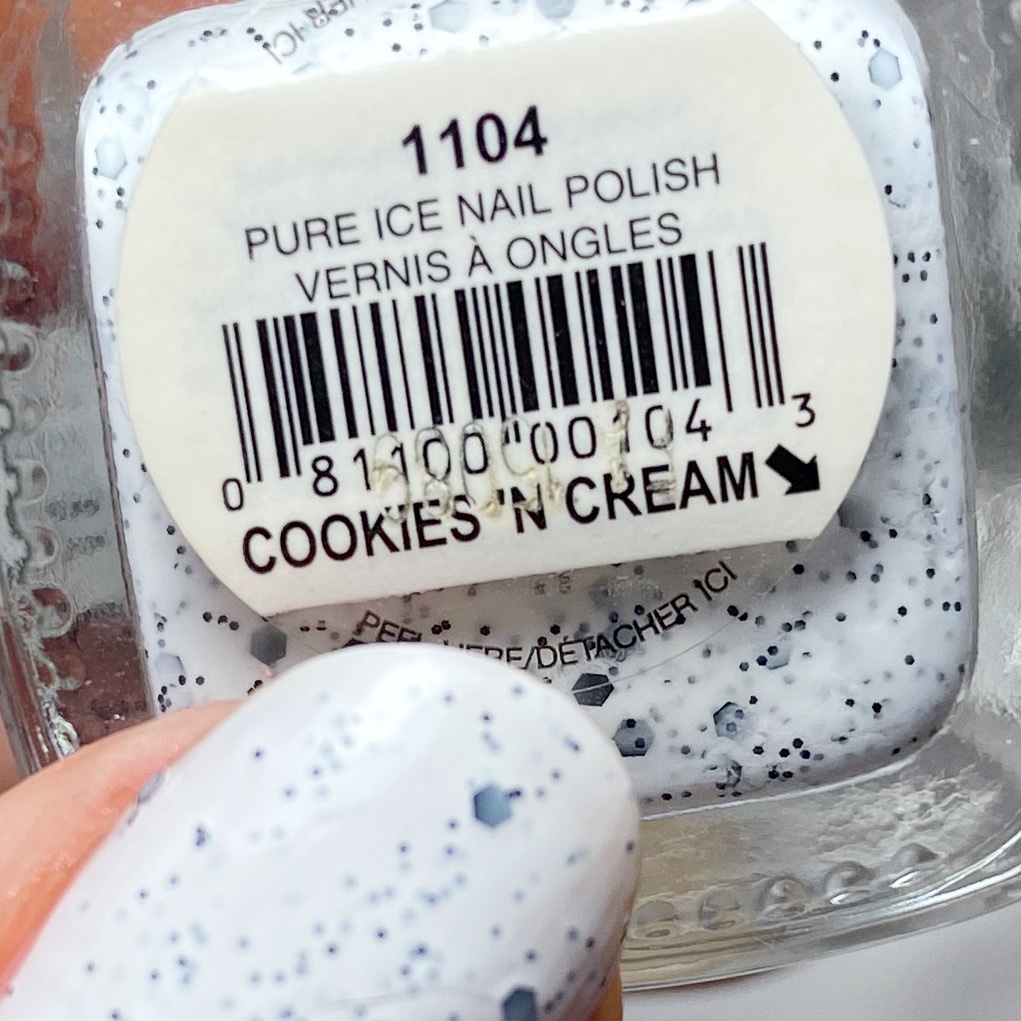
Today I’m going old school though, with a polish from deep in my stash. I’ve been living for speckled nail looks lately, so obviously that means pulling out some from deep in the past. You might remember, a few years ago, the brand Pure Ice released a collection of speckled nail polishes that I think were based on nail polishes. Naturally, I bought three at the time. I don’t often pull them out, with the exception of this time of year because I feel like they’re absolutely perfect for Easter nails.
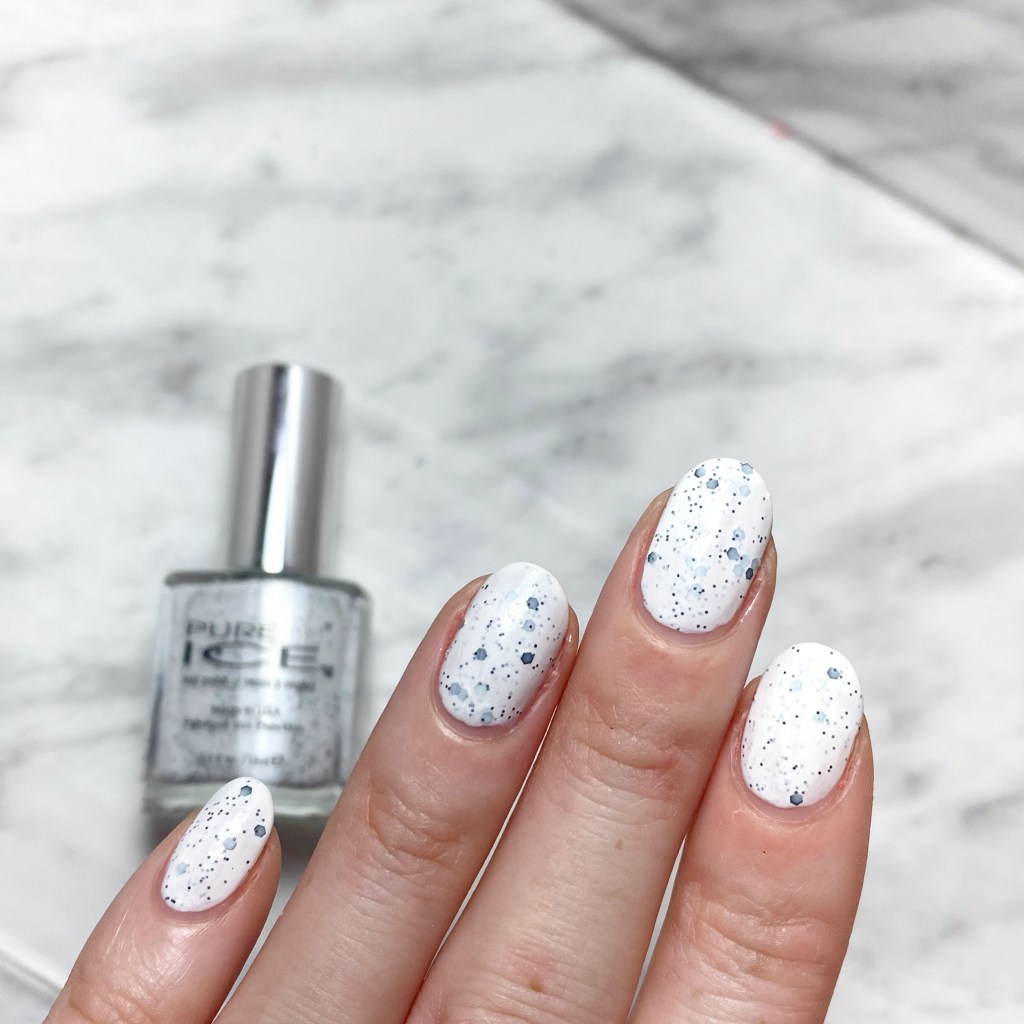
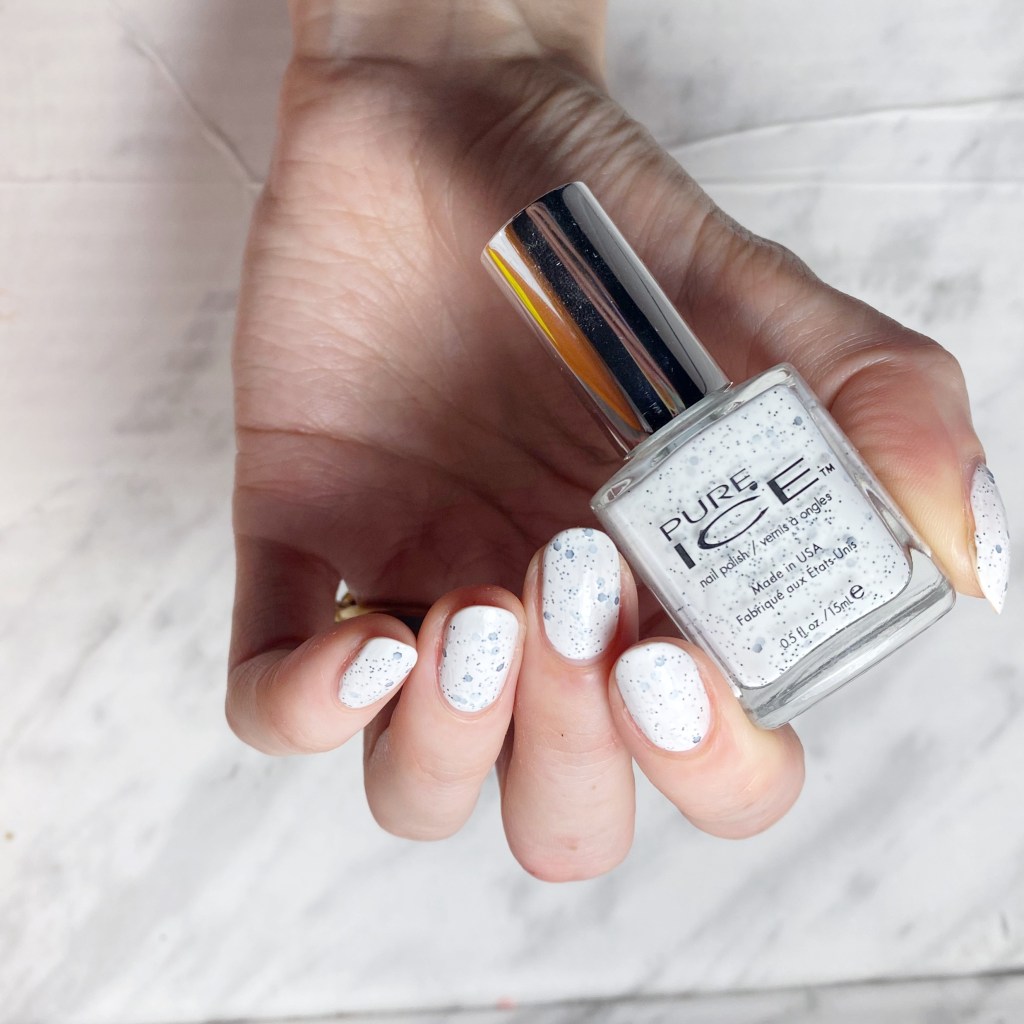
2 coats, no top coat.
As the name implies, Cookies ‘N Cream is a white base with multisized hex glitters that gives the impression of cookies & cream ice cream.
I applied 2 coats of polish for my application — a thinner first coat, followed by a thicker second coat which gave exactly the opacity I was hoping for. The base is thin enough that the black glitters show through perfectly, giving you the multi layered effect. It also dried down quickly. which left a semi textured in some places, thanks to the layered glitters, but this could easily be fixed with a thick coat of glossy top coat.
I really, really love the different sized glitters in this polish ( & its sister shades I own Boysenberry & Orange Sorbet) versus a speckled polish like Deborah Lippmann Polka Dots & Moonbeams. & it really does look like ice cream, which just makes me think of Summer, & I can’t wait for Summer days.
It also kind of makes me wish I had scooped up all 6 shades in the collection back in 2015 because every time I wear one I realize just how much I freaking love speckled nail polish, & this trend needs to make a comeback!
What do you think about Pure Ice Cookies ‘N Cream? Do you love these speckled polishes as much as I do? Are there any nail polishes you’re hoping the Easter Bunny brings you next weekend? Let me know down in the comments below!
Hello lovelies & happy Sunday! I hope everyone had a safe St. Patrick’s Day. Mine was spent on the hunt for nail polish deals. Well, originally I had tried to find some thrift goodies, but that was a bust so I ended up checking out the clearance bins to see if I could find any fun shades & I was quite successful.
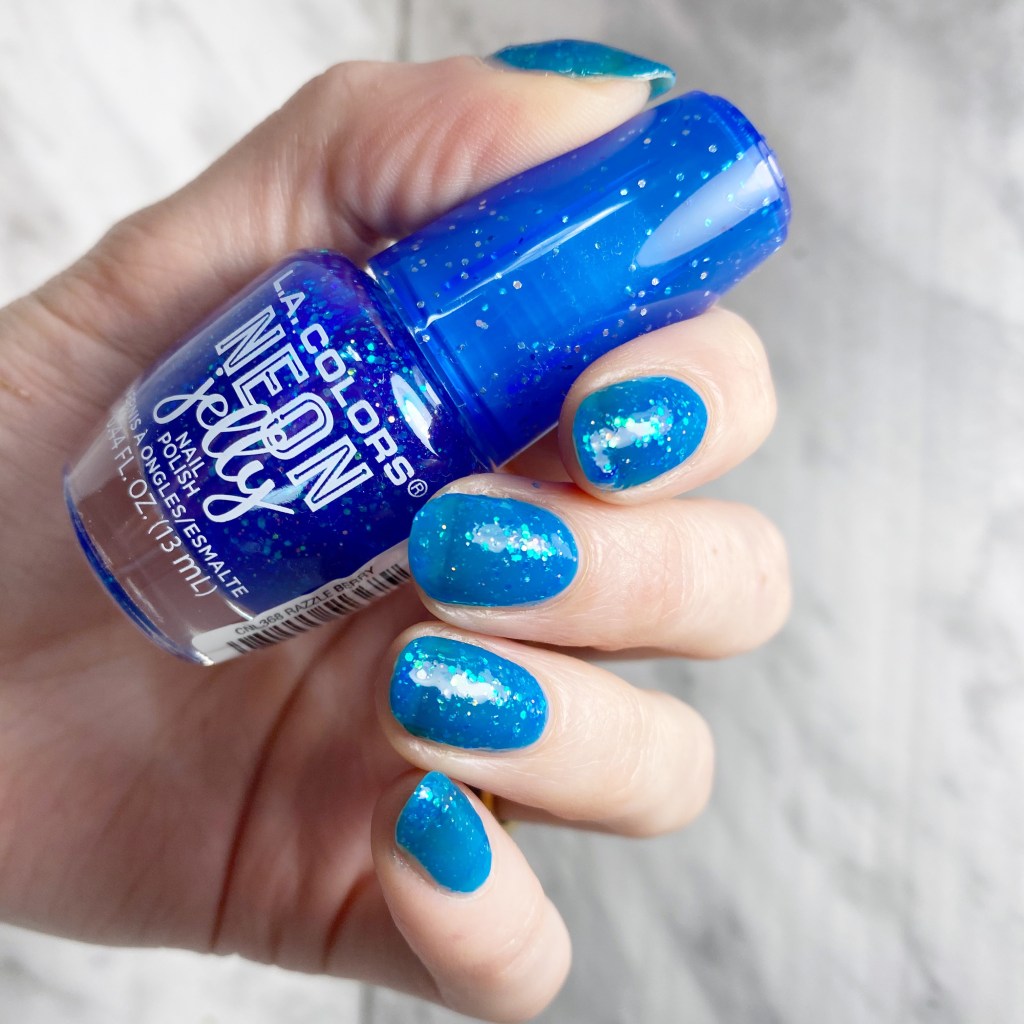
Today though, I’m excited because I have a brand new shade I found at my local Walmart. They have just started carrying the L.A. Colors brand — which I haven’t seen around here in stores in a while — so naturally I had to pick up a few new shades. I decided one 3 polishes from 3 different lines. First up today: Razzle Berry from the Neon Jelly line.
3 coats, no top coat
The first shade to catch my eye was this sparkly beauty Razzle Berry. It’s a syrup-y blue jelly base packed with multi-sized iridescent glitters. For my swatches, I needed 3 coats for full coverage but as you can see it obviously isn’t fully opaque. The colour of the polish itself, also, is a bit lighter on the nail than in the bottle, but I’m sure if I had the patience to apply more coats, it would darken. It did apply easily though, & the wider brush made application pretty simple.
This shade is definitely giving me peachy Summer vibes. I love the glitter in the bright blue base with those glitters. I was a little bummed that it wasn’t quite as dark as the bottle shade, but most likely if I was wearing this again, I would probably layer it over a blue base so I didn’t need as many layers of polish. I mean, how gorgeous would this look layered over Essie In The Cab-ana? I’m definitely going to be trying that ASAP.
What do you think about L.A. Colors Neon Jelly Razzle Berry? Are you a fan of glittery jelly formulas like this? Let me know all your thoughts down in the comments below & let me know if you’d like me to pick up anymore of these Neon Jelly shades to swatch.