Crystal Drag Marble (featuring Black Dahlia Lacquer Frozen Twilight & Winter Dusk)

PR

Features Gifted Product in Exchange for Content

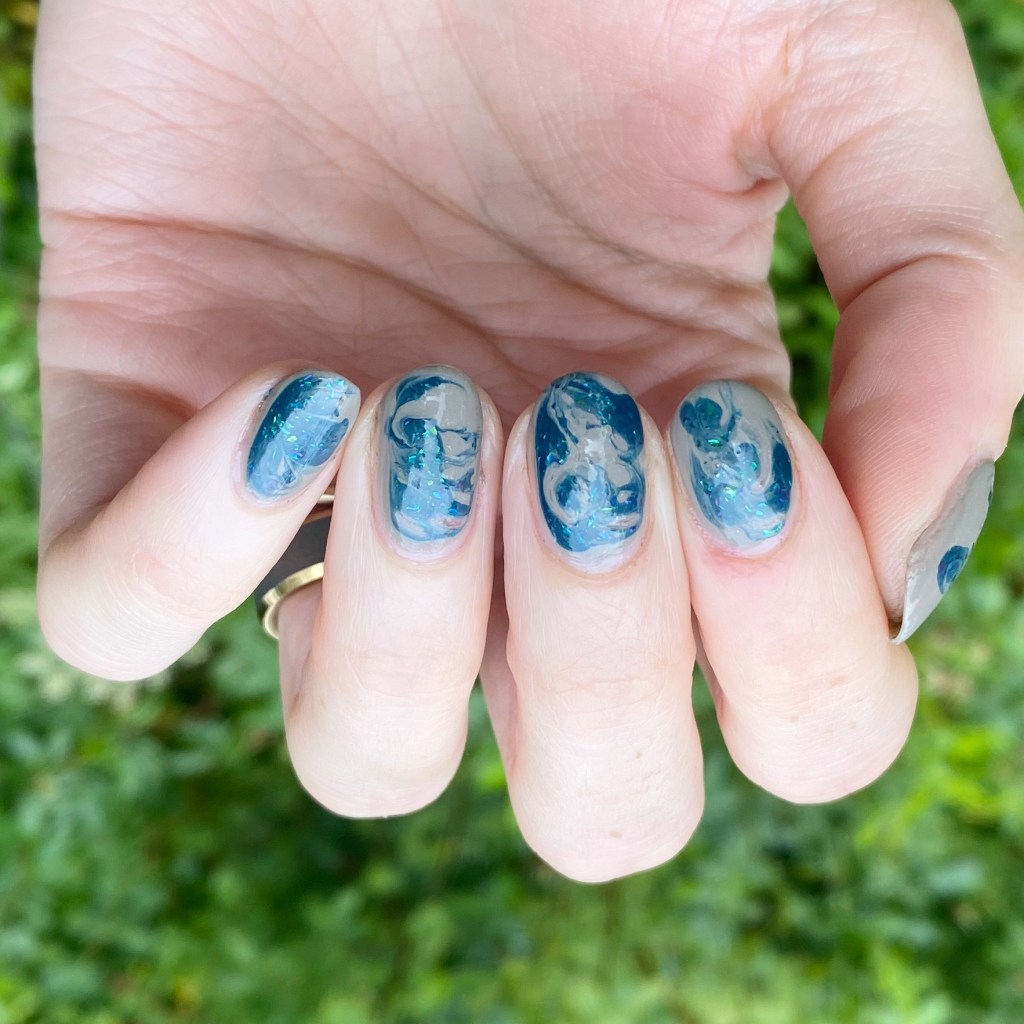
Good morning lovelies & happy Tuesday! I hope everyone’s week is off to a not too stressful start. Today I’m excited because I’m sharing a stunning nail art look that I’m really, really excited about using the beautiful shades from Sunday’s Swatch Sunday post.

The polishes I used for this manicure are: 

  • Base Coat: Essie Hard To Resist Glow & Shine 
  • Top Coat: Essie Gel Setter
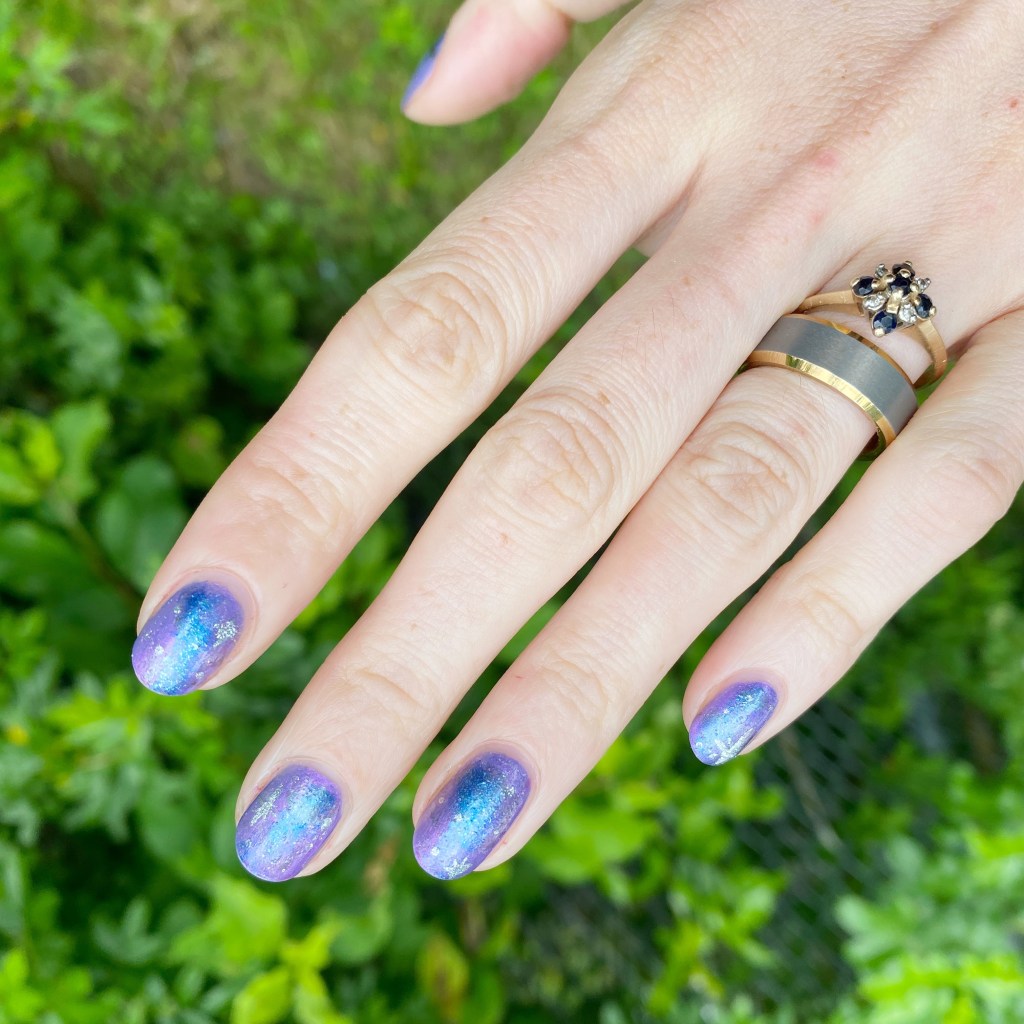
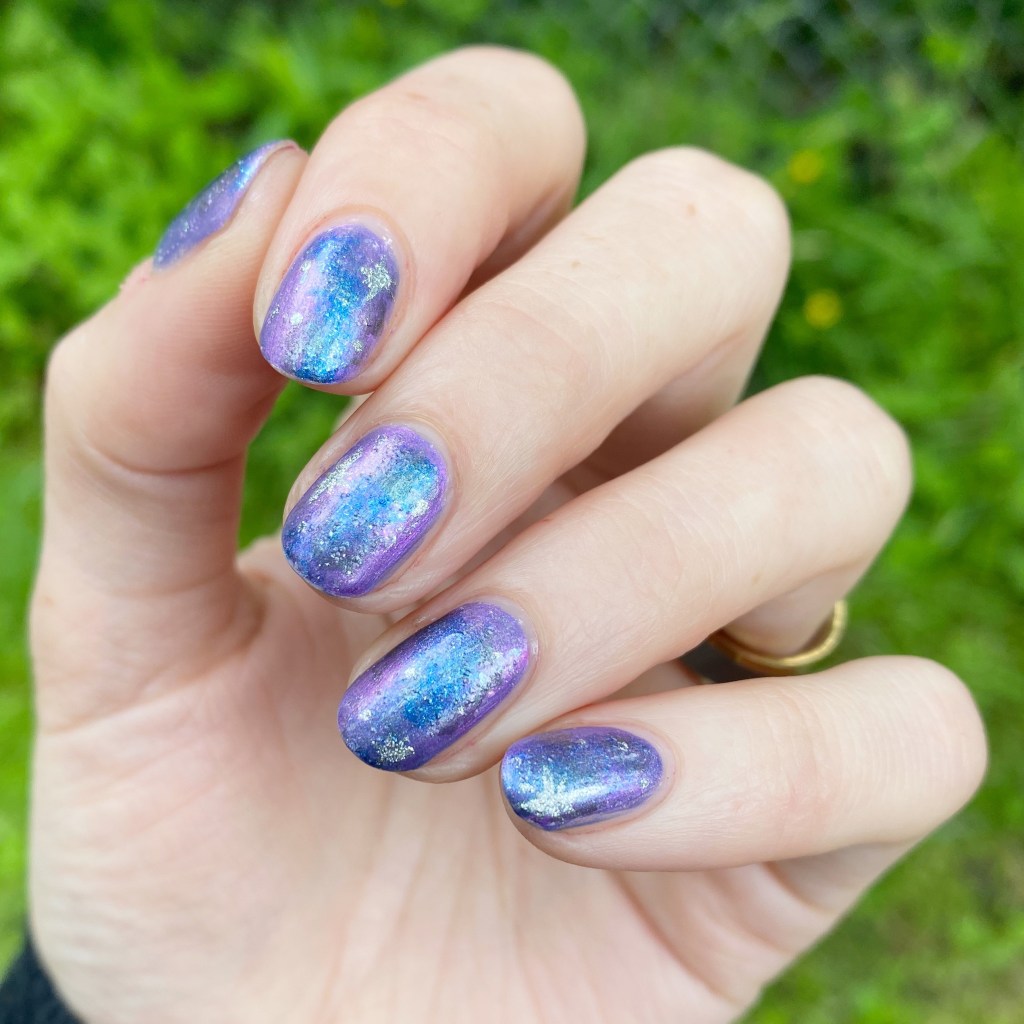
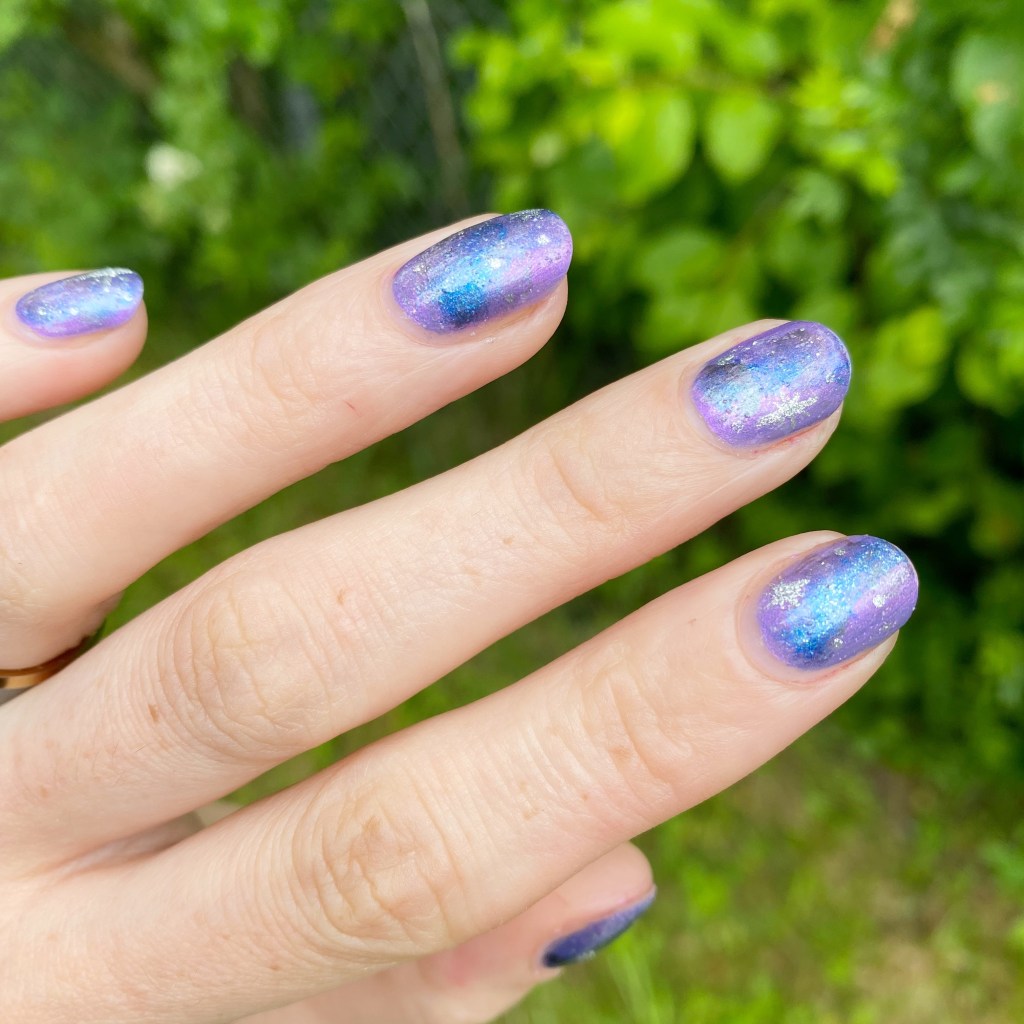
  • Black Dahlia Lacquer Frozen Twilight (NailStuff.ca exclusive)
  • Black Dahlia Lacquer Winter Dusk (NailStuff.ca exclusive)
  • NailStuff.ca Dotting Tool Trio — I used the thinnest one to make it easiest to create my drag marble

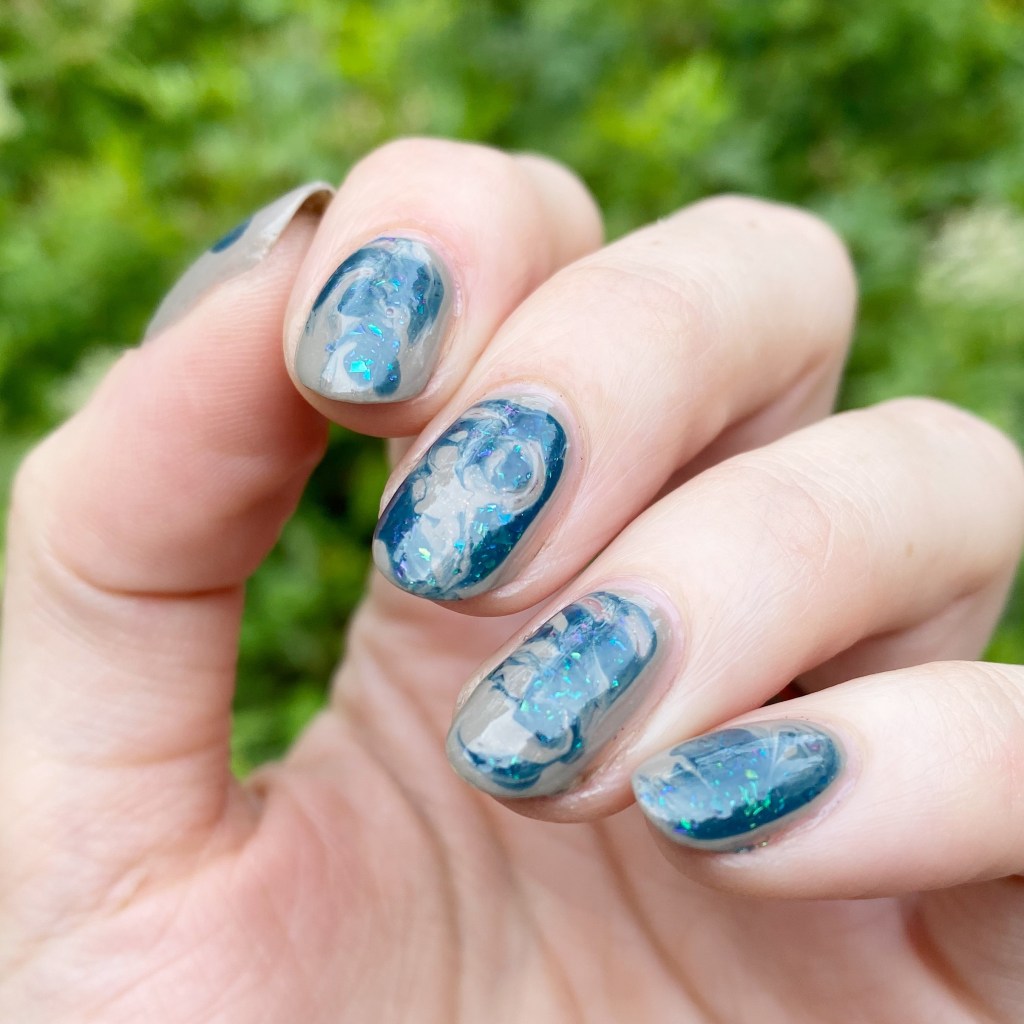
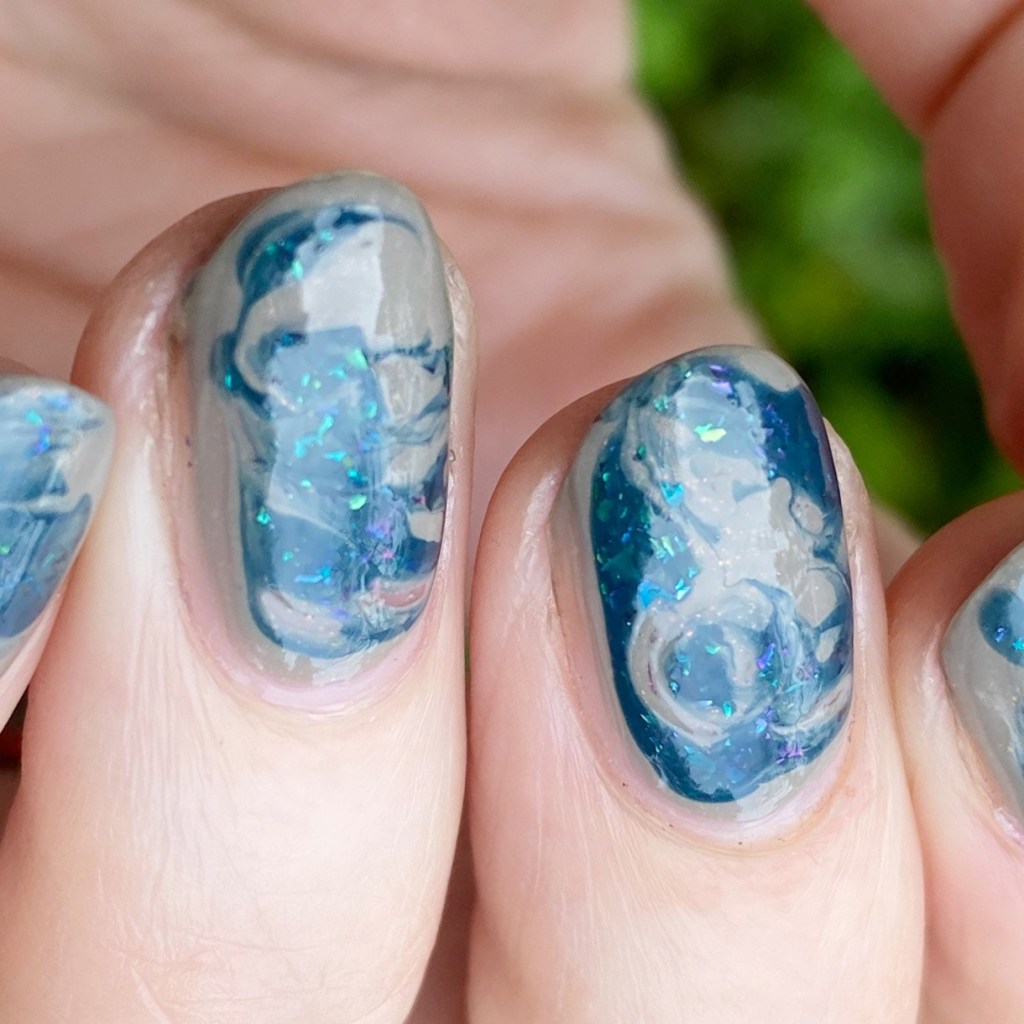
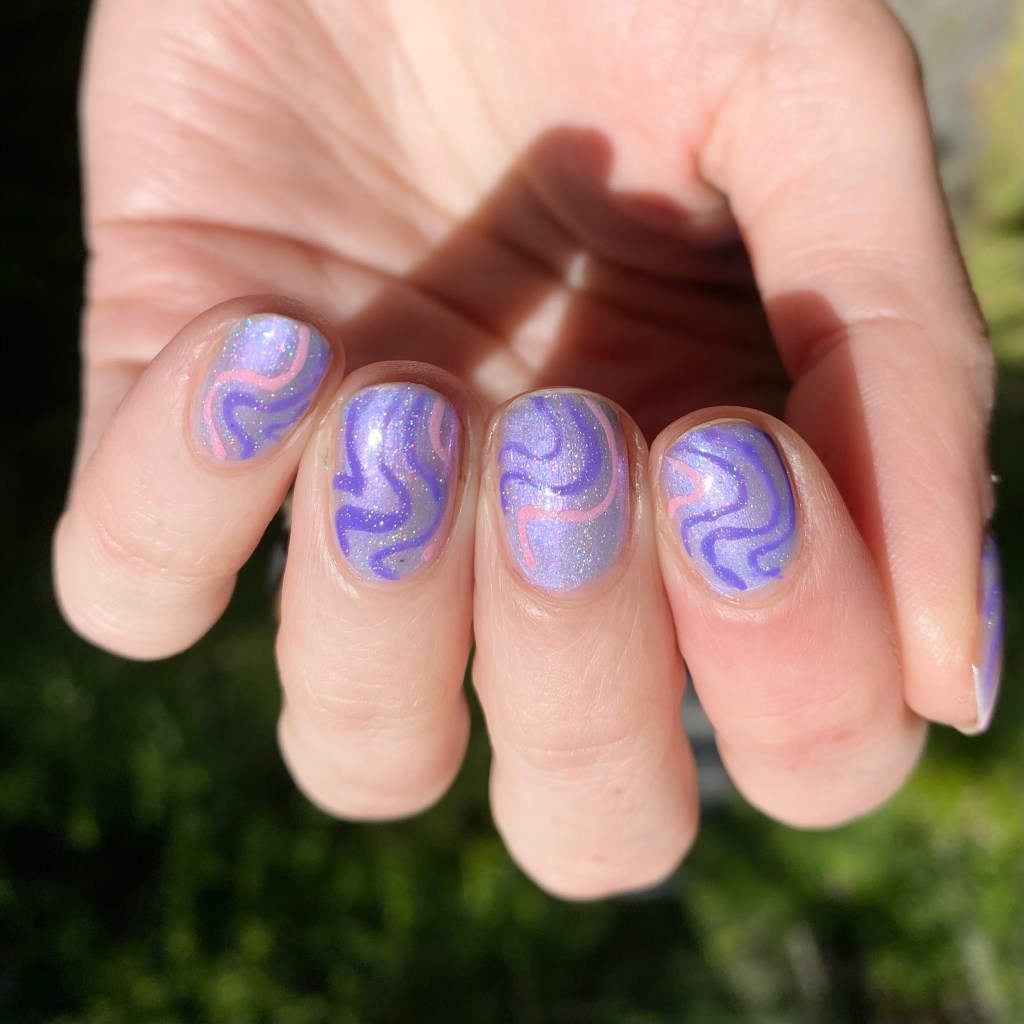
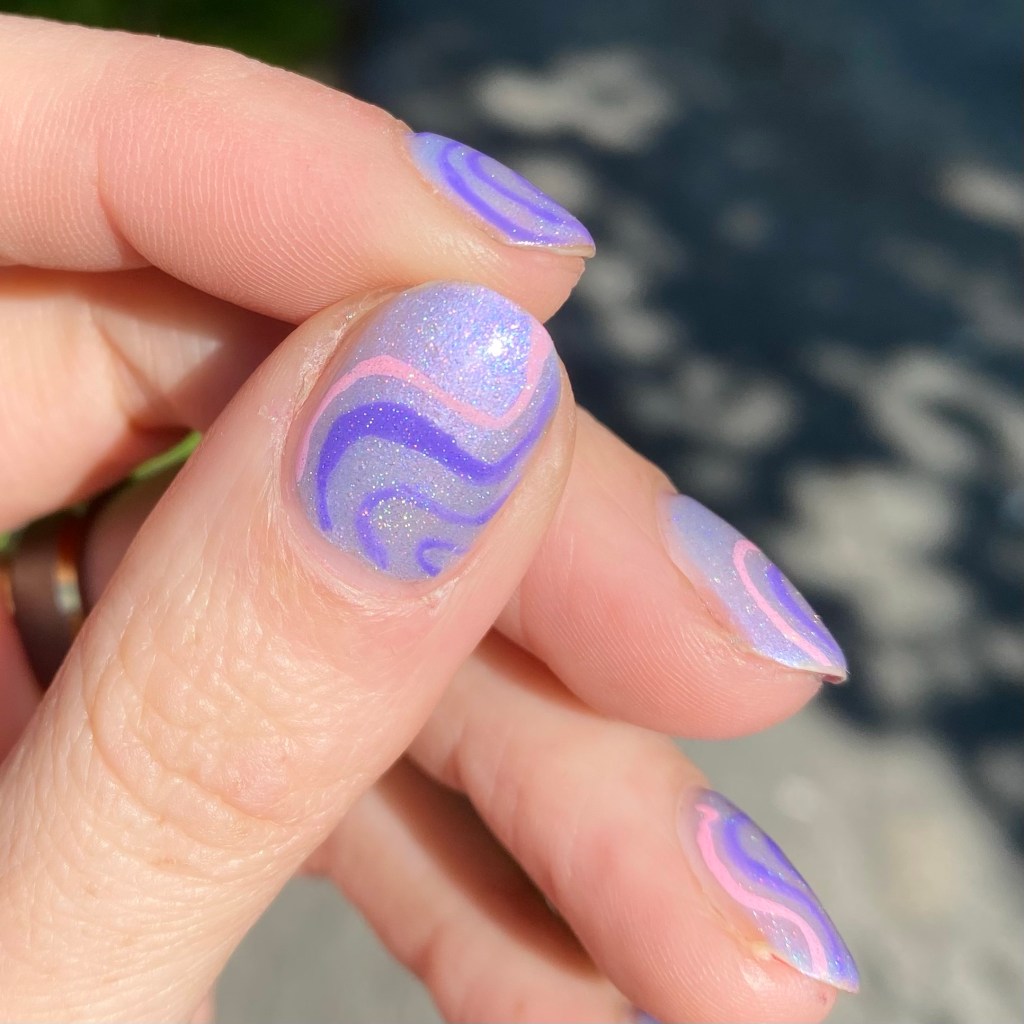
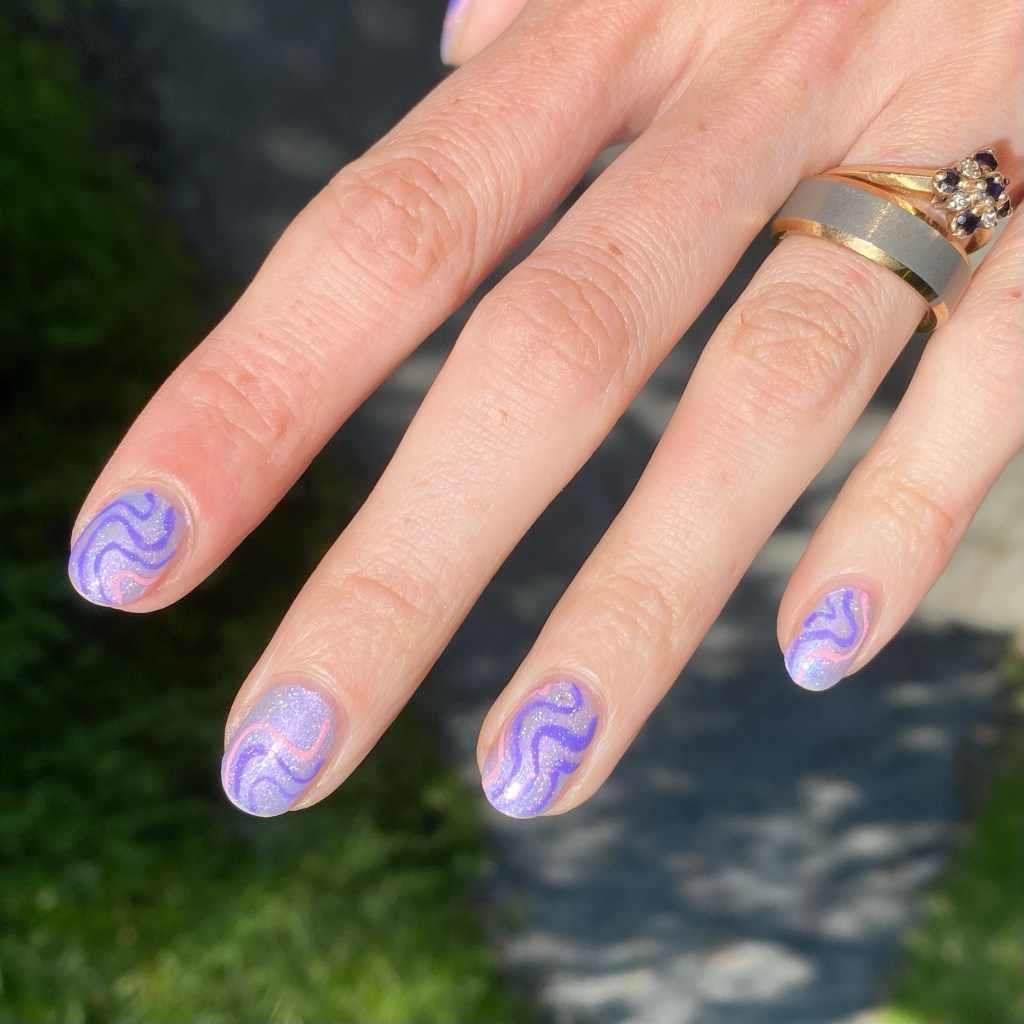
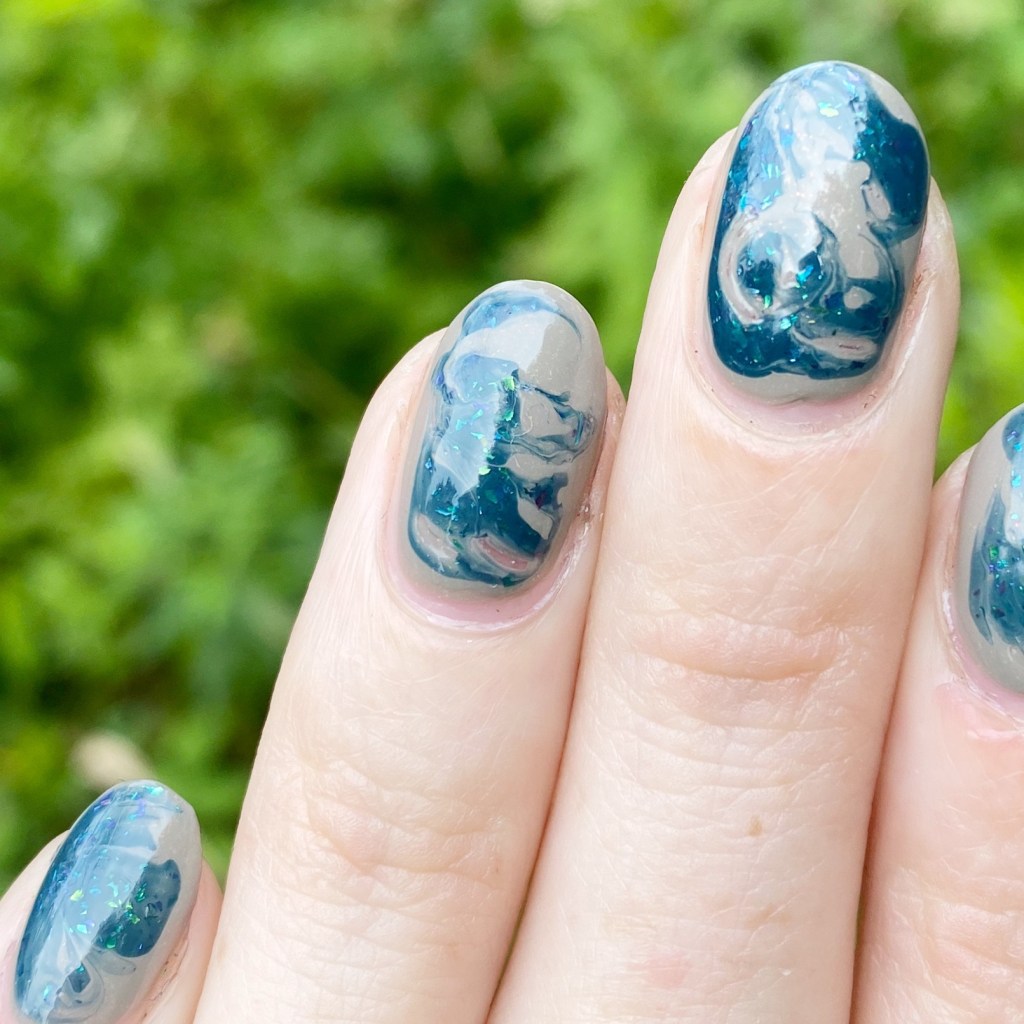
Look at the close up! I adore the look of Frozen Twilight against Winter Dusk.

I’m not going to lie — I was a bit nervous about how well these two shades were going to marble together. & quite honestly, this might be the most successful (& beautiful!) drag marble I’ve done in longer than I can remember. It sort of reminds me of when you find rocks that have geodes & crystals running through them.

It just turned out so pretty!

The jelly formula on Frozen Twilight being a bit on the thinner side meant it was also a lot easier to get the polishes swirling without things starting to dry too quickly. Nothing worse than trying to do a drag marble, & your polishes are drying as your trying to marble them! Then you get weird bald patches & have to start over. Ugh, the worst! But these two shades marbled together like a dream & I’m super happy with the end result.

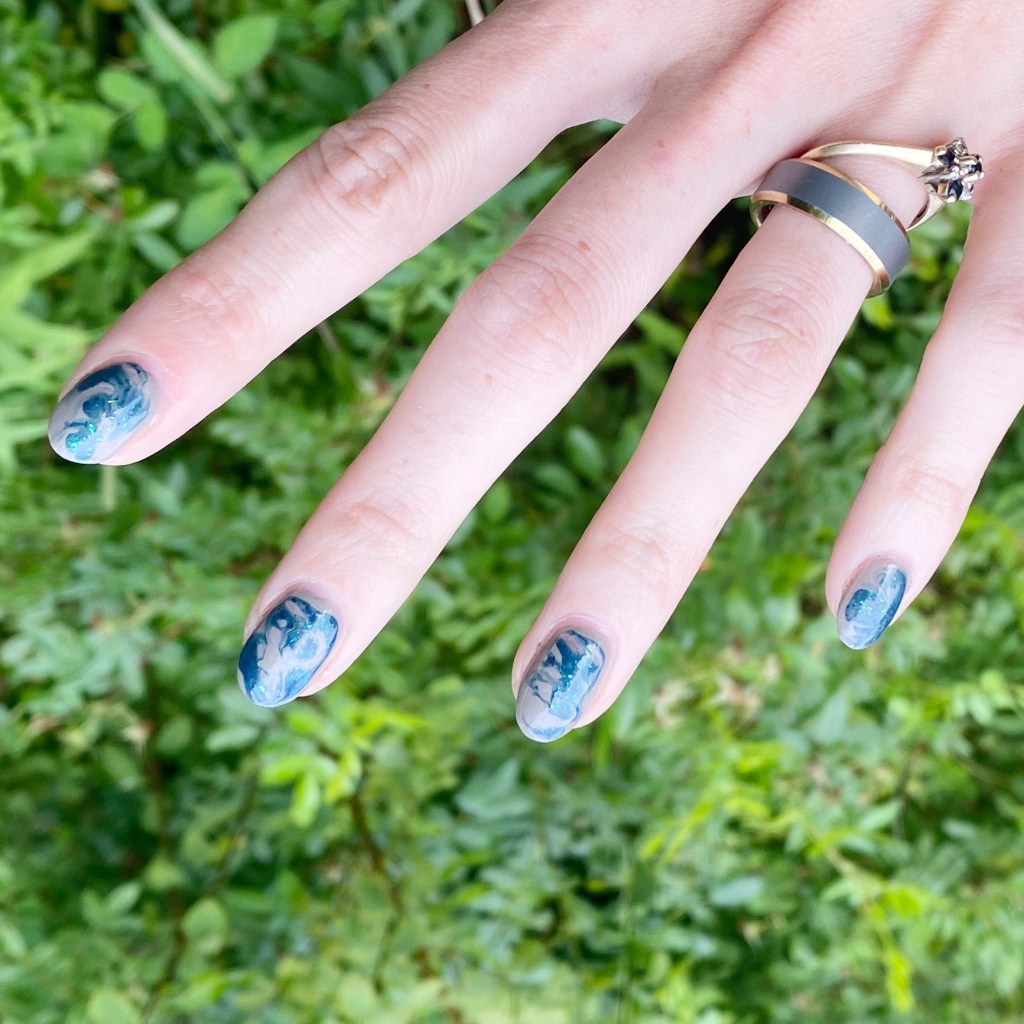
What do you think about this drag marble featuring Frozen Twilight & Winter Dusk? Do you like how I paired these two shades together? Do you love the Autumn vibes that these shades are giving off? Let me know all your thoughts down in the comments below!

Products featured in this post were provided in exchanged for content.  All thoughts are honest & my own.

Subtle Red Colour Blocking

Hello lovelies & happy Tuesday! I hope everyone is having a fantastic start to their week. Can you believe we’re in August now? That’s just… this Summer is really speeding by!

Today I’m sharing an easy nail art look I wore recently. We all know — I love red nail polishes. & I was feeling a red manicure. So I decided to pair a couple of red polishes together in a fun (& super simple) nail art look.

The polishes I used for this manicure are: 

  • Base Coat: Essie Hard To Resist Glow & Shine
  • Top Coat: Essence Colour Shine Top Coat
  • Sally Hansen Complete Salon Manicure Warm Regards
  • Sally Hansen CSM Red Handed

I really like the subtle red on red nail art. Like I said, I really wanted to wear red nails — I always want to wear red nails — but I wanted to spice it up a smidge, & this subtle colour blocking seemed like an easy, cute option! From far away you might not notice to two colour paired together, but up close you can see the fun pattern. Next time, I might do a similar look, but with all red abstract stripes.

Any excuse for red nails!

What do you think about this subtle colour blocking design? Is this a nail art design you would wear?

Let me know what you think down in comments below — & what colour you would wear this design in!

Sparkly Holo Purple Swirls

Hello lovelies & happy Tuesday! I hope everyone’s week is off to a good & not too stressful start so far. I finally have a day off, which is very exciting — even if today seems to be the one day in the last, like 8, that isn’t beautiful & sunny.

Oh well. I do, however, have some fun & sparkly nails from a day which was very sunny! I wore these last week during a particularly sunny day, which was perfect to show off all the holo goodness.

The polishes I used for this manicure are: 

  • Base Coat: Essie Hard To Resist Glow & Shine 
  • Top Coat: Sally Hansen Miracle Gel Top Coat
  • Holographic Top Coat: Starrily Eclipse
  • Essence Colour & Go Little Lila Town
  • Color Club Art Club Pink Pastel
  • Colour Club Art Club Passion flower

Originally, I hadn’t planned on adding the holographic top coat, but I’m so glad that I did because it made the whole look feel complete. & it was just so much more fun! Definitely a fun Summer look.

Also, it’s reminding me of how much I love stripers. Don’t get me wrong, I love love love all my nail art brushes & they’re wonderful. But there is just something different about one of those striper polishes. I feel like I need to get some more, again. There is just certain times when those are the brushes I need in my life, & I keep forgetting that until I use one of my old ones again. Guess that means it’s time to take a little trip to Sally Beauty!

What do you think about this nail art look? Do you enjoy these holo purple stripes? Let me know all your thoughts down in the comments below, & if you’d wear this nail art look.

Summer-y Dotticure featuring Essie

Hello lovelies! Hope everyone is having an awesome week so far.

I’m excited because I have another fun (& easy) nail art look to share with you featuring some brand new (to me) shades I recently picked up. I worked like a mad woman over the Canada Day long weekend, so I decided to treat myself to a few new Summery nail polishes. & when I was looking at these brand new shades, I was like “hmmm, what can I do with these polishes?”

& the answer was obvious: dotticure!

The polishes I used for this manicure are: 

  • Base Coat: Essie Hard To Resist Glow & Shine 
  • Top Coat: Sally Hansen Miracle Gel Top Coat
  • Essie Throw in the Towel
  • Essie Swoon in the Lagoon
  • Essie In the Cab-ana
  • Essie Blanc
  • NailStuff.ca Dotting Tool Trio

How gorgeous are these shades together? Originally I planned on buying Essie Bahama Mama but then when I was in the nail polish aisle I noticed Bahama Mama is very close to Sally Hansen InstaDri Zip Wine so I decided to hold off (for now), & go for some more vibrant Summery shades. Essie In the Cab-ana is an old favourite & my old bottle is running out, & the other two shades were fun, bright pinks, & I seem to be very drawn to pink nail polish lately.

I think I might do a polish haul instagram reel soon, since I have been really loving (& buying) pinks, so why not show them off.

What do we think about this dotticure look? I feel like this is kind of reminiscent of my early dotticure days, where they were a bit more abstract. Let me know what you think down in the comments below, & what colours you would pick for a dotticure like this!

Metallic Purple Galaxies 🌌

Hello loves — hope your week is off to a lovely start.

Today I’m sharing the look I did featuring my latest Swatch Sunday pick as the base of. I teased how excited I was to share this nail art, so I’m really excited for you to see! It’s been ages upon ages since the last time I featured a galaxy design on my nails — like 2019 or so — so this was long, long overdue.

The polishes I used for this manicure are: 

  • Base Coat: Essie Hard To Resist Glow & Shine 
  • Top Coat: Sally Hansen Miracle Gel Top Coat
  • Rimmel London 660 Climax
  • Essence Galaxy Flakes Rock My World
  • OPI Miss Piggy’s Big Number
  • OPI Peace Love & OPI
  • Sally Hansen Miracle Gel Buffalo Nickel
  • Starrily Space Debris
  • NailStuff.ca Dotting Tool Trio
  • NailStuff.ca 4mm Micro Detail Brush
  • Latex Free Make Up Sponge (mine are random Dollarama ones)

So, full disclosure: I did these nails at like 12:30 at night, half asleep, & with horrible lighting, so they’re not perfect. But I do think the combination of colours is awesome. I love the purple on purple. My stars are a little wonky, & I’m not sure silver was the right choice for them (I probably should have went with black instead) but I do think the whole look turned out very pretty. I really do always forget just how much I love galaxy nails until I wear them again.

Plus they’re a nail art look that works just as awesome on short nails as they do on long nails.

What do you think about this galaxy nail art look? Have you done galaxy nails before? Let me know all your thoughts down in the comments below.