SWATCH SUNDAY — Sinful Colors Pumpkin Spice

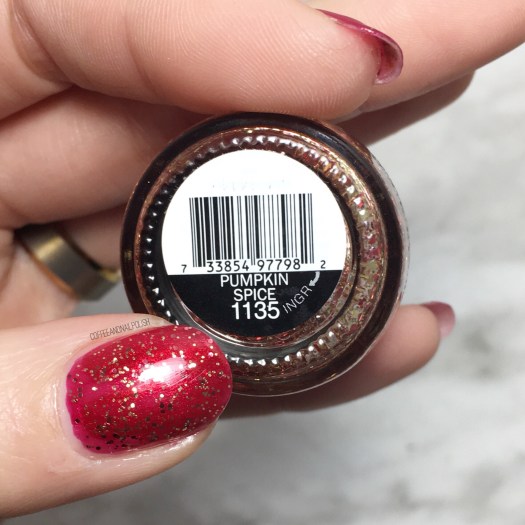
Oh my gosh, this post is so late going up! But better late than ever! Today’s Swatch Sunday post is an old Fall favourite of mine that has lived in my stash for a few years now: Sinful Colors Pumpkin Spice.

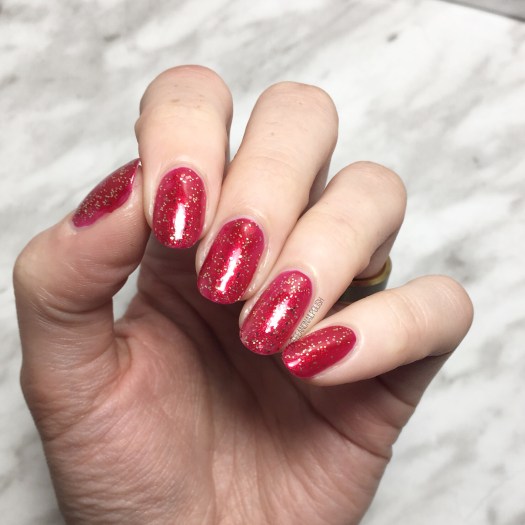
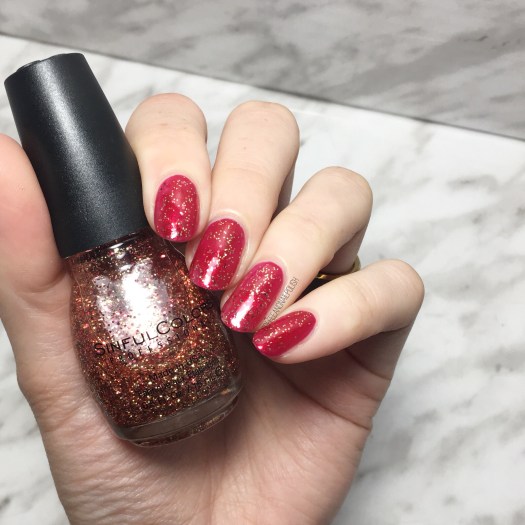
Sinful Colors Pumpkin Spice is a special edition polish that they release & re-release in the Fall as part of their Halloween collection. I googled it, & the first reference I could find was dated 2012. I purchased my bottle circa 2014. The polish itself is a clear base, full of gold & reddish orange glitters. For my swatches, I decided to apply it over a base of ORLY Color Blast Garnet–I did 2 coats of Pumpkin Spice over one coat of Garnet.

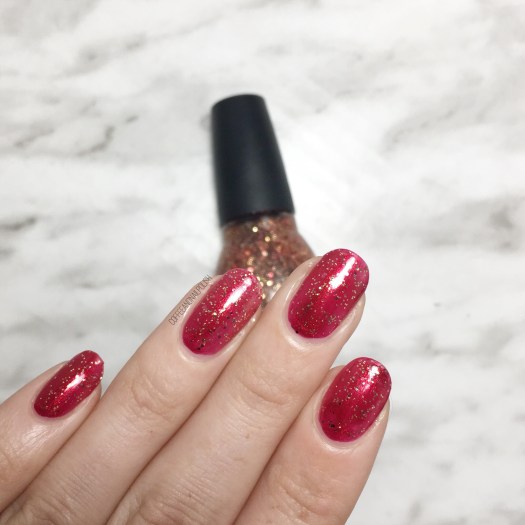
As you can see from my pictures & swatches, Pumpkin Spice is not a super dense glitter topped. Two coats still left the base shade visible. You could definitely build more opacity by sponging the glitter on. I definitely think that this glitter pops more over a dark base verses the red base, in person my nails looked a lot more glittery.

This is definitely a favourite Fall Polish for me & I am so darn ready for all things Fall. It’s officially September & it means I am ready. Bring on my knee high socks, plaid everything, cosy knits & Fall Polish collections. Goodbye Summer, it’s been fun.

As I mentioned above, Sinful Colors seems to re-release Pumpkin Spice as part of their Fall/Halloween collections, although I haven’t looked hard enough to see if it’s been release yet. I couldn’t find anything online about this year’s release, but we’re still pretty early. I feel like it will probably be re-released again, just because it seems to come back every year.

I guess we will have to wait & see!

Do you own Sinful Colors Pumpkin Spice? Do you love it? Share down below & if you know whether or not it will be part of this year’s Halloween display!

More Sweater Nails

If you follow me on Instagram, you might have watched my Instagram story & saw I broke my middle nail super short earlier this week. Like–beyond baby nails. But I do have some unposted manicures I was saving up for after we moved & I’m unpacking, so I’ll have a few long nails designs to share in the meantime.

Like these sweater nails! Who doesn’t love rocking sweater nails? With the dropping temperatures outside, I know I’ve been wearing nothing but my thickest sweaters (I don’t do well with the cold). So why not paint my nails to match?

For this manicure, the polishes I used were:

  • Base Coat: Essie Grow Stronger
  • Top Coat: Seche Vive
  • Sally Hansen Complete Salon Manicure Pat On The Black
  • Essie Topless & Barefoot
  • China Glaze Life is Rosy
  • URSugar Nail Stencil item AUB39877 — click to buy
  • MyNailsDid Nail Vinyl sweater pattern vinyl (they’re back up on her site!) & straight nail vinyls
  • NailStuff.ca small circle studs–Gold Mixed Decoration Nail wheel 
  • Small dotting tool

I just love how these turned out. I feel like the differing colours & patterns just bring the whole look together. I could honestly probably do this manicure in every colour combination possible, & never get tired of it! A little green & red & bam! You have perfect ugly Christmas sweater nails for your holiday party. (& now I must remember that because that is so happening now!)

Just looking at this design is making me really miss my long nails already. 😢 But rocking baby nubs just gives me the opportunity to come up with awesome & Pretty nail art for short nails. I’ve already got a few manicures I’m working on, so you’ll have to stay tuned! & if you have any requests, let me know.

<<<<<
o you think of these sweater nails? Would you match your nails to your favourite sweater? Let me know in the comments below!

My New Favourite Purple & Swirly Accent Nails 

Happy Friday everyone! Today I’ve got a quick mani I did recently when I was feeling some nail art, but didn’t want to do anything too complicated. This mani was actually inspired by a design I did back in September 2016 as part of my failed attempt at the 31 Day Challenge. I loved the look of the design over a super sheer polish, so I decided that it would make for the perfect accent nail. 

For this manicure, the polishes I used were:

  • Base Coat: Essie Grow Stronger
  • Top Coat: Seche Vive
  • L’Oréal Elusive
  • Ardene Ice Mist
  • Essie Frock N’ Roll
  • Small detail brush from Bundle Monster 

Okay can we talk about L’Oréal Elusive for a second? I found this bottle at my local Lawtons in the clearance section (my favourite place for polish finds) & I had to buy it! It’s just such a good shade of purple, & I’ve been wearing it a lot lately. Also I totally apologize for the chipping at the tip of my nails—I took these shots after 2 full days of wear so they were looking tougher than they should. But this purple…. it’s just such a good purple! 💜 I don’t know if you’ve noticed, but I’ve been on a huge purple kick lately. 

What do you think of this accent nail? Let me know your thoughts in the comments below. & leave some suggestions for any nail art you’d love to see! 

Holo Accent Nails using NailStuff.ca Holo Pigment! 

Happy Wednesday everyone! The week is already speeding by, which is crazy—halfway to the weekend. To get us over this mid week slump, today I’ve got another item I was so kindly sent to try out by NailStuff.ca: holo pigment flakies. 

This is my first time ever using any kind of pigment for the nails (I know, I’m so behind on the times) so I was super excited to give it a whirl & also totally unsure of how to go about it. I know these pigments work really well over gel nails, but I change my nails too often for that so I decided to create these holo nails using just nail polish! So after watch a bunch of YouTube & Instagram videos, I felt pretty confident I could do this! 

For this manicure, the polishes I used were:

  • Base Coat: Essie Grow Stronger
  • Top Coat: Seche Vive
  • L’Oréal Pino Purple
  • NailStuff.ca Holo Pigment Flakies
  • Fingerpaints Peel Off Base Coat
  • Edge Perfection Cuticle Barrier  

To accomplish this look: 

  • I painted all my nails with L’Oréal Pino Purple (including my ring finger.) 
  • I applied top coat to all my fingers except my ring finger & on that nail I applied Fingerpaints Peel Off Base Coat. (I originally tried used just wet nail polish but found the flakies didn’t stick as well for me.)
  • Next I applied my Edge Perfection Cuticle Barrier around my ring finger & let it dry completely. 
  • I then took the small eyeshadow applicator that comes with the flakies, & patted them down onto the nail & tried to rub them in some. It took about 2 applications to completely cover my base. (You can see at the edge of my nails where I missed a few spots.)
  • Seal in flakies with top coat (I used Seche Vive for that shine.) 

Super simple & only slightly messy. I did end up getting holo flakies in my bed (where I do my nails pretty much always) which in turn ended up sticking to my son for a couple of days but nothing wrong with a little holo glitter! 

I will say, my second attempt using a sticky base coat over my polish worked much better (as opposed to using just my base of polish). The first time I tried half the flakies came off with my top coat, but it could be my polish had dried too much for the flakies to really stick. 

Have you used holo flakies before? Any tips  for application that you’ve discovered? Leave all your thoughts below! 

*PR SAMPLE* Some of these items were sent to me for review. However, all opinions are my own. 

Cosy Sweater Nails

Temperatures have been feeling much more seasonal the last couple days here in Halifax, which means I’ve been living in my most cosy of sweaters. & it also means I’ve been seriously digging sweater nail art! 

There is just something unnatural about rocking knit nails when it’s 18 degrees celsius outside (that’s 64 degrees fahrenheit to my non-Canadian friends!) So as soon as temperatures started to dipped, I decided to pull out my knit nail vinyls for some perfectly November-worthy nails. 

For this manicure, the polishes I used were: 

  • Base Coat: Essie Grow Stronger
  • Top Coat: Seche Vive
  • Essie Under the Twilight
  • Ardene Daydreamer
  • Sally Hansen Hard As Nails Hard To Get
  • URSugar Nail Vinyls item #AUB39877 — Click to buy
  • NailStuff.ca gold triangle studs — Gold Mixed Decoration Nail wheel 
  • Latex Free Make Up Sponge (for sponging over nail stencil) 
  • Edge Perfection Polish Barrier 

I’m really feeling this design using these heart/knit pattern vinyls from URSugar. They definitely remind me of a cosy sweater & just make me want to pull on my softest, most plush sweater & curl up on the couch with a peppermint mocha or gingerbread latte. This is my absolute favourite time of year & I just want to soak in every moment! Before we know it, snow will be falling & I’ll be complaining about being cold. 

What do you think of this design? Are you a fan of the sweater pattern nail? Share your thoughts with me down in the comments!