Birthday Nails with Essie Birthday Girl 🎉

F516455D-4537-4A98-AB92-7F0C2C493092

Hello lovelies & Happy Tuesday! Hope everyone is having a beautiful start to their week. Today I’m breaking up my usual posting schedule because TODAY IS MY BIRTHDAY! That’s right, today marks 33 years around the sun. So obviously I needed to do something fun on my nails to mark the occasion.

In years past I’ve done some obvious birthday nails, but this year I decided to let the polish do the talking. When I saw that Essie had released a polish called Birthday Girl, I knew that I was going to need to own it & incorporate it into my birthday mani this year! I also wanted to do something fun, as I snapped a nail just in time for my birthday, so I am back to some serious shorties.

B6F4411E-B3BE-4022-A8E6-B491C3881773

D5BA04A3-77C1-4A8D-97B2-F6EDDF238362

For this manicure, the polishes I used were:

  • Base Coat: Duri Rejuvocate
  • Top Coat: YSL Beauty Quick Dry Top Coat
  • Essie The A-bliss {PR sample}
  • Essie Birthday Girl
  • Color Club Pucci-licious
  • Color Club Eternal Beauty
  • Essie Play Date
  • Sally Hansen Pat on the Black
  • Nailstuff.ca 11mm Liner Brush {PR sample}

.

6B65E022-F47A-402E-A001-10F99CDAA9E7

01B4F731-8F0D-445D-AAF9-C1103719365E

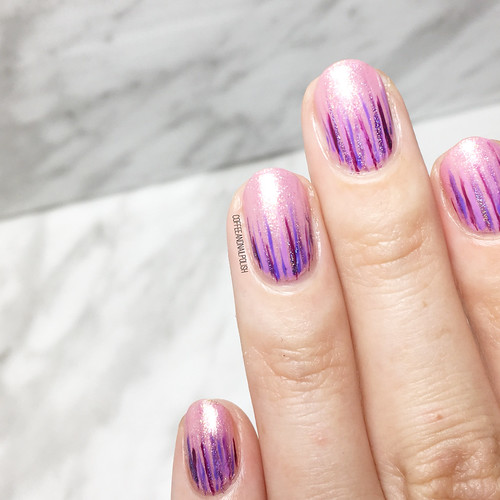
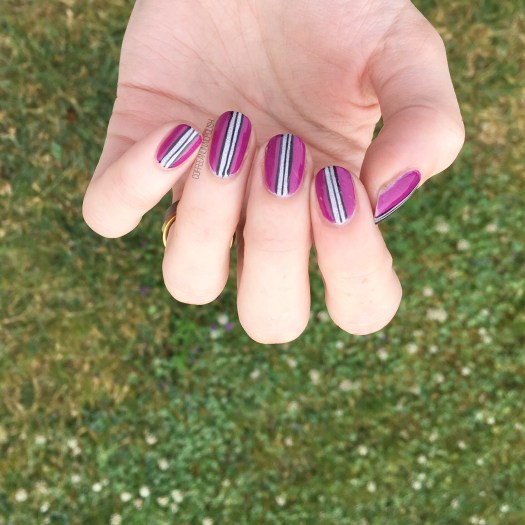
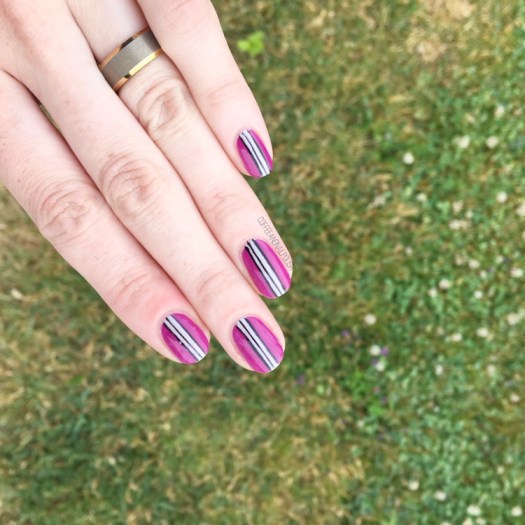
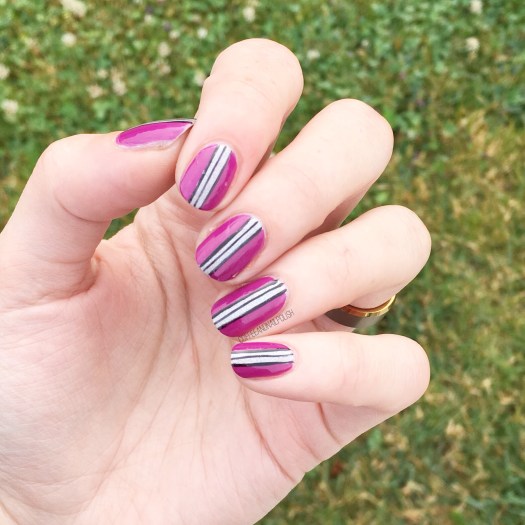
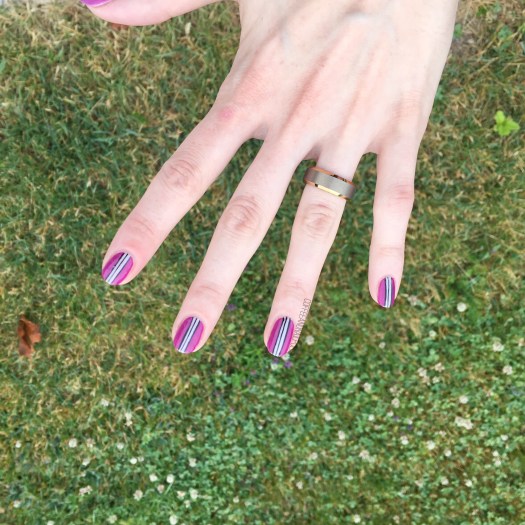
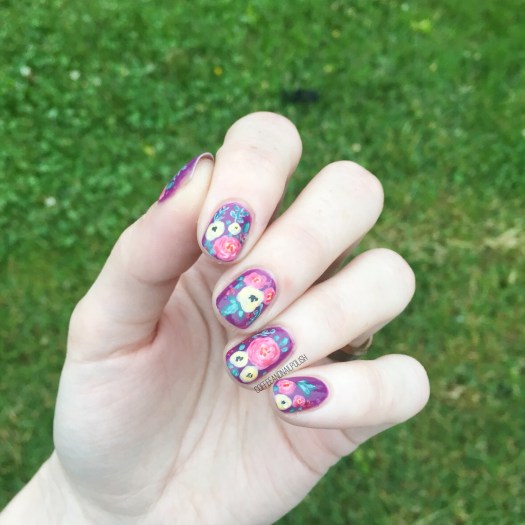
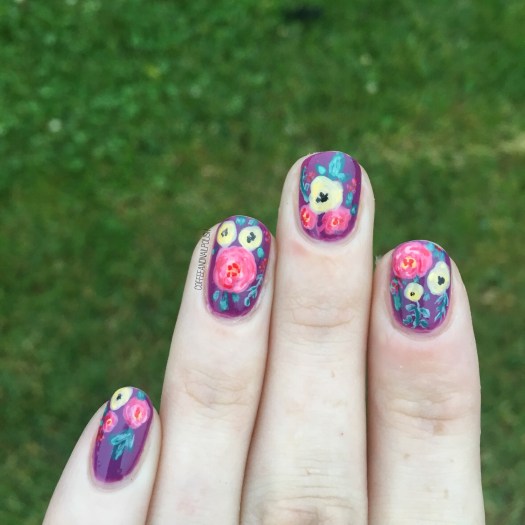
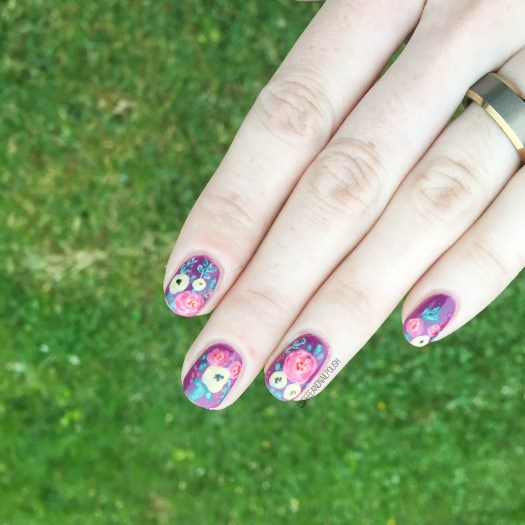
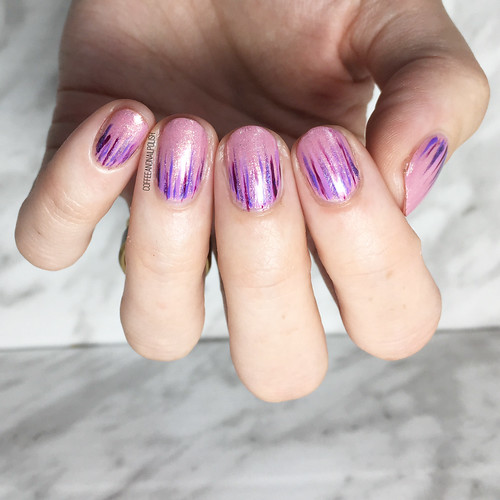
For my base, I applied two coats of Birthday Girl over one coat of The A-bliss. I then did a whole bunch of Pinterest stalking to see what kind of design I wanted to do overtop my base of Birthday Girl & in the end I decided a Waterfall look was the way to go! Do you remember when Waterfall designs were all the rage? I feel like this design needs to make a comeback!

3C197715-613B-4B6C-8739-90325123C31A

DF26AE0C-B843-43C7-B7C3-D9FD5043AFED

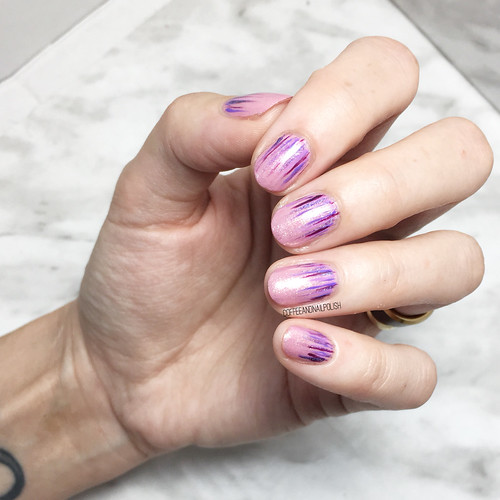
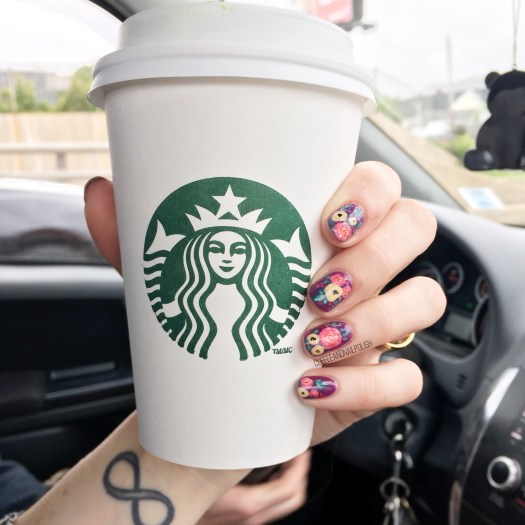
For this look I decided to pick a few purples that I thought would compliment my pink base. Then o used my liner brush from NailStuff to brush thin streaks of polish at my cuticle line, & bam! An low effort design that looks super fancy & fun. Kind of reminds me of sparkling fireworks at the base of my nails which is perfect for celebrating, even if my idea of celebrating is drinking my free birthday drink from Starbucks & playing with the new stamping plates my Mum bought me for my birthday! I can’t think of a more perfect day. ☕️💅🏻

06924BF0-00CA-4581-8459-66D69BCD6AE0

59F2C682-46CF-43FC-8C89-1023165DE1EC

Hope everyone has an amazing day! Let me know what you think about this look & what colour combination you’d love to see me do in a Waterfall look next! 💙

Purple & Silver Racing Stripes

Happy August lovelies. Its that time of year… stores are beginning to set up for back to school & my cravings for all things Fall themed hit hard. Thankfully the 30+ degree weather has been keeping me in a Summer state of mind & keeping neon shades on my nails!

Today’s nails is a simple look that’s easy to do, but makes your nails look way longer than they actually are thanks to the vertical stripes. It’s also a great way to practice your freehand line work! I feel like mine has gotten a little rusty, so I’ve been taking every excuse to practice.

For this design, the polishes I used were:

  • Base Coat: OPI Nail Envy
  • Top Coat: Essie Speed Setter
  • Essence We Will Spock You
  • YSL Beauty Violine Surrealiste
  • Kiss Products Nail Art Striper in Black
  • Born Pretty Store Aurora Rainbow Nail Striping Tape in purple (item #40423) — I used the thickest tape of the 3

Using striping tape for your initial line in the middle makes creating your smaller black lines much easier. & then end result looks so cool! & gives your nails the appearance of extra length. Plus, like I said, for those of us still working on freehanding straight lines, this really helps with practicing.

I just love how these kind of look like racing stripes. Sadly the holo of Essence We Will Spock You didn’t want to show thanks to a hazy morning, but the little hint of holo with the purple looked awesome!

Do you have a trick for making your nails look longer? Let me know your thoughts down in the comments below!

Vintage Roses (take #17283)

You know when you did that perfect pair of jeans or shirt or outfit that looks amazing, & fits your perfectly, & just makes you look amazing? You wear it constantly (maybe more than you should), because it just looks so good? That is how I feel about floral & vintage rose nails. & that is why I have ANOTHER floral design to share with you.

This design is actually inspired by an old design of mine, this time using blues instead of pinks. Yep, I’ve done a different version of these simple roses a lot but they never get old to me, so hopefully they’re not tired to you.

For this manicure, to polishes I used were:

  • Base Coat: OPI Nail Envy
  • Top Coat: Essie Gel Setter
  • Essie Find Me an Oasis
  • OPI Angel with a Leadfoot
  • Sally Hansen Complete Salon Manicure Rose to the Occasion
  • Essie Bachelorette Bash
  • Sally Hansen Insta-dri Petal Pusher
  • YSL Beauty Vert D’Orient
  • Essie First Timer
  • NailStuff.ca Mixed Decoration Nail Wheel in Gold
  • Small dotting tool
  • Small detail brush from Bundle Monster

Oooooh these roses over white is definitely one of my favourite accent nails to do. I love all floral nails, but there is something about vintage roses that just looks so good: easy to do, but looks beautiful & complicated every time. Not to mention, roses are one of the easiest florals to do because I find (for me at least), they’re one of ten hardest florals to mess up.

My tutorial on how I do roses is Here.

So what do you think of this design? Are you a vintage roses person or do you prefer other floral? Share your thoughts down below!

Rustic Floral Pattern Nails

Can you never have too many floral manicures in your life? Personally, I don’t think so. We all know how much I adore flowers–from clothes, to shoes, to cellphone cases to my nails, I can never have enough! Recently I found a Rifle Paper Co. phone case at Winners on payday, so I decided to attempt to recreate said pattern on my nails.

My attempt definitely turned out a little more rustic than its inspiration, but I think that is why I love the end result so much!

For this manicure, the polishes I used were:

  • Base Coat: OPI Nail Envy
  • Top Coat: Essie Gel Setter
  • Boho Green Make Up Moonlight
  • Quo by ORLY Breathable Pep in my Step
  • Sally Hansen Miracle Gel Pretty Piggy
  • Sally Hansen MG Pretty Peony
  • Sally Hansen MG Off the Shoulder
  • Essie A-List
  • China Glaze Sun Upon My Skin
  • China Glaze Metro Pollen-tin
  • YSL Vert D’Orient
  • Sally Hansen Insta-dri Thyme is Money
  • Essie First Timer
  • Sally Hansen I ♥️ Nail Art pen in Black
  • Bundle Monster detail brush

I’m kind of excited for Summer because it means I can change up my backgrounds & use outside. How lush does this design look with green grass in the background? Definitely throwing my pictures back to my pre-light-box days with these photos & I’m loving it! Seriously, staged photos are awesome but something about natural light makes your manicures look that much better.

If that doesn’t say Summer, I don’t know what else does! Also I’m never, ever going to get sick of doing floral. Never. How could you ever get sick of something so pretty! Hence why I keep filling my closet with more & more floral clothing pieces. The obsession continues! 🌿🌼🌱

what do you think of this design? Are you feeling Summery? Leave a comment down below & let me know!

Quatre-floral nails 🌸

Another day, another floral design to share with you! Hence the punny blog title! Today’s design is actually inspired by a sponsored ad that popped up in my Instagram feed. I was inspired by the combination of patterns that I decided to create a pretty Spring design with a mixture of patterns–quatrefoil & floral, with a few gold studs to bring the whole manicure together!

For this manicure, the polishes I used were:

  • Base Coat: Nailtek 2
  • Top Coat: Seche Vive
  • YSL Beauty Gris Underground
  • OPI Angel With A Lead Foot
  • OPI Mod About You
  • Sally Hansen Miracle Gel Bourbon Belle
  • Sally Hansen Complete Salon Manicure Rose To The Occasion
  • Sally Hansen MG Little Peony
  • Essence The Green & The Grunge
  • Essie First Timer
  • Sally Hansen MG Super Charge
  • Sally Hansen I ♥️ Nail Art pen in black
  • Bundle Monster Small Detail Brush
  • Bundle Monster medium sized dotting tool
  • What’s Up Nails Moroccan stencils
  • NailStuff.ca Mixed Decoration Nail Wheel in Gold

This design just turned out so fun! I love the combination of everything–colours, patterns & styles. The mixture of pinks (with grey) is so lovely for Spring. & I really, really love how my floral came together. Feels oh so very Spring like to me! & with sunshine & Spring temperatures today, it will be the perfect manicure for enjoying my day off outside today.

I love when my nails come together from random inspiration & turn out being a favourite design for me! Also I totally forgot how perfect this YSL grey was… it has a hint of purple in its undertones which the pink really brings out when they’re paired together. Oooooh between this design on my nails & the sunshine pouring in through my windows as I write this, I’m feeling Spring so much. In fact, since temperatures will be agreeable today, I’ll definitely be pulling out one of my Spring dresses or rompers to wear while adventuring today.

A shot of my pretty floral with the beautiful bouquet of flowers my husband surprised me with the other morning.

What do you think of this design? What was the last thing that inspired your nails? Share your thoughts down in the comments below & let me know where you find your nail inspo!