Mint & Floral 🌿🌸

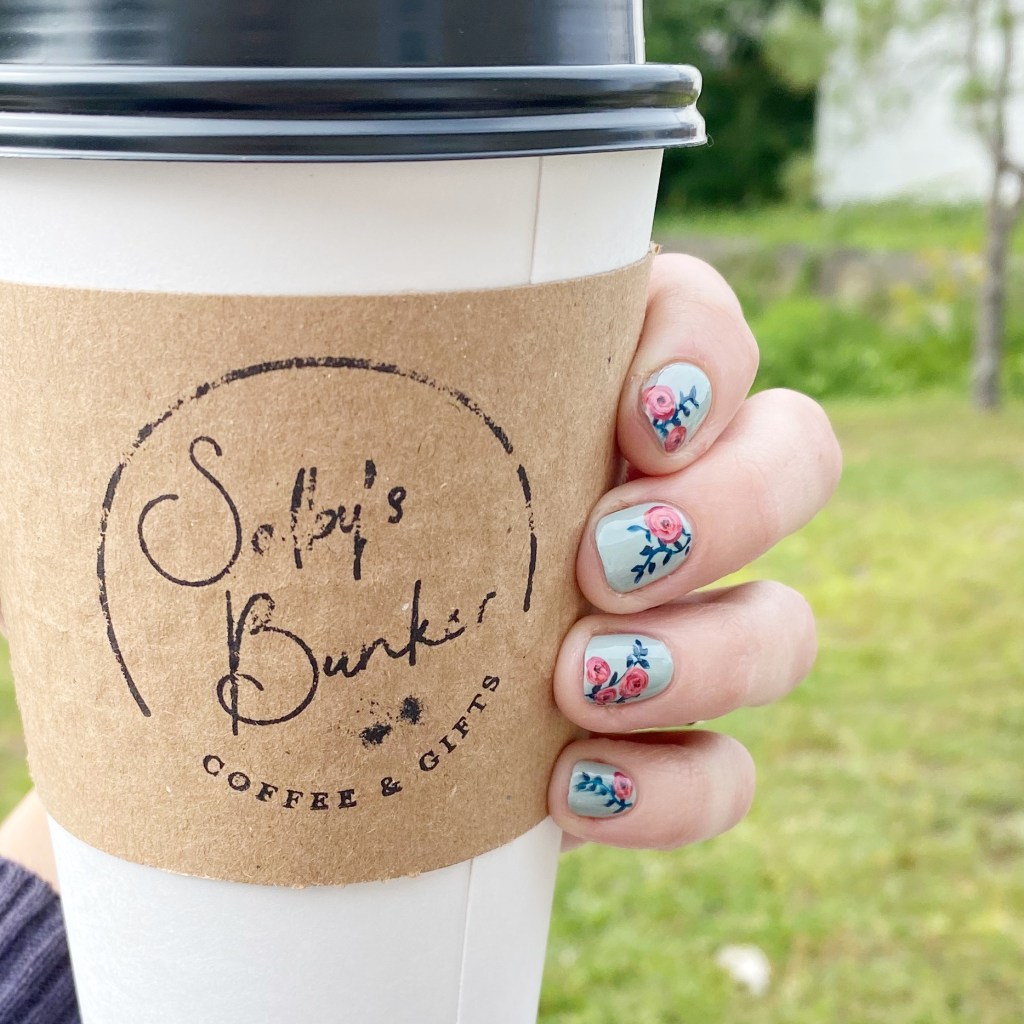
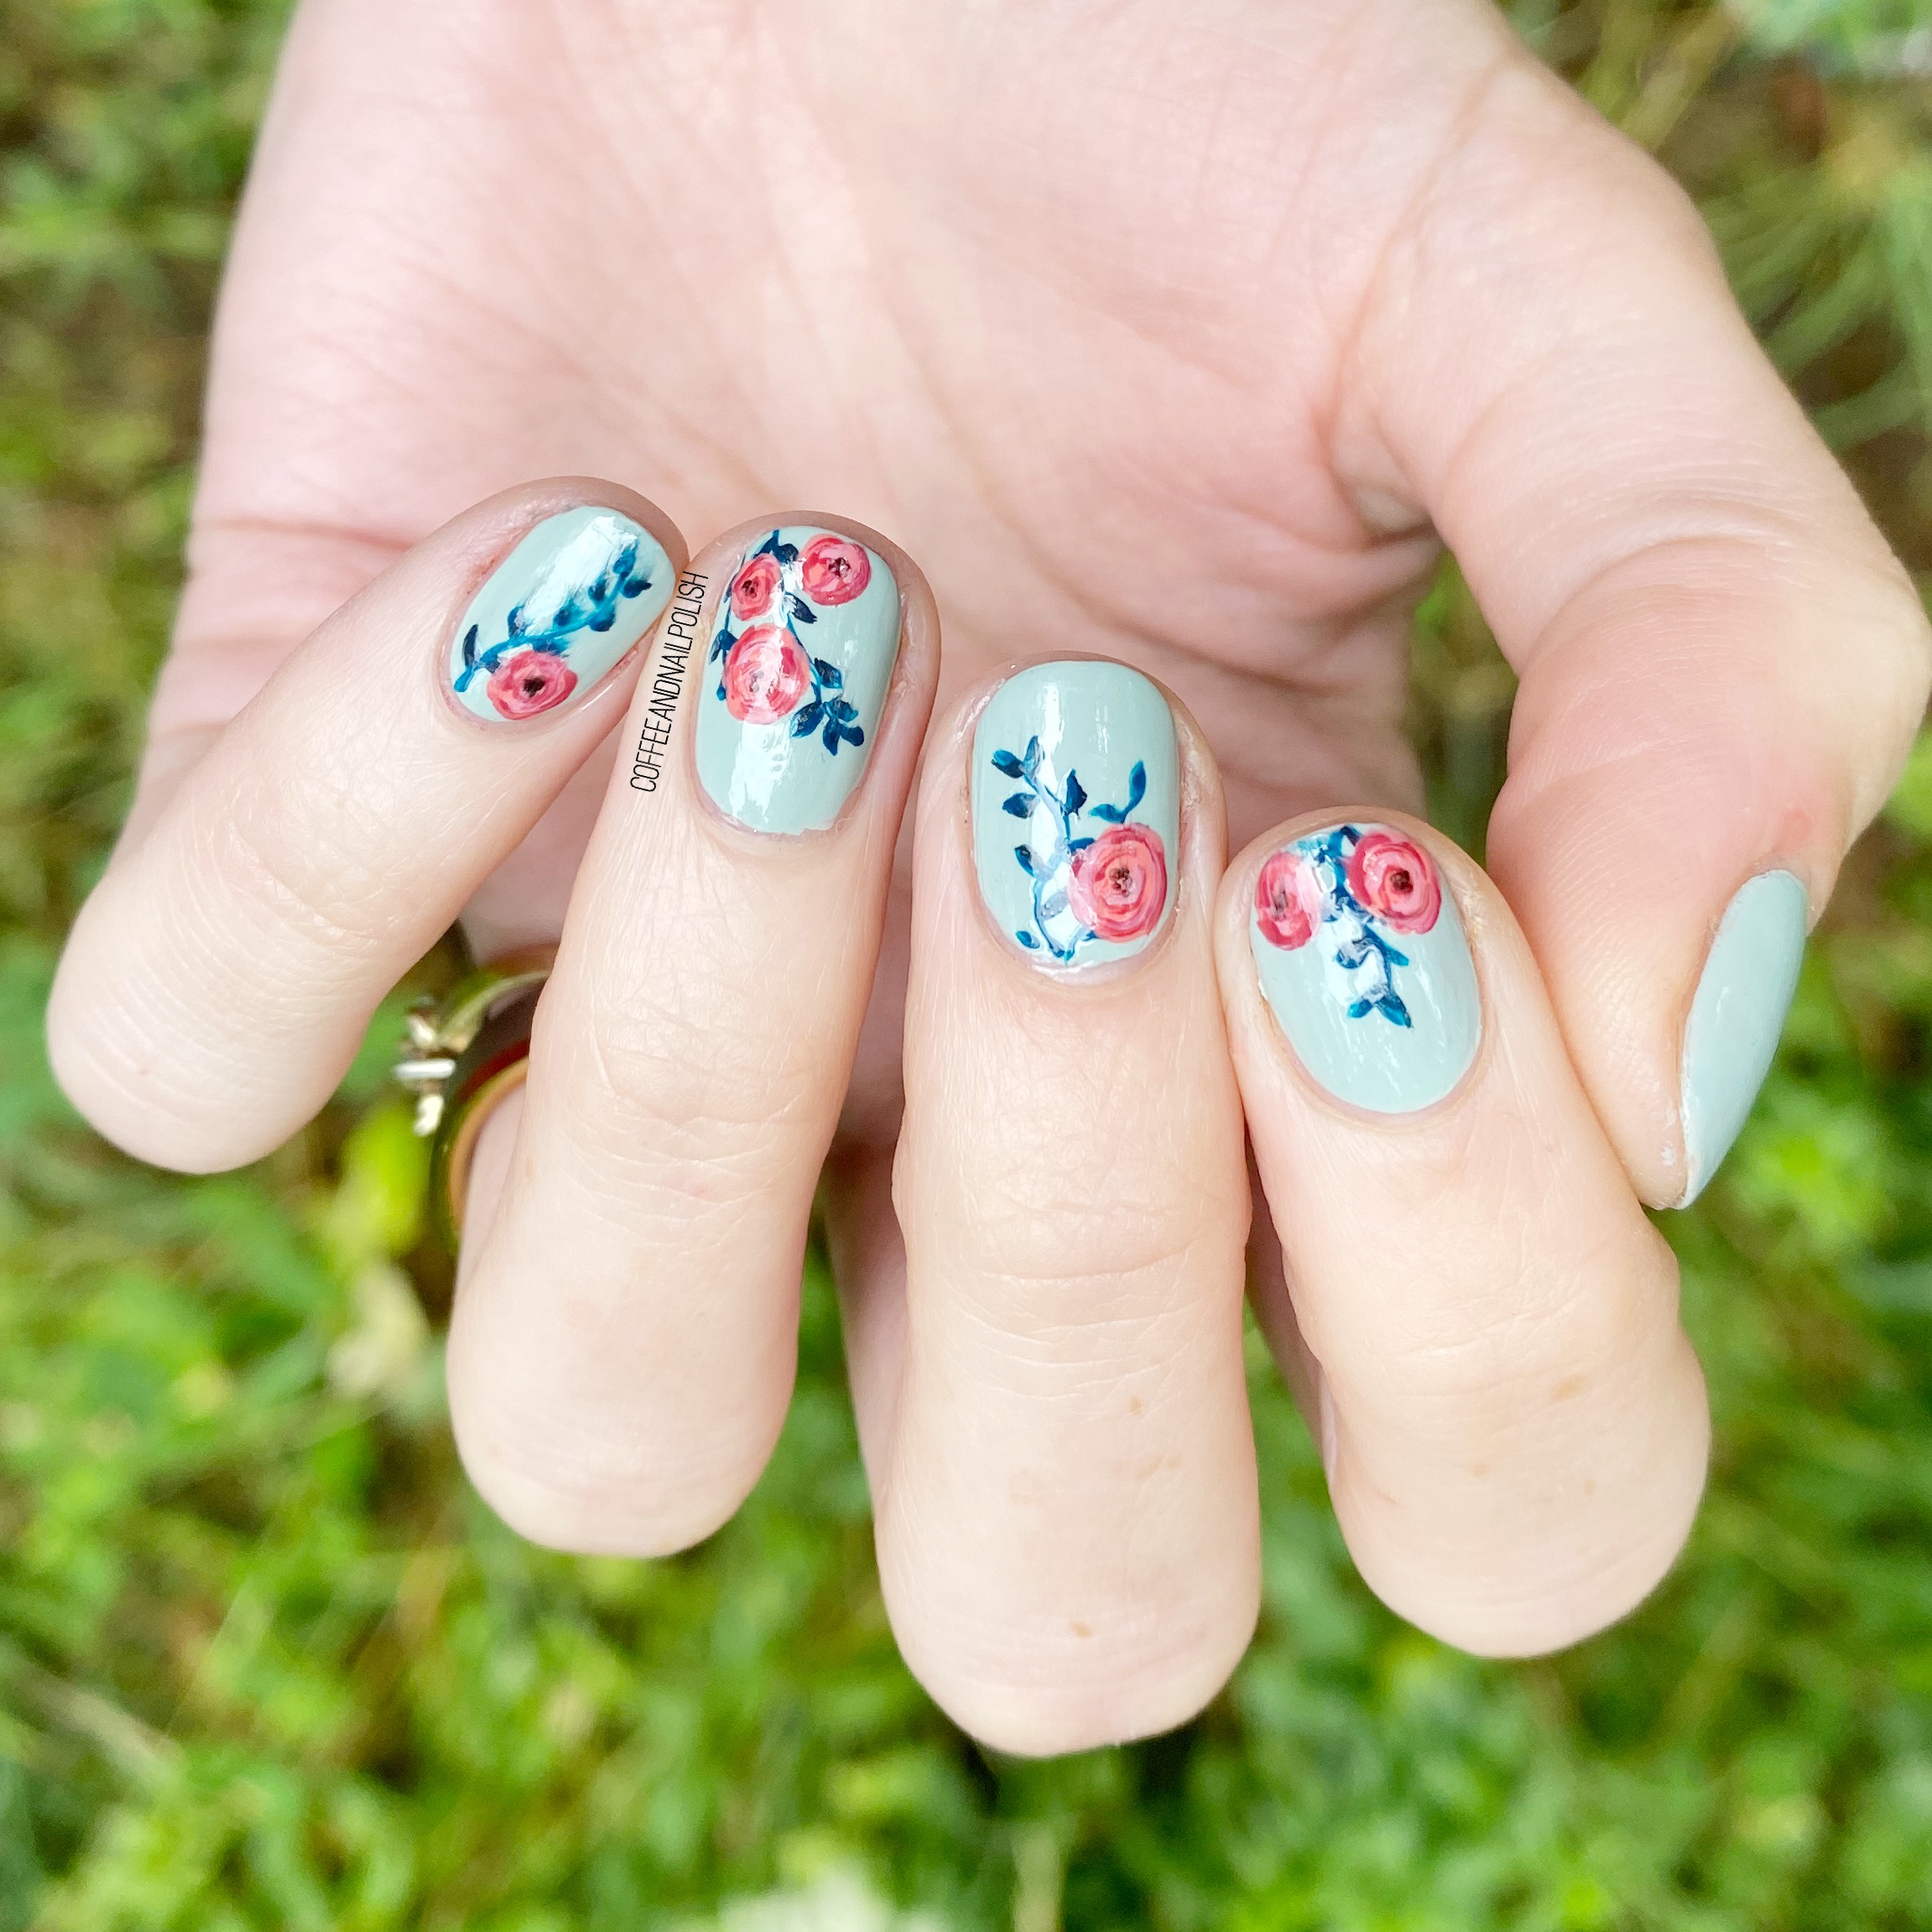
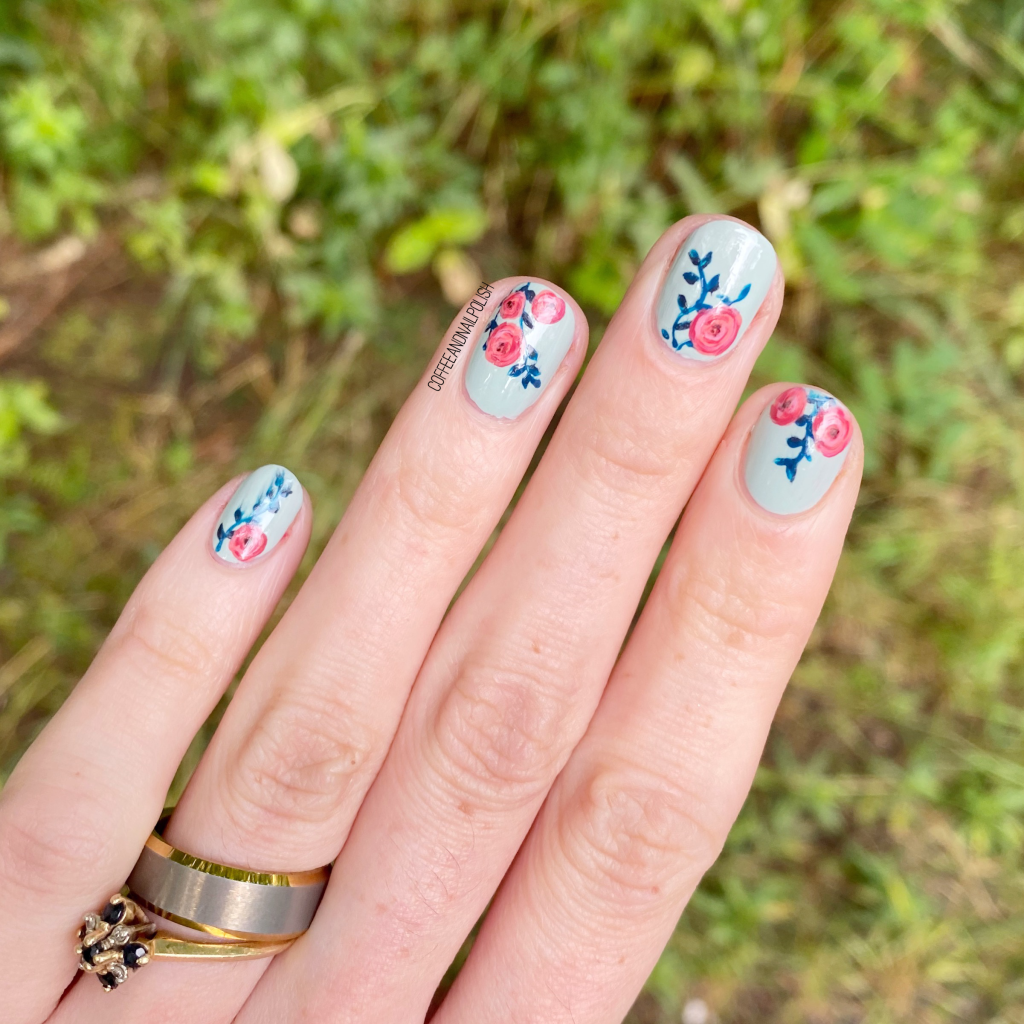
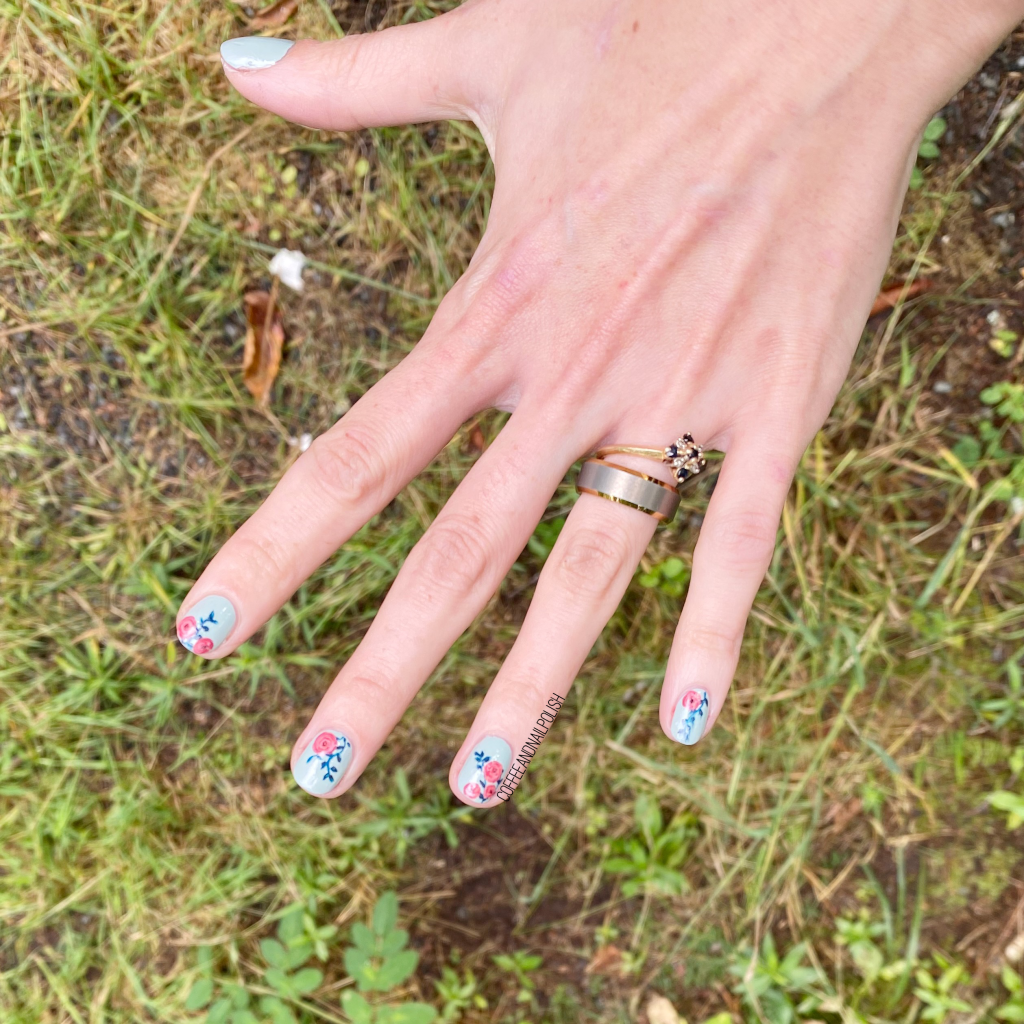
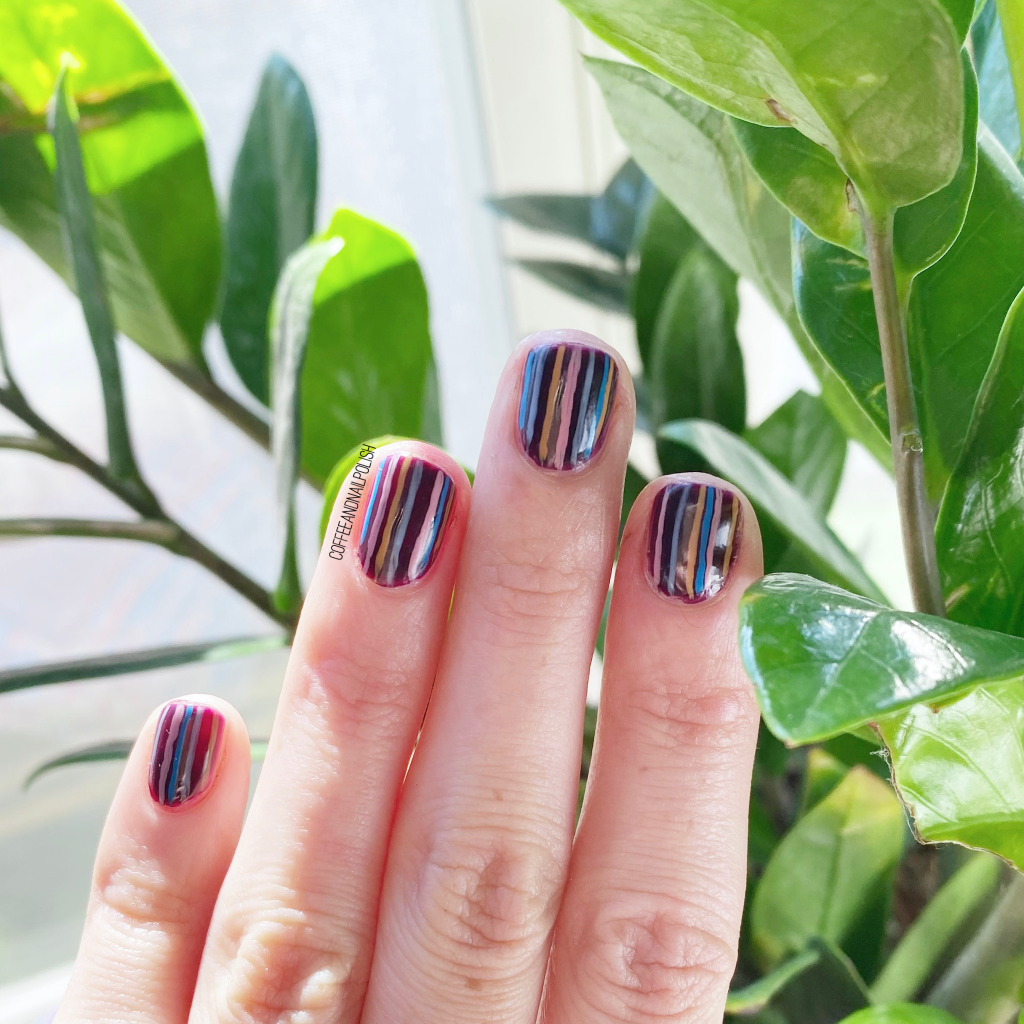
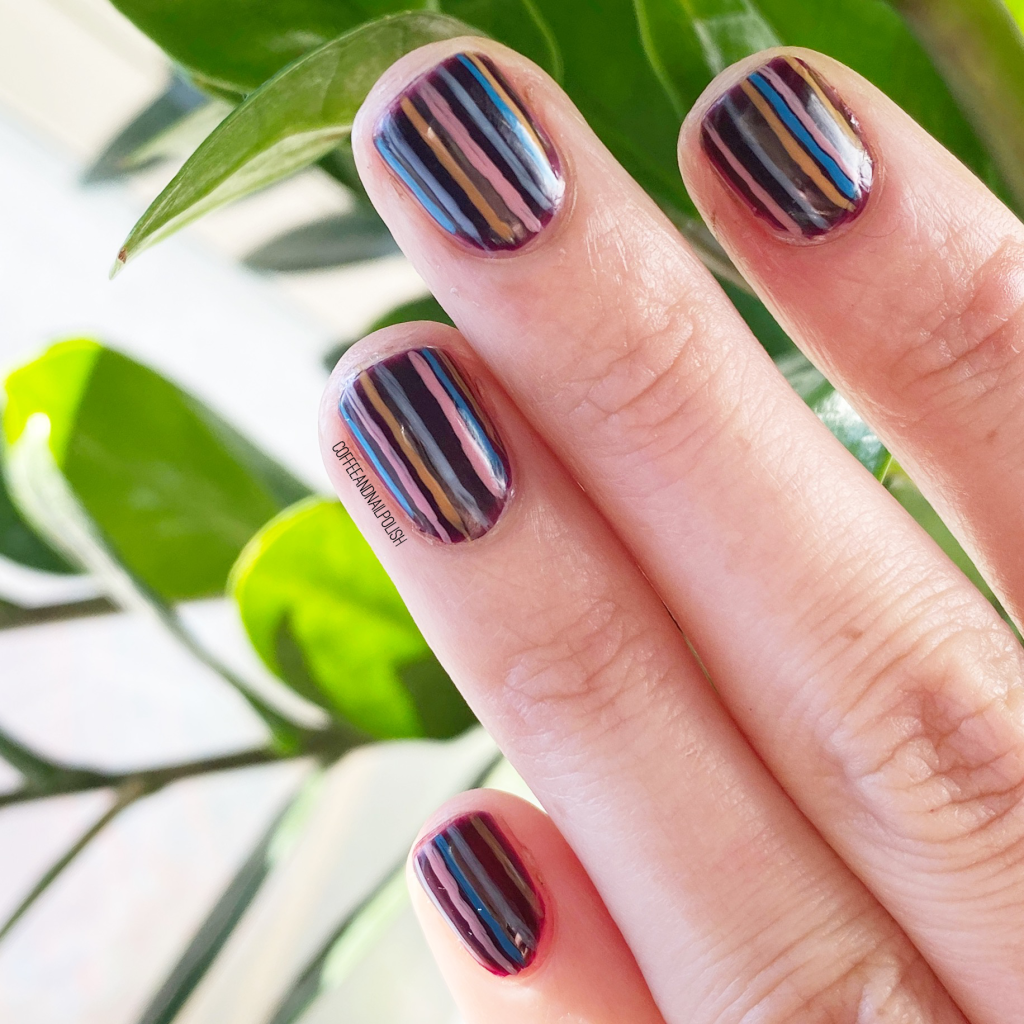
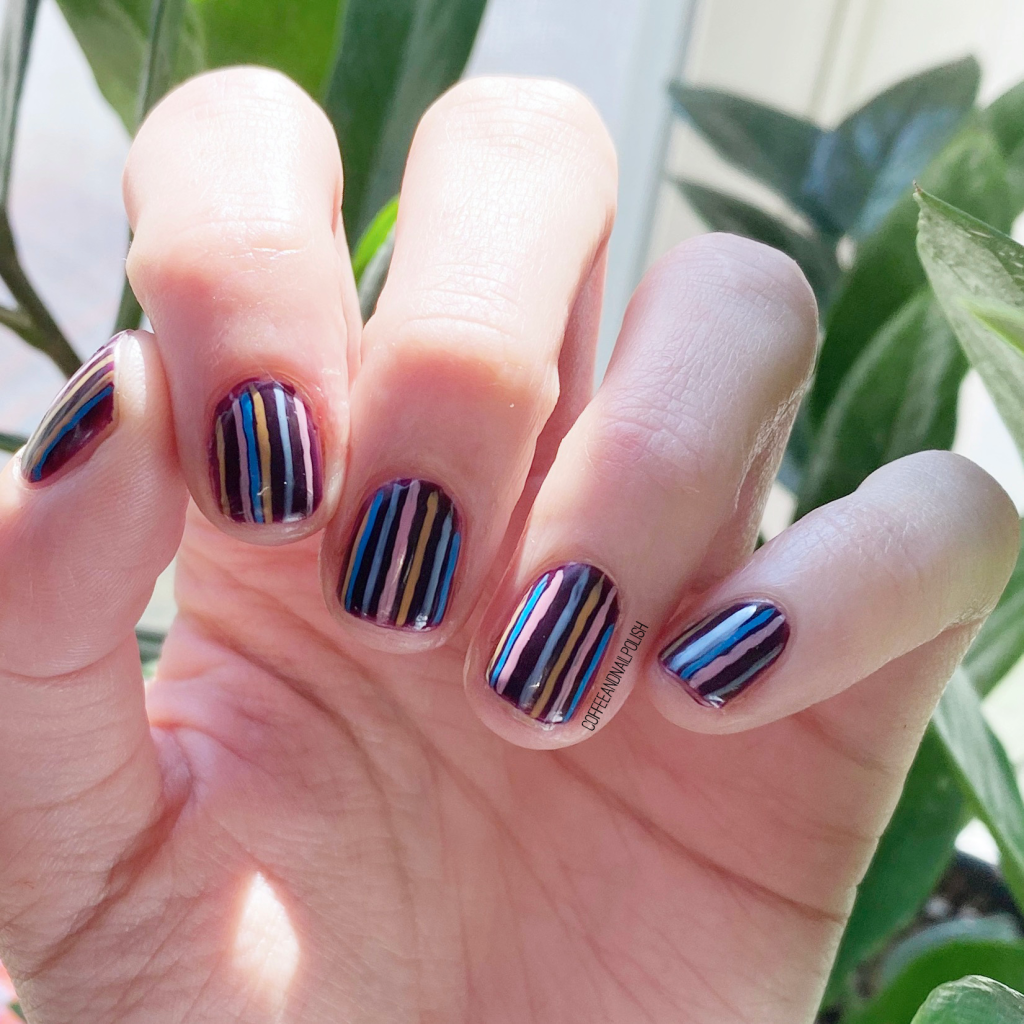
Hello lovelies & Happy Thursday. It’s been a minute since my last floral design, so I thought I was more than overdue. Truthfully, this started out as just a look featuring vining, but something felt like it was missing. So I freehanded a few roses & BAM! The look was complete!

  • Base Coat: Sally Hansen Hard As Nails
  • Top Coat: Essie Speed Setter
  • Sally Hansen Insta-Dri Thyme Is Money
  • Sally Hansen CSM One In A Melon
  • OPI Suzy Shops & Island Hops
  • Essie Stop Drop & Shop
  • Quo by Orly Diva
  • Essie After School Boy Blazer
  • Essence Black is Back
  • NailStuff.ca 4mm Micro Detail Brush (COFFEE10 saves you 10%!)
  • NailStuff.ca Dotting Tool Trio

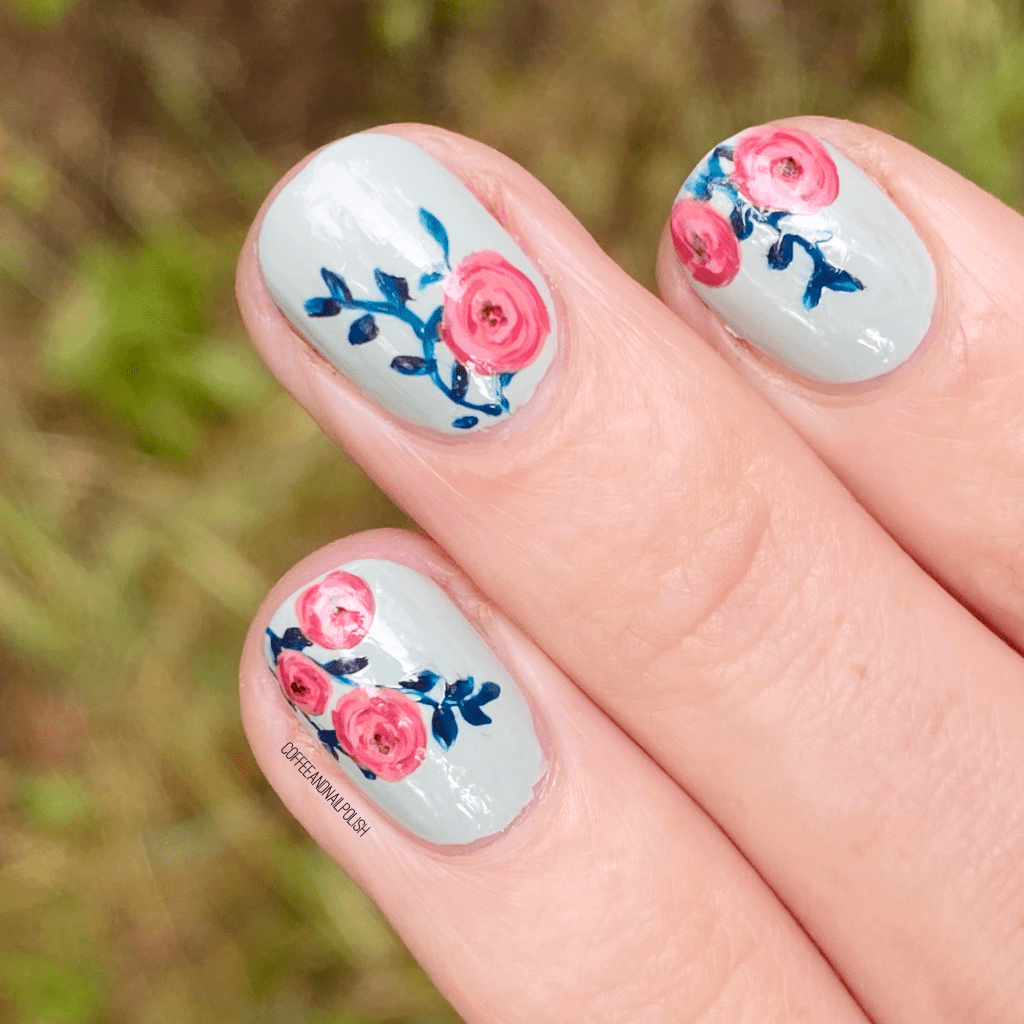
You know I love a good floral — clothing, nails, phone cases. Give me all the floral! Also I really love the look of a pink floral over a pale blue or green vase — it really makes the flowers pop! Also using the micro detail brush from NailStuff really makes a difference when I’m free handing florals. The roses turned out so realistic! I’m so absolutely in love with them.

What do you think about this freehand floral? Have you missed seeing floral on my blog? Let me know down in the comments below!

Freehand Moroccan Tile Accent Nails

Hello lovelies & Happy Tuesday! Hope everyone is enjoying the beginning to their week. Today I’m sharing a nail art look I did last week on a whim. I was just playing around with some lines, practicing, & ended up dreaming up these black & white Moroccan tile inspired accent nails.

& honestly, they turned out even more perfect than I had imagined!

  • Base Coat: OPI Nail Envy
  • Top Coat: Essie Gel Setter
  • L’Oréal Totally Turquoise
  • Sally Hansen CSM Let’s Snow
  • Essence Black Is Back
  • NailStuff.ca 4mm Micro Detail Brush (COFFEE10 saves you 10%!)
  • Small dotting tool (NailStuff.ca Dotting Tool Trio)

First off, I have to be honest & say that while this L’Oréal shade Totally Turquoise is beautiful, oh boy is she a stainer upon removal. Which sucks, because she’s such a beautiful colour! Secondly, I am so so so happy with how these accent nails turned out. They’re definitely a little bit different for me, but that’s why I love them! Especially the pinky, & they totally turned out like what I imagined in my brain.

Ahhh, they look so cool! & even though my line work isn’t 100% perfect, I think it adds to the design. They looks a little rustic, which is neat!

What do you think of this accent nail design? Do you like the black & white against the turquoise? Share all your thoughts down in the comments below!

Freehand Stripes

Good morning lovelies & happy Tuesday! Hope everyone is having a lovely week so far. ♥️ I’ve been mostly stuck in bed or on the couch because I messed up my neck somehow, but at least that gives me a chance to work on some blog stuff!

Now I know I said I wasn’t going to start thinking about Fall quite yet, but man… I had one sip of Pumpkin Spice latte & now it’s all I can think about! Haha. I kid, but I’ve definitely been finding myself drawn more to darker colours the last few times I’ve painted my nails. In fact, I’ve already switched my pedicure over! Today’s manicure was a combination of both; a little bit Autumn, with some lighter shades thrown in as well.

For this manicure, the polishes I used were:

  • Base Coat: OPI Nail Envy
  • Top Coat: Essie Gel Setter
  • Sally Hansen CSM Pat On The Black
  • Essie Kaf-tan
  • Essie Bikini So Teeny
  • Quo by ORLY Breathable Sheer Luck
  • Dimension Nails Blue Morpho Butterfly
  • NailStuff.ca 7mm detail brush(COFFEE10 to save 10%)

Stripes make your nails look longer, right?

As you might have noticed from Sunday’s swatch post, I’ve rounded my nails off again. I’m really trying to get them to grow a bit better, & I find an almond/rounded look suits me better for healthier nail growth. So we’re back to rounded, & hopefully with some serious nail self care, we can grow them super long again! (Like circa 2017 long!)

I really like the pop of colour on the dark base colour. Pat On The Black is such a perfectly dark burgundy shade, I love wearing it in the Fall. & when you add the stripes of lighter shades overtop, they really pop! It also lightens things up, so I’m not fully committing to Fall just yet. However, I’ll drink Pumpkin Spice if I want to… that I’m not budging on! Haha.

What do you think about this striped look? Do you prefer a square or rounded nail shape? Let me know down in the comments below!

Neon Dotticure (again 🕶)

Hello lovelies & Happy Thursday! I don’t know about where you are, but the August swelter is real here in Halifax. So I thought it would be a good idea to pull out some neons, embrace the heat, & enjoy what is left of Summer before I dive fully into wanting all things Fall (& it’s coming…. oh it’s coming!)

Today I thought I would share this fun neon dotticure I did with a few of Sally Hansen Miracle Gel’s neon shades they released last year! It’s fun, it’s bright, & it takes little real talent to look gorgeous, which is why they’re my favourite to do when I’m short on time, or too tired to function.

For this manicure, the polishes I used were:

  • Base Coat: OPI Nail Envy
  • Top Coat: Essie Gel Setter
  • Sally Hansen Miracle Gel Get Mod
  • Sally Hansen Miracle Gel Peach Please
  • Sally Hansen Miracle Gel Electri-Lime
  • Sally Hansen Miracle Gel Miami Nice
  • Sally Hansen Miracle Gel Fuchsia Fever
  • Sally Hansen Miracle Gel Violet Voltage
  • NailStuff.ca dotting tool from Dotting Tool Trio

Hey, so I know what you’re thinking: Hey Shannon, haven’t you already done a dotticure with these shades? Yes, yes I have. But that was a much more dainty dotticure, & this one is much more BAM! in your face. Or, at least that’s what I’m telling myself. Haha.

Or maybe I just totally forgot. I mean, 2020 has all kind of done our brains in a little bit. Who even remembers last year anymore?

What do you think about this dotticure redux? Are you still embracing the neon? Let me know what you think down below!

Blue & Grey Herringbone Pattern

Good morning lovelies & Happy Wednesday. I don’t know how it’s possible that we’re already half way through the week, but we are! & Today I’ve got a cute nail art look to share that is perfect for short nails (like mine!)

I’ve always been a fan of herringbone/chevron looks, mostly because they’re surprisingly easy to do! & for a bit of a rustic look like this, you don’t need to have the most perfectly thin of straight lines. & it will still look cute! This particular design was actually inspired by this pot, although I added the splashes of blue to make it a bit more Summery.

For this manicure, the polishes I used were:

  • Base Coat: Essie Strong Start
  • Top Coat: Essie Gel Setter
  • Sally Hansen Xtreme Wear Grey Area
  • China Glaze Boho Blue
  • Kiss Products Nail Art Striper in white
  • NailStuff.ca Dotting Tool Trio — I used the small one to fill in my blocks of colour! (Use COFFEE10 to save 10%)

I really really love how these turned out. My white Kiss striper is definitely on it’s last legs which led to a bit of messiness of my stripes, but I feel like it works with this kind of pattern. Truthfully, I could have used a striper nail art brush to achieve the same look, but I was short on time, & this was a bit easier. I will definitely have to try again though, maybe with a few of the Essie Summer 2020 polishes I just received! I think I could do a beautiful quatrefoil design with them too, so stay tuned for fun nail art looks!

What do you think about this herringbone look! I feel like it looks really good on my super short nails! It’s a great way to fancy them up! Let me know what your favourite short nail design is in the comments below!