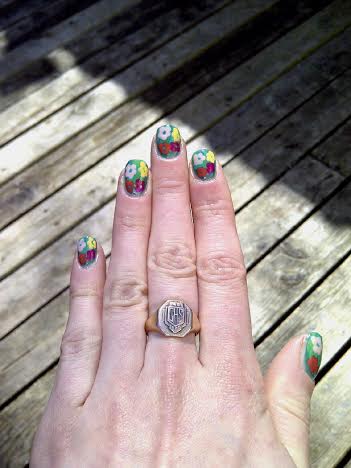
“You’re the boss, applesauce.” Andy Warhol inspired nails.

I’ve been all about the floral lately. I found these Andy Warhol inspired nails on Pinterest, and knew I had to recreate them. A few years ago, I was completely obsessed with everything Warhol related–I even had a pair of Levi’s from their Warhol collection. So I knew I had to create my own version of those flower nails.

Surprisingly, they were really easy to create.

andywarhol

First, I painted my nails with a base color of green. I used Sinful Colors Strapped. It’s a dark Forrest green, which dries to a Matte finish.

andywarhol2

Next, I created my “grass” using the dry brush technique with a collection of other green colors: ACO by Ardene in Sour Apple, ACO by Ardene in Green Peace and Sally Hansen Xtreme Wear in Kiwi Bikini.
andywarhol3

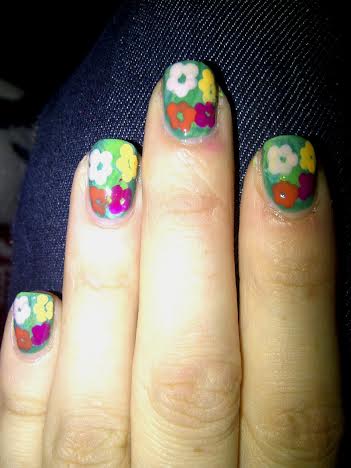
After my grass was complete, I created my floral using a medium sized dotting tool and my four colors: Essence Love Letter’s collection in Rosy in Love (light pink flowers), China Glaze in Metro Pollen-tin (yellow flowers), ACO by Ardene in Lollipop Queen (purple flowers), and Revlon in Siren (orange flowers).

andywarhol4

Finally, I finished off with a layer of Sally Hansen Diamond Flash (yey! I finally have a new bottle and am so happy) and tada! Andy Warhol inspired floral nail art.

andywarhol5

And in the sunshine. =)

andywarhol6

So what do you think of these Andy Warhol nails? Did I do justice to my original inspiration?
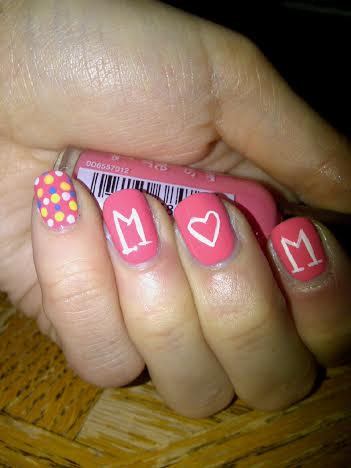
Mother’s Day Mani.

Yesterday, as I said in my previous post, was Mother’s Day. I worked all day, but afterwards we headed to my parent’s house for a Mother’s Day barbecue, so I wanted to paint my nails for the occasion.

I haven’t been doing a lot of nail art lately–a combination of being busy with work, and tired, and also wanting to re-wear old polishes I haven’t worn in a while. But I couldn’t pass up a chance to do something fun for Mother’s Day–that’s my favorite part of holidays… all the nail art possibilities.

mom

mom2

For this manicure I used:

  • Sally Hansen X-treme Wear in Coral Reef — my base color.
  • Stripe Rite Striping Brush in White — my lettering.
  • OPI My Boyfriend Scales Walls — polka dots.
  • Sally Hansen X-treme Wear in Mellow Yellow — polka dots.
  • Kozmic Colors nameless blue — polka dots.
  • Sally Hansen Diamond Flash Top Coat!

I hope all the Mom’s out there had a wonderful day! I made sure to spoil my Mom as much as possible. ❤

MeMomedit

(This is a super old picture–taken on my 25th birthday, but it’s okay because we both look fabulous!)

31 Day Nail Art Challenge — Day 20: Water Marble.

Okay, so I can’t water marble.

I can’t do it. I don’t know how people can create such beautiful water marble manicures, but I am not one of them. However, I didn’t want to not have anything to show for day 20–except a whole bunch of failure–so I looked up “water marble without water” in google, and what did it lead me to? A dry “water marble” technique. Score! So it’s not your typical water marbled nails, but it was something I could actually accomplish so I figured that was better than nothing!

(If you’re interested, I used this youtube tutorial by cutepolish.)

drywatermarble

The polishes I used for this manicure were:

  • Revlon polish in Minted–mint green polish.
  • China Glaze in What a Pansy!–purple polish.
  • OPI in My Boyfriend Scales Walls–white polish.
  • ACO by Ardene in Sea of Beauty–baby blue polish.
  • ACO by Ardene in Kiss from a Rose–pink polish.
  • Sally Hansen Diamond Flash Top Coat.

Even though I couldn’t do a proper water marble, I LOVE these. They spring color combination pops on the nail, and I just love the swirls. Even though I only did it on two accent nails for this manicure, I think it would love amazing all on my nails, and I will definitely be trying it again so I can play with it more (and with more color combinations).


Also, I’ve been thinking about this challenge, and I have to admit I’ve started to feel a little confined by it. I started it so I would have inspiration, but lately I feel like it’s restricting the manicures I want to do. There is SO much inspiration out there, and so many manicures I really want to try! I still want to finish the challenge, and not be a quitter, but I think I will be spreading it out with some other manicure ideas. Especially as my brand new dotting tool set just arrived, and I’ve yet to be able to really play with it, and it’s begging me to do some awesome floral nail art!


31 Day Nail Art Challenge — Day 19: Galaxy Nails.


I love the look of galaxy nails. Plus they’re fun to do. It’s been a while since I’ve done one, so I was excited to give it another try.

galaxy galaxy2


The polishes I used for this manicure were:

  • Mary Kay Nail Lacquer in Blue Knight — dark background.
  • Color Institute in gold (no official name on it.)
  • Color Institute sparkles (no official name on it.)
  • Revlon in I’m Electro.
  • Revlon in Spidey Sense.
  • Revlon in Orchid.
  • Pure Ice in Get in Line.
  • Pure Ice in Over You.
  • Salley Hansen Diamond Flash Top Coat

These didn’t turn out exactly like I imagined in my head, but I think it’s because the polishes I used were very pigmented, and I was a little too heavy-handed. I wanted to use metallic polishes, because I’ve never tried using them for galaxy nail art before. Never the less, I loved the sparkle that it give my galaxies! And even though I wasn’t sure if they looked a lot like the galaxies I wanted them to, but I did get lots of compliments which always makes me feel proud of the manicures I’ve done.

What do you think of galaxy nail art?

And what to you think of my attempt at metallic galaxies?

The 31 Day Nail Art Challenge — Day 18: Half Moons.

So I didn’t go exactly with the prompt for Day 18 of the challenge. After a long day at work, I kind ran out of time to do a traditional half moon manicure, so I kind of went the reverse, and revisited the ruffian manicure (which I’ve also seen referred to as a reverse moon manicure).

I’ve done a lot of typical moon manicures in my day — it was one of the first nail art techniques I tried, aside from polka dots. But I’ve yet to perfect the technique for the ruffian manicure, so that was another reason why I wanted to give it another try. Even though I’ve watched all the tutorials, I still can’t comprehend how people can get their lines so perfect!

reversemoonmanicure

reversemoonmanicure2

For this manicure, the polishes that I used were:

  • Essence Color & G0 in That’s What I Mint!
  • China Glaze in Flying Dragon
  • Sally Hansen Diamond Flash Top Coat
  • LA Girl Quick Dry Top Coat.

For a second attempt, these aren’t bad. As you can see, I missed a spot on my pinky finger when I was going through with Flying Dragon, which I didn’t notice until I took pictures. I still haven’t perfected the technique, but with practice it’s getting a little easier.

I really do love how the ruffian manicure looks–it’s a little something different from your typical moon manicure. And it’s a great way to play with different color combinations–you can color block, or choose complimentary colors. I really love the contrast of Flying Dragon and That’s What I Mint!


=)