More Christmas Tree Nails!

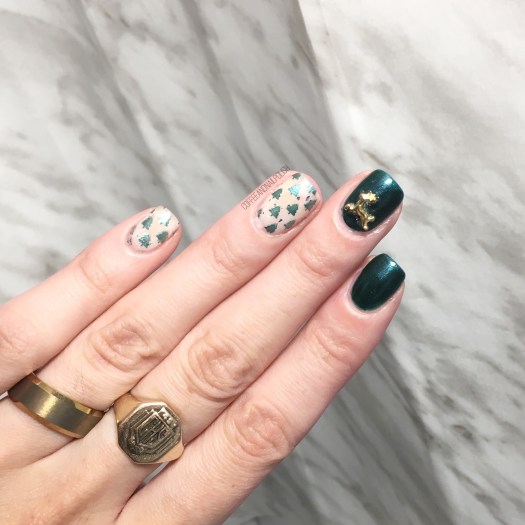
Okay, so I think I’m obsessed with Christmas tree nail art. 🎄 I seriously can’t get enough of them. This time I created some Christmas tree stamped nails using a design I didn’t even know I had! I was trying to create something new, & discovered on this plate I reviewed from the Summer that there was this cute tree pattern–perfect for Christmas nails! So obviously it meant I needed to try it out.

<<<<<
is manicure, the polishes used were:

  • Base Coat: Nailtek 2
  • Top Coat: Seche Vive
  • China Glaze Emerald Fitzgerald
  • Essie Tuck It In My Tux
  • Morgan Taylor Dreaming of Gleaming
  • Morgan Taylor Silver in my Stocking
  • Born Pretty Store Stamping Plate BPL015
  • Clear Jelly Stamper (also from Born Pretty)
  • NailStuff.ca reindeer studs

<

I really, really love how these turned out. i think they’re just so pretty. I tried out my hand at double stamping using silver under the green, but it’s very subtle. However it did make Emerald Fitzgerald pop a lot more, since it’s a little thin for stamping. Also, can we talk about these ADORABLE reindeer studs from NailStuff.ca? I used a whole lot of top coat to attach them to my nail & they lasted a whole day easily. Also they’re the cutest studs I’ve ever seen.

what do you think of this Christmasy design? Let me know your thoughts in the comments below!

Geometric Christmas inspired nails

Happy Tuesday! Can you believe it’s only 6 days until Christmas?! I hope everyone else is more prepared than I am–although I did get out some Christmas cards & finished the wrapping for my sister’s family, so I’m not completely behind. Today I have another simple Christmas design that looks just like wrapping paper!

For this design, the polishes used were:

  • Base Coat: Nailtek 2 Foundations
  • Top Coat: Seche Vive
  • Deborah Lippmann Through the Fire
  • Ardene Ice Mist
  • Zoya Ray
  • L’Oréal Feeling Kilty
  • The Base Coat Vinyls Triangle Pattern Stencil
  • NailStuff.ca triangle stud — Gold Mixed Decoration Nail wheel
  • Small dotting tool (to fill in the triangles)

I’m not going to lie–filling in each individual triangle was kind of time consuming but it is totally worth it! I’ve always been a fan of geometric designs, & I just love how these look. A dressed up Christmas design. & the little triangle stud mimics the look of the pattern but could also be a stand in for a Christmas tree. I just think these are so classy–don’t get me wrong, I love all Christmas designs. But I’ve had fun this year creating different designs that aren’t your typical Christmas looks.

What do you think of this design? Would you wear these? Let me know your thoughts in the comments below! 🎄

More Sweater Nails

If you follow me on Instagram, you might have watched my Instagram story & saw I broke my middle nail super short earlier this week. Like–beyond baby nails. But I do have some unposted manicures I was saving up for after we moved & I’m unpacking, so I’ll have a few long nails designs to share in the meantime.

Like these sweater nails! Who doesn’t love rocking sweater nails? With the dropping temperatures outside, I know I’ve been wearing nothing but my thickest sweaters (I don’t do well with the cold). So why not paint my nails to match?

For this manicure, the polishes I used were:

  • Base Coat: Essie Grow Stronger
  • Top Coat: Seche Vive
  • Sally Hansen Complete Salon Manicure Pat On The Black
  • Essie Topless & Barefoot
  • China Glaze Life is Rosy
  • URSugar Nail Stencil item AUB39877 — click to buy
  • MyNailsDid Nail Vinyl sweater pattern vinyl (they’re back up on her site!) & straight nail vinyls
  • NailStuff.ca small circle studs–Gold Mixed Decoration Nail wheel 
  • Small dotting tool

I just love how these turned out. I feel like the differing colours & patterns just bring the whole look together. I could honestly probably do this manicure in every colour combination possible, & never get tired of it! A little green & red & bam! You have perfect ugly Christmas sweater nails for your holiday party. (& now I must remember that because that is so happening now!)

Just looking at this design is making me really miss my long nails already. 😢 But rocking baby nubs just gives me the opportunity to come up with awesome & Pretty nail art for short nails. I’ve already got a few manicures I’m working on, so you’ll have to stay tuned! & if you have any requests, let me know.

<<<<<
o you think of these sweater nails? Would you match your nails to your favourite sweater? Let me know in the comments below!

Holo Accent Nails using NailStuff.ca Holo Pigment! 

Happy Wednesday everyone! The week is already speeding by, which is crazy—halfway to the weekend. To get us over this mid week slump, today I’ve got another item I was so kindly sent to try out by NailStuff.ca: holo pigment flakies. 

This is my first time ever using any kind of pigment for the nails (I know, I’m so behind on the times) so I was super excited to give it a whirl & also totally unsure of how to go about it. I know these pigments work really well over gel nails, but I change my nails too often for that so I decided to create these holo nails using just nail polish! So after watch a bunch of YouTube & Instagram videos, I felt pretty confident I could do this! 

For this manicure, the polishes I used were:

  • Base Coat: Essie Grow Stronger
  • Top Coat: Seche Vive
  • L’Oréal Pino Purple
  • NailStuff.ca Holo Pigment Flakies
  • Fingerpaints Peel Off Base Coat
  • Edge Perfection Cuticle Barrier  

To accomplish this look: 

  • I painted all my nails with L’Oréal Pino Purple (including my ring finger.) 
  • I applied top coat to all my fingers except my ring finger & on that nail I applied Fingerpaints Peel Off Base Coat. (I originally tried used just wet nail polish but found the flakies didn’t stick as well for me.)
  • Next I applied my Edge Perfection Cuticle Barrier around my ring finger & let it dry completely. 
  • I then took the small eyeshadow applicator that comes with the flakies, & patted them down onto the nail & tried to rub them in some. It took about 2 applications to completely cover my base. (You can see at the edge of my nails where I missed a few spots.)
  • Seal in flakies with top coat (I used Seche Vive for that shine.) 

Super simple & only slightly messy. I did end up getting holo flakies in my bed (where I do my nails pretty much always) which in turn ended up sticking to my son for a couple of days but nothing wrong with a little holo glitter! 

I will say, my second attempt using a sticky base coat over my polish worked much better (as opposed to using just my base of polish). The first time I tried half the flakies came off with my top coat, but it could be my polish had dried too much for the flakies to really stick. 

Have you used holo flakies before? Any tips  for application that you’ve discovered? Leave all your thoughts below! 

*PR SAMPLE* Some of these items were sent to me for review. However, all opinions are my own. 

Cosy Sweater Nails

Temperatures have been feeling much more seasonal the last couple days here in Halifax, which means I’ve been living in my most cosy of sweaters. & it also means I’ve been seriously digging sweater nail art! 

There is just something unnatural about rocking knit nails when it’s 18 degrees celsius outside (that’s 64 degrees fahrenheit to my non-Canadian friends!) So as soon as temperatures started to dipped, I decided to pull out my knit nail vinyls for some perfectly November-worthy nails. 

For this manicure, the polishes I used were: 

  • Base Coat: Essie Grow Stronger
  • Top Coat: Seche Vive
  • Essie Under the Twilight
  • Ardene Daydreamer
  • Sally Hansen Hard As Nails Hard To Get
  • URSugar Nail Vinyls item #AUB39877 — Click to buy
  • NailStuff.ca gold triangle studs — Gold Mixed Decoration Nail wheel 
  • Latex Free Make Up Sponge (for sponging over nail stencil) 
  • Edge Perfection Polish Barrier 

I’m really feeling this design using these heart/knit pattern vinyls from URSugar. They definitely remind me of a cosy sweater & just make me want to pull on my softest, most plush sweater & curl up on the couch with a peppermint mocha or gingerbread latte. This is my absolute favourite time of year & I just want to soak in every moment! Before we know it, snow will be falling & I’ll be complaining about being cold. 

What do you think of this design? Are you a fan of the sweater pattern nail? Share your thoughts with me down in the comments!