Christmas-y Glitter Gradient 🎄❄️

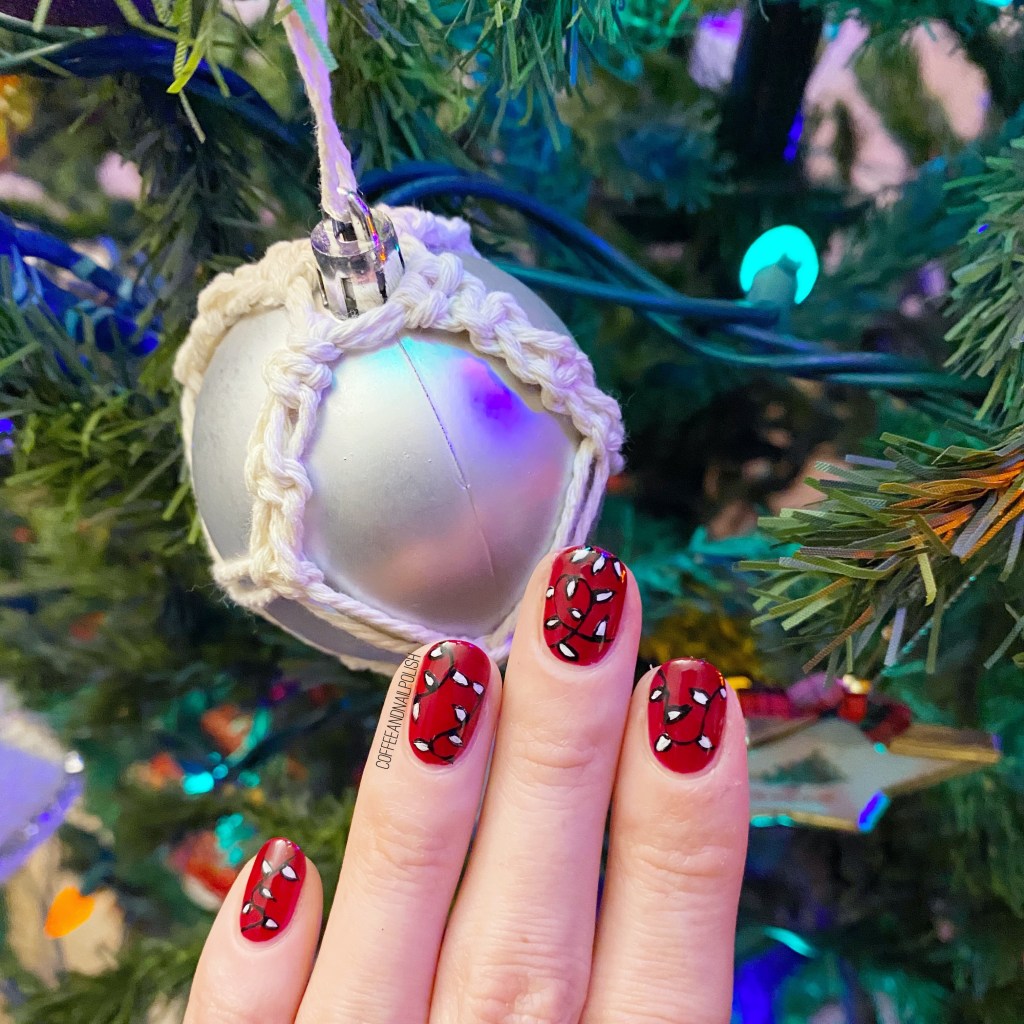
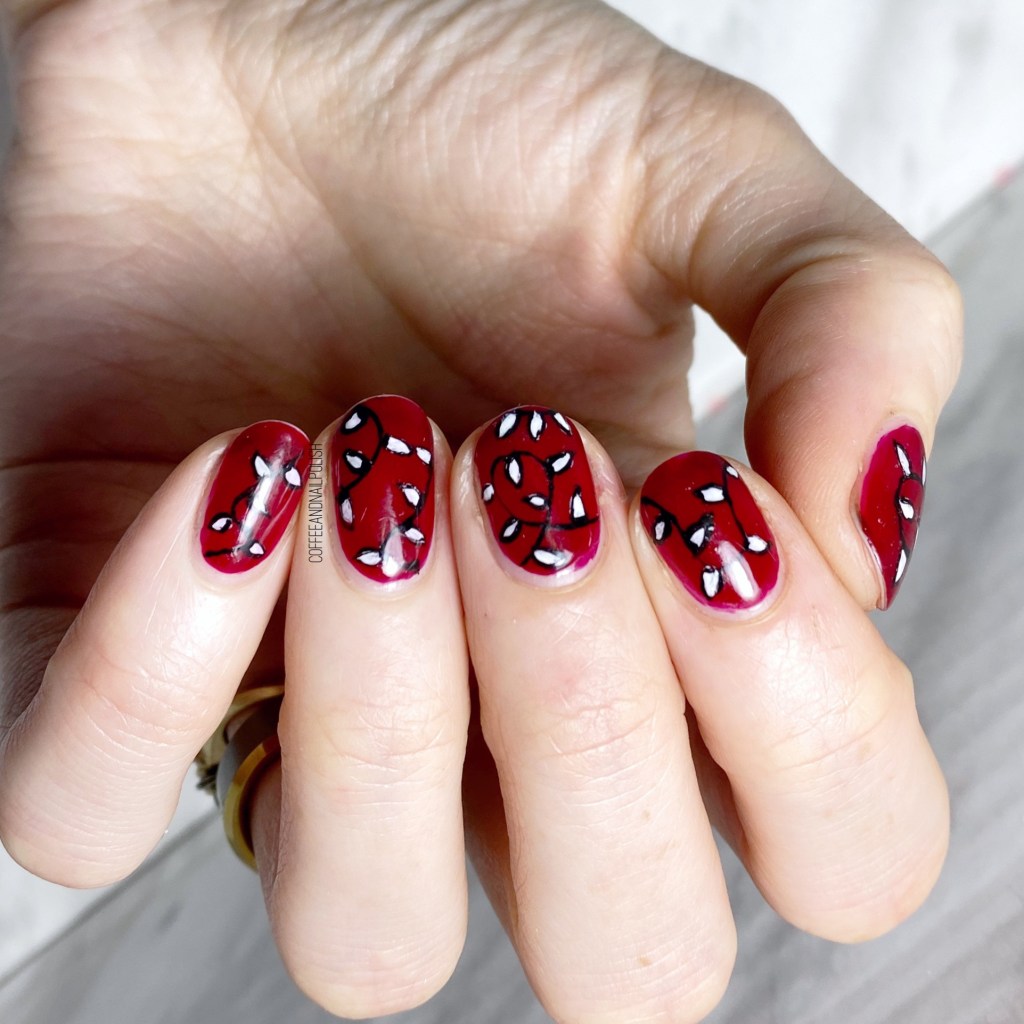
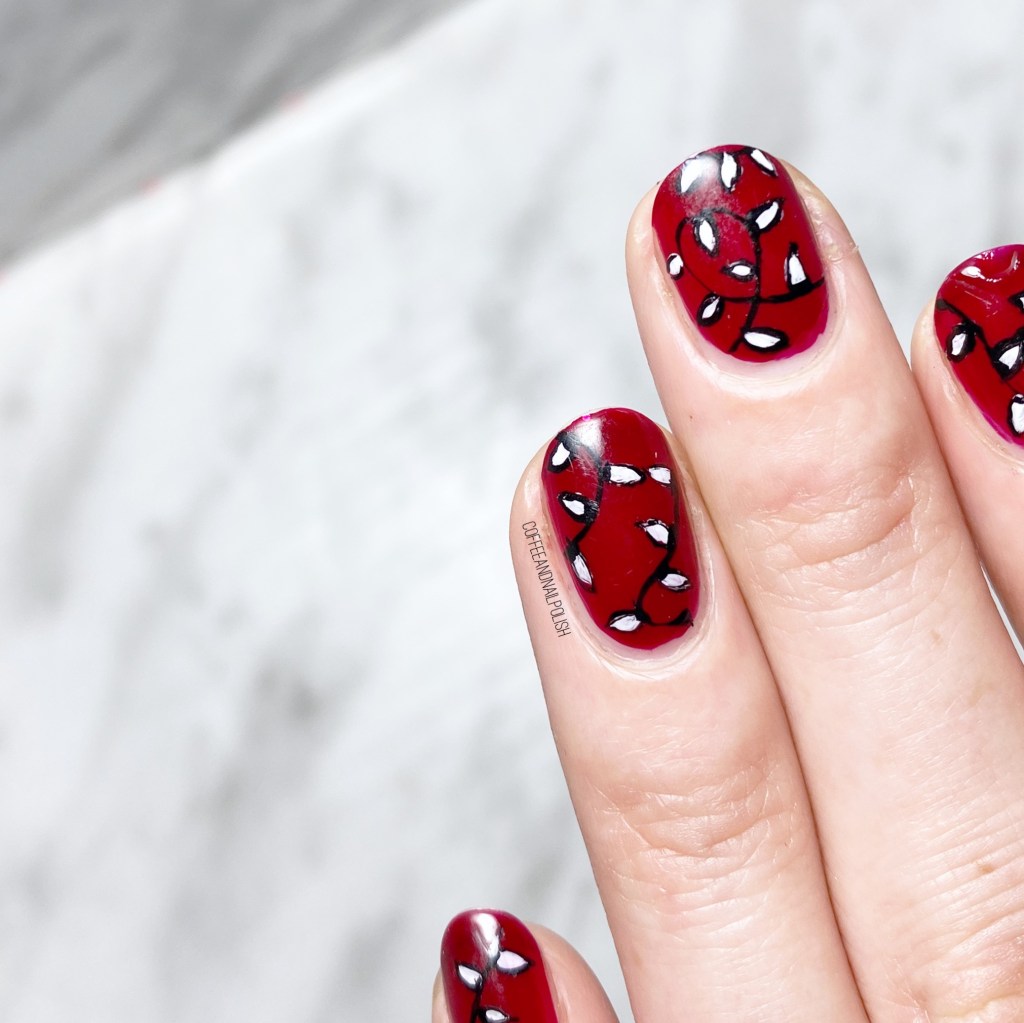
Hello lovelies & happy Tuesday! I know, I’m switching this thing up by posting on a Tuesday. I decided this week that I’m doing to (try) & post a Christmas design every day leading up to Christmas Eve! I just have so many design ideas I want to share!

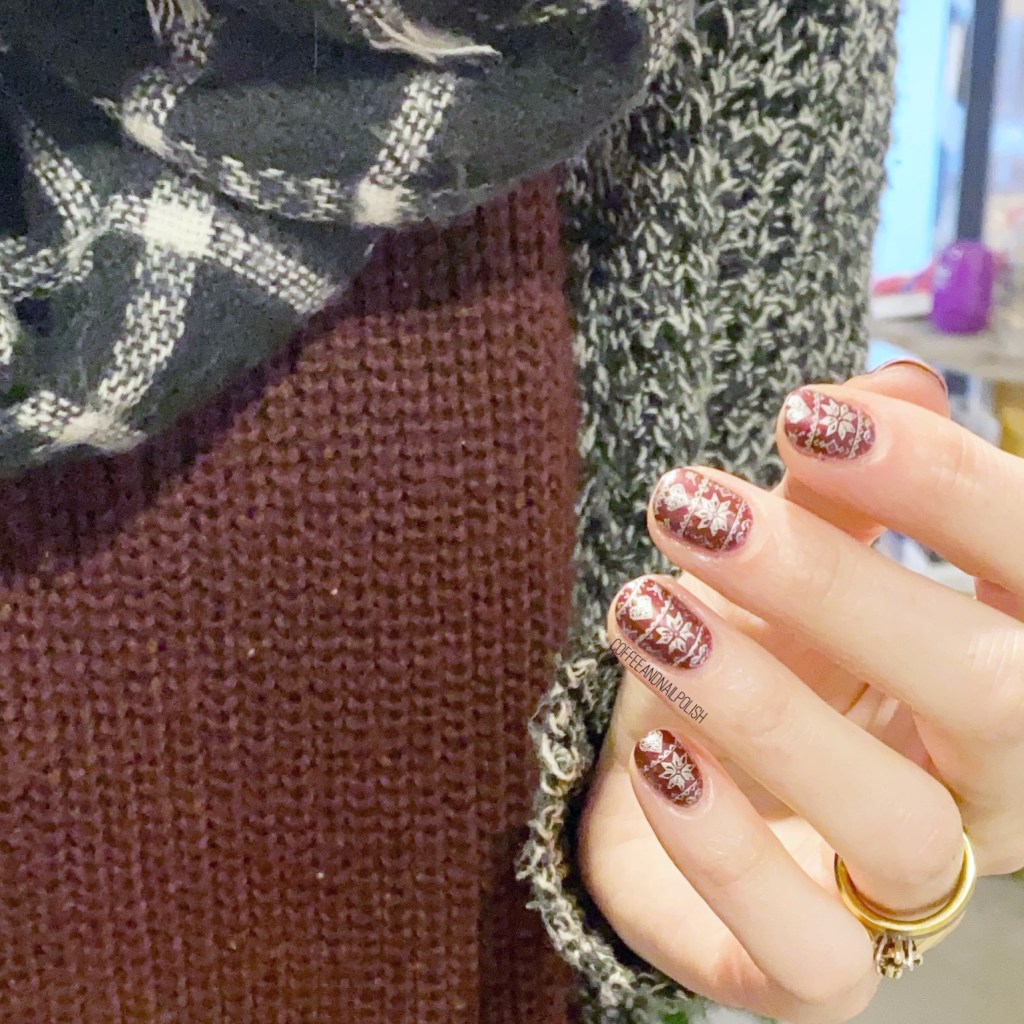
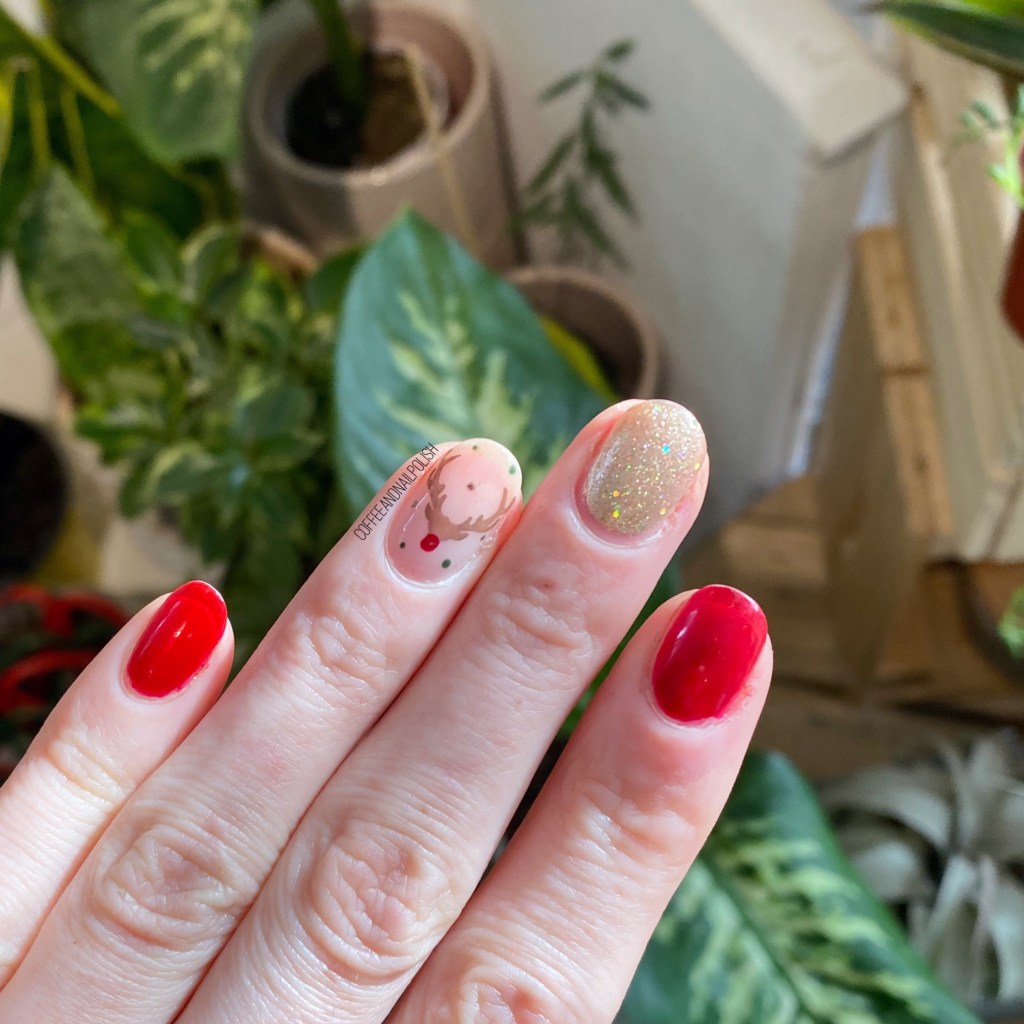
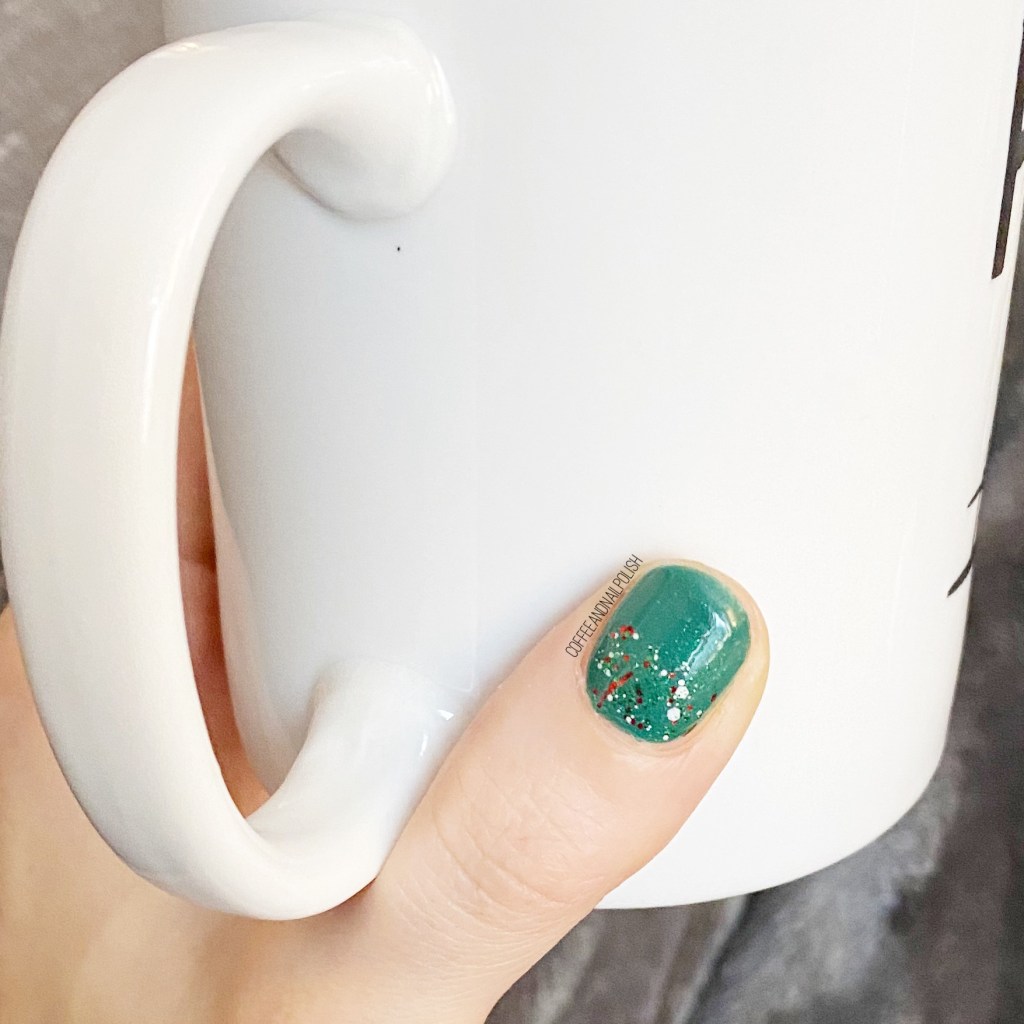
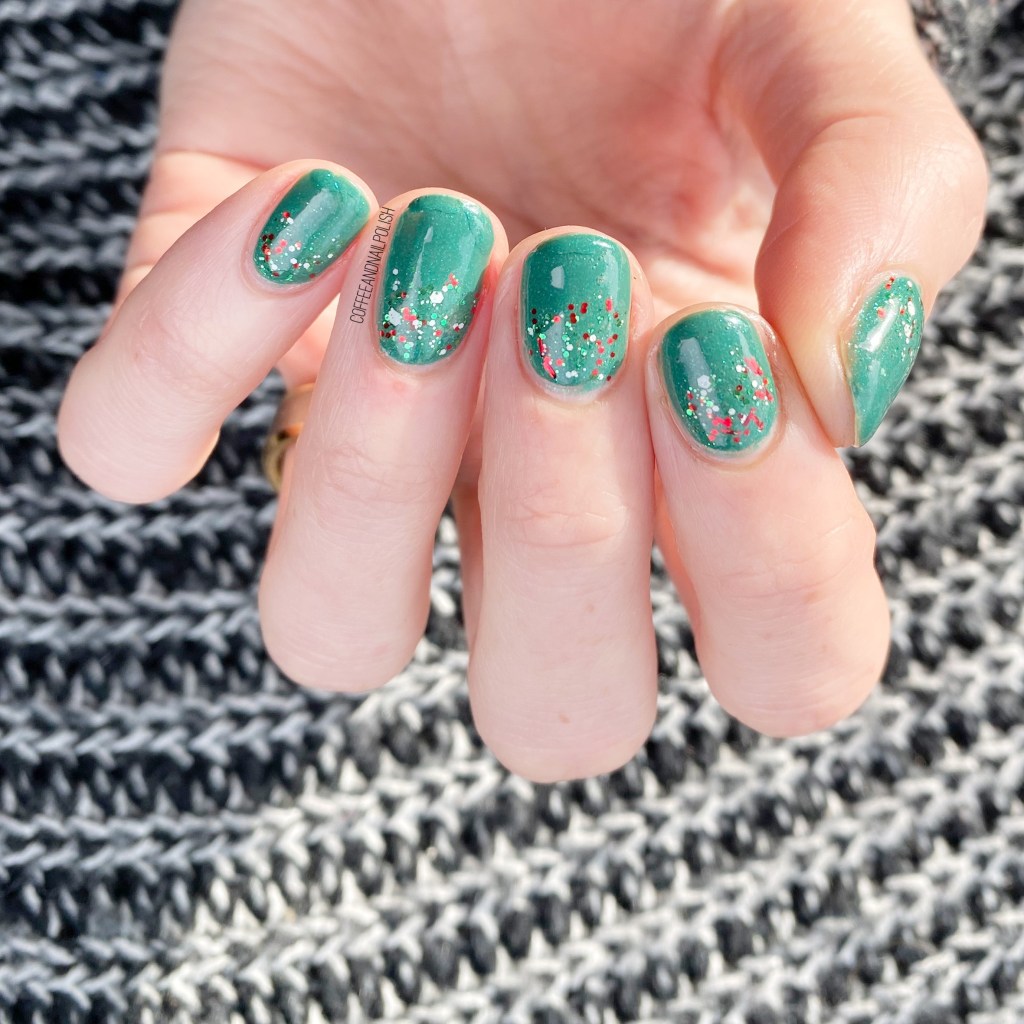
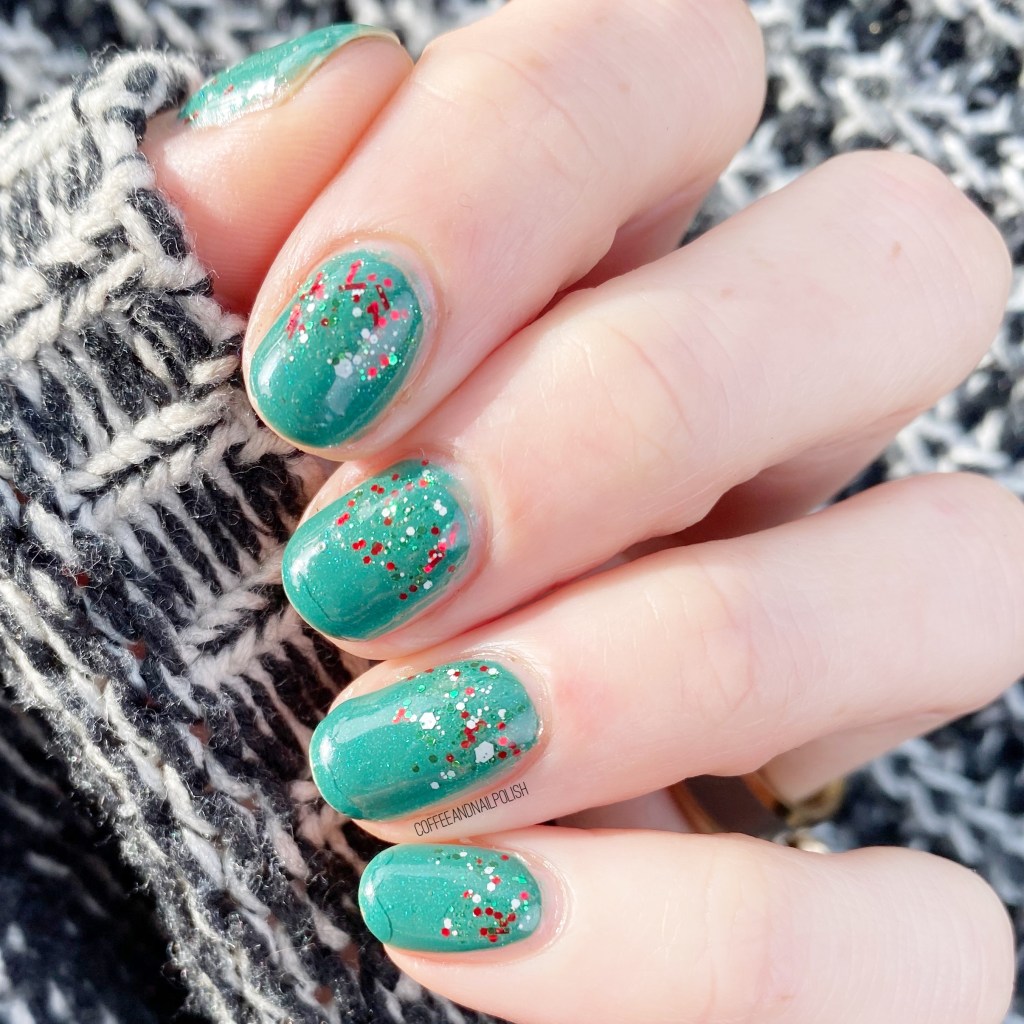
Today is a simple but effect look — a glitter gradient. Glitter gradients are definitely one of the best I-have-no-time-to-do-nail-art-but-I-want-fancy-nails designs but they take virtually not extra time to do. This one especially doesn’t require any tools at all—I just dabbed the glitter on using the nail polish bottle brush.

For this manicure, the polishes I used were:

  • Base Coat: Sally Hansen Hard As Nails
  • Top Coat: Sally Hansen Miracle Gel Glossy Top Coat
  • Icing Emerald City
  • Icing Santa Baby

How cute is that glitter on top of the green of Icing Emerald City? This is one of my favourite Christmas glitters of all time (I shared swatches of it last year), & I’ve done some version of this glitter gradient every year, with different base colours, because it works so well.

Also the polish is scented like candy canes when dry, even 5 years after I bought it, which I think is so much fun! The glitter also has a variety of different shaped glitters, which I really like, because it gives good dimension to the gradient so that it pops on the nail! In fact, I had a lot of people comment on my nails at work, which always brings a smile to my face!

What do you think of this glitter gradient? Are you a fan of this type of easy nail art design? What holiday design/polish are you currently wearing? I’d love to know, so please share down in the comments below!

#GlamNailsChallengeDec — Wrapping Paper

Hello lovelies & happy Monday! Hope everyone had a lovely & not too stressful weekend. We went out on a family (car) adventure to look at Christmas lights, which was lovely, & one of my favourite Christmas activities!

Today I’m sharing another beautiful Christmas-y look for #GlamNailsChallengeDec: Wrapping Paper.

For this manicure, the polishes I used were:

  • Base Coat: Sally Hansen Hard As Nails
  • Top Coat: Sally Hansen Miracle Gel Glossy Top Coat
  • Essence Give Me Nude, Baby
  • Essie Sparkle On Top
  • Zoya Ray
  • Essie Mosaic On Down
  • Deborah Lippmann Through The Fire
  • Sally Hansen Miracle Gel Get Mod
  • NailStuff.ca 16mm Nail Art Striper Brush (COFFEE10 to save 10%)

I loved how open this prompt was, because there were so many options! I decided I wanted to go with a nude-ish base, a little sparkle, & some Christmas-y stripes. It’s the kind of wrapping paper I would love to see my gifts wrapped under the tree. I loved the shimmer from the glitter (Essie Sparkle On Top) & the bit of shimmer in the nail polish.

There is just something about the subtle ness of the nude base, the bit of sparkle & the stripes that I just love.

What do you think about my wrapping paper inspired nails? Would you rock this design? Have you figured out your Christmas nail look? Let me know in the comments below!

Christmas-y Snowflake Sweater Nails

Good morning lovelies & Happy Friday! It’s a snowy Friday here on the East Coast, which is giving me serious holiday feels for the first time all month! ❄️ There is something about a blanket of freshly fallen snow that can make the biggest Grinch feel holly & holly. (Unless of course, you have to shovel it. Haha)

Today I thought I’d share some more pretty Christmas/Winter/Holiday nails. & yep, more stamping. A large majority of my stamping plates are Christmas related, hence why I tend to stamp more this time of year (also, it’s fast too, which I need when working 10 hour days haha.)

For this manicure, the polishes I used were:

  • Base Coat: Sally Hansen Hard As Nails
  • Top Coat: Sally Hansen Miracle Gel Glossy Top Coat
  • Matte Top Coat: Sally Hansen Miracle Gel Matte Top Coat
  • Deborah Lippmann Through the Fire
  • Essie No Place Like Chrome
  • Born Pretty Store Stamping Plate (no longer available)
  • NailStuff.ca Clear Stamper

Such a cute look for Christmas, or Winter in general. & a sweater inspired look is definitely a go-to design for me during this time of year. I’m just sad this particular stamping plate is no longer available, although I’m sure there are 1000 similar ones you can definitely find online. I just adore the little hearts in this pattern! 💗❄️ & of course, have to finish everything with a swipe of matte top coat, because it just completes the whole look!

What do you think about these cozy nails? Are you more of a fan of stamping, freehand, or nail vinyls? Let me know in the comments below!

#GlamNailsChallengeDec — Reindeer 🦌

Hello lovelies & happy Wednesday. We’re officially halfway through December & Christmas is a week away! How did that even happen? But I’m loving just all the Christmas nail art looks I’ve been wearing — definitely the most wonderful time of year for nail art!

Today we have another #GlamNailsChallengeDec look to share! Today’s prompt is Reindeer, so naturally that meant I needed to pull out my favourite reindeer stamping plate design for some Rudolph nails!

For this manicure, the polishes I used were:

  • Base Coat: Sally Hansen Hard As Nails
  • Top Coat: Sally Hansen Miracle Gel Glossy Top Coat
  • Sally Hansen Miracle Gel Good Cheer-y
  • Sally Hansen Miracle Gel Goldie Rocks
  • Essie Mosiac On Down
  • Essence Give Me Nude, Baby
  • Zoya Ray
  • OPI How Great Is Your Dane?
  • NailStuff.ca Dotting Tool Trio (COFFEE10 saves you 10%!)
  • Born Pretty Store Stamping plate BP-L032 (item #23268)
  • NailStuff.ca Clear Stamper

Oh man, this look is just classic Christmas, & I love it! It was also a really easy look to do — the hardest part was the stamping, but as you can see, it turned out perfect! If you don’t have a stamping plate (or don’t like stamping), a nail vinyl would work just as easily! A perfect look for Christmas morning. 🎄

What do you think of this reindeer look? Do you enjoy these festive designs I’ve been sharing for #GlamNailsChallenge? Don’t forget to check out all the lovely looks people have been sharing.

Have a lovely Wednesday!

#GlamNailsChallengeDec — Christmas Lights

Good Morning lovelies & Happy Monday! Can you believe it’s only 10 days until Christmas Eve? Who else isn’t finished their shopping yet? 🙈

Today it’s time for another #GlamNailsChallengeDec look — this time the prompt is Christmas Lights. Originally I did a more tradition Christmas lights look, but I completely smeared it when I applied my top coat, so I went back & redid them as another design. & this is actually a recreation of a look I did 4 years ago that were inspired by one of the Starbucks Red Cup designs!

For this manicure, the polishes I used were:

  • Base Coat: Sally Hansen Hard As Nails
  • Top Coat: Sally Hansen Miracle Gel Shiny Top Coat
  • Sally Hansen Miracle Gel Can’t Beet Royalty
  • Sally Hansen Miracle Gel Get Mod
  • Starrily Nails VantaBlack
  • NailStuff.ca 4mm Micro Detail Brush (COFFEE10 saves you 10%!)

I’m really digging this look. Yes, it’s not your traditional Christmas Lights look, but I’m kind of glad my first design got all smeared (although, definitely wasn’t in the moment, haha!) It gave me a chance to recreate one of my favourite nail art looks from a few years ago! & I definitely love taking a trip down (nail art) memory lane!

What do you think about this take on Christmas lights? Do you like my white light look? Are you more of a coloured Christmas light person, or an all white Christmas light person. We are definitely team coloured lights here— there is something about them that just feels way more Christmas-y! 🎄