Spring floral.

First, I have to apologize for my lack of posts recently. After getting promoted at work, my ability to sit down and write a blog post took a bit of a hit. But I’m back, and I plan on finding the right rhythm so I can start posting a couple times a week again.

Is anyone else seriously craving Spring?

I don’t know where you live, but we’ve had a seriously messy and frigid Winter. Too much snow! Too much ice! So I’m all about Spring right now. Even if it seems a million miles away, I can still embrace Spring on my fingertips!

IMG_3836


IMG_3839

The polishes used for this pretty floral are:

  • Essie Strut Your Stuff (Bright Blue)
  • OPI Angel With A lead foot (White)
  • Icing Cupcakes and Caviar (Darker Pink)
  • OPI Suzy shops and Island Hops (Light Pink)
  • Essie Parka Perfect (Light Blue)
  • Sally Hansen Golden-I (Gold)
  • Sally Hansen I Love Nail Art pen in green
  • Sally Hansen Nail Art pen in navy
  • Seche Vite top coat.
  • L’Oreal The Matte Velvet top coat.

I’m so seriously in love with this mani. My only complaint is that I only did my floral as accent nails instead of a whole mani. Also I’ve found the best matte top coat in the whole wide world! Look at this beautiful matte goodness. If you are looking for an amazing Matte top coat, you simply must search it out!

I have ideas about doing a whole blog post dedicated to the perfect colours for Spring so I must ask–what is your go-to Spring polish? I’m still on the look out to add to my collection so let me know in the comments below!


Waterfall nails.

As I teased yesterday, I wanted to create some fun nail art using Peek a Blue as my base color. Last Summer, I remember seeing waterfall nail art everywhere. I haven’t done a waterfall nail in a while, so I decided Peek a Blue would be the perfect base color for my nail art.

waterfall

waterfall2

The polishes I used for this manicure were:

  • Sinful Colors Be Happy & Icing Peek a Blue — my base color.
  • ACO by Ardene Blue Tide.
  • Nicole by OPI What’s the Mitch-uation.
  • The Color Workshop unnamed shimmery blue.
  • ACO by Ardene Midnight Stars.
  • QUO by Orly unknown mini blue polish.
  • Sally Hansen Diamond Flash Top Coat.
  • Icing’s It’s a Matte World matte top coat.

I feel like it turned out pretty well, even though it’s far from perfect. Next time I would definitely paint my waterfall lines slightly longer. Also I don’t know what I was thinking adding Midnight Stars–I totally forgot it’s a clear base with glitter so it looks a little misplace on the nail. But besides those little problems, I do love them. And the adding Matte top coat just pulled everything so perfectly together. I love the smooth finish it gives the whole look. =)

waterfall3

waterfall4

waterfall5

So what do you think of this attempt at Waterfall nails? I know the trend was super popular last year, and it’s not featured as much on nail blogs as it once was, but I’m still a big fan.

Perfect Polka Dots.

After yesterday’s nail art fail, I wanted to do something I couldn’t screw up. Last week, I bought quite a few new polishes including a Zoya polish I found at my local shoppers on clearance at Lawton’s (my favorite place to get polish–the selection is unbelievable, and they always have amazing deals!) So I decided to grab that gorgeous Zoya and my dotting tool set, and play around a little bit.

dots

The polishes I used for this manicure are:

  • Zoya Piaf — my soft and sparkly yellow base color.
  • Unnamed Mariposa purple polish.
  • Unnamed Maripose pink polish.
  • Sally Hansen Diamond Flash top coat.
  • Icing It’s a Matte World matte top coat.

dots2

I really like how these turned out. I’m really, really loving my dotting tools right now, and doing all the dots on my nails. I’ve been practicing really hard to get my polka dots perfect, and I definitely think I’ve improved a lot since my first attempts at polka dots. It was quick to do, but made my nails feel pretty instantly. The only thing I would change is using a bigger size of dotting tool–I feel like there is a lot of space between my dots.

Killing it in Killing Red by Layla.

I think I’ve mentioned before that I used to be completely obsessed with red nail polish. I went a good year and a half almost exclusively painting my nails some shade of red. (This was circa 2004-2005 when all the celebrities of young Hollywood–Mary-Kate Olsen, Nicole Richie, ect–were rocking bright red nails.) Now a days, I don’t wear red quite as often (except as a pedicure), but I do love to throw back to a classic every once in a while.

rednails2

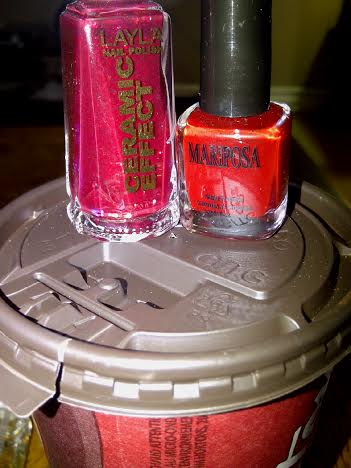
For this manicure, the polishes I grabbed were:

  • Mariposa Mini polish in red.
  • Layla Ceramic Effect in shade 53 (which, I saw somewhere was called Killing Red.)

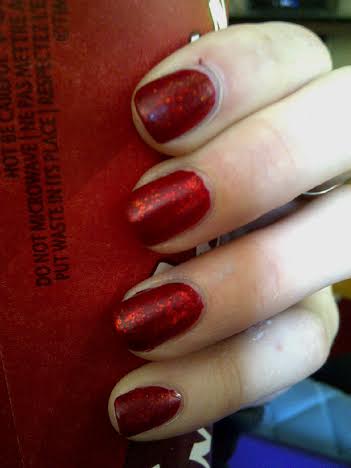
I applied a base color of the Mariposa, because I knew from experience that the Layla takes quite a few coats to cover. This Mariposa polish is a red jelly. I’ve never used it before–I grabbed it on a whim–but I must say it has beautiful application, even if there is still visible nail nail with it on it’s own. Next, I applied two coats of Layla 53–Killing Red, to get a full application of the flakies over my nail. Oh my god I love this polish. It’s such a step above your basic red. I finished it all off with a coat of Essence Gel-Look Top Coat, followed by Essence Nail Art Express Dry Drops. When that was dry, I finished with a coat of Icing’s “It’s a Matte World” Matte top coat.

rednails3

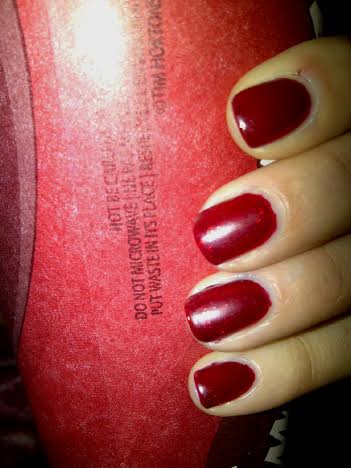
Such a gorgeous combination. Makes me remember exactly why I use to love wearing red nail polish so much. But it isn’t until you capture it with no flash that you can really see it’s true beauty.

rednails rednails4

Can you see those beautiful golden flakies swimming in this red polish? I didn’t have the best natural light inside for taking pictures, but they still come through.

rednails5

I legit cant stop staring at my nails, especially in the sunshine. It’s making me realize I’m going to have to go out and get more Layla polishes. All the ones I have used already have all been winners, and they have such an awesome selection! First on my list is going to be some of their holographic polishes. I’ve seen swatches of them online, and I have to have all of them!

31 Day Nail Art Challenge — Day 3: Yellow Nails.

For my third day of the 31 day nail art challenge, I went with simple nails. I love nail art, but sometimes I do have to go with something quick, if only because I don’t have the time to get super complex (or I run out of time). For this manicure, I used Sally Hansen’s Hard as Nails Xtreme Wear in “Mellow Yellow”.

yellowunedited

I kind of love this yellow. I’m usually more of a fan of softer yellows, but I like the brightness of “Mellow Yellow“. I’ve read online about the formula being touchy, and the application for me was a little streaky. This is three coats, and I found I had to wait for the previous ones to dry before adding another. Thankfully, adding my top coat seemed to balance everything out and I didn’t have any bald spots.

Everything was topped with Sally Hansen Diamond Flash top coat, and two layers of Quo by Orly Matte sparkle finish top coat in pink.