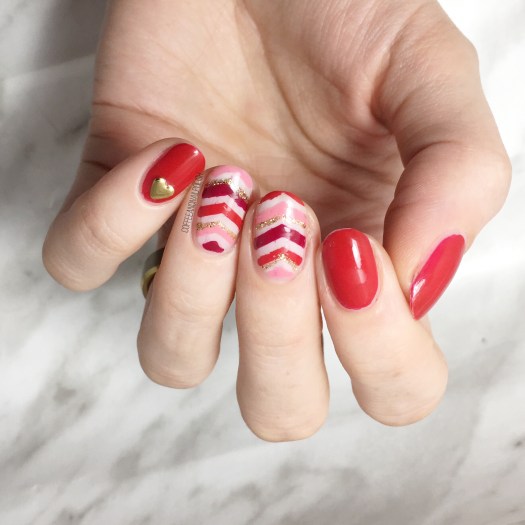
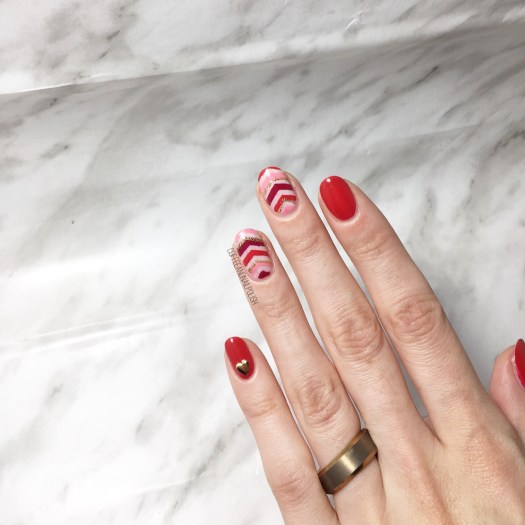
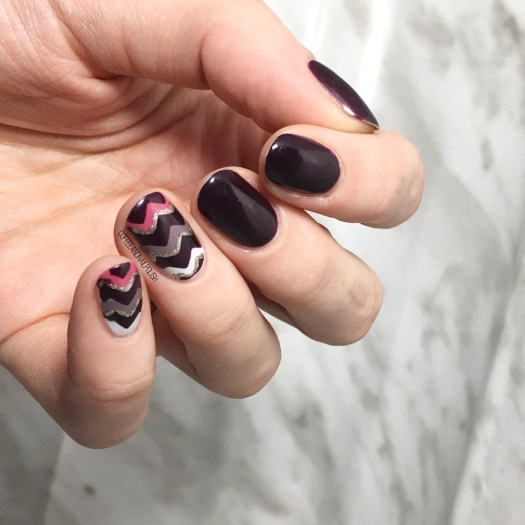
Multicoloured Chevron Accent Nails

Good Morning! We’re half way through the week & in Halifax it’s actually snowing. I seriously thought we would never see actual Winter, so it’s pretty exciting! Although I’m sure it will lose its novelty in about a day & a half.

Today I’m sharing a chevron accent nail design with you. I’ve really been into darker shades right now (& grey, always) so I decided to combine a whole lot of shades together. & I even made you another tutorial to show you the technique I used.

Music: bensound.com

For this design, the polishes I used were:

  • Base Coat: Nailtek 2
  • Top Coat: Seche Vive
  • Sally Hansen Complete Salon Manicure Pat on the Black
  • Essie Merino Cool
  • Color Club Silver Lake
  • OPI Aurora Berry-alis
  • L’Oréal Feeling Kilty
  • Kiss Products Nail Art Chevron Vinyls
  • Small detail brush (from Born Pretty Store)

You can see in the video above, I was originally going to use Essie Merino Cool (such a good grey) as my main colour, but switched it to Sally Hansen CSM Pat on the Black because it just went better with the accent nails. Also next time I want to try filling in each chevron with a different colour for even more coloured stripes.

This is such a great design for a beginner because it looks complicated, but it’s really not. The hardest part honestly is just placing your vinyls (as you can see from the above video!) You could also use straight vinyls to make your stripes, but that would involve extra wait time for drying. Your stripes don’t have to be perfect because you’re covering them up anyways, so freehanding them usually is just easiest!

What do you think of this design? Would you try it out? Let me know your thoughts below! & if you do try it out, don’t forget to tag me on social media & use the tag #lookcoffeeandnailpolish! 💜 Happy Wednesday everyone!

Gold Aztec Stamping

Happy Friday everyone! Starting off today with some more stamping. I’m still waiting on an order from Born Pretty Store to arrive (with some new stamping plates) so I guess in the mean time, it’s the same old ones again! This time I was feeling something a little tribal-esque so I decided to go with another one of my discontinued Born Pretty Store plates. I’m thinking I need to branch out & try some other awesome plates so if you have any suggestions of your favourites, leave them below!

The products used for this manicure are:

  • Base Coat: Nailtek 2
  • Top Coat: Seche Vive
  • Morgan Taylor Plum-thing Magical
  • Morgan Taylor Just Tutu Much
  • Edge Perfection Cuticle Barrier
  • Born Pretty Store Clear Jelly Stamper
  • Born Pretty Store stamping plate (discontinued) — this one has similar patterns.

So first off, Morgan Taylor Just Tutu Much is so freaking good for stamping. I mentioned this in my swatch post of these shades, but I’m really impressed. It’s so nice when you find polishes that stamp so fantastically over dark shades. I love it! It makes me really excited to have my new plates arrive, so I have a whole new variety of images to share!

What do you think of this stamped design? Where do you buy your favourite stamping plates? Let me know in the comments below! 💜

*PR SAMPLE* Some of these items were sent to me for review. However, all opinions are my own.
<These polishes were all gifted to me by Morgan Taylor as part of the Preen.Me #PreenMeVIP program>

Gold Flakie Glitter Placement

Happy Saturday lovelies! Hope everyone is having a wonderful first week of 2018. Today I am super excited, not only because I have these super cute flakie nails to share, but I created a tutorial for you… a VIDEO tutorial! I’ve been toying with the idea of creating videos for a while, but kind of nervous how doing it. But 2018 is all about challenging myself when it comes to this blog! & honestly, it turns out wasn’t as scary as I thought it would be! It’s actually kind of fun. ♥️

<<
oducts used for this manicure:

  • Base Coat: Nailtek 2
  • Top Coat: Seche Vive
  • Morgan Taylor Don’t Toy With My Heart
  • Nailstuff.ca gold foil flakies
  • Dotting tool (mine is from Bundle Monster)

<

I always love a good glitter placement, & I thought these gold foil flakies from Nailstuff.ca paired so well with the red base of Morgan Taylor Don’t Toy With My Heart. It’s a little different trying to place flakies verses glitter from polish, but the end result looks just as gorgeous. I’ll definitely be trying this look with a few of the iridescent flakies I own.

A close up of these nails shows how cool the flakies look. I’m definitely going to be using this technique more often!

what do you think of this glitter placement design? I plan on making more tutorial videos, so let me know what you’d like to see & anything I can do to improve!

*PR SAMPLE* Some of these items were sent to me for review. However, all opinions are my own.

<These polishes were all gifted to me by Morgan Taylor as part of the Preen.Me #PreenMeVIP program>

Geometric Christmas inspired nails

Happy Tuesday! Can you believe it’s only 6 days until Christmas?! I hope everyone else is more prepared than I am–although I did get out some Christmas cards & finished the wrapping for my sister’s family, so I’m not completely behind. Today I have another simple Christmas design that looks just like wrapping paper!

For this design, the polishes used were:

  • Base Coat: Nailtek 2 Foundations
  • Top Coat: Seche Vive
  • Deborah Lippmann Through the Fire
  • Ardene Ice Mist
  • Zoya Ray
  • L’Oréal Feeling Kilty
  • The Base Coat Vinyls Triangle Pattern Stencil
  • NailStuff.ca triangle stud — Gold Mixed Decoration Nail wheel
  • Small dotting tool (to fill in the triangles)

I’m not going to lie–filling in each individual triangle was kind of time consuming but it is totally worth it! I’ve always been a fan of geometric designs, & I just love how these look. A dressed up Christmas design. & the little triangle stud mimics the look of the pattern but could also be a stand in for a Christmas tree. I just think these are so classy–don’t get me wrong, I love all Christmas designs. But I’ve had fun this year creating different designs that aren’t your typical Christmas looks.

What do you think of this design? Would you wear these? Let me know your thoughts in the comments below! 🎄

Winter Chevron Moons

Hello & Happy Tuesday! Sorry for the lack of posts this weekend–it was kind of a rough weekend & my motivation for posting took a hit. (Also I noticed the majority of my last post disappeared & I’ve been too frustrated thinking about having to rewrite it so I’ve been avoiding the blog. My bad.) But today I have a brand new post with something that has been seriously lacking in my life lately: chevron moons!

I’m calling these winter chevron moons because… it sounds cool? The colours just kind of give me that Winter vibe, so I thought it worked. Also I figured everyone might want to see something other than snowflakes.

For this manicure, the polishes I used were:

  • Base Coat: Nailtek 2 Foundations
  • Top Coat: Seche Vive
  • Nubar Queen
  • Essie Parka Perfect
  • OPI My Favourite Ornament
  • URSUGAR Chevron Nail Stencils (I used the inner pieces.)

I love the combination of the pale blue, deep purple & sparkly gold. I thought this colour combo was a nice switch up from all the Christmas-y designs I’ve been doing, & features two of my favourite winter polishes: Essie Parka Perfect & OPI My Favourite Ornament. Every Christmas, this gold has to come out because the sparkle is just so perfect. ✨

For me, Christmas/Winter nails are all about the sparkle. These aren’t your typical holiday nails, but I think they would look fantastic with a pretty dress at a Christmas/New Year’s party, especially if you don’t want to resort to the classic Christmas shades. It’s all about the sparkle that makes it perfect. I’m so obsessed with Christmas party looks right now because I have no Christmas party of my own to go to. I just keep coming up with looks I would wear if I had somewhere to go (& then imagine what fancy dress sitting in my closet I would pair with it.)

What do you think of these chevron moons? Let me know your thoughts in the comments below!