Black & White X-pattern Nails ✖️

Happy Tuesday lovelies! Anyone else currently attempting to survive the heat? Thank goodness for air conditioning because I haven’t really had to deal with the humidity much. Never thought I would be happy to spend 95% of my day at work, but if it keeps me from being sweaty I’m all for it!

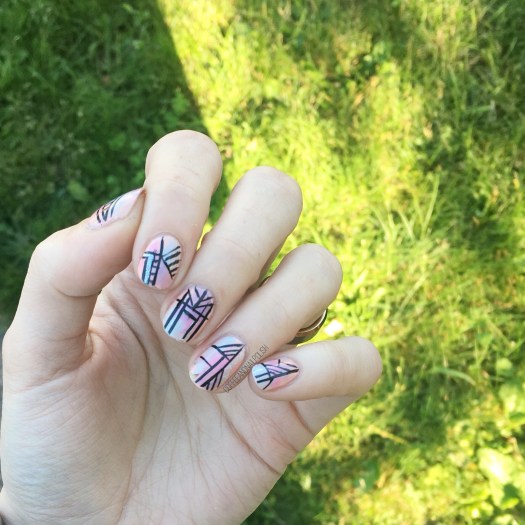
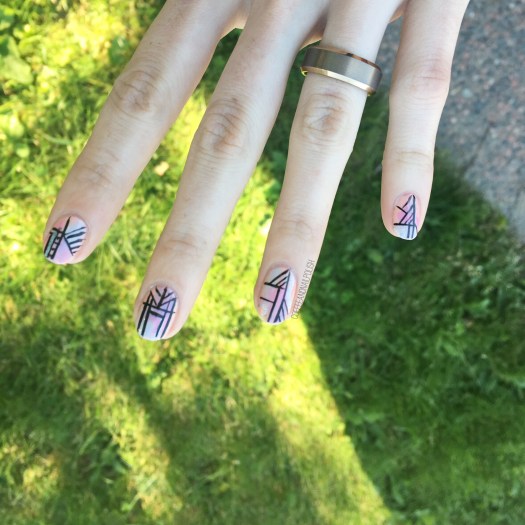
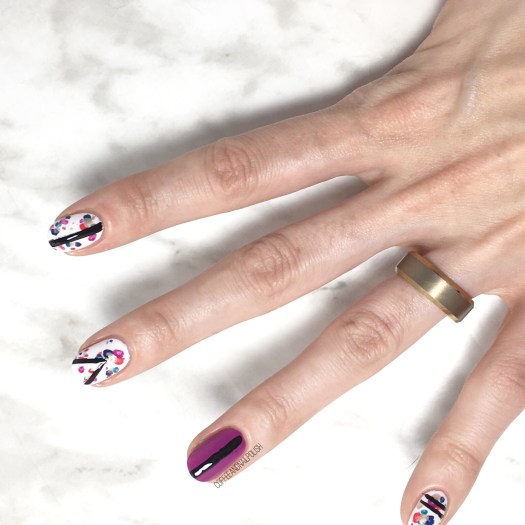
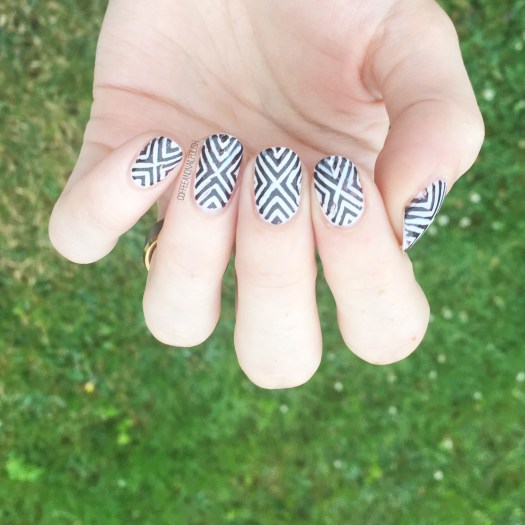
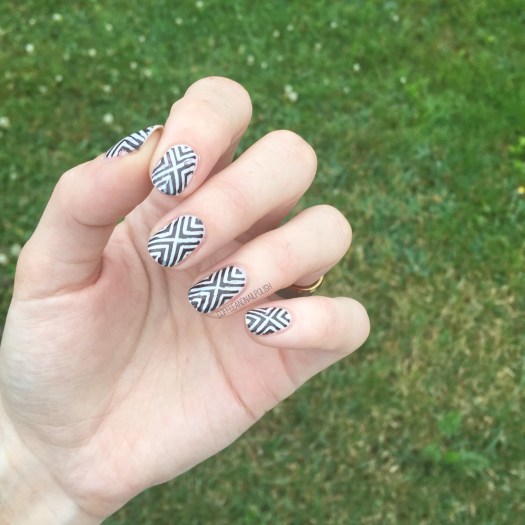
Today I’ve got the day off though, & I’m showing off a fun design I wore for 3 days last week. You know I’m in love with a design when I wear it for more than a day, & I really loved this look! Seriously, I probably would have worn it longer, but my nails started chipping at work & I couldn’t deal.

For this manicure, the polishes I used were:

  • Base Coat: OPI Nail Envy
  • Top Coat: Essie Speed Setter
  • Sally Hansen CSM Let’s Snow
  • Essie Frock ‘N Roll
  • Xroma Polish & Vinyls X-Pattern Nail Stencils
  • Make Up Sponge

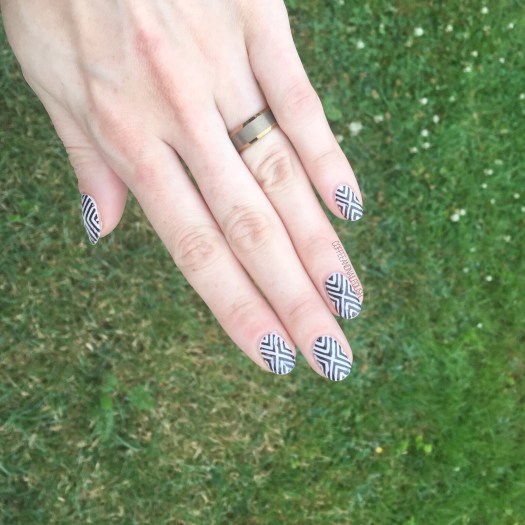
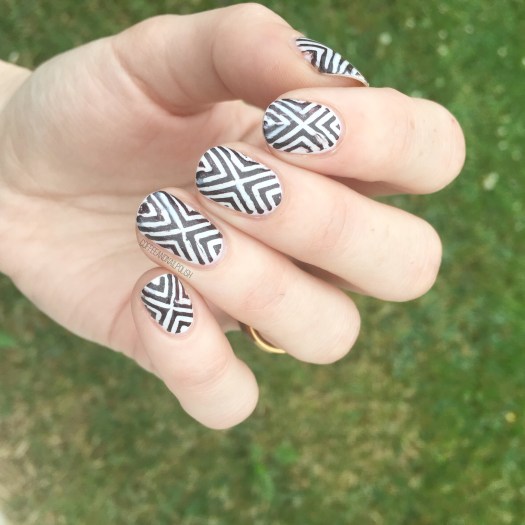
How cute is this look?! This was the last of my x-pattern vinyls, so I’m definitely going to need to pick up some more ASAP. I’ve tried to freehand this look before but it looks way better when it’s done with vinyls (oh, & takes WAY less time too!) Also even though Essie Frock ‘N Roll isn’t technically a black polish, it looks close enough & works so perfectly over my white base. I love wearing black & white nail designs & pairing them with a bright & colourful outfit.

So what do you think about this black & white design? What are you wearing on your nails this week? Share down below! ♥️

Pastel Sponging & Freehand Geometric Lines

Happy Friday lovelies! Yesterday was spent surviving the craziness of the mall with the big Build-A-Bear event! Our store was insane, mostly from the people who gave up on waiting in the 8+ hour line. Props to anyone who stood in that line & waited it out… you’re the real brave people!

Today’s look was accomplished thanks to some brand new stripers from Kiss! I was in the need of some new ones, & found them on clearance so I knew I had to pick them up. A brand new striper is one of my favourite things for creating crisp lines. & since it had been so long since I’d done a geometric design, I decided to play around a little bit!

For this manicure, the polishes I used were:

  • Base Coat: OPI Nail Envy
  • Top Coat: Essie Speed Setter
  • Essie High Class Affair
  • L’Oréal Royalty Reinvented
  • Sally Hansen Miracle Gel Sweet Tea
  • Sally Hansen Miracle Gel Ocean Daze
  • Essie Splash of Grenadine
  • Kiss Products Striper in Black
  • Kiss Products Striper in White
  • Kiss Products Striper in Silver Glitter

Please excuse the tip wear & chip on my ring finger — I wore these nails for over 2 days before I thought to take a picture of them. I was just to enthralled with how they looked, I completely forgot about photographing them!

If I had to pick a favourite nail, I think it would probably be my middle finger. The design feels very Art Deco. Definitely going to need to try this design again over a gold or bronze. It was be very Gatsby, which is a style I haven’t tried a whole design over. I definitely think it looks really cool over my pastel sponging though.

what do you think about this geometric design? Which nail is your favourite? Let me know your thoughts in the comments below!

Spring Splotches & Geometric Lines

Happy Monday Lovelies! Today is a super exciting day for me because I’m officially starting at my new job after my week away training, which is both nerve wracking & a brand new adventure for me. Also exciting is today’s manicure which was inspired by a few make up cases I stumbled across at Superstore while grocery shopping.

I love when I find inspiration when I’m not looking for it. This pattern just screams nail art, so obviously I had to snap a picture for future nail designs. I loved the imperfect splotches of colour against the white background & loved how well it paired with the other make up back.

For this manicure, the polishes I used were:

  • Base Coat: Quo by ORLYBreathable Kiss Me, I’m Kind
  • Top Coat: Seche Vive
  • Sally Hansen Hard As Nails Hard To Get
  • Essie Flowerista
  • Essie Too Too Hot
  • Essie Garden Party
  • Essie All the Waves
  • L’Oréal Feeling Kilty
  • Quo by ORLY Nail Art Striper in Black
  • Medium size nail art brush

I just love love love how these turned out! The pretty spring colours, the splotches of colour with the geometric lines. It just turned out as perfect on the nail as I pictured in my head. I feel like I don’t do my freehand lines as often as I used to, so I’ve been trying to practice more!

What do you think of this design… do you think I stuck close enough to my inspiration? Where do you get your nail art inspiration from? Let me know your favourite place to find inspiration (or who inspires you) down in the comments below!

Happy Monday everyone 🌸

Geometric Christmas inspired nails

Happy Tuesday! Can you believe it’s only 6 days until Christmas?! I hope everyone else is more prepared than I am–although I did get out some Christmas cards & finished the wrapping for my sister’s family, so I’m not completely behind. Today I have another simple Christmas design that looks just like wrapping paper!

For this design, the polishes used were:

  • Base Coat: Nailtek 2 Foundations
  • Top Coat: Seche Vive
  • Deborah Lippmann Through the Fire
  • Ardene Ice Mist
  • Zoya Ray
  • L’Oréal Feeling Kilty
  • The Base Coat Vinyls Triangle Pattern Stencil
  • NailStuff.ca triangle stud — Gold Mixed Decoration Nail wheel
  • Small dotting tool (to fill in the triangles)

I’m not going to lie–filling in each individual triangle was kind of time consuming but it is totally worth it! I’ve always been a fan of geometric designs, & I just love how these look. A dressed up Christmas design. & the little triangle stud mimics the look of the pattern but could also be a stand in for a Christmas tree. I just think these are so classy–don’t get me wrong, I love all Christmas designs. But I’ve had fun this year creating different designs that aren’t your typical Christmas looks.

What do you think of this design? Would you wear these? Let me know your thoughts in the comments below! 🎄

Geometric stamping over Sally Hansen Mermaid’s Tale 

Yesterday I featured a swatch of Sally Hansen CSM in Mermaid’s Tale–a beautiful teal jelly glitter shade. Today I have the mani I did using that shade as my base colour! I’ve really had a lot of fun getting into stamping, & practicing, so I decided to try stamping a pattern over the glitter. I knew black wouldn’t show up over such a dark base, so I decided to grab something fun & bright (Turquoise) & the end result turned out perfect. 

For this manicure, the polishes used were:

  • Base Coat: Finger Paints Peel Off Base Coat for Glitter
  • Top Coat: Cutex Quick Dry Top Coat
  • Essie Under the Twilight 
  • Sally Hansen Complete Salon Manicure Mermaid’s Tale
  • China Glaze Turned Up Turquoise
  • Born Pretty Store Clear Jelly Stamper item #24059
  • Older Born Pretty Stamping Plate that’s no longer available — this plate contains the same image. 

Can I just say how impressed I am with how well Turned Up Turquoise stamps? I was shocked with how opaque it was on the nail, especially over such a dark base colour. I wasn’t sure how it was going to look, but it turned out awesome! I always find myself so drawn to dark shades in the Fall months, but the pop of colour over top works well for a transitional manicure–just enough of Summer & just enough of Fall, all in one design. 


What do you think of this stamping? What polishes do you love for stamping? Share all your secrets in the comments below! I’m going to be ordering a bunch of new stamping plates (especially Halloween/Christmas themed plates) in the next couple days so I’m looking for all the best stamping polishes for playing.