GlamnailschallengeOct—Skeletons 💀

3C23D45B-1949-42AD-B0B2-056244275611

07A90D34-AA19-404F-BEF8-3D87E72BA16F

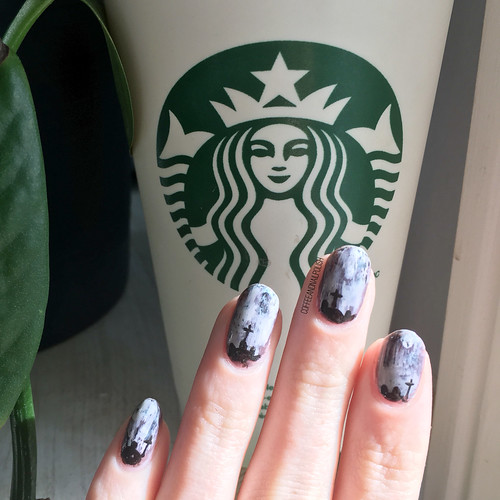
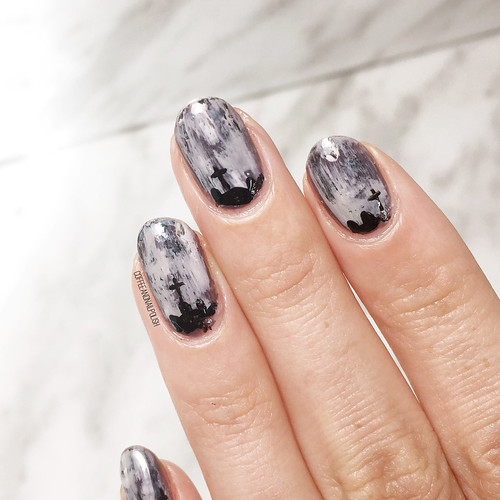
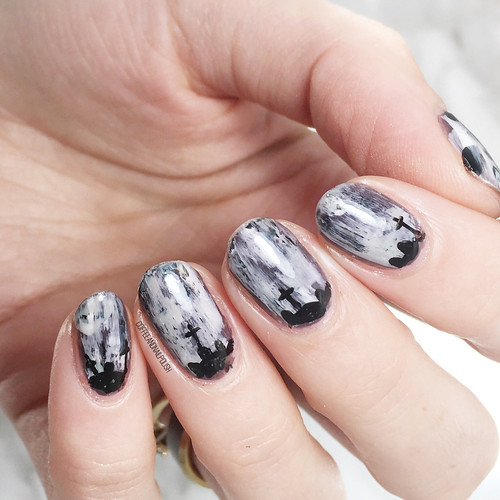
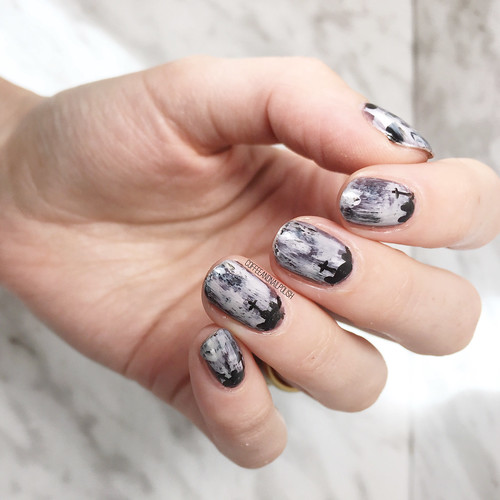
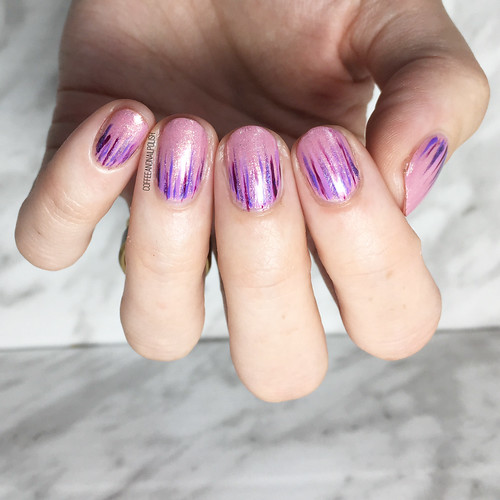
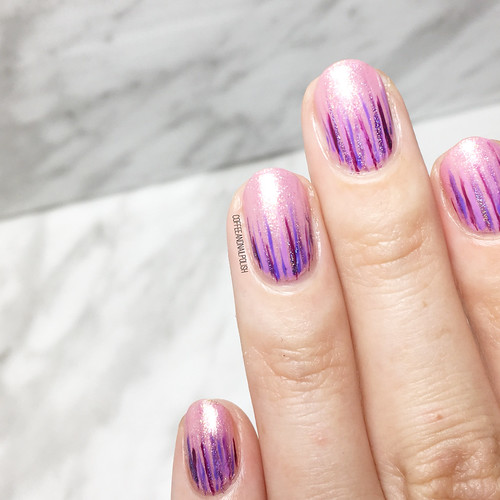
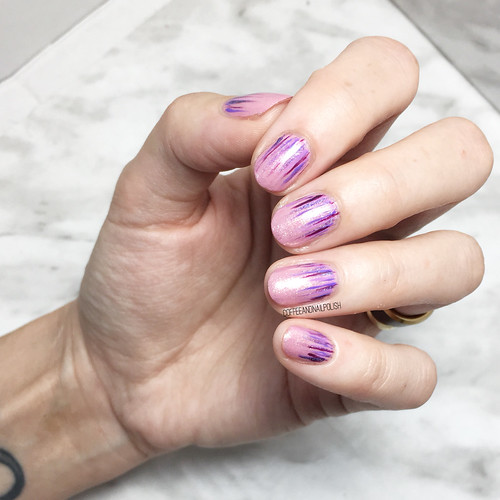
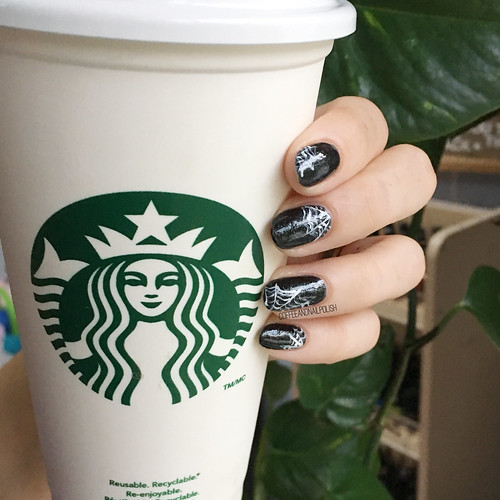
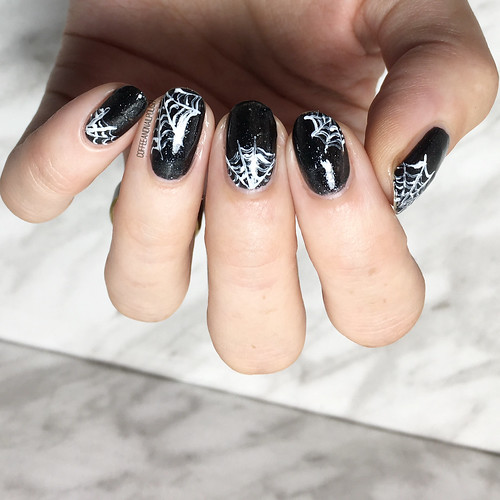
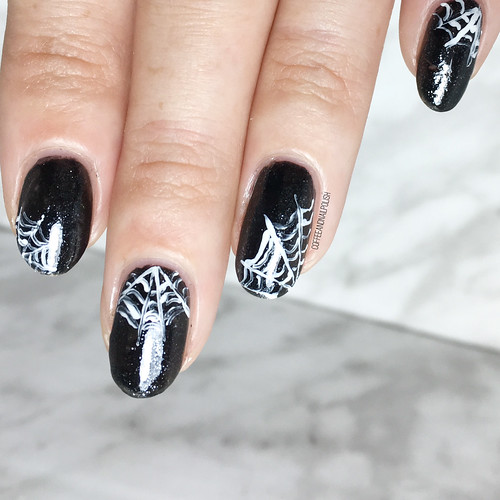
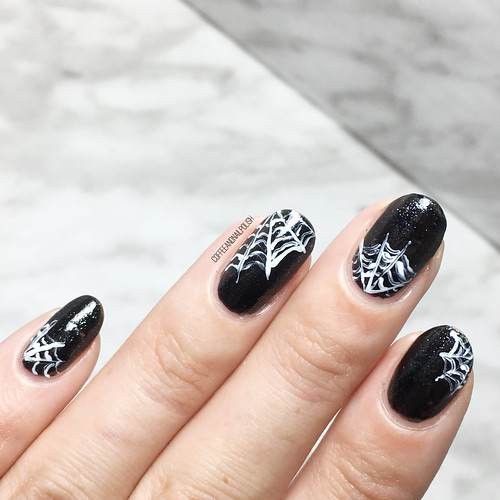
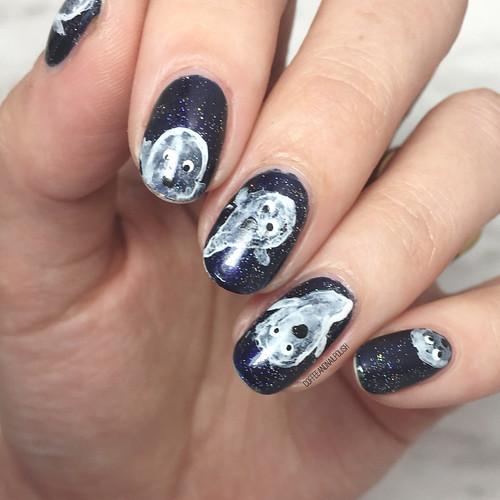
Hello lovelies & Happy Monday! The Halloween countdown is officially on, & I have another spooky design created for GlamnailschallengeOct! The next prompt on our list is skeletons, which is not an image I’ve ever attempted on my nails before, so I was really excited to give it a shot! & honestly, I think this is my favourite manicure of the challenge so far!

4BCD3F7B-E43C-4788-8B5D-9F9004289667

73ED538D-3350-4D24-9500-19E3046F2944

For this manicure, the polishes I used were:

  • Base Coat: Duri Rejuvocate
  • Top Coat: YSL Beauty Quick Dry Top Coat
  • Essie Leggy Legend
  • China Glaze Pathological Liar Liar
  • Sally Hansen Miracle Gel Get Mod
  • Black Acrylic Paint
  • NailStuff.ca 7mm liner brush (from Mermaid Brush Trio)
  • Born Pretty Store Classic Patterns stamping plate BP-L006 (item #17924)

.

F4B008B7-52FE-4698-A1FB-D04F6DBFAD81

DC6AAB54-3553-4271-AD65-AC96387A5B2C

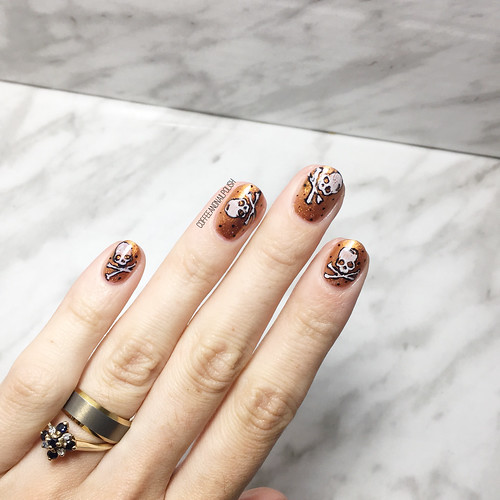
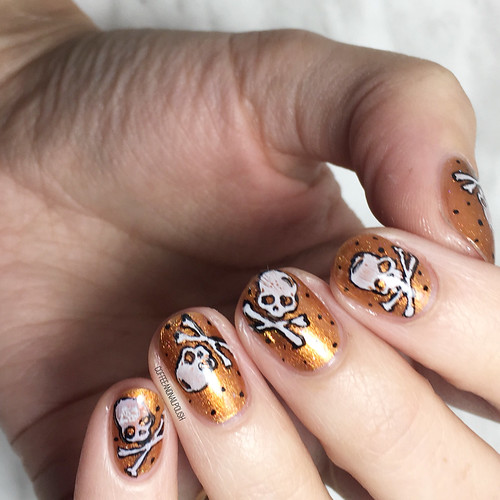
This nail art look was built in layers. First I started off with my base, which is Pathological Liar Liar layered over Leggy Legend — I definitely need to do two coats of PLL next time, but I definitely love it a lot more when it has some undies.

Next I decided to use this skull & cross bones image from my classic patterns stamping plate from Born Pretty Store, mostly because I was unsure about free handing skeletons. On its own, the image was a little meh, so I took a risk & outlined the stamp with black acrylic paint & my mermaid tail brush from NailStuff. & that’s when this mani came to life! The outlining made the image pop on my nail & I am absolutely OBSESSED with it. I also did a few polka dots around it to fill in the space. It almost looks like nail art stickers, which is super cool. I literally didn’t even want to take these off after I put them on.

8D66BC93-B1AB-4344-90CC-13694BD29928

178C7866-7FF7-4CB6-8CDF-9C5B0F311D60

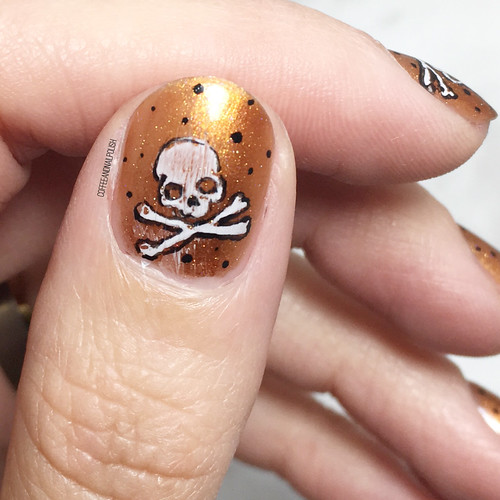
I really like how the stamping & outlining almost looks slightly cartoon-y. Going with black & white over the coppery orange base was definitely the way to go.

I feel like if 17 year old me was into nail art like this back in the day, this is a design I would have rocked in a variety of background colours… while listening to the Ataris on repeat & writing angsty journal entries. Works for Halloween & non-Halloween alike.

9FE3B814-FB50-47EA-A715-006F445ECAAB

What do you think about my skeleton nails? Would you wear this design? What do you think about combining freehanding & stamping in the same manicure? Let me know all your thoughts down in the comments below! & don’t forget to keep following along with  #glamnailschallengeOct on Instagram for all the nail art looks!

GlamnailschallengeOct—Graveyard

F8BE6792-595A-4D59-B704-2C83751D9DE2

Hello lovelies & happy Wednesday! This has been a busy week for manicures & it’s not over yet. Today I’ve got the next prompt for GlamnailschalleneOct: Graveyard! For this look, I wanted to channel the look of gravestones as my background sky & then create a little landscape graveyard near my cuticles.

EBAFEFFF-791E-4579-90C3-A91447C6B211

09640F49-48F7-456E-917A-0518E14FE3CB

For this manicure, the polishes I used were:

  • Base Coat: Duri Rejuvocate
  • Top Coat: YSL Beauty Quick Dry Top Coat
  • Sally Hansen Xtreme Wear Grey Area
  • Maybelline Audacious Asphalt
  • Sally Hansen Miracle Gel Get Mod
  • Essence Black is Back
  • NailStuff.ca 7mm liner brush

.

B7A18CDF-74B2-4ACF-8BAD-D374F600EFAF

4BD3B4A5-4670-4A61-AA2B-099BCAE4DD27

I had this idea in my heart to create this grungy grey background, I feel like it was kind of successful? Not exactly how I pictured in my head, but I still really like it. Next time I would probably add a dark dusky purple or blue to add a bit of colour to the mix. But over all, I think this design captures the spookiness of a graveyard, & when it comes to Halloween designs that’s what is most important, am I right?

5D2BA561-7E3B-4A1B-A6BF-1B400241E394

A5E79DD4-C927-4B09-AC13-69405E4DF92D

I think my dry brush background might be one of my favourite parts of this look. Instead of doing short brush strokes, I brushed the polish brush up almost the entire length of my nail. It really helped capture the haunting quality of gravestones/graveyards, which I am really excited about. I will say though, next time I would probably pull out my What’s Up Nails graveyard stencils for the gravestones.

9F6ACCBB-B9A4-4A11-B23D-AC284D2466DA

what do you think about this grungy graveyard design? Are you already planning your Halloween nail art looks?

& don’t forget you can keep up with #glamnailschallengeOct on Instagram for everyone else’s amazing designs this month! There are still a few more fun design looks coming up for the rest of the month!

Birthday Nails with Essie Birthday Girl 🎉

F516455D-4537-4A98-AB92-7F0C2C493092

Hello lovelies & Happy Tuesday! Hope everyone is having a beautiful start to their week. Today I’m breaking up my usual posting schedule because TODAY IS MY BIRTHDAY! That’s right, today marks 33 years around the sun. So obviously I needed to do something fun on my nails to mark the occasion.

In years past I’ve done some obvious birthday nails, but this year I decided to let the polish do the talking. When I saw that Essie had released a polish called Birthday Girl, I knew that I was going to need to own it & incorporate it into my birthday mani this year! I also wanted to do something fun, as I snapped a nail just in time for my birthday, so I am back to some serious shorties.

B6F4411E-B3BE-4022-A8E6-B491C3881773

D5BA04A3-77C1-4A8D-97B2-F6EDDF238362

For this manicure, the polishes I used were:

  • Base Coat: Duri Rejuvocate
  • Top Coat: YSL Beauty Quick Dry Top Coat
  • Essie The A-bliss {PR sample}
  • Essie Birthday Girl
  • Color Club Pucci-licious
  • Color Club Eternal Beauty
  • Essie Play Date
  • Sally Hansen Pat on the Black
  • Nailstuff.ca 11mm Liner Brush {PR sample}

.

6B65E022-F47A-402E-A001-10F99CDAA9E7

01B4F731-8F0D-445D-AAF9-C1103719365E

For my base, I applied two coats of Birthday Girl over one coat of The A-bliss. I then did a whole bunch of Pinterest stalking to see what kind of design I wanted to do overtop my base of Birthday Girl & in the end I decided a Waterfall look was the way to go! Do you remember when Waterfall designs were all the rage? I feel like this design needs to make a comeback!

3C197715-613B-4B6C-8739-90325123C31A

DF26AE0C-B843-43C7-B7C3-D9FD5043AFED

For this look I decided to pick a few purples that I thought would compliment my pink base. Then o used my liner brush from NailStuff to brush thin streaks of polish at my cuticle line, & bam! An low effort design that looks super fancy & fun. Kind of reminds me of sparkling fireworks at the base of my nails which is perfect for celebrating, even if my idea of celebrating is drinking my free birthday drink from Starbucks & playing with the new stamping plates my Mum bought me for my birthday! I can’t think of a more perfect day. ☕️💅🏻

06924BF0-00CA-4581-8459-66D69BCD6AE0

59F2C682-46CF-43FC-8C89-1023165DE1EC

Hope everyone has an amazing day! Let me know what you think about this look & what colour combination you’d love to see me do in a Waterfall look next! 💙

GlamnailschallengeOct—Spiders 🕸

1032A28E-F25B-407A-9C43-A5985EB9D7BE

We are almost halfway through the month, can you believe it? & Happy Thanksgiving to all my Fellow Canadians celebrating today with Turkey, Tofurky or whatever else you’re making for the occasion.

Today I have another look for GlamnailschallengeOct! Today’s prompt is Spiders, which is quite possibly my least favourite thing in the whole wide world, but a popular choice this time of year for nail art. & I do seem to do some kind of Spider web look each year, as it’s a time honoured Halloween classic.

8DC1903D-16E3-43A7-B5FD-8BA23026C05B

068B64C5-4AA8-4709-97B6-EB6B9881EBE5

For this manicure, the polishes I used were:

  • Base Coat: Quo by ORLY Bonder
  • Top Coat: Essie Gel Setter
  • Nicole by OPI Totally in the Dark
  • White Acrylic Paint
  • NailStuff.ca 16mm Striper Brush

.

B6A4DE71-B977-48D7-993B-97C6724DB7A4

8C3AEBA7-A8C3-4D0A-8110-D0E3CC82EEAA

Okay, so regardless of my phobia toward legit spiders (& their sticky webs), I am really loving how these turned out. These turned out much more delicate than some of my previous spider web attempts, which I’m very happy about. Turns out good nail art brushes really make a huge difference in how nail art turns out! My nail art brushes from NailStuff.ca has really improved how my nail art looks & has brought my freehanding to another level… even when I’m on a nap time time crunch. Also I fought it for a longtime, but using acrylic paint also really helps with upping the look, probably because it doesn’t dry as quickly as nail polish does.

B2509975-6E26-4850-8B3C-BB49D56608AB

018A9DC4-4CB3-4A77-9C39-615A4C416033

Halloween manicures make me so happy, even ones involving spiders (ick). This would definitely be a fun manicure to wear for a witchy Halloween costume, or something like Mortica. I have quite decided what I’m being for Halloween, although Kenneth tells me I’m being a princess, but if I go with a spooky look I may have to recreate this! I did end up wearing this manicure for a good 5 days.

712FCE00-9C74-4F92-8513-3011CDD4FEEB

B71AB842-BE47-4A44-83C0-B6E474C6932E

What do you think about this spider design? Are you already planning your spooky Halloween designs? Don’t forget to keep checking out #glamnailschallengeOct on Instagram for everyone else’s amazing designs this month!

GlamnailschallengeOct—Ghosts 👻

6BFA27D0-E1DF-4432-81ED-1E3A98CA3982

Hello lovelies & happy Wednesday! The week is certainly speeding by! Today I have another fun look designed for #glamnailschallengeOct–ghost inspired nails! & be still my Halloween loving heart, because these turned out so much fun. I decided to try out a look I’ve always wanted to try, using watered down acrylic paint.

F093700A-35A3-47B1-8926-96BE2B0F972A

0B4941D6-F9CD-4DE9-9296-85626A02A3BA

For this manicure, the polishes I used were:

  • Base Coat: Quo by ORLY Bonder
  • Top Coat: Essie Speed Setter
  • Joe Fresh Gel Look Gothika Blue
  • China Glaze Fairy Dust
  • White acrylic paint
  • Black acrylic paint
  • Thick nail art brush (I used an old one from Bundle Monster)
  • Small dotting tool (Mine are from NailStuff.ca)

.

5EFA1380-E304-4564-800A-2D0DE88414D7

4698DFF5-B64A-4D54-9379-79B3E6716F50

First off, loving this base of Fairy Dust over Gothika Blue because it really does look like the night sky. Also why do I always forget how amazing China Dust Fairy Dust is over pretty much everything, but especially over dark polishes. I don’t wear it nearly as much as I should. Could you imagine it over a dark red to black gradient?! Okay I’m getting some nail art ideas for more Halloween designs! Definitely going to need to try that out in the next couple weeks before Halloween. It would look so good!

Okay back to this design, haha.

C8B82B1B-D030-4326-A2BD-0B1E019C51AC

2EB77859-9EF2-4119-9E96-100A6246F950

This design turned out pretty much how I imagined, although I kind of wish I had watered down my acrylic slightly more to give my ghosts a more ghostly appearance, but I think the trick is the try & only do one coat of white vs. a few coats. My thumb kind of turned out my favourite, because you can see the the base peeking through his ghostly body. & I love how it looks. Next time I try this technique, I’ll know what works a bit better & I’ll be able to get them all perfect.

2A2C77C4-09ED-4198-93BC-CA514813383F

8D1FAFC1-2537-4E43-AA9B-340CB3518E93

What do you think about today’s ghostly look? Have you started planning your Halloween looks yet? Let me know down in the comments below what you think about this design, & as always check out #glamnailschallengeOct on Instagram for everyone else’s amazing designs this month!

🎃