GlamnailschallengeOct—Ghosts 👻

6BFA27D0-E1DF-4432-81ED-1E3A98CA3982

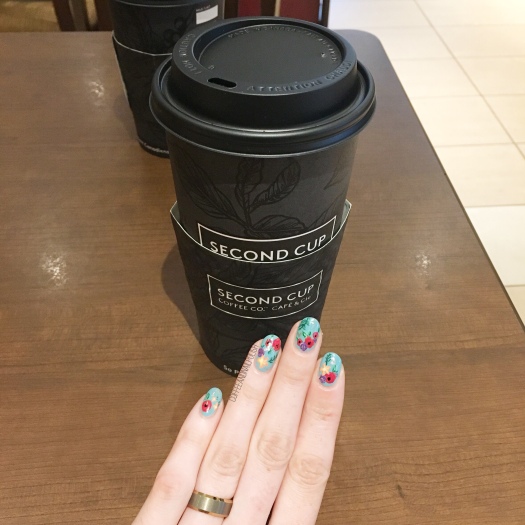
Hello lovelies & happy Wednesday! The week is certainly speeding by! Today I have another fun look designed for #glamnailschallengeOct–ghost inspired nails! & be still my Halloween loving heart, because these turned out so much fun. I decided to try out a look I’ve always wanted to try, using watered down acrylic paint.

F093700A-35A3-47B1-8926-96BE2B0F972A

0B4941D6-F9CD-4DE9-9296-85626A02A3BA

For this manicure, the polishes I used were:

  • Base Coat: Quo by ORLY Bonder
  • Top Coat: Essie Speed Setter
  • Joe Fresh Gel Look Gothika Blue
  • China Glaze Fairy Dust
  • White acrylic paint
  • Black acrylic paint
  • Thick nail art brush (I used an old one from Bundle Monster)
  • Small dotting tool (Mine are from NailStuff.ca)

.

5EFA1380-E304-4564-800A-2D0DE88414D7

4698DFF5-B64A-4D54-9379-79B3E6716F50

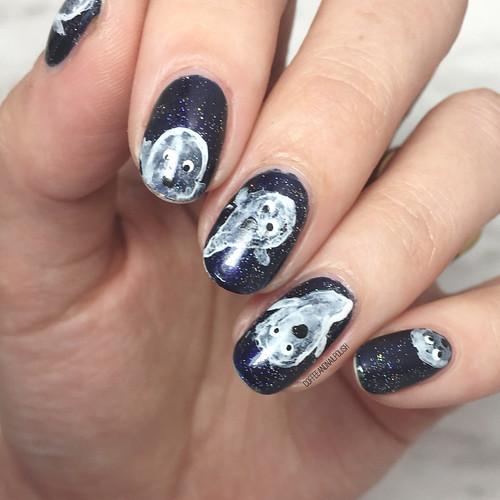
First off, loving this base of Fairy Dust over Gothika Blue because it really does look like the night sky. Also why do I always forget how amazing China Dust Fairy Dust is over pretty much everything, but especially over dark polishes. I don’t wear it nearly as much as I should. Could you imagine it over a dark red to black gradient?! Okay I’m getting some nail art ideas for more Halloween designs! Definitely going to need to try that out in the next couple weeks before Halloween. It would look so good!

Okay back to this design, haha.

C8B82B1B-D030-4326-A2BD-0B1E019C51AC

2EB77859-9EF2-4119-9E96-100A6246F950

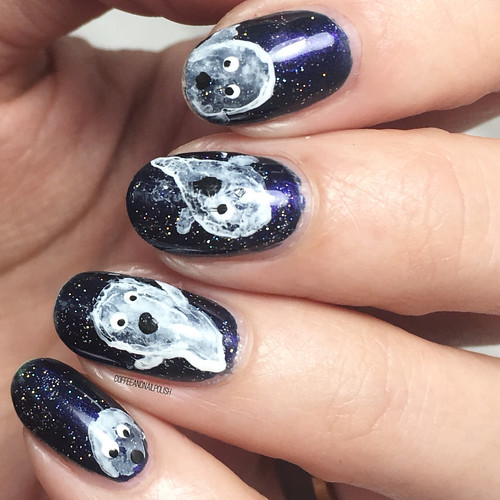
This design turned out pretty much how I imagined, although I kind of wish I had watered down my acrylic slightly more to give my ghosts a more ghostly appearance, but I think the trick is the try & only do one coat of white vs. a few coats. My thumb kind of turned out my favourite, because you can see the the base peeking through his ghostly body. & I love how it looks. Next time I try this technique, I’ll know what works a bit better & I’ll be able to get them all perfect.

2A2C77C4-09ED-4198-93BC-CA514813383F

8D1FAFC1-2537-4E43-AA9B-340CB3518E93

What do you think about today’s ghostly look? Have you started planning your Halloween looks yet? Let me know down in the comments below what you think about this design, & as always check out #glamnailschallengeOct on Instagram for everyone else’s amazing designs this month!

🎃

Rifle Paper Co Phone Case Inspired Floral

Good morning lovelies & happy Tuesday… as happy as a Tuesday can be! Today I have some floral nails from a few weeks back to share. This design was inspired by a brand new phone case I picked up at Winners recently… a Rifle Paper Co phone case! & I was so excited by the pattern that I just had to recreate it on my nails!

For this manicure, the polishes I used were:

  • Base Coat: OPI Nail Envy
  • Top Coat: Essie Speed Setter
  • Essie In the Cab-Ana
  • OPI Koala Berry
  • OPI My Chihuahua Bites
  • Essence The Green & The Grunge
  • Essie First Timer
  • Sinful Colours Amethyst
  • Essie Play Date
  • Sally Hansen Miracle Gel Sweet Tea
  • China Glaze Metro Pollen-tin
  • Sally Hansen I ♥️ Nail Art pen in black
  • Essie Jiggle Hi, Jiggle Lo
  • Small detail brush from Bundle Monster

I’m really, really loving this pattern. It’s been a little while since I rocked floral, so I’m was excited to break it out again. Especially since it’s already starting a feel a little Fall like in the morning, & I feel the call of cosy sweaters & jewel toned polishes already!

So what do you think of this floral design? Have you ever been inspired by a phone case? Share down below!

Cactus Accent Nails 🌵💅🏻

Happy Thursday! It’s been a while since I rocked any cactus nails, & I was craving some vibrancy. I don’t often reach for green polish when painting my nails, but I’ve been trying to get out of my comfort zone. Keeping with that, I decided to pull a green (textured) polish from deep in my stash that I haven’t worn in too many years to count, & paired it with some cute cacti on my accent nails!

Polishes I used for this design were:

  • Base Coat: OPI Nail Envy
  • Top Coat: Essie Speed Setter
  • LA Girl Sand Blast Nail Polish in Green Island
  • China Glaze What’s She Dune?
  • Essie First Timer
  • Essie Off Tropic
  • Deborah Lippmann She Drives Me Crazy
  • Essie A-List
  • OPI I Eat Maine-ly Lobster
  • Small detail brush (from Bundle Monster)
  • Small dotting tool (from Bundle Monster)

Sadly I kind of hid the texture of LA Girl Green Island with my top coat, but it came through a bit. This was my very first textured polish, back in the very early days of my nail art. It was also the beginning of my obsession with finding nail polish deals at Lawton’s—I remember scoring it & a blue Sand Blast Polish for only a dollar. & so began my obsession with finding old polishes at awesome deals. & I still hate spending full price for polish to this day!

Also I love creating these little freehand cactus. Still on the search for some cactus nail vinyls, because I’m a little cactus obsessed, but in the meantime I don’t mind freehanding my cacti. I also just picked up a new stamping plate from Essence with a cactus on it, so stay tuned as I plan on trying it out soon (hopefully this weekend!)

What do we think of this design? Do you still have any textured polishes in your stash? Let me know down in the comment below!

White & Purple Drag Marble 💜

Good Morning lovelies & happy Tuesday! Hope everyone had a fantastic beginning to their week.

Today I’m showing off some brand new nails & a design I haven’t done in a while: drag marble. I literally couldn’t remember the last time I attempted one–I’ve been trying so many awesome marbling techniques–that it felt like a good time to give an old favourite another try!

For this manicure, the polishes I used were:

  • Base Coat: OPI Nail Envy
  • Top Coat: Essie Gel Setter
  • Sally Hansen Complete Salon Manicure Lets Snow
  • Sally Hansen Miracle Gel Just Maui’d
  • Color Club Eternal Beauty
  • Bundle Monster drag tool.

Drag marbles were my first foray into marble nails because they seemed like the least messy option! Definitely takes a bit of practice to keep your nails from looking swampy (or one colour completely taking over the entire nail!) but once you get that down, the end result can be stunning!

Of all my nails, I think my ring finger probably turned out the best, followed by my middle finger. Sadly, I was using a more than half empty bottle of top coat, so there were way too many bubbles happening… but I guess that helps add to the marble effect! & thankfully you can’t really see them from far away. It was just me they bothered immensely.

What do you think of this drag marble design? What’s your favourite marble technique? Let me know all your thoughts down below!

Vintage Roses (take #17283)

You know when you did that perfect pair of jeans or shirt or outfit that looks amazing, & fits your perfectly, & just makes you look amazing? You wear it constantly (maybe more than you should), because it just looks so good? That is how I feel about floral & vintage rose nails. & that is why I have ANOTHER floral design to share with you.

This design is actually inspired by an old design of mine, this time using blues instead of pinks. Yep, I’ve done a different version of these simple roses a lot but they never get old to me, so hopefully they’re not tired to you.

For this manicure, to polishes I used were:

  • Base Coat: OPI Nail Envy
  • Top Coat: Essie Gel Setter
  • Essie Find Me an Oasis
  • OPI Angel with a Leadfoot
  • Sally Hansen Complete Salon Manicure Rose to the Occasion
  • Essie Bachelorette Bash
  • Sally Hansen Insta-dri Petal Pusher
  • YSL Beauty Vert D’Orient
  • Essie First Timer
  • NailStuff.ca Mixed Decoration Nail Wheel in Gold
  • Small dotting tool
  • Small detail brush from Bundle Monster

Oooooh these roses over white is definitely one of my favourite accent nails to do. I love all floral nails, but there is something about vintage roses that just looks so good: easy to do, but looks beautiful & complicated every time. Not to mention, roses are one of the easiest florals to do because I find (for me at least), they’re one of ten hardest florals to mess up.

My tutorial on how I do roses is Here.

So what do you think of this design? Are you a vintage roses person or do you prefer other floral? Share your thoughts down below!