SWATCH SUNDAY — ACO by Ardene 80s Prom Dress

Hey lovelies! & happy Sunday. Can you believe it’s August?! How did that happen? The pumpkin spice is calling me already. But since it’s still Summer, I won’t get into the Autumn colours just yet… though I will say, I’m already planning a post featuring my picks for Fall so stay tuned!

But let’s starting off August by embracing Summer! In fact, let’s go way back with a neon Ardene nail polish circa 2014! 80s Prom Dress.

For those who don’t know, Ardene is a Canadian retailer that focuses more on clothing now, but used to be all about jewelry & accessories & has a pretty impressive nail polish selection. I used to be a manager in the company, so I would see first hand all the nail polishes as we got them! It also means I own entire drawer of their polishes.

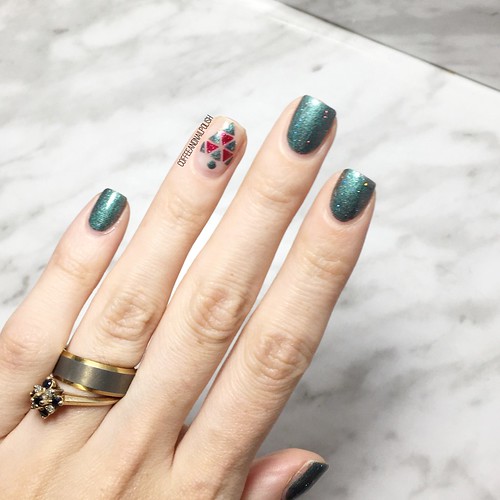
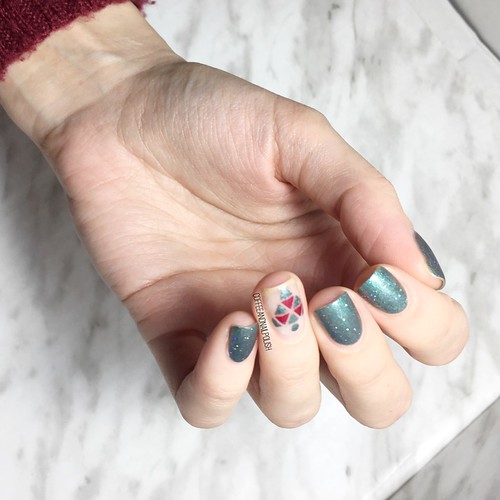
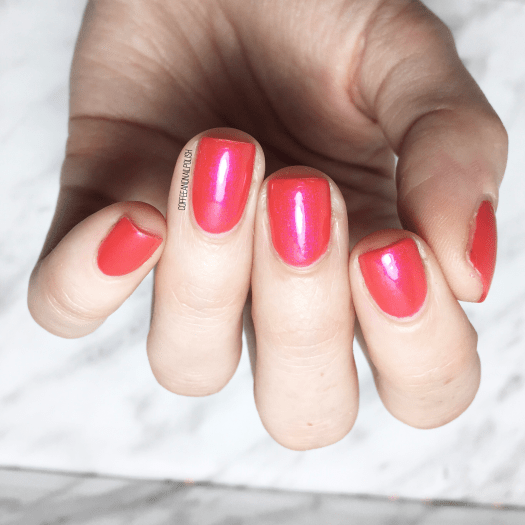
80s Prom Dress is a beautiful neon coral jelly, with a striking fuchsia shimmer. The formula is semi sheer, so I applied two coats of polish over a base of YSL Corial Colisee to make sure I had full opacity. & the two go so well together, you can’t spot where one ends & the other begins! You can also build full opacity with this shade, but it takes about 4 coats.

I love how unique this shade is. The colour is so vibrant, the shimmer stands out, & the combination is perfection. & feel like the name suits this shade so well, because this totally is the colour you would expect to see on a garishly loud prom dress from 1982.

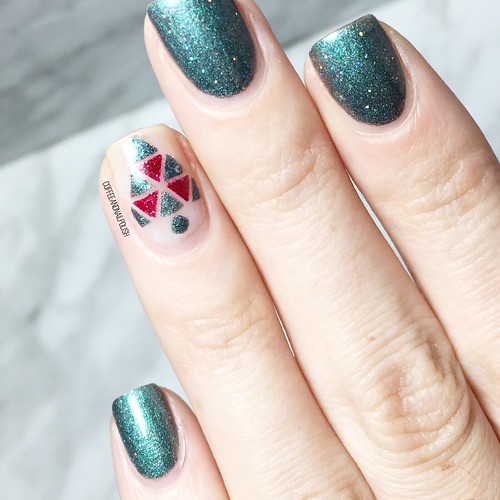
A close up to really see that beautiful glowing fuchsia shimmer.

What do you think about this beautiful neon shade? Are you still all about summer shades, or do you find your mind wandering to Autumn polish? Let me know down in the comments below!

Happy 6th Blogiversary Coffee & Nail Polish

Hello lovelies & Happy Sunday. I know what you’re thinking — this isn’t my usual Sunday content. But I’m making a special exception for this Sunday because IT’S MY BLOGIVERSARY!

6 years ago today, I posted my very first post here on coffee & nail polish, & I haven’t stop since. A lot has changed since those early, early days of blogging but my love of nail polish has not. & I can honestly say I can’t imagine not having this place, my very own place, to share that love! So whether you’ve been reading since the beginning, or just recently found me, I just want to say thanks for being here! & have a piece of cake (or a very large fancy coffee) for me!

In honour of today, I thought I would do something I did for a previous blogiversary, & recreate one of my early nail art looks. This orange floral look was the second ever nail art I posted here on the blog, & one of the first really good florals I ever painted. I was going to attempt to repaint this using all the originally polishes I used, but sadly both my bottles of China Glaze Metro Pollen-tin, as well as my bottle of OPI My Boyfriend Scales Walls are long gone. So I updated the look using newer polishes in the stash.

For this look, the polishes I used were:

  • Base Coat: Sally Hansen Good Kind Pure Hardener
  • Top Coat: Essie Gel Setter
  • Essie Fall for NYC
  • Sally Hansen Miracle Gel Get Mod
  • Sally Hansen Complete Salon Manicure Firey Island
  • ACO by Ardene Lemon Sorbet
  • Essie First Timer
  • Essie Off Tropic 
  • NailStuff.ca 7mm detail brush (COFFEE10 to save 10%)
  • NailStuff.ca Dotting Tool Trio 

Back when I started this blog, I think I had a single dotting tool (Essence brand — I still have it around here somewhere) I had bought from Shoppers Drug Mart for like $1.99, some cheap dollar store brushes I never ended up using, & a bunch of striping polishes. & that was the extent of my nail art tools. But you know, I thought that was amazing & I loved teaching myself how to create nail art looks with them, like that beautiful floral. & honestly, I remember being so beyond proud of myself for posting those. I thought they were the best nails I ever painted!

Flash forward: check out those roses! I’m in love. But I will definitely say this — the tools you use definitely make a huge difference in your ability to paint. Everyone always comments on how much my painting has improved, but I definitely think it has a lot to do with the fact my tools have improved as well. That’s always my #1 tip to those who ask me what tips I have for improving their painting: invest in good brushes! I absolutely adore my nail art brushes from NailStuff.ca, but I also have amazing brushes I used to use from Bundle Monster (now Maniology) that definitely helped my improve my skills. &, of course, practice!

So what do you guys think of this floral recreation? Have you ever recreated an old manicure?

Thank you guys SO much for sticking around, for finding me, for liking my posts & leaving comments. You honestly have no idea how much it means to me to see people loving what I do, & the fact after 6 years people still love it! ♥♥♥

Have an amazing Sunday!

Easy Yellow Floral Nails

Hello lovelies & happy Tuesday! How is your isolation going? So far I’ve attempted to organize baby girl’s wardrobe, watched 2 &1/2 seasons of Gossip Girl, & spent a lot of time drinking coffee & hanging out with the fam. I’ve also been organizing my nail art supplies, again, because I tend of having a habit of letting them get a bit messy in between. & while organizing my supplies, I realized it’s been a long time since I attempted using my striping polishes & nail art pens in a full manicure. Once upon a time, they used to be the main way I would draw my flowers, so I thought it would be fun to attempt a simple floral design using my old favourites.

For this manicure, the polishes I used were:

  • Base Coat: Sally Hansen Good Kind Pure Hardener
  • Top Coat: Essie Gel Setter
  • ACO by Ardene Lemon Sorbet
  • Sally Hansen I ❤️ Nail Art pen in Magenta
  • Sally Hansen I ❤️ Nail Art pen in Purple
  • Sally Hansen I ❤️ Nail Art pen in Turquoise
  • Art Club 2Way Nail Art Striper pen in Neon Green

I’m so used to using my good nail art brushes that creating my leaves & vines were more difficult than I thought they would be. I used to be absolutely obsessed with these strippers & nail art pens, & I think they’re still an amazing option for beginner nail artists or traveling as all your polish & tools are co,boned together. Is it the best floral I’ve ever done? Well, no. But I do think it’s still a very beautiful floral & I love them a lot! Plus the colour combination is very, very Springy! & I’ll take any hint of Spring I can get.

What do you think about this floral? What are you favourite nail art tools? Let me know what you think down in the comments below!

#GlamnailschallengeDec — Christmas Trees

90E81591-F97F-47D7-BA88-688F0DDC2AA8

Good morning lovelies & happy Monday! & happy Christmas Eve Eve! We are quickly approaching Christmas & the end of GlamNailsChallengeDec! Today’s prompt for this challenge is Christmas trees! Naturally I went to Pinterest to find a look I liked, & found this tutorial originally posted on Instagram by @thebasecoat.

F9B9169B-A898-44E1-807C-3431BE74FD8D

139A3F05-9E76-49C4-BBD4-18A1BB97B32E

For this manicure, the polishes I used were:

  • Base Coat: Sally Hansen Complete Salon Manicure Strengthening Base Coat
  • Top Coat: Essie Speed Setter
  • Icing Stores matte teal shimmer
  • Quo by ORLY Falling Star
  • China Glaze Ruby Pumps
  • Ardene Ice Mist
  • NailStuff.ca Dotting Tool Trio (COFFEE10 to save 10%)

.

043423A3-A3B7-4168-BE6E-279530536509

622D0E95-31F0-4DBD-AEB5-6B890051F1AC

For this look I started off by applying the triangle nail stencil to my accent nail, then one at a time applied my colours to the empty spaces to create a triangle on the nail. I followed the Base Coat’s tutorial for colours. It was also way easier using a pre designed nail vinyl than attempting to position striping tape or straight nail vinyls into the same shape.

6E776060-74A2-42E1-8EE3-D4BD2621BCFC

33465D9D-CC61-4EAA-8062-A58925C74755

Honestly this look was too simple to do, but turned out so cute! I think this is such a perfect Christmas Day look—who doesn’t love Christmas trees! & the mixing of colours is very Christmasy. I absolutely lovely it!

74D0F345-1285-4AE1-9583-82D296AF7D97

What do you think about this design for Glamnailschallengedec? Have you figured out your Christmas design yet? Don’t forget to check out Instagram for all the other amazing look for #glamnailschallengeDec!

GlamnailschallengeDec— Snowflakes ❄️

295D3F82-9BCB-4A72-B323-B61C9863E1F9

Good morning lovelies & Happy Wednesday! We’re already halfway through our week, how crazy is that?! & even crazier we’re almost half way to Christmas! (I haven’t even begun to process the fact this year, no DECADE, is almost over…) Today I have another manicure to share with you as part of #glamnailschallengeDec — Snowflakes!

Snowflake designs are actually one of my favourite nail art looks for this time of year, because there are so many ways to create snowflakes: stamping, stickers, freehand, & even just glitter! For today’s look, I decided some more stamping was in order because I have about 5 different stamping plates with snowflakes on them. I really wanted to feature one snowflake per each nail & I love how these turned out because they remind me a lot of Frozen. ❄️

30922547-10AF-4821-8253-B5E14F868D79

656FC76D-444E-4F24-BDFB-1A4DFC92BD9C

For this manicure, the polishes I used were:

  • Base Coat: Sally Hansen Complete Salon Manicure Strengthening Base Coat
  • Top Coat: Essie Speed Setter
  • Quo by ORLY Breathable Kiss Me I’m Kind
  • Sally Hansen Xtreme Wear Ice Pop
  • ACO by Ardene Style Icon
  • Superchic Lacquer Throwing Shade (c/o: NailStuff.ca — COFFEE10 to save 10%)
  • Nailstuff.ca clear stamper & scraper set 
  • Assortment of BornPretty stamping platesthis one has an assortment of similar snowflake images.

.

20866F10-C3D4-45F0-BA6E-C6CE21C837EF

63583769-6AFD-4338-8C11-791FCD5E0B91

B5590443-2DBB-4488-8D4D-9ADB83892420

I started this look off by creating a glitter sandwich using Kiss Me I’m Kind, Ice Pop & Style Icon. I wanted a really soft, delicate base for my snowflakes. If you don’t know what a glitter sandwich is, basically you start off by applying a layer of jelly/sheer polish, a layer or two of glitter & then finishing it with another layer of your jelly/sheer polish over your glitter. It really gives the glitter a softer look, which I love. It looks really beautiful all on it’s own or as the base for nail art. I thought it would be perfect for this particular design because it gives the effect of snow in the background (or at least that’s what it reminds me of.)

EE2C064B-596F-42C4-AAFD-FA775BF0AB3A

1CB11F12-791C-44E5-B92E-24A72B5AC10E

Victoria (aka @nailstuffca) was the one who told me how amazing the Superchic polishes were for stamping, which is why I grabbed Throwing Shade for my snowflakes, & she was so right! I was very impressed with how well it showed up on my nail, especially because I had such a light base to start. I can’t wait to try again over a darker base colour (a navy blue such as Essie Bobbing for Baubles perhaps? Stay turned!)

Seriously though, can you go wrong with holo snowflakes? I really don’t think you can! Who doesn’t want to feel like an Ice Queen.

A07541D0-8E44-4597-AE10-5DBDEC97C659

Who else loves a good snowflake design? I really really love wearing snowflakes on my nails, especially when the actual white stuff seems to be keeping its distance. It just doesn’t really feel like Christmas to me, until there is a little snow on the ground.

As always, don’t forget to check out #glamnailschallengeDec over on Instagram to see everyone’s fun snowflake looks. & stay tuned, because there are still a ton of fun designs to come!