Sideways Glitter Gradient using Olive & June’s New Flash Glitter Gel Polishes

contains PR/gifted product

Hello lovelies & Happy 2026! We made it!

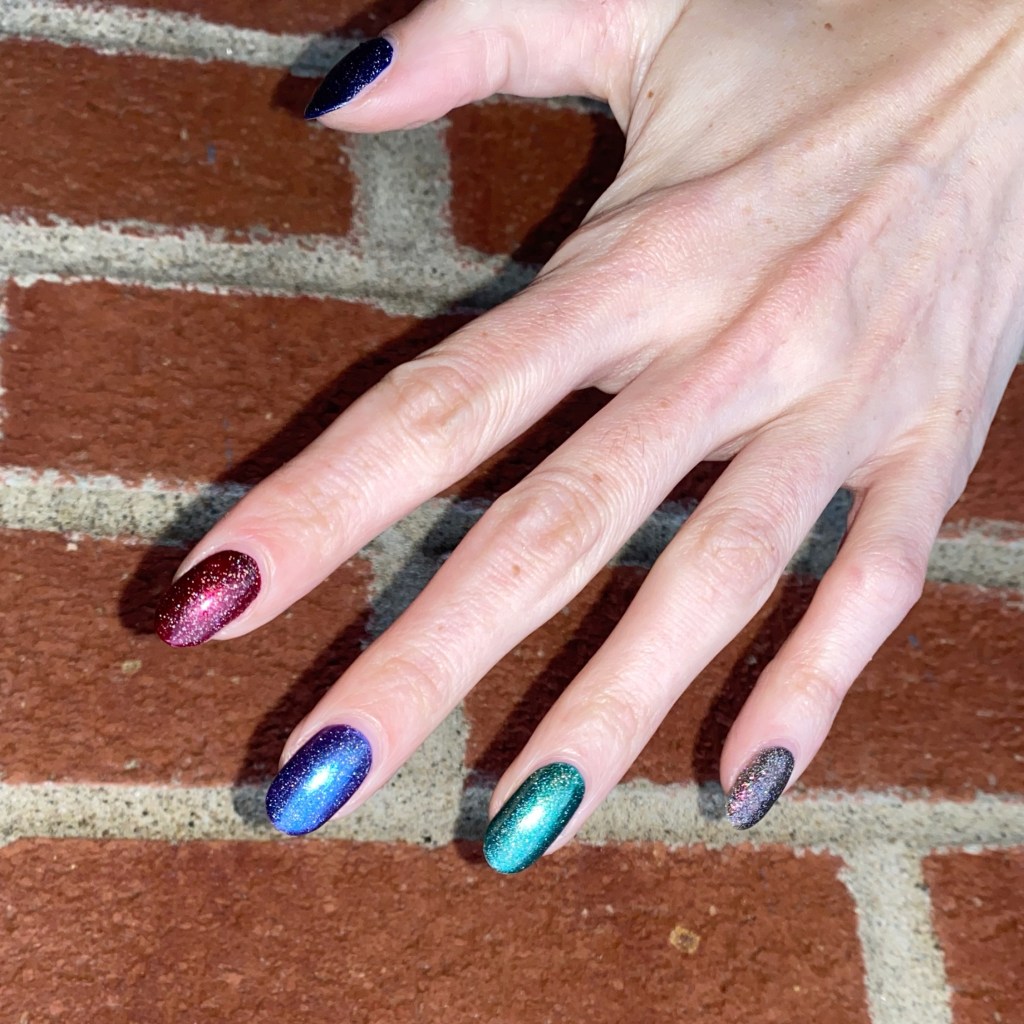
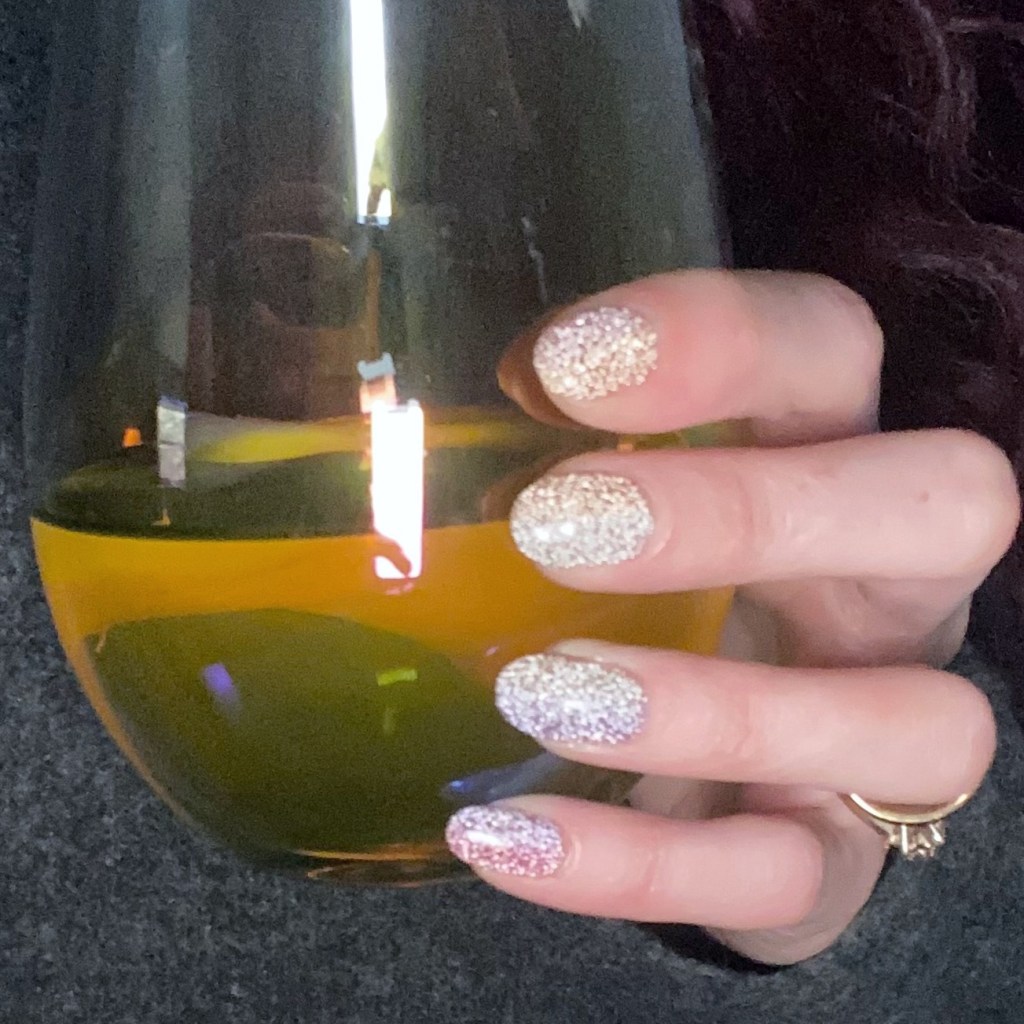
I hope everyone had a wonderful Christmas season, & holiday. It was definitely a weird one this year, but we survived & it’s a brand new year. I decided to take a bit of a break at the end of the year, BUT I did end 2025 with sparkle. Just before Christmas, I was sent some amazing nail mail from Olive & June featuring their brand new Flash Glitter Gel nail polishes — which was an amazing Christmas surprise!

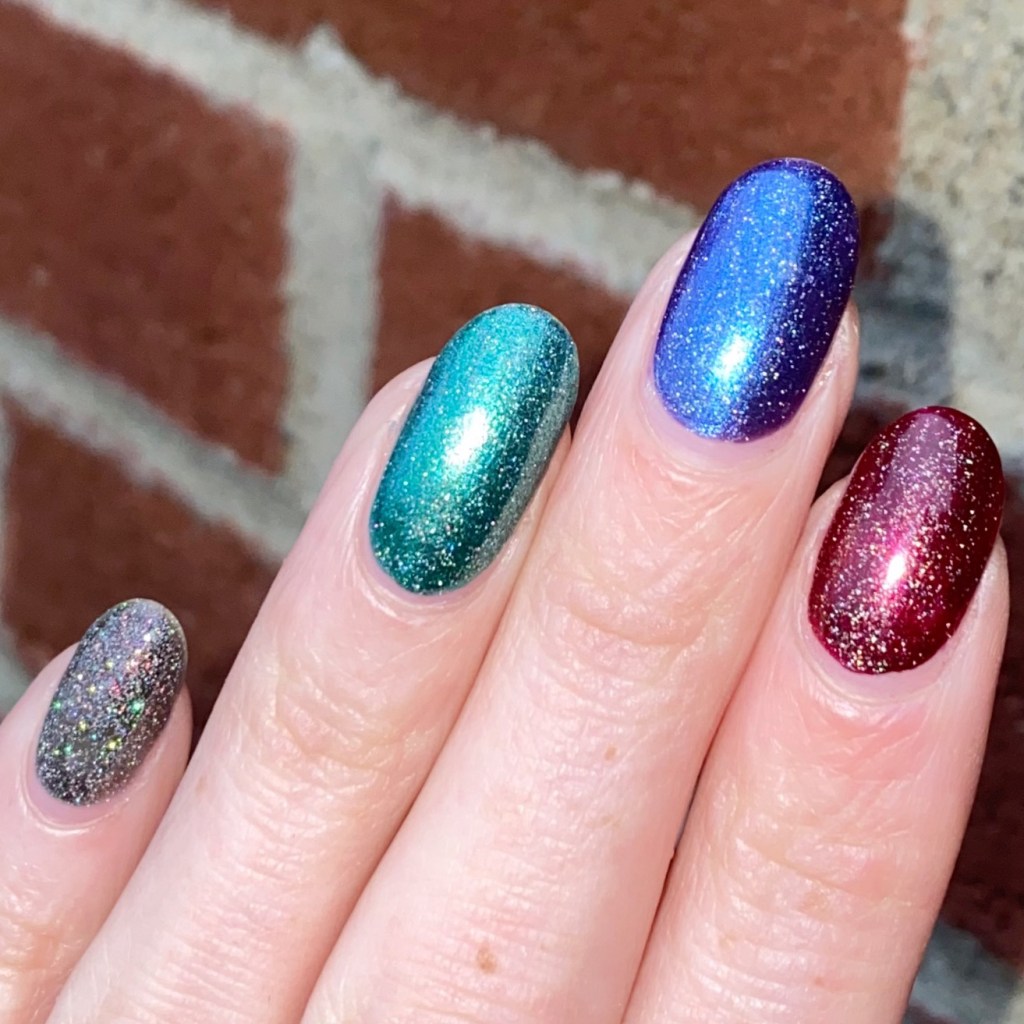
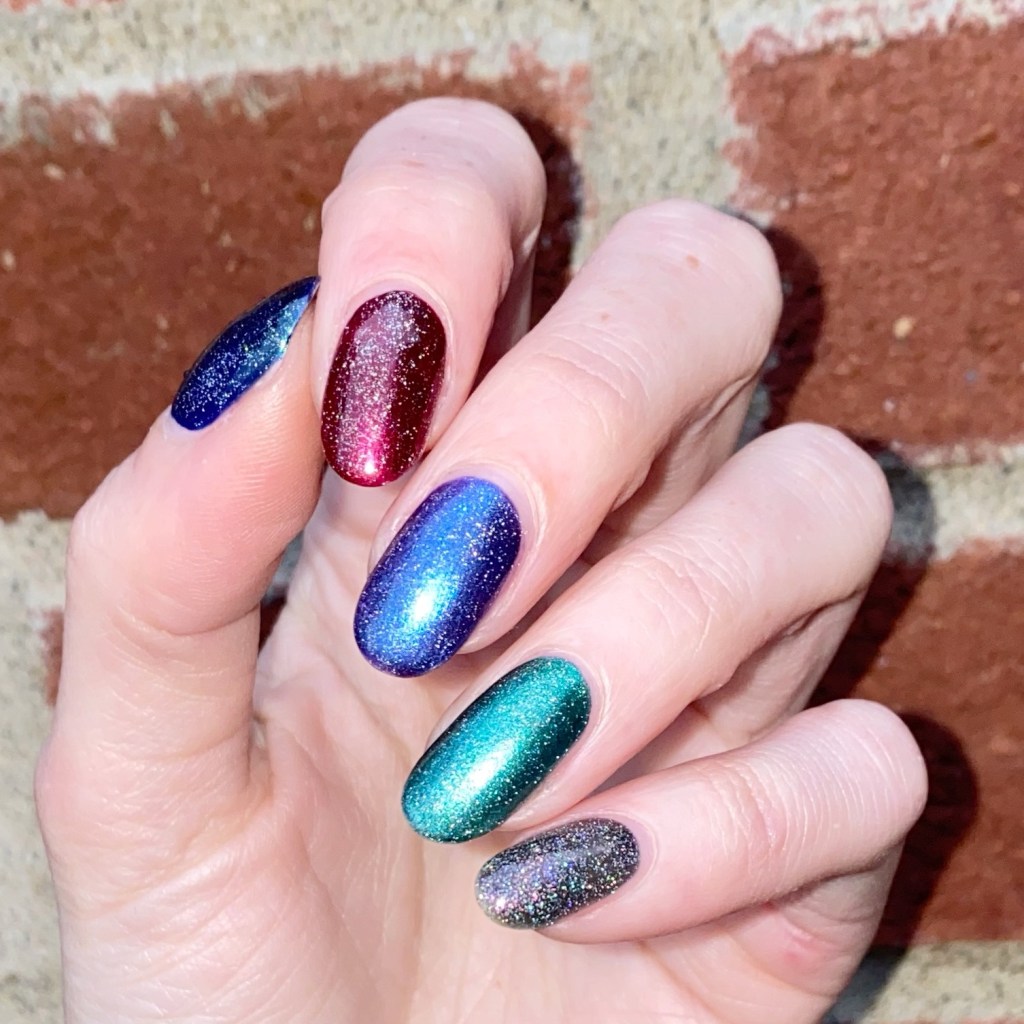
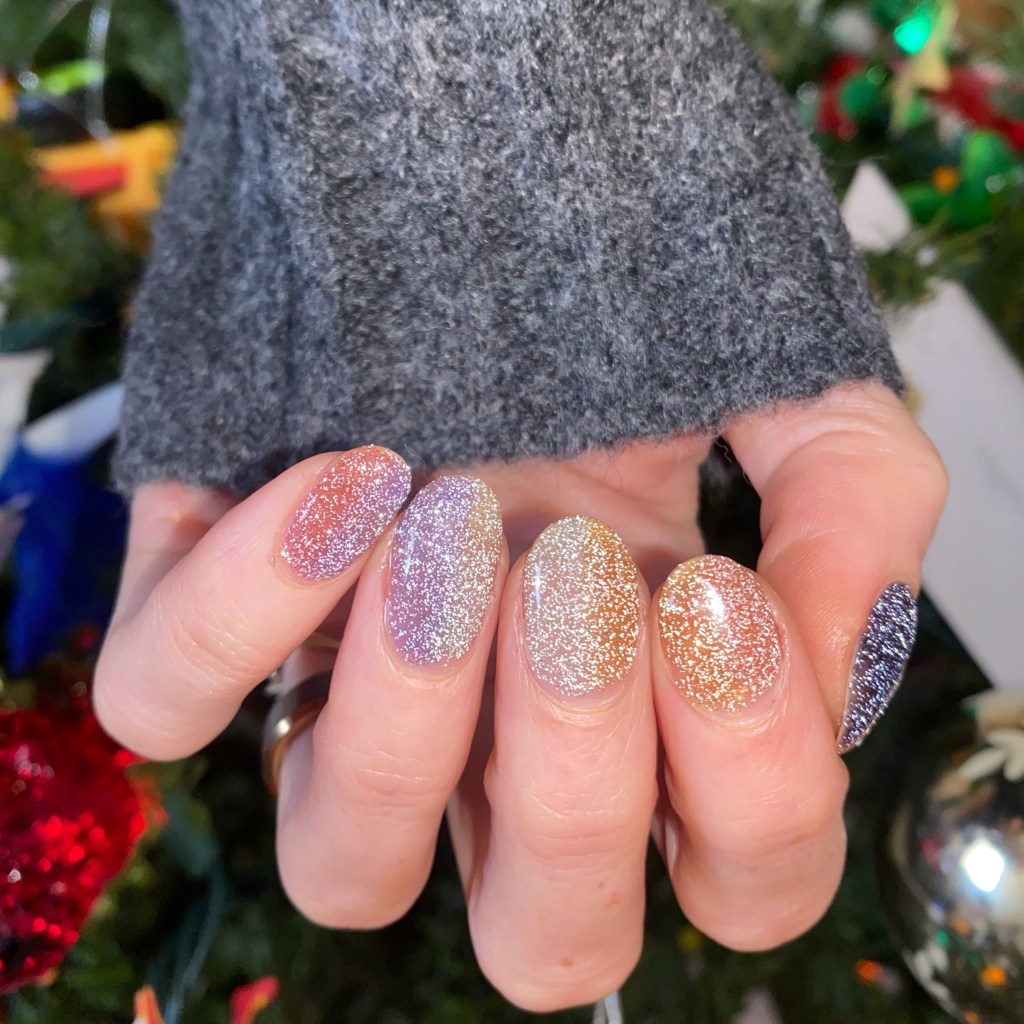
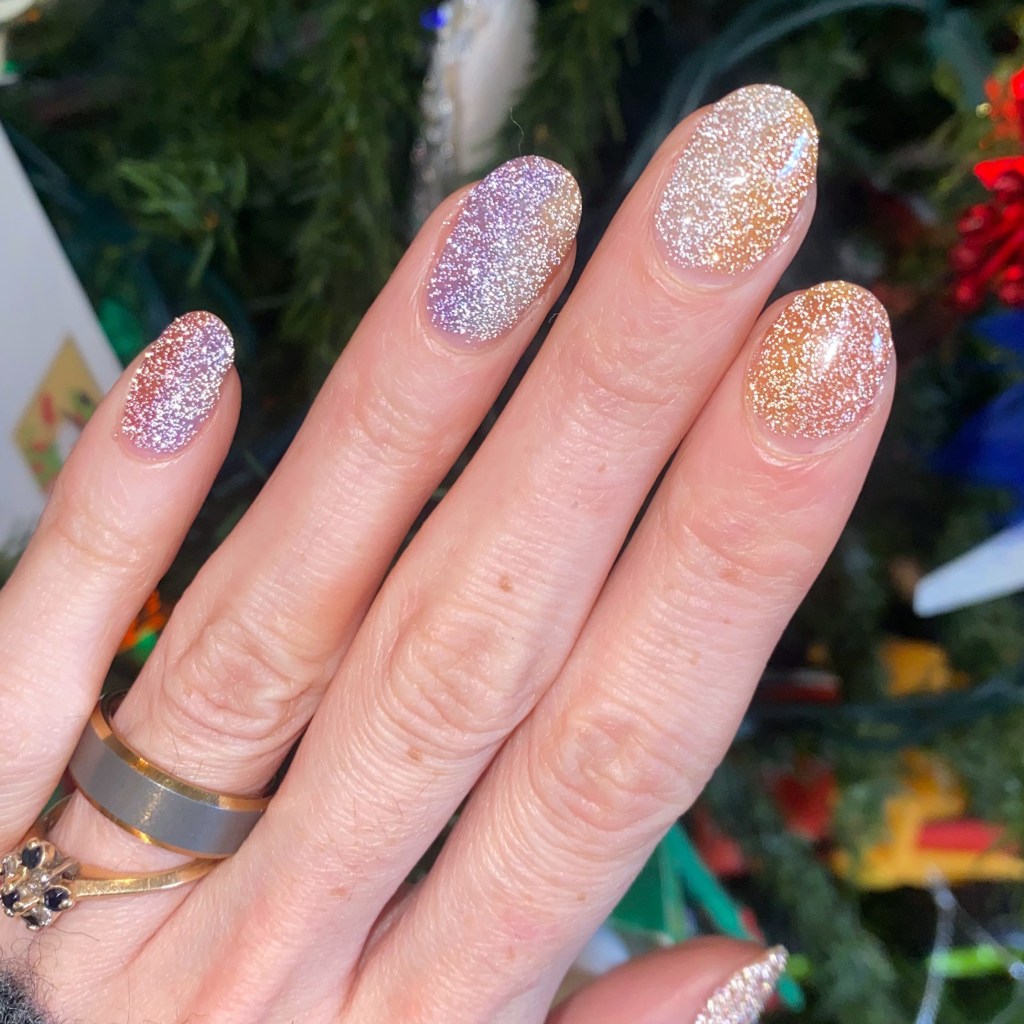
So naturally I needed to wear these gorgeous shades for New Years Eve, & I decided to attempt a gradient using all these shades. I’ve not done a ton of nail art with gel polish, but I’m so happy with my sideways gradient! It looks like a rainbow going across my nails. I was definitely a little nervous going in, but I am so beyond in love with how this design turned out!

The polishes I used for this manicure are: 

  • Base Coat: Olive & June Peel Off Base Coat
  • Base Coat: Olive & June Gel Base Coat
  • Top Coat: Olive & June Gel Top Coat
  • Olive & June Gel Sparkly Pink Drink (rose gold)
  • Olive & June Gel Pop Fizz Mani (gold)
  • Olive & June Gel Mani on the Dance Floor (grey silver)
  • Olive & June Gel Karaoke is a Good Time (purple)
  • Olive & June Gel Out Past Curfew (black)
  • Olive & June Gel Rosé Rhymes with Partay (pink)
  • Flat Nail Art Brush

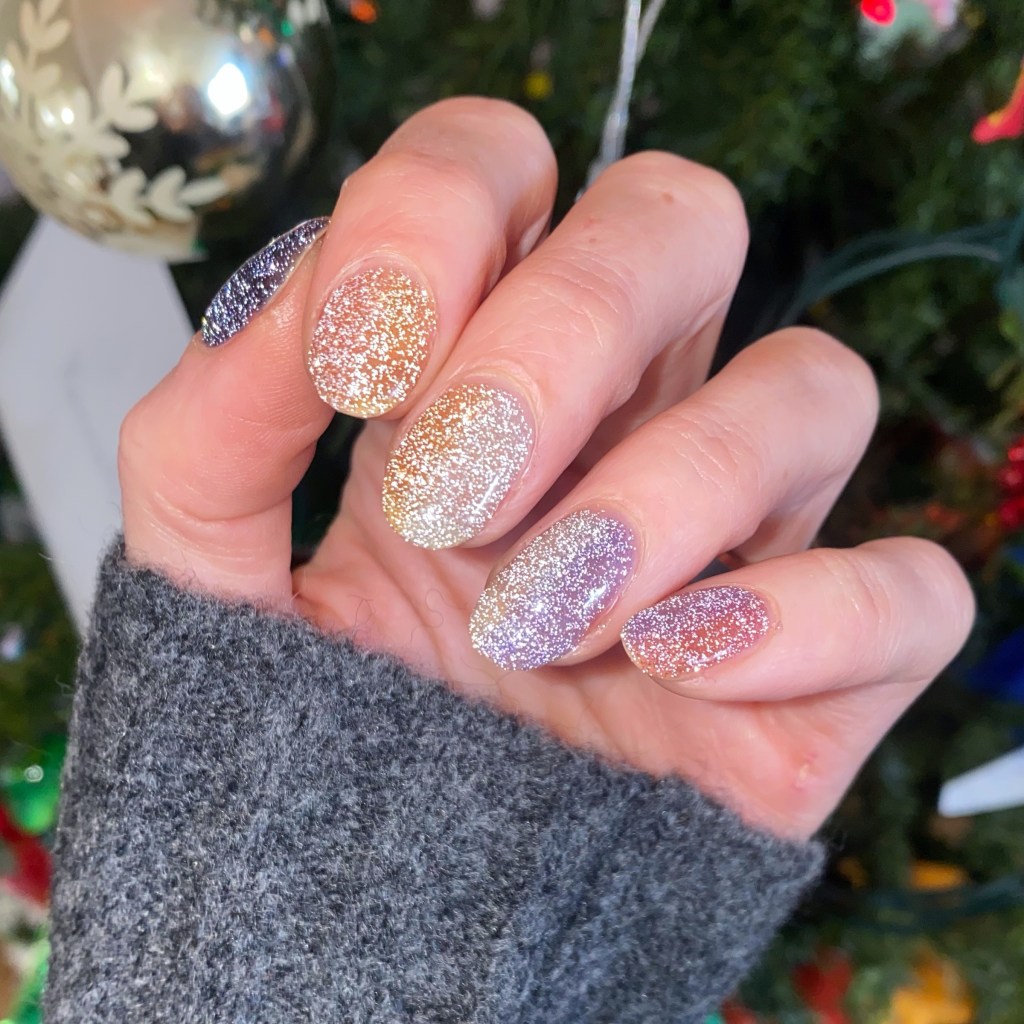
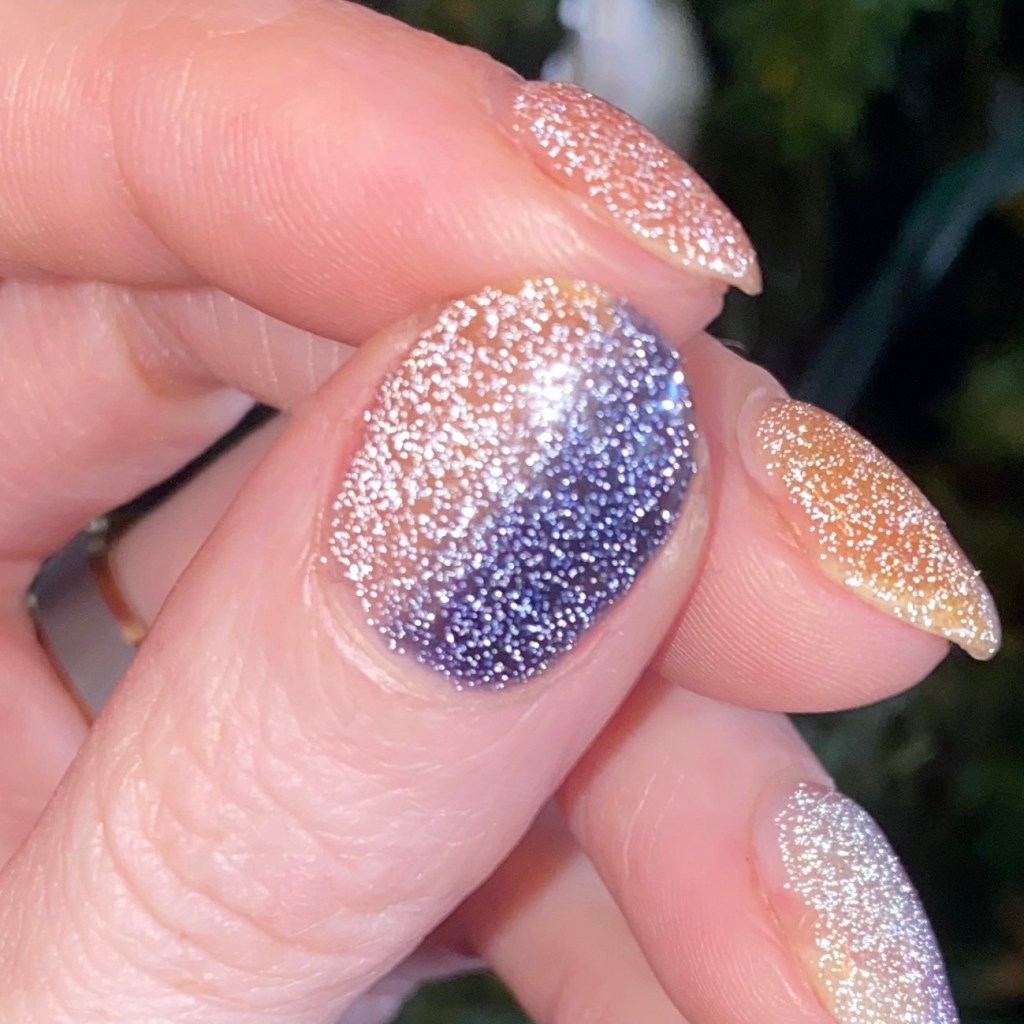
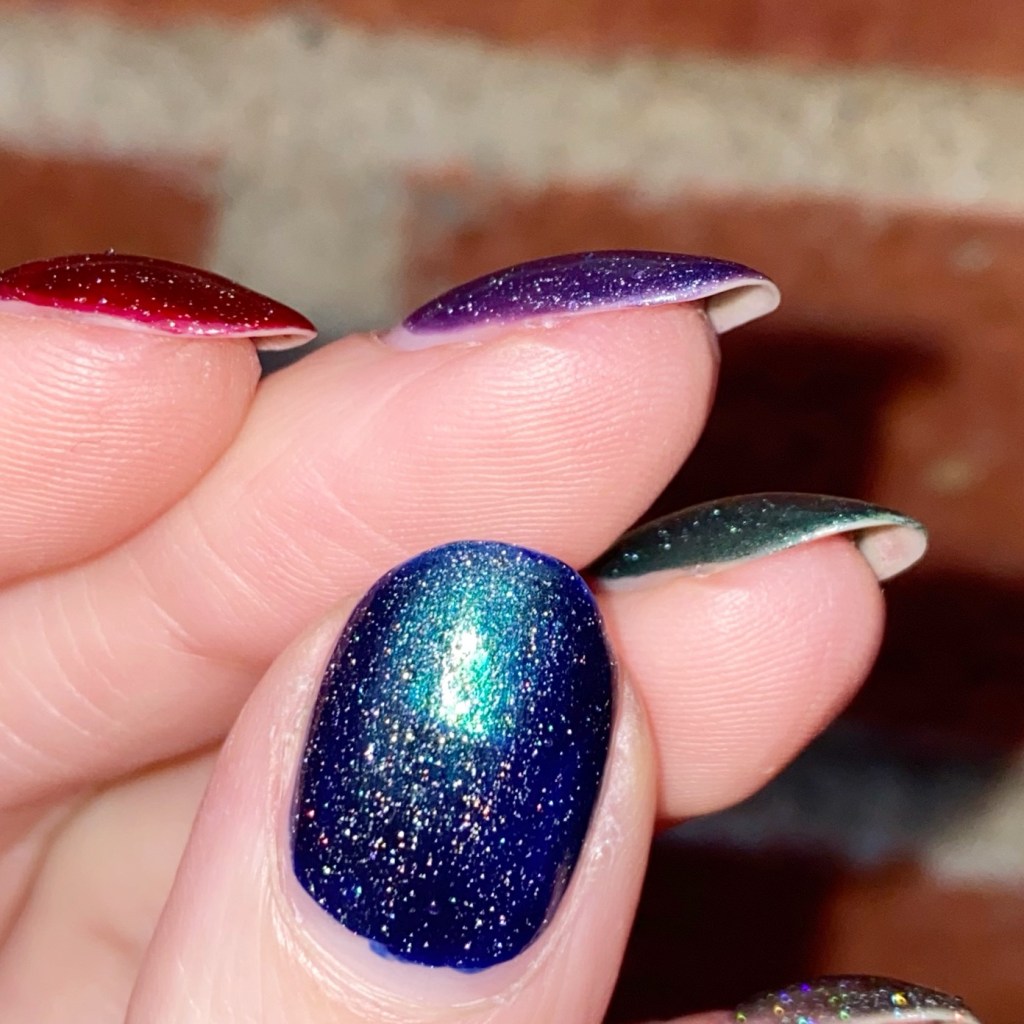
I have to say — creating this gradient was not as hard as I thought it would be. The longest process was curing between each layer, but they came together so beautifully. & compared to other gradients, they were much harder to mess up. I used a flat nail art brush (clean up brush) to blend the two shades together, & it worked so perfectly. I’m kind of sad I wore these with a peel off base coat, because I could have easily worn these for a full week instead of just the night.

This was my first experience with flash glitter, & I get it now! The way it sparkles under flash is incredible. It makes me feel like a disco ball in the best possible way — & I think we all need to sparkle a little more this year. That’s definitely on my list of New Years resolutions for this year.

If you’re interested in trying out these Olive & June Glitter Flash Gel polishes, they have the whole set listed online (including gel lamp), or you can purchase the shades individually. They also have really cool Flash Glitter press on nails which I have not tried, but look really really cool, & would be a great option for someone who doesn’t want to (or cannot) wear gel nail polish!

What do you think about my New Years Eve nails — did I start my 2026 on the right foot finger? Let me know all your thoughts down in the comments below, & what your resolutions are for this year!

♥︎

Gold Swirlie Freehand

Hey lovelies!

I know you what you’re thinking — girlie where have you been this week?!

This has been a jam packed week full of blood work & regular work, so I haven’t had time to get super creative with my nails. I also had a couple breaks, so my nails are now considerably shorter. But I did do this pretty freehand swirly nail art look last week, before everything, so I’m excited to finally share them!

The polishes I used for this manicure are: 

  • Top Coat: Sally Hansen InstaDri Top Coat (red bottle) 
  • Base Coat: Sally Hansen Miracle Cure
  • Essence Good Girl Bad Girl Leather Effect Caught In The Middle (2015)
  • Sally Hansen Good As Good (Holiday 2019)
  • NailStuff 7mm Mermaid Tail liner brush

I used to do swirly looks like a lot circa 2015/2016, & I’m not sure why I stopped. I like how this looks like some fancy wallpaper or wrapping paper. & Good As Gold as some holographic glitters in it, which catch the light every so often & makes it look even prettier.

What do you think of my swirlie golden freehand nails? Do you like designs like this? Let me know all your thoughts down in the comments below. Personally these feel very glamourous to me!

Happy Friday & (almost) weekend!

🖤

Jewel Toned Skittle 💎

Good morning lovelies. I hope everyone is feeling okay-ish this morning. I know things are feeling pretty down for a lot of people right now so I’m sending love.

Today I’m sharing an easy November look. One of the things I feel myself drawn to this time of year is jewel tones. Even though I’m not feeling full on holiday nails quite yet, I do enjoy holiday nail polishes from years past. So I thought I would combine a few fun ones from years past into a gorgeous skittle.

The polishes I used for this manicure are: 

  • Base Coat: NailStuff Essentials Base Coat *
  • Top Coat: Nail Stuff Essentials Quick Dry Top Coat *
  • Sally Hansen Miracle Gel Under The Tree
  • Sally Hansen Miracle Gel Wrapped in Love
  • Sally Hansen Miracle Gel Hyp-nautical
  • Sally Hansen Miracle Gel Me, My Elf & I
  • Sally Hansen Miracle Gel Hue There?
  • Sally Hansen Miracle Gel Make It N-Ice

How gorgeously do these polishes compliment each other? I feel like I’m always trying to create the perfect skittle look, & finally feel like this one is it! The jewel tones, the added glitter. It just all came so together so perfectly — probably why I’ve been wearing this look for over 4 days! See

What do you think about this jewel toned skittle? Are you getting excited about holiday collection releases? Which nail polish collections are you most excited about for the Holidays? Let me know all your thoughts in the comments below!

Birthday Nails with Essie Birthday Girl 🎉

F516455D-4537-4A98-AB92-7F0C2C493092

Hello lovelies & Happy Tuesday! Hope everyone is having a beautiful start to their week. Today I’m breaking up my usual posting schedule because TODAY IS MY BIRTHDAY! That’s right, today marks 33 years around the sun. So obviously I needed to do something fun on my nails to mark the occasion.

In years past I’ve done some obvious birthday nails, but this year I decided to let the polish do the talking. When I saw that Essie had released a polish called Birthday Girl, I knew that I was going to need to own it & incorporate it into my birthday mani this year! I also wanted to do something fun, as I snapped a nail just in time for my birthday, so I am back to some serious shorties.

B6F4411E-B3BE-4022-A8E6-B491C3881773

D5BA04A3-77C1-4A8D-97B2-F6EDDF238362

For this manicure, the polishes I used were:

  • Base Coat: Duri Rejuvocate
  • Top Coat: YSL Beauty Quick Dry Top Coat
  • Essie The A-bliss {PR sample}
  • Essie Birthday Girl
  • Color Club Pucci-licious
  • Color Club Eternal Beauty
  • Essie Play Date
  • Sally Hansen Pat on the Black
  • Nailstuff.ca 11mm Liner Brush {PR sample}

.

6B65E022-F47A-402E-A001-10F99CDAA9E7

01B4F731-8F0D-445D-AAF9-C1103719365E

For my base, I applied two coats of Birthday Girl over one coat of The A-bliss. I then did a whole bunch of Pinterest stalking to see what kind of design I wanted to do overtop my base of Birthday Girl & in the end I decided a Waterfall look was the way to go! Do you remember when Waterfall designs were all the rage? I feel like this design needs to make a comeback!

3C197715-613B-4B6C-8739-90325123C31A

DF26AE0C-B843-43C7-B7C3-D9FD5043AFED

For this look I decided to pick a few purples that I thought would compliment my pink base. Then o used my liner brush from NailStuff to brush thin streaks of polish at my cuticle line, & bam! An low effort design that looks super fancy & fun. Kind of reminds me of sparkling fireworks at the base of my nails which is perfect for celebrating, even if my idea of celebrating is drinking my free birthday drink from Starbucks & playing with the new stamping plates my Mum bought me for my birthday! I can’t think of a more perfect day. ☕️💅🏻

06924BF0-00CA-4581-8459-66D69BCD6AE0

59F2C682-46CF-43FC-8C89-1023165DE1EC

Hope everyone has an amazing day! Let me know what you think about this look & what colour combination you’d love to see me do in a Waterfall look next! 💙