SWATCH SUNDAY — Dimension Nails Hooded Seal & Snowy Owl (from The Arctic Collection)

•pr sample/gifted•

Hello lovelies & happy Sunday! It’s another chilly, snowy Sunday here. I feel like I just keep repeating that over & over… but Spring has to come eventually, right?

Today I’m sharing some beautiful Dimension Nail swatches from their Arctic Collection. They’re kind of snowy, wintery shades, which I feel is perfect for this snowy Sunday. These beauties were recently gifted to me courtesy of NailStuff.ca, so I’m excited to show them off! I don’t think I’ve ever had a Dimension Nails polish that hasn’t been absolutely beautiful, & these shades are no exception.

For those who aren’t familiar with the brand, Dimension Nails is an indie nail polish brand that is 10+ chemical free, as well as being vegan & cruelty free.

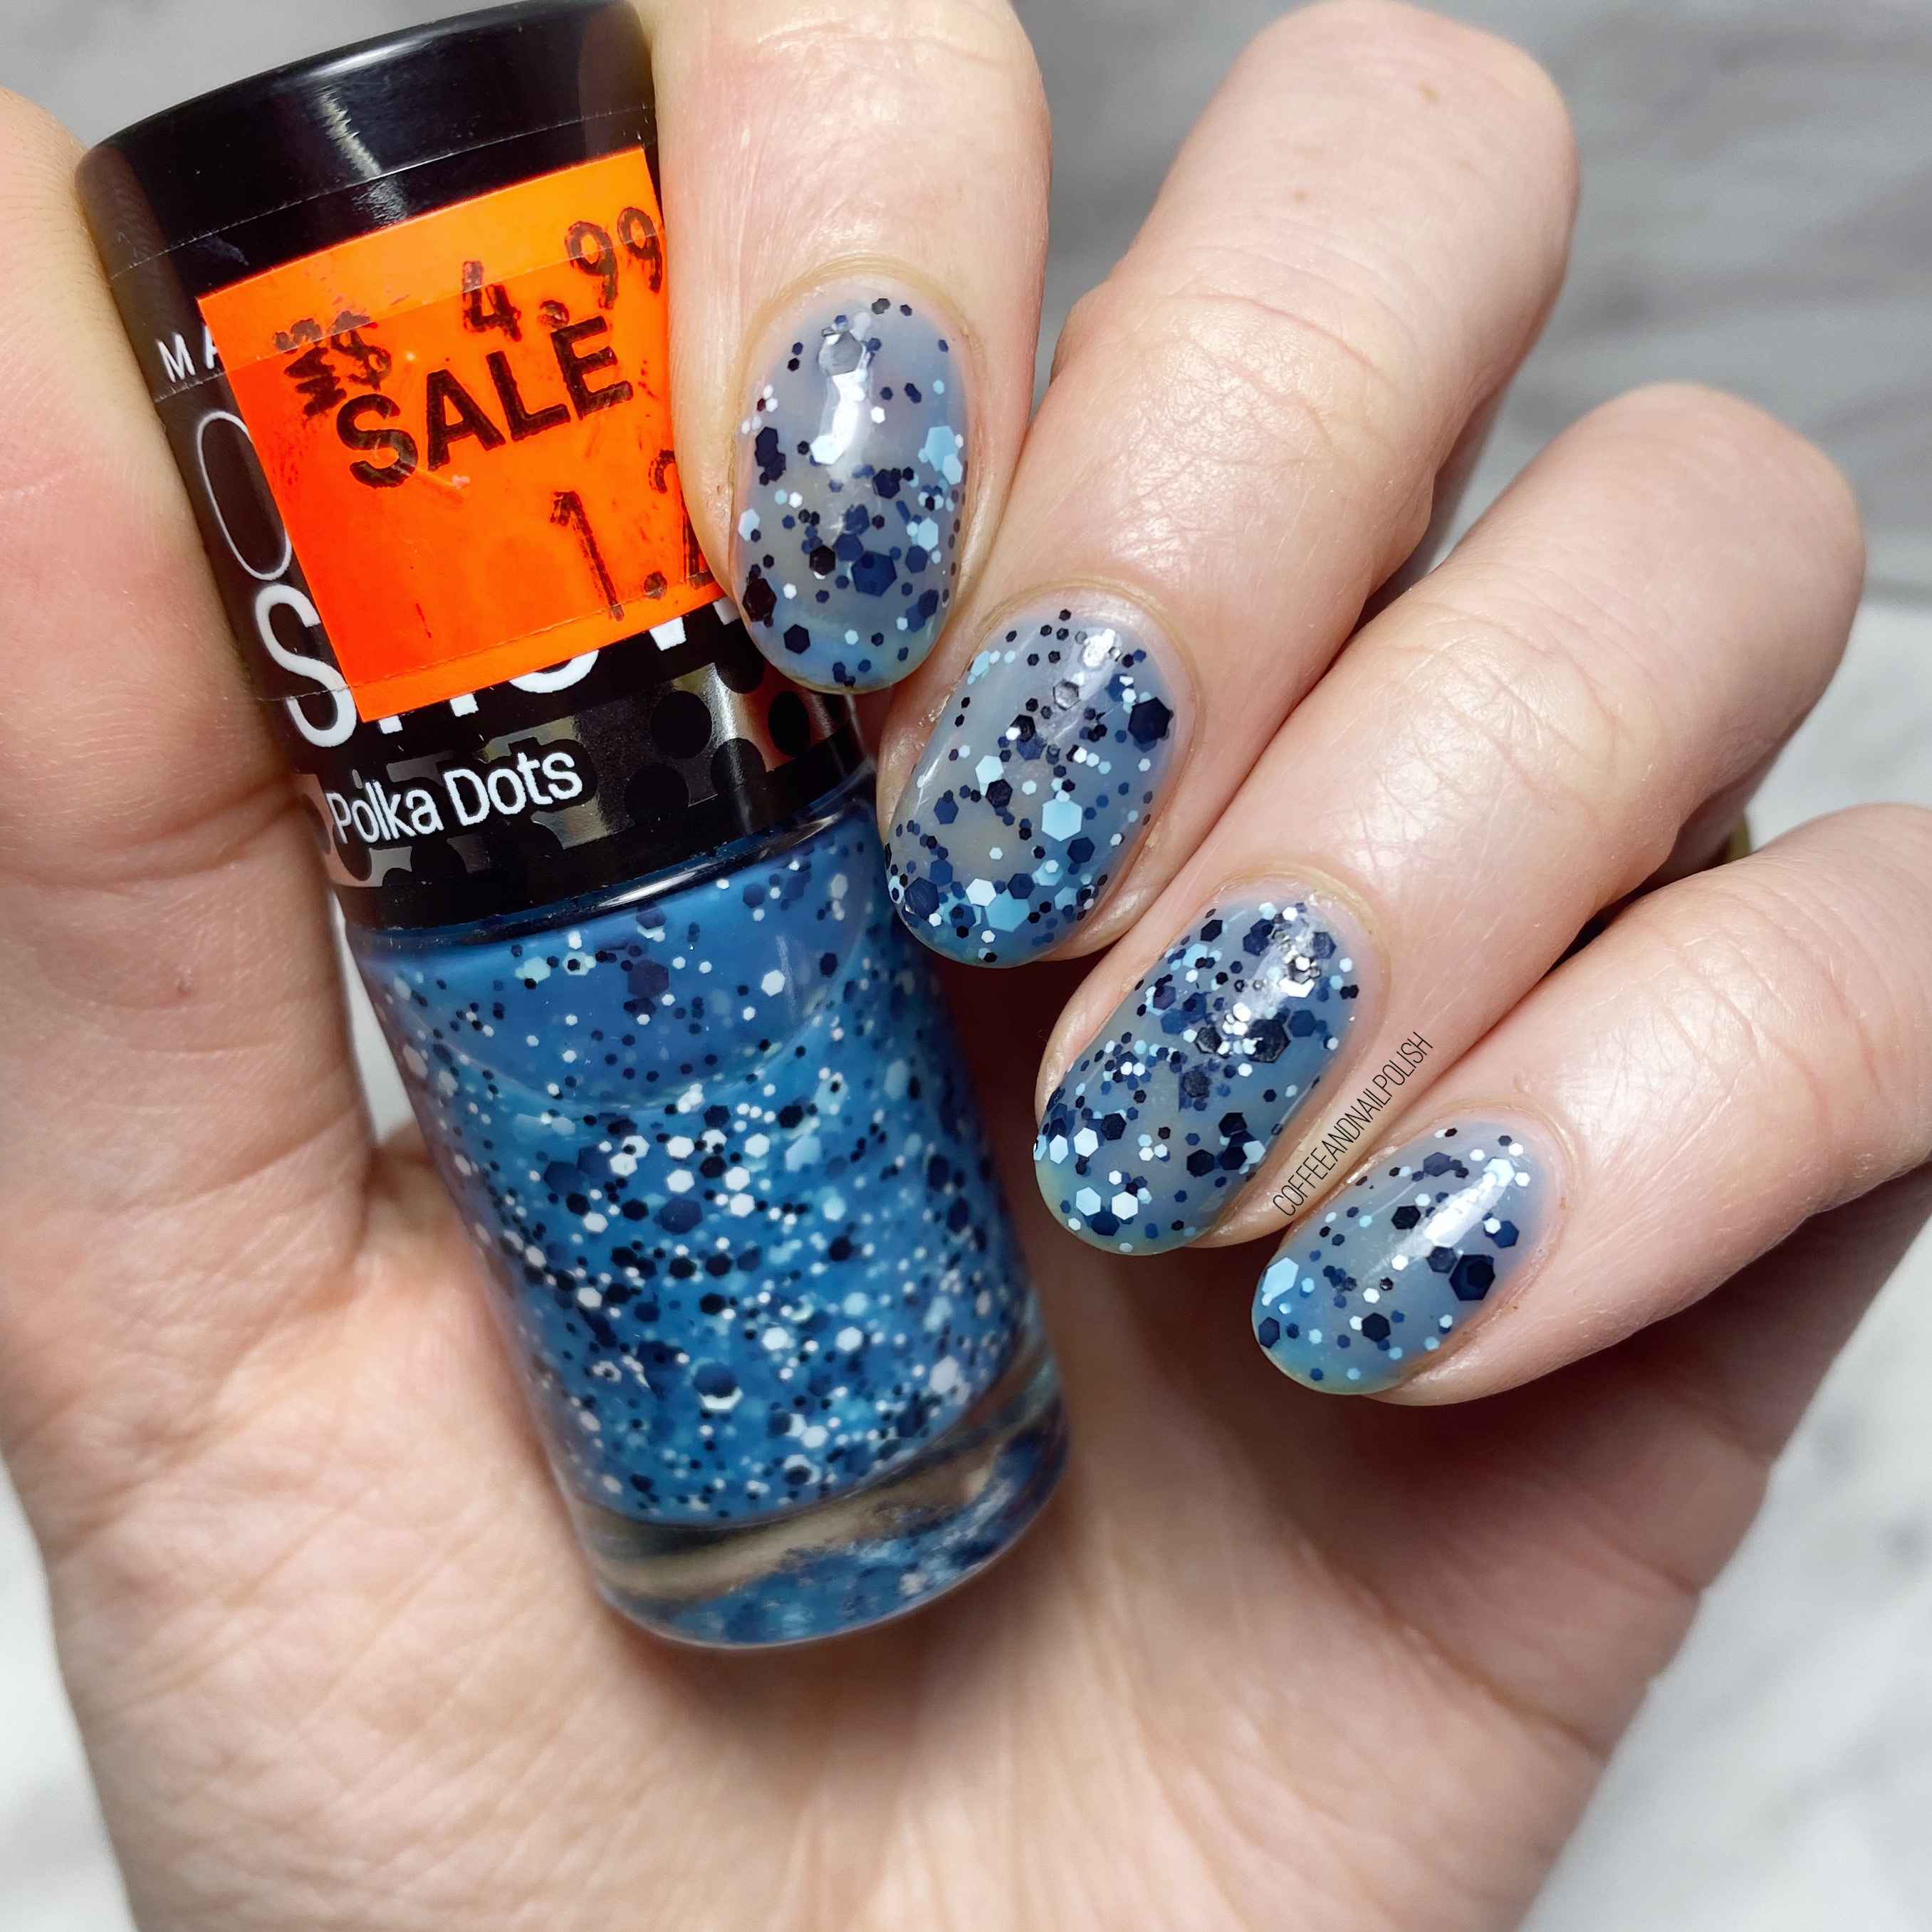
Dimension Nails — Hooded Seal (The Arctic Collection)

2 coats, no Top Coat

First up, we have Hooded Seal, which is a beautiful & shimmery baby blue liner holo. The formula was smooth, & easy to apply. The first coat was a bit sparse, but the second coat built to great opacity.

The holo was really pretty on this. I have deeper, darker blues, but I don’t think I have any which are this pretty pale blue. I also like that it has this beautiful darker blue shimmer that you can capture in the right lighting.

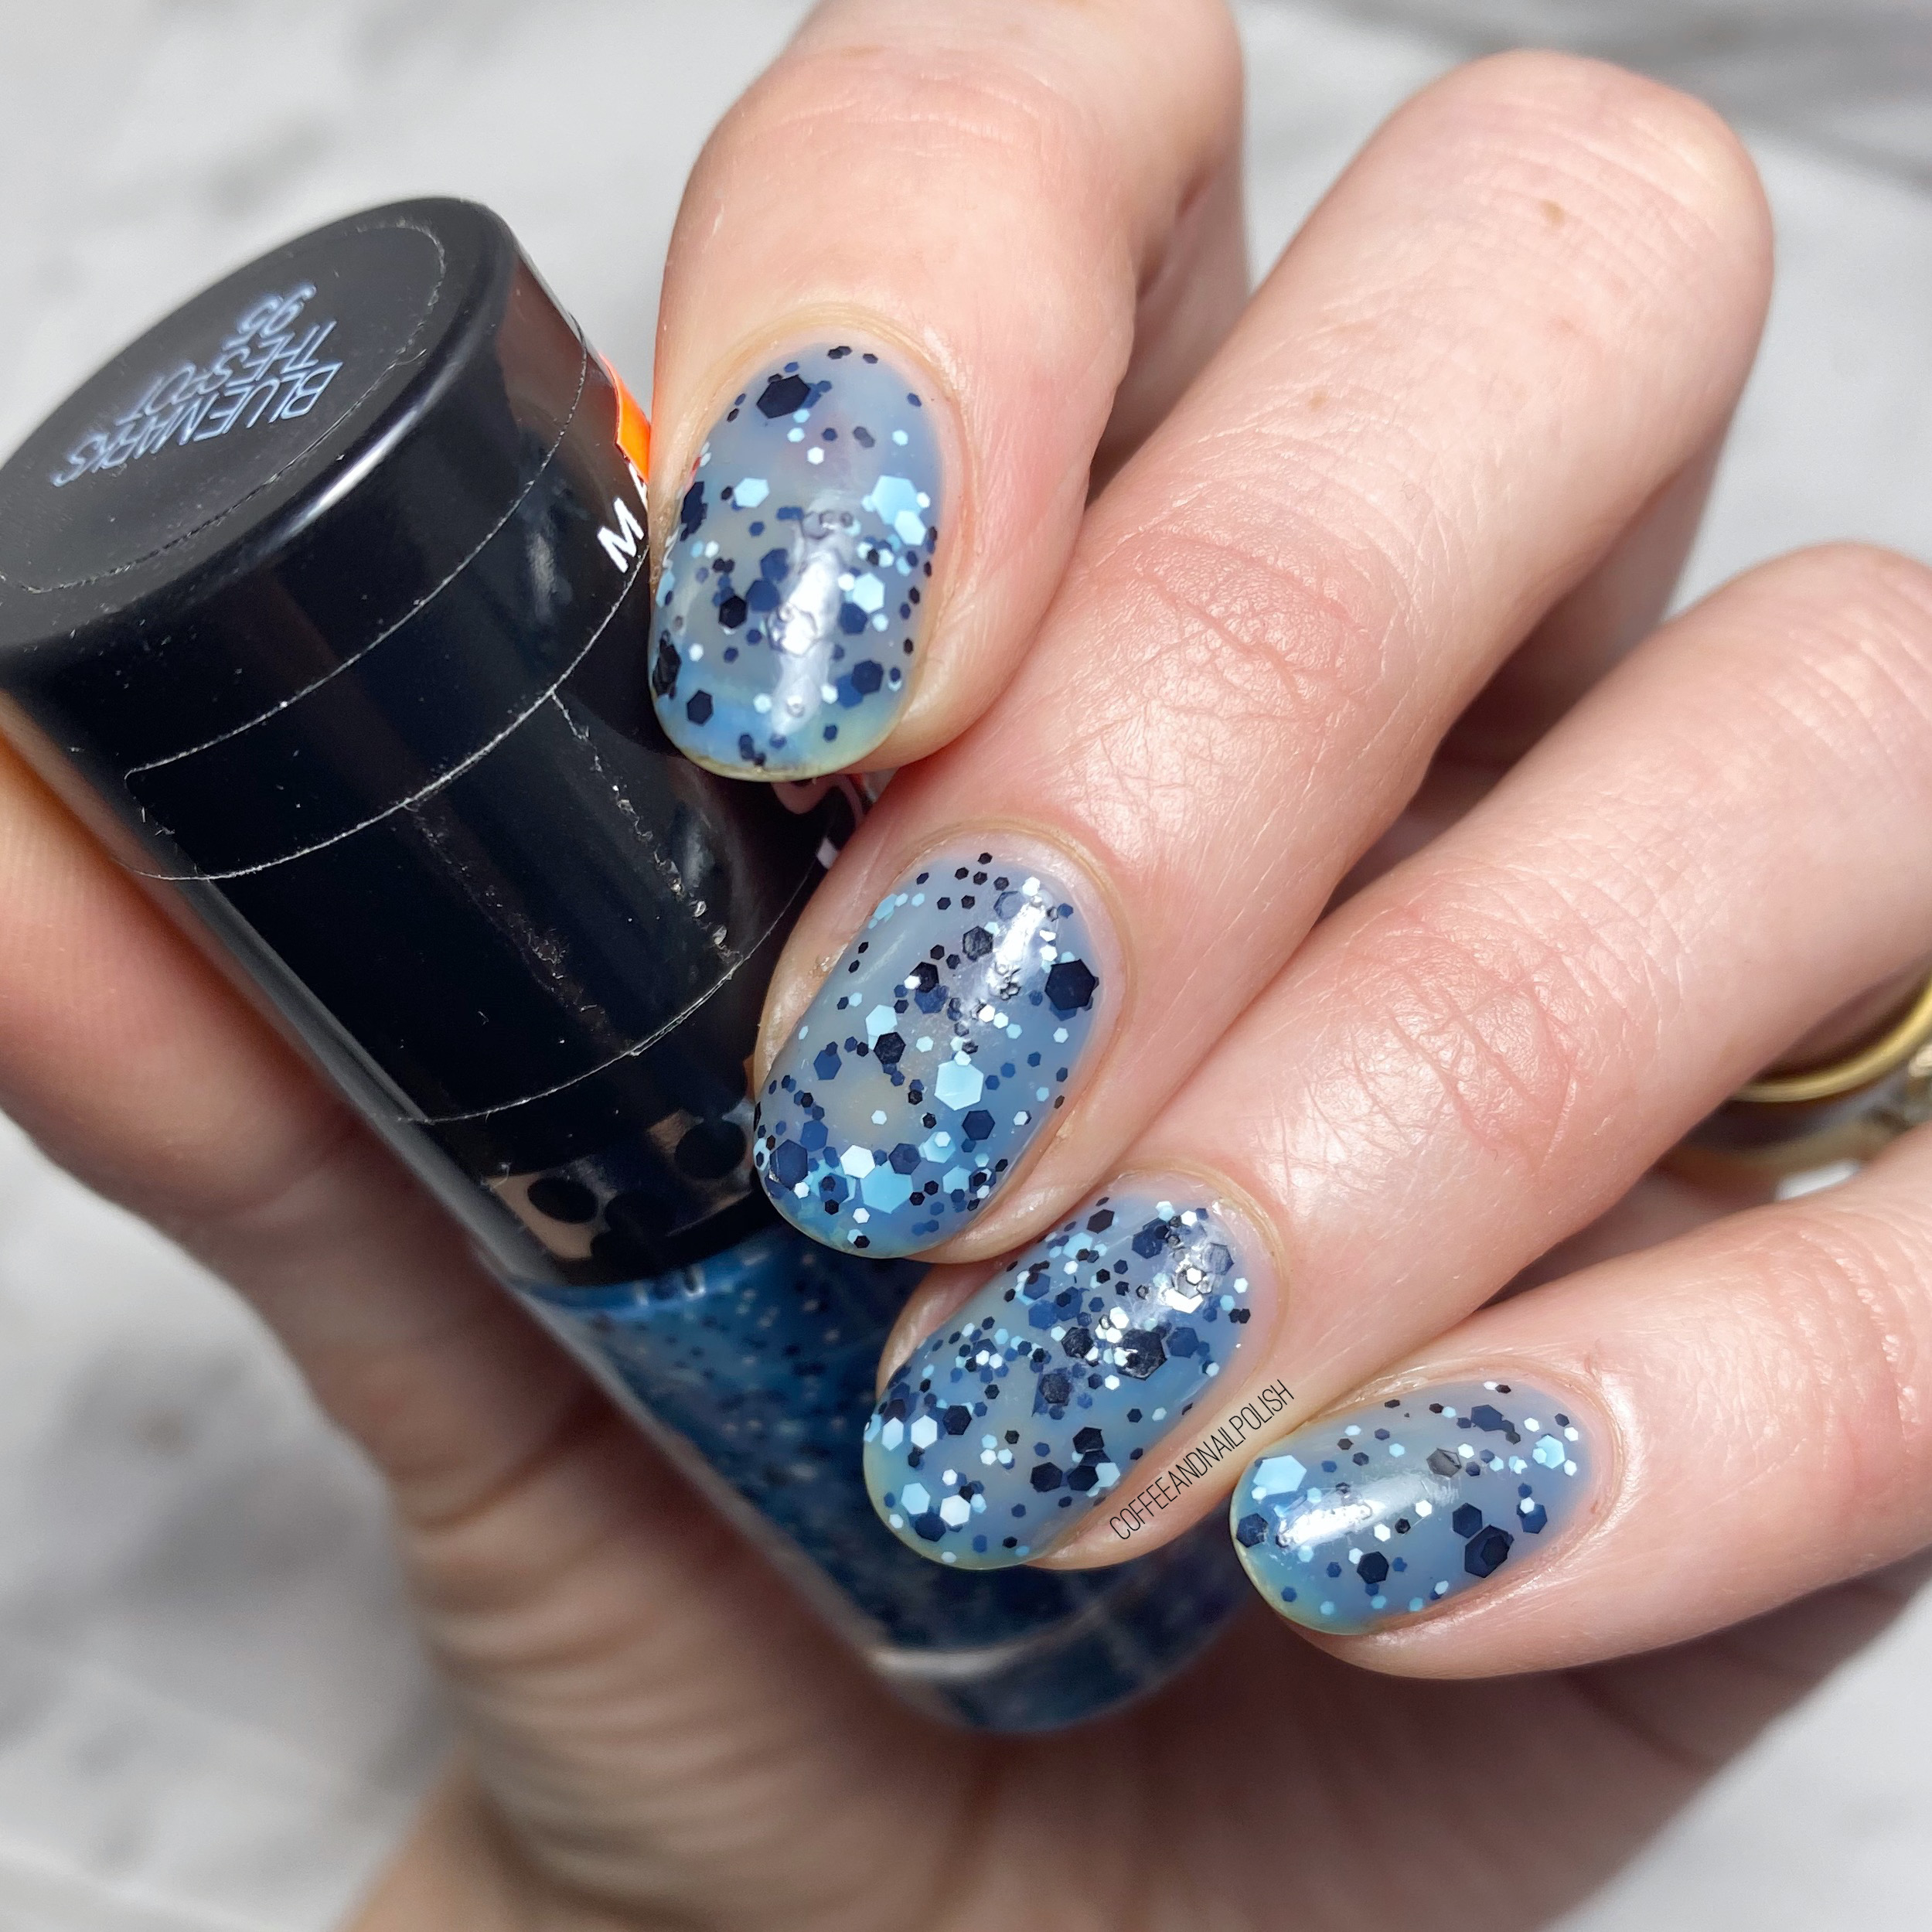
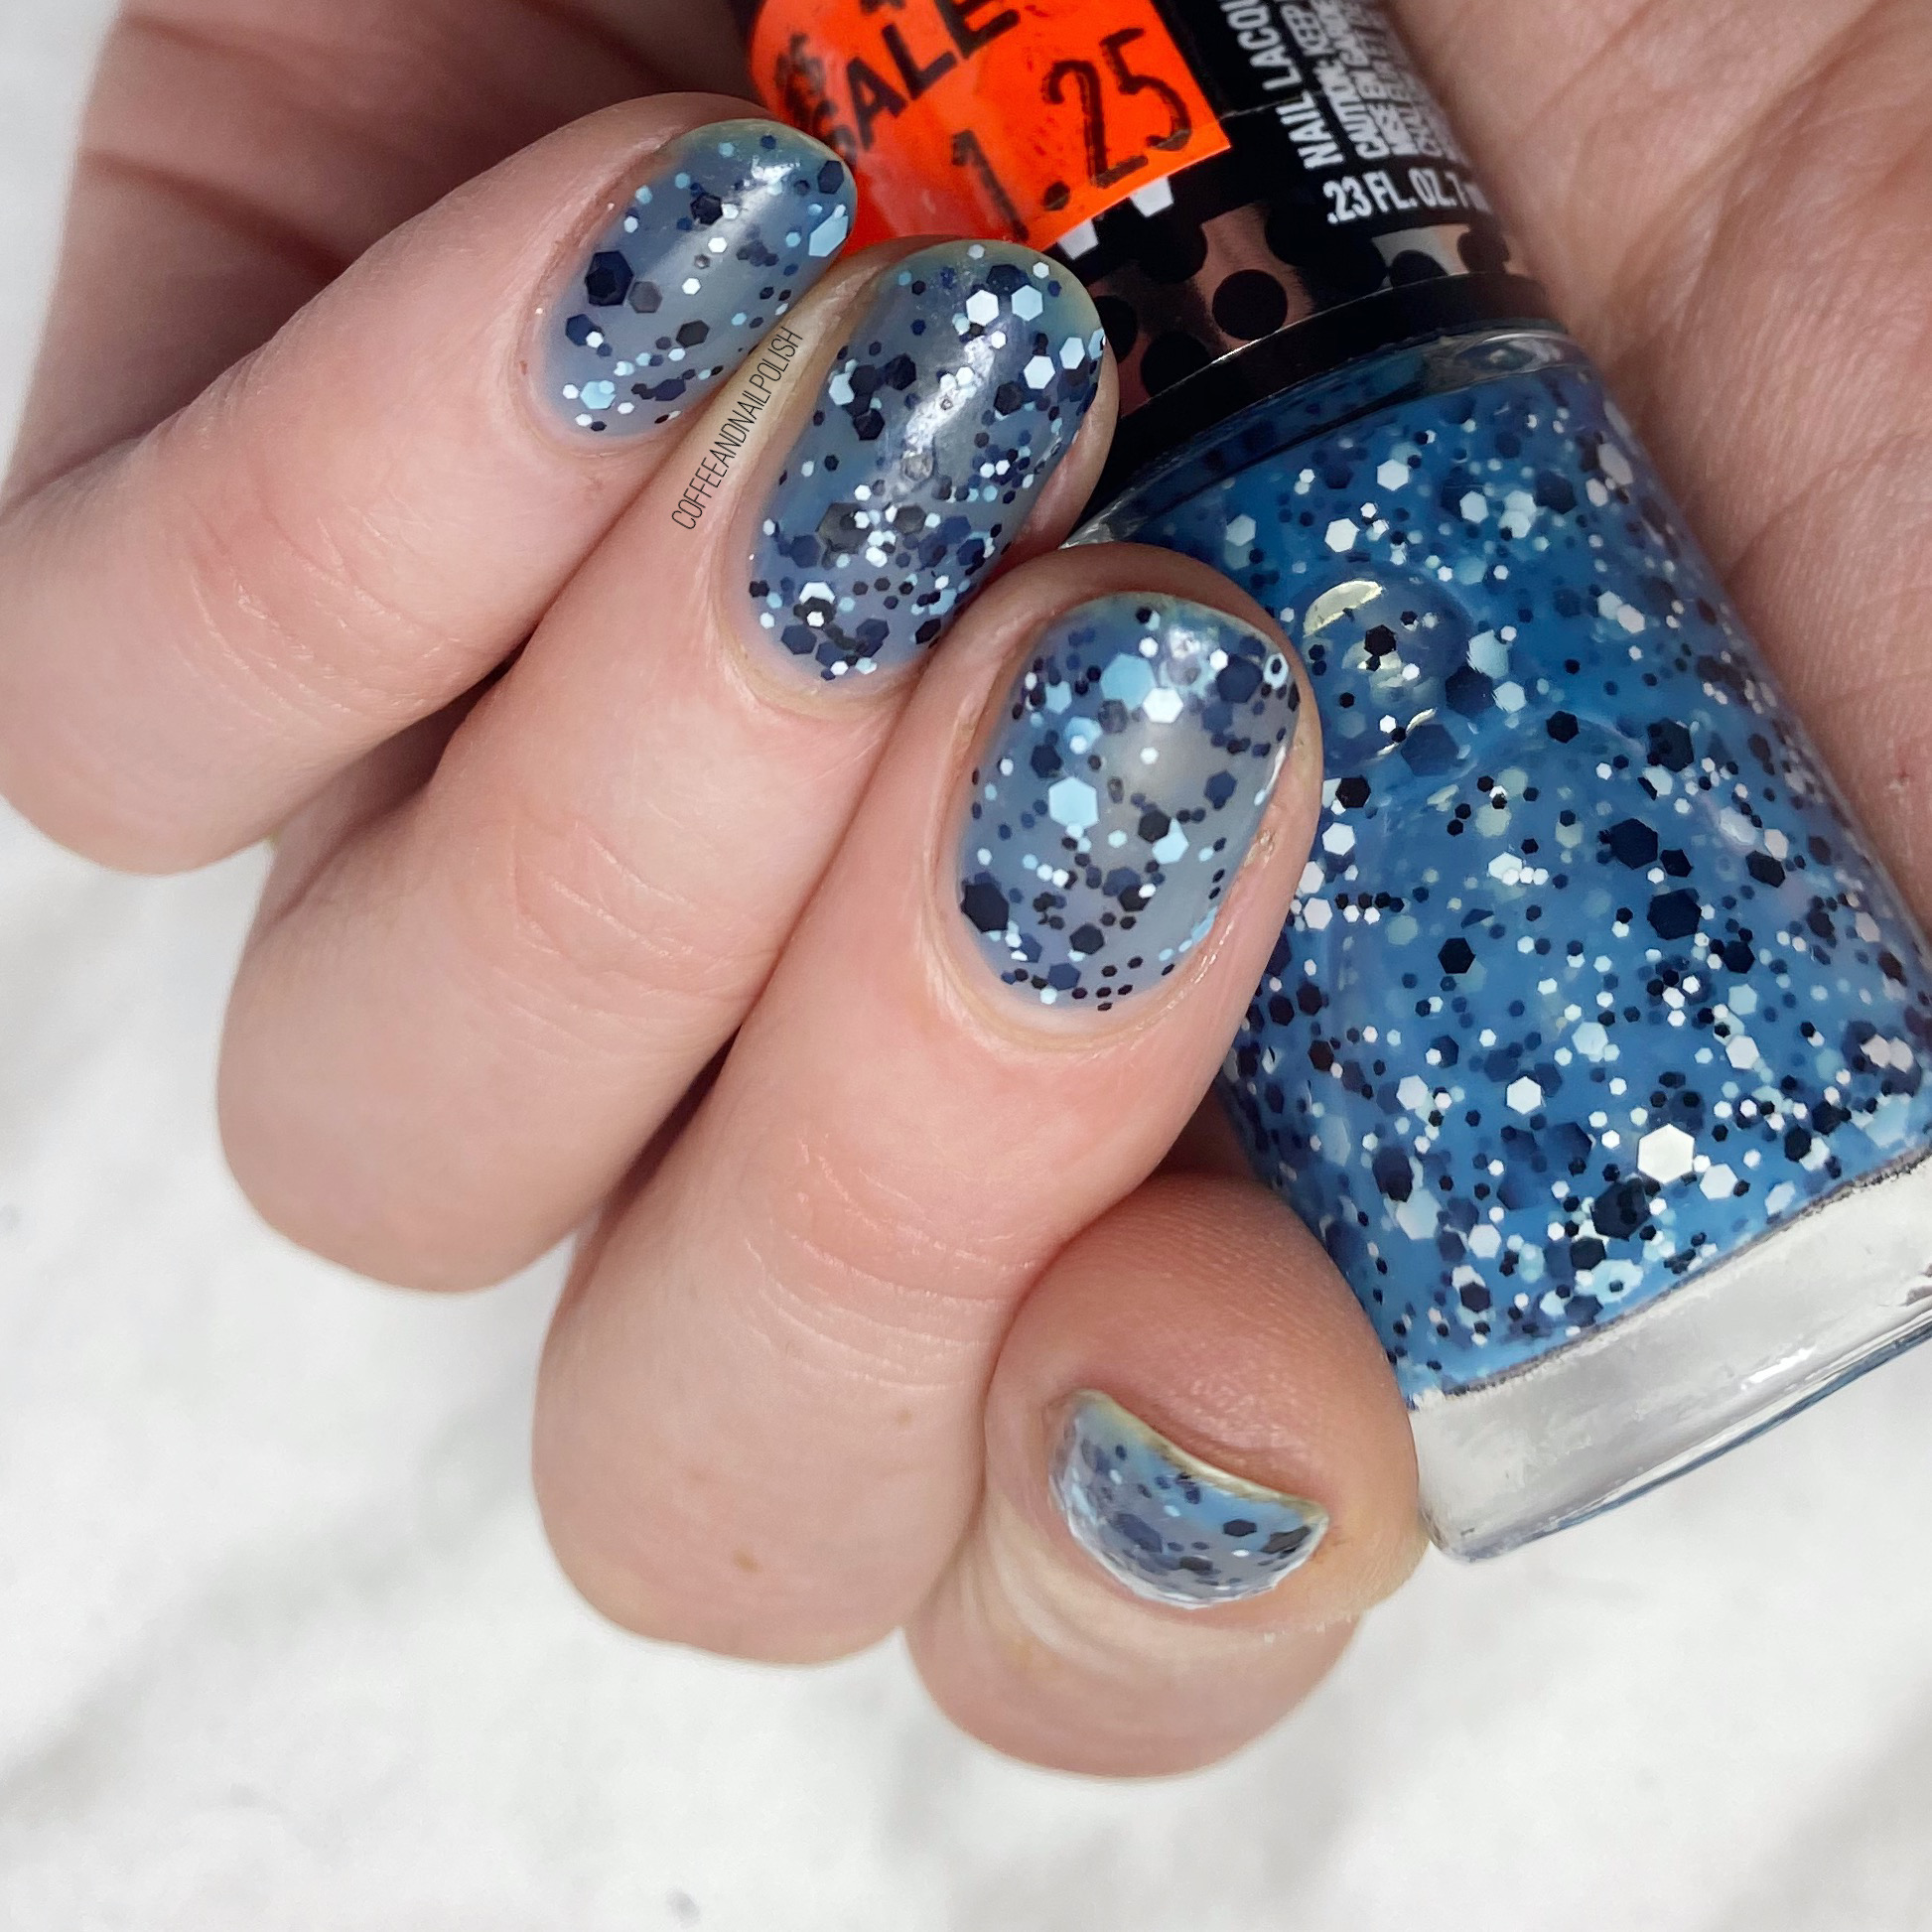
Dimension Nails — Snowy Owl (The Arctic Collection)

2 coats, no Top Coat

Next up from the Dimension Nails Arctic Collection is another beautiful blue: Snowy Owl. This beautiful shimmery blue has a lovely shimmer of micro glitter which gives it a frosty finish. The formula on this one was a bit more sheer than Hooded Seal — I also applied 2 coats for coverage, but I feel like this one needed one more for complete opacity.

It’s definitely gorgeous on it’s own, but I could see it being equally lovely with one layer over another polish — white, grey, dark blue. I feel like you could definitely have some beautiful combinations.

What do you think about these two beauties from the Dimension Nails Arctic Collection? Do you have a favourite? Let me know in the comments below!

Both these shades were gifted to me c/o: NailStuff.ca! You can find the entire Arctic Collection available on her site (shipping available to both Canada & the USA) as well as other many of the other Dimension Nail collections!

Juicy Abstract Stripes

Hello lovelies & happy Thursday. It’s almost the weekend… who else is excited?! Of course, they’re calling for (another) big Winter storm Friday night into Saturday. So that’s… fun. I’m so over Winter & snow it’s not even funny! But you know what I’m not tired of–fun, bright nails!

This time, I was feeling some colours I haven’t worn in ages. Coral used to be a go-to nail polish shade for me, & I’m not sure when that changed. So when going through my stash, I was feeling some coral-y shades, & this is what I ended up with. Also, yes, more abstract stripes because they’re just so easy to do.

The polishes I used for this manicure are: 

  • Base Coat: Essie Millionails
  • Top Coat: Seche Vive
  • OPI I Eat Maine-ly Lobster
  • OPI Can’t Hear Myself Pink
  • Essie Blanc
  • Starrily Vantablack
  • OPI Koala Bear-y
  • NailStuff.ca 16mm Striper Brush

I actually ended up wearing these nails for 4 days, which is unheard of for me. Usually I’m changing my nails after day 2, maybe day 3. But I loved these so much I couldn’t actually bring myself to change them until they were really actually chipped.

These nails remind me of nails I did years ago, that I was equally in love with. Those were definitely the inspiration for this look. I know these kind of manis are super popular on Instagram right now, & some people might be slightly sick of them, but to me they will never get old. They’re just so easy, & funky. You have no idea how many compliments I got for this look! It definitely made my nail art loving heart happy.

What do you think about this design? Do you enjoy these abstract stripes?

Leave a comment down in the comments below, & let me know which colour combination you would love to see as an abstract stripe design like this?

Deep & Dark Chrevron Half Moons 🌙

Hello lovelies & happy Tuesday.

I hope everyone had a lovely start to their week! I worked a crazy day at work yesterday, thanks to the holiday, so I legit feel hungover even though I didn’t have anything but coffee to drink! It’s going to be a 3 or 4 coffee kind of day.

But in the meantime, how about some fun nails? I actually did these nails back in… October, November (I think?) but for some reason didn’t get around to posting them. Which is actually a shame because look how beautiful they are! You know how much I love chevron moons, & I adore all the details on these ones.

The polishes I used for this manicure are: 

  • Base Coat: Essie Millionails
  • Top Coat: Seche Vive
  • Sally Hansen InstaDri Cinna-Snap
  • Sally Hansen InstaDri Night Drive
  • Essie Mosaic On Down
  • Chevron nail vinyls
  • NailStuff.ca 7mm detail brush

How pretty are these with the addition of the gold lines? I remember thinking these were so, so beautiful when I wore them, which is why I still can’t understand why I never got a chance to post them. Sometimes that happens, or — even worse — I’ll do a manicure I adore, but then wreck it before I have a chance to get pictures of it! That one always breaks my heart the most.

I feel like I haven’t done my chevron moons in a while, so I think I’ve been inspired to do another one very, very soon. Maybe one featuring some very beautiful Spring shades? Feeling inspired!

What do you think of this chevron moon design? Would you wear a look like this? Do you like the combination of colours with the maroon, navy blue & gold?

Leave me a comment down below, & let me know what you think of this look!

SWATCH SUNDAY — Maybelline Color Show Blue Marks The Spot

Hello lovelies & happy Sunday!

It’s another snowy Sunday here, which is not what I was hoping for. But it matches well with the nail polish I picked for this week’s Swatch Sunday pick: Maybelline Color Show Blue Marks The Spot. This shade is actually a super oldie, going back to (I think) 2013! I picked my bottle up on Clearance a few years ago, after Maybelline had stopped making the Color Show brand.

3 coats, no Top Coat.

The first thing about Blue Marks The Spot is that it is very, very thin. This is 3 coats of polish, & you can still see the nail below. I’m not sure how many coats you would actually need for full opacity, but I’m going to guess it’s more than I would want to do haha. You could definitely do a white or blue base, though, if you wanted to the sheerness.

The formula is sheer, like I said, but other than that it’s not too hard to work with. The coats dry quickly, & the glitters are very well dispersed so you don’t have to worry about digging around trying to find them.

Obligatory macro shot.

I used to be so, so scared of glitter nail polishes & never want to wear them because removal would be impossible. Obviously, taking off glitter polish isn’t my favourite thing, but I’m not quite so scared of wearing my glitters like I used to be. Which, is good, because I love, love, love these spotted polishes & have quite a few in my stash from different brands.

What do you think about this fun spotty nail polish? Do you remember the Maybelline Color Show line, & these spotted polishes in particular. I also have the green one, Drops of Jade, I’m kind of sad I didn’t get the whole range of these shades were they were out, but maybe some day I’ll discover more in the bottom of a clearance bin to complete my collection haha.

Have a lovely Sunday!

Red Pink & Purple Sparkly Glitter Gradient ✨

Hello lovelies & happy Tuesday! It was feeling like Spring here this weekend, but now we’re officially back in Winter mode with about 30cm of snow that fell yesterday. I’m just so over Winter. It’s cold, & slushy, & I miss wearing cute dresses. I can’t wait for us to officially defrost.

But in the meantime, I guess I’ll distract myself with some pretty nails.

It’s been a long while since I did a gradient on my nails that wasn’t just some glitter. Honestly, I find the clean up–even with liquid latex!–a pain, & I don’t have time for it. But I was really, really feeling a sparkly gradient after putting on my Swatch Sunday pick Essence Me & My Lover, so I decided to give it a try.

The polishes I used for this manicure are: 

  • Base Coat: Essie Millionails
  • Top Coat: Seche Vive
  • Essence Me & My Lover
  • Aco by Ardene Boudoir
  • Aco by Ardene Wish
  • Latex free make up sponge

Check out those layers of glitter! It’s been a long time since my last gradient like this with lots of glittery shades, but I’m obsessed with how it turned out.

Instead of doing the classic gradient sponging where you apply all three colours onto the sponge & then apply it to the nail, I sponged each layer of glitter on the nail instead… which still gave me the same effect without having to worry about the clean up! I find it’s easier to do that with glittery shades like these, because they blend into each other easier, & you don’t have those unblended lines you might get with a cream polish. & of course, sealing it all in with top coat also helps blend things.

What do you think of these glittery gradient nails? Would you wear a super glittery gradient like this on your nails? Let me know what you think down in the comments below, & what colour combination you would wear!