SWATCH SUNDAY — Revlon Cherries in the Snow

Good morning, & happy February. Can you believe we are already a month into this year? It’s crazy! & it also means it’s time to start thinking about Valentine’s Day nails. We all know Red is one of my favourite nail polish shades to wear, so I always have a wide variety of polish picks when it comes to the love-iest day of the year. ♥️

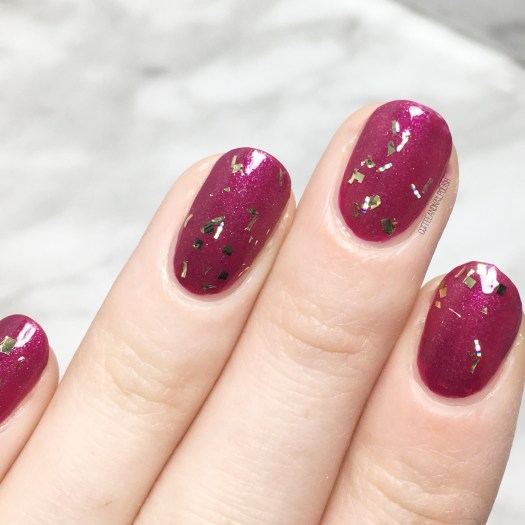
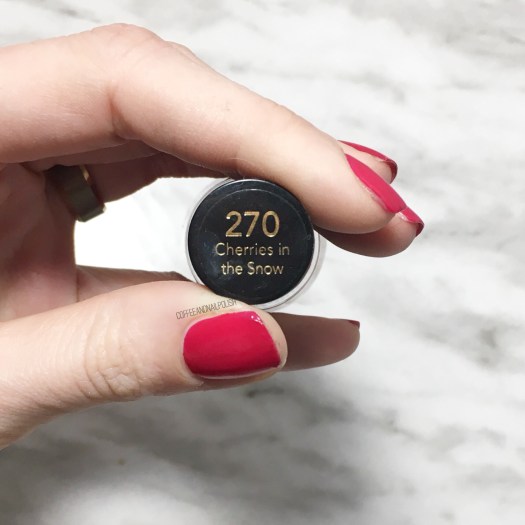
& I’m honour of that, I thought I would pull out one of my lovely red shades Cherries in the Snow.

For my swatch, I did two coats of polish over my base & finished it off with top coat. Sometimes I find red can be hard to build, but the formula lead to opacity really well.

Now technically I think this shade is a red leaning pink (at least it’s photographing as such) but depending on your skin tone it could probably go either way. Which, personally, I think makes it a fantastic pick for your V-Day Manicure!

I picked up this polish at my local Walmart about 2 years ago & it’s my understanding that it’s been discontinued. That being said, Google tells me that it’s still available on a couple sites online including nailpolishcanada.com so if you’re dying to get it in your collection, you still have time!

Pink Purple Blue Holo Gradient

Good morning everyone & happy Wednesday! Today I’m showing off some holo nails with this pinky purple blue holo gradient. Sometimes you just need to do something a little fun on your nails to jazz up your Wednesday!

This gradient was a spur of the moment decision & because of that I couldn’t find my usual sponges so I decided to try using a make up applicator. It didn’t turn out exactly like I wanted (or how I’ve seen other nail artists do it) but that’s okay because the holo kind of hides that fact! ✨Another reason everything is better with holo.

The polishes I used for this manicure:

  • Essie Grow Stronger
  • Essie Speed Setter Top Coat
  • Wrenn Polish Mesmerizing
  • Color Club Eternal Beauty
  • OPI Give Me Space
  • Small Sponge make-up applicator

Look. At. That. Holo. Also please ignore the cat hair on my finger haha. Even though my sponging if the gradient was kind of a fail, the holo really hides that fact which I love. Next time I would probably try this colour combo the old fashioned way, but for a quick spur of the moment design, I still think these turned out great. Plus it was super easy, & when you’re tired & doing your nails at 11:30 at night, sometimes that’s the only thing that really matters.

what do you think of this gradient. What is your favourite holo polish? Let me know down below in the comments!

💕

SWATCH SUNDAY — Butter London Pistol Pink

Good Morning & Happy Sunday. Or should I say storm day, as winter weather is currently starting in my neck of the woods. ❄️ Hope everyone that doesn’t have to go out in it, is cuddled up under a blanket with a big mug of coffee!

If you are lucky enough to be snoodled up on your couch, I have a pretty polish to share with you today! Today’s Swatch Sunday pick is Butter London Pistol Pink. This gorgeous deep fuchsia pink was originally released circa 2013 as part of the Rock Your Colour collection, but came to be in my stash a few years ago thanks to Winners. (Canadian version of TJ Maxx for my non-Canadian friends.)

For my swatches, I did a base, two coats of polish & finished with top coat to seal it in as I was planning on wearing it for the day. The base is that deep fuchsia pink, & it’s scattered throughout with lighter pink shimmer that gives it a glowing effect. This is definitely the kind of pink that I adore I could wear for ages–I’ve always been more drawn to deeper & darker berry pinks more so than your brights or neons.

To me, this would be the perfect manicure shade for Valentine’s Day. Which is coming up very, very quickly so time to start brainstorming on looks now!

As I mentioned, I found this shade at my local Winners so I’m not too sure how available this shade is for purchase. I checked the Butter London website, but it doesn’t look to be available there or Amazon, so if you are looking for this shade you’re probably best off checking your own local Winners, Marshall’s or TJ Maxx or seeing if anyone on EBay has one for sale.

I decided since I was going to be rocking this manicure for the day, I needed someone to add on top–so I added a quick swipe of Sinful Colors Twilight Twinklies over top for a little golden glam!

So what do you think of today’s Swatch Sunday polish pick? Is Butter London Pistol Pink hiding away in your stash? Let me know your thoughts on this shade in the comments down below!

Dark & Simple Dotticure

Good morning lovelies & happy Wednesday! Today’s look is one of my favourite easy nail ideas–a simple dotticure. Seriously, is there any easier way to add a little fun to other wise boring nails then with a few carefully placed dots? (Especially when you stay up too late binge watching Netflix & forget all about doing your nails…)

For this manicure, I pulled out one of my beloved Sally Hansen nail art pens. I’m not sure if you can still purchase these (I haven’t looked in a while) but a few years ago I picked them up & they’re one of my favourite & easiest ways to create polka dots! There is something so easy about using a pen instead of a dotting tool for creating teeny, tiny polka dots.

For this manicure, the polishes I used were:

  • Base Coat: Essie Grow Stronger
  • Top Coat: Essie Speed Setter
  • OPI Cosmo With A Twist
  • Sally Hansen I ♥️ Nail Art pen in Silver

What I love about this look is how easy it is. Paint nails. Let dry a few minutes. Dot with nail Art pen & seal with top coat. Bam, done! No tools even needed. & you don’t even need to worry about cleaning off your dotting tool & then re-dipping it into the polish, so finishing your nails is a whole lot faster. & the dots seem to end up being more similar than when I try to do the same look with a dotting tool.

so what do you think of this look? Are you a fan of dotticures? Share your thoughts down in the comments below! ♥️

Hearts & Zig Zags

You know when you get a nail art look in your head & you want to try & make it work on your nails… there is nothing more satisfying than bringing it to life & it turning out better than you expected!

This look was one I wanted to try but I wasn’t sure what colours to go with. Thanks to some Pinterest stalking, I figured out exactly the colour combination I wanted! I wanted something that would fit my January mood, especially since I didn’t want my nails to look too Valentine-y.

For this manicure, the polishes I used were:

  • Base Coat: Essie Grow Stronger
  • Top Coat: Essie Speed Setter
  • Ardene Day Dreamer
  • Essie Mint Candy Apple
  • Quo by ORLY Diva
  • Quo by ORLY Breathable Fairy Godmother
  • The Base Coat Regular Chevron/Zig Zag Vinyls
  • The Base Coat Heart Vinyls
  • NailStuff.ca dotting tool set

I seriously think these turned out so, so cute! It feels like absolute ages since I pulled out my Vinyls & I have to admit… I missed them. I also love this combination of dark teal, grey & mint. I never know what colours to wear on my nails this time of year, but darker shades are definitely calling my name more often!

What do you think of this look?

You could definitely adapt it & turn it into a Valentine’s Day look with some pink & red polishes. & it was surprisingly easy (if a little bit time consuming) to do. ♥️