SWATCH SUNDAY — Icing Emerald City

Good morning lovelies & happy Sunday! It’s 4 sleeps until Christmas, can you believe it? I definitely can’t.

I was searching through my stash to find a Christmas-y green to share, & realized that I don’t really have a lot of green polishes (that aren’t neon) in my stash. I did stumble across this beauty from years past, & thought it would be a great to share!

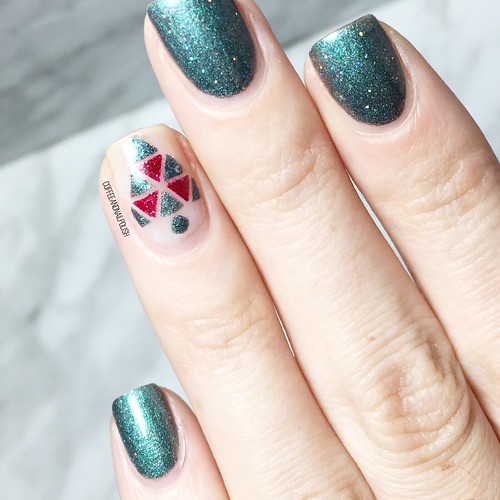
Today’s polish pick is Icing Emerald City, which is a beautiful emerald green shimmer with a soft “cashmere” finish. This shade was originally purchased circa 2013-2014 (I’m guessing).

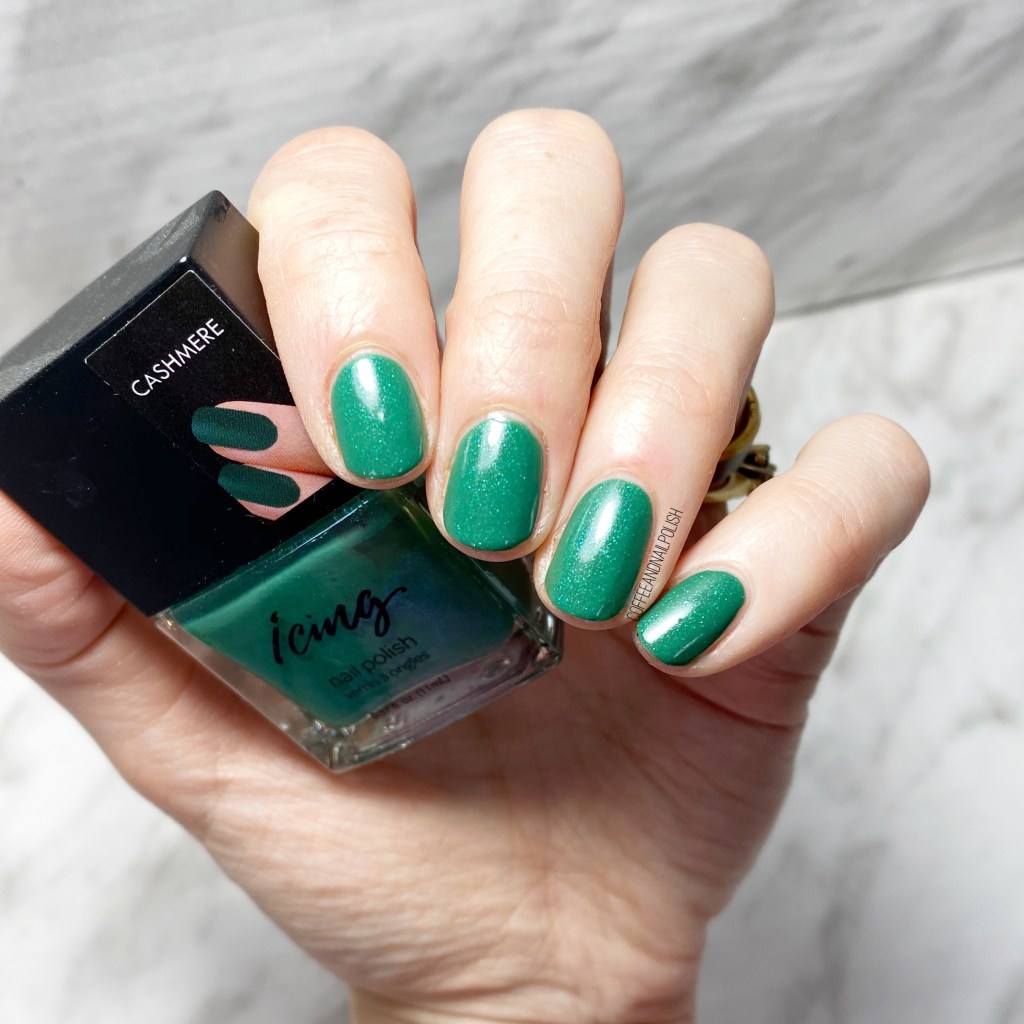
2 coats, no top coat.

For an old polish, the formula is easy to work with. It’s thick, so it applied well, but not clumpy or weird (which is good for an old shade). I did need 2 coats for full opacity, but that was just because of a few streaky spots. I love the brushes on these old bottles, because of how wide they are—it really makes the polish easy to apply. As for the finish, I was kind of expecting it to be more matte for a “cashmere” finish, & while it wasn’t super shiny, it wasn’t super matte either. Now, that’s not a bad thing, but I’d probably add a matte top coat over top if I was looking for a really true “cashmere” finish.

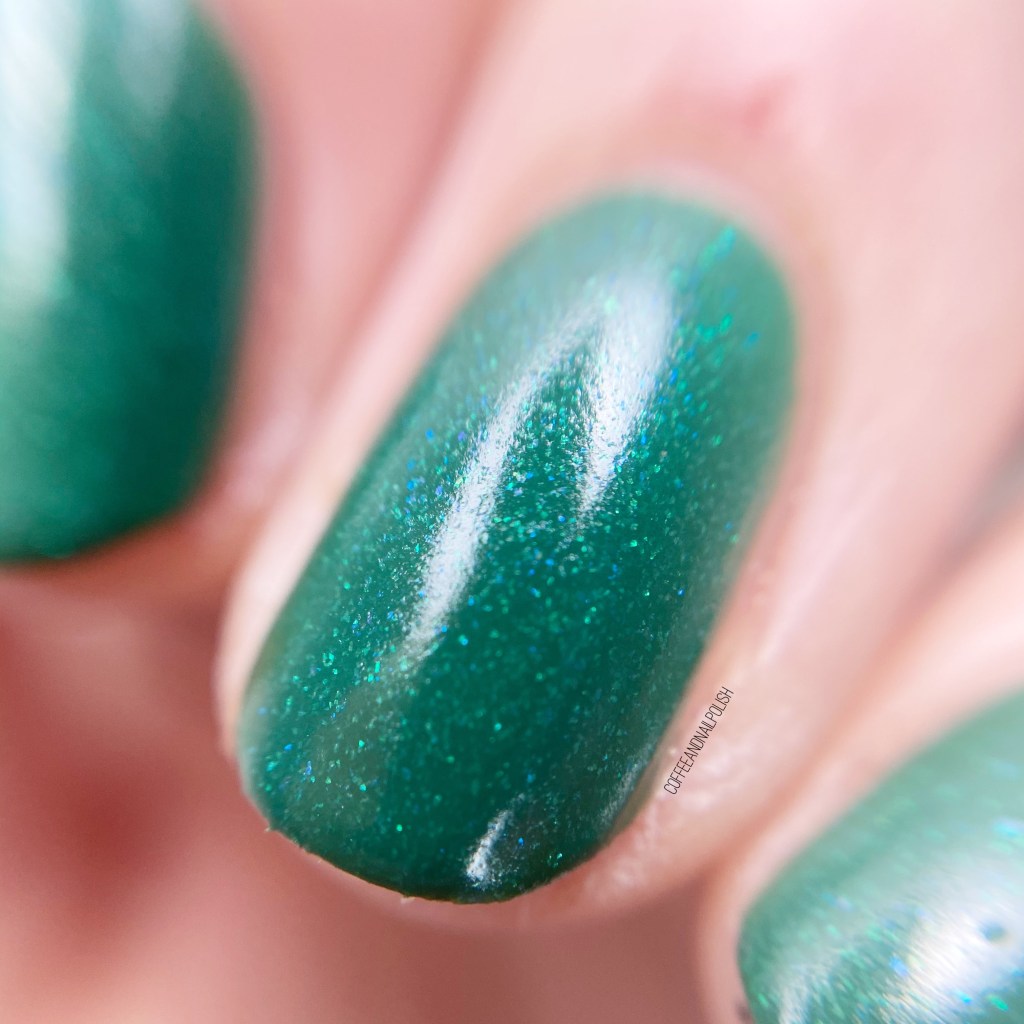
Check out that macro! You can really see the blue & green micro glitters that make up the shimmer. I’m kind of obsessed. Such a beautiful green, & it really is great for a Christmas look!

What do you think about this old school shade? What is your favourite Christmas green? After looking in my stash, I’m realizing I really need to get a few more in my stash! Let me know your picks down in the comments below!

#GlamnailschallengeDec — Christmas Trees

90E81591-F97F-47D7-BA88-688F0DDC2AA8

Good morning lovelies & happy Monday! & happy Christmas Eve Eve! We are quickly approaching Christmas & the end of GlamNailsChallengeDec! Today’s prompt for this challenge is Christmas trees! Naturally I went to Pinterest to find a look I liked, & found this tutorial originally posted on Instagram by @thebasecoat.

F9B9169B-A898-44E1-807C-3431BE74FD8D

139A3F05-9E76-49C4-BBD4-18A1BB97B32E

For this manicure, the polishes I used were:

  • Base Coat: Sally Hansen Complete Salon Manicure Strengthening Base Coat
  • Top Coat: Essie Speed Setter
  • Icing Stores matte teal shimmer
  • Quo by ORLY Falling Star
  • China Glaze Ruby Pumps
  • Ardene Ice Mist
  • NailStuff.ca Dotting Tool Trio (COFFEE10 to save 10%)

.

043423A3-A3B7-4168-BE6E-279530536509

622D0E95-31F0-4DBD-AEB5-6B890051F1AC

For this look I started off by applying the triangle nail stencil to my accent nail, then one at a time applied my colours to the empty spaces to create a triangle on the nail. I followed the Base Coat’s tutorial for colours. It was also way easier using a pre designed nail vinyl than attempting to position striping tape or straight nail vinyls into the same shape.

6E776060-74A2-42E1-8EE3-D4BD2621BCFC

33465D9D-CC61-4EAA-8062-A58925C74755

Honestly this look was too simple to do, but turned out so cute! I think this is such a perfect Christmas Day look—who doesn’t love Christmas trees! & the mixing of colours is very Christmasy. I absolutely lovely it!

74D0F345-1285-4AE1-9583-82D296AF7D97

What do you think about this design for Glamnailschallengedec? Have you figured out your Christmas design yet? Don’t forget to check out Instagram for all the other amazing look for #glamnailschallengeDec!

#GlamNailsChallengeDec — Santa 🎅🏼

EB4751E8-9046-43E6-9B11-29412612C3D1

Hello lovelies! We’ve got another prompt for #GlamNailsChallengeDec to share today! & yep… I’m aware that I’m a day behind, but that’s life sometime.

Our second prompt of the challenge is Santa! So in honour of that I decided to do Santa hats over my previous manicure of Icing Stores Santa Baby just to maximize the full Santa effect!

D56B0A8E-51B8-4AAF-9814-3032576224CE

D779D67A-7548-4776-9689-0C9FA937B033

For this manicure, the polishes I used were:

  • Base Coat: Sally Hansen Green Tea Bamboo Strengthener
  • Top Coat: Essie Speed Setter
  • Essie Wrap Me Up
  • Icing Stores Santa Baby
  • Quo by ORLY Stilettos on the Run
  • Sally Hansen Miracle Gel Pat on the Black
  • Sally Hansen Miracle Gel Get Mod
  • Nailstuff.ca 4mm micro detail brush (COFFEE10 saves 10% off your purchase!)
  • Nailstuff.ca Dotting Tool Trio

.

C6B00F1C-516F-4FF7-A159-68E2D4F5D4E0

EDD494C6-B39D-4612-9BCC-DEF6AD297D5D

I remember the first time I ever attempted a Santa hat manicure… & I won’t lie, it wasn’t pretty. I’m pretty sure I used a dotting tool to try & draw my lines, which did not turn out very good at all. (Literally just went & found the picture on Facebook so if you’re curious, click here to see my masterpiece.)

I’ve come along way after a lot of practice, & these little hats turned out too cute. The jelly-like finish of Stilettos on the Run show off the glitters underneath, which is really quite cool. I’m digging it a lot.

6A3E4457-12F5-4C45-B08E-B7948D555CF5

F189F0C9-5D3F-4E13-95E2-9A282ED737D6

These feel very, very Christmas-y to me for sure. The colours, the design… there is no denying these are for Christmas! So much fun!

F961971A-1CC6-4483-9954-CB8F5E02D1EF

What do you think about this Santa inspired design? Have you popped over to Instagram yet go check out the other looks for #glamnailschallengeDec yet? Stay tuned for more fun, hopefully on time, nail art looks to come!

Blast from the Past — Crackle Nail Polish

I’m sure if you’ve been a part of the nail polish community for any amount of time, you’ve seen quite a few nail polish trends come & go: feather nail polish, magnetic nail polish, textured nail polish & of course… crackle nail polish.

For those who don’t know what crackle nail polish is, it was a kind of topper you would apply over already painted nails, that would crack as it dried, revealing the base colour underneath. I was first introduced to crackle nail polish back with the Katy Perry Teenage Dream collection from OPI, & though it was the most genius idea, so naturally my obsessive brain had to own as many crackle polishes as possible! Thankfully, even nail polish company & their friend seem to come out with their own version of crackle so it was easy to get my hands on a whole slew of brands, colours & finishes!

Most of my shades have long since dried up & are pretty much impossible to use, but every so often I get the urge to pull out one of my bottles still holding on & play around with it. Thank you nostalgia.

For this manicure, the polishes I used were:

  • Base Coat: Sally Hansen Bamboo & Green Tea Strengthener
  • Top Coat: Essie Gel Setter
  • My blues from my cobalt blue comparison post
  • Icing Shatter nail polish Electric Graffiti

As you can see, even though this polish is about 7 years old, it still works semi well in terms of the crackle effect (minus my pointer finger… I have no idea what happened there!) Like I said, I collected quite a few of these shades during the heigh of their popularity, but only a few of them still work to this degree. & now that my nail art techniques have improved over the years, I don’t really grab these shades like I once did.

& just for fun, I wanted to share the very first mani I ever did using this fun polish. Please excuse the awful quality in all regards (painting, photography, ect)

As you can see, the actual cracking abilities of Electric Graffiti has dwindled over the years, but for a polish way past prime, I’m impressed I can still get any crackle out of it. I feel like because the formula has thickened up a lot, that’s the reason the shatter is different. A thinner application would definitely give me a reaction much more like my throwback manicure… wondering if adding a bit of thinner to the bottle would revive it. I’m curious to find out.

what are your thoughts on the crackle/shatter nail polish trend from years past? I know some people have very strong feelings about these polishes (& how much they hate them). Let me know if you’re team crackle or hate it?

Turquoise & Purple Marbled Nails

Good morning lovelies! I’m back from the land of the stomach flu. Thankfully I managed to avoid catching it but the rest of the house was not so lucky. After 3 days of basically hiding, I finally managed to do my nails & it feels so good. Especially since yesterday marks 🎉FIVE YEARS🎉 since the beginning of this little nail blog of mine.

& I totally forgot until yesterday (I blame pregnancy brain & trying to avoid gastro.) I’m going to do a post tomorrow soon I’ve been planning on writing forever, but in the meantime I have some quick & easy nails that have become a favourite over the years!

Today’s look is another Saran Wrap splatter/marble.

The polishes I used for this look were:

  • Base Coat: Nailtek 2
  • Top Coat: Seche Vive
  • Icing Matte Effect Polish 60217
  • Color Club Disco Dress
  • Sally Hansen Hard As Nails Black Heart
  • Crinkled up plastic bag

Usually I try to create a splatter effect when I do my Saran Wrap nails, but I wanted to do more of a marble look this time so I layered my polishes… a splatter of purple, a splatter of turquoise, a splatter of Black & then a little more turquoise. This created the more marble effect & they look EXACTLY like how I pictured in my head!

I’m seriously just so in love with how they turned out.

I just want to say thank you really quick to everyone who has been checking out this blog for the last five years. From my early days with some questionable photography skills to now, you guys are the reason I keep coming back… even if there are long pauses due to things like morning sickness & birth haha.

& I’ll keep coming back no matter what new adventures life comes my way.

💙💙