Mermaid Sparkle Nails ✨🧜‍♀️

Hello lovelies & happy Thursday!

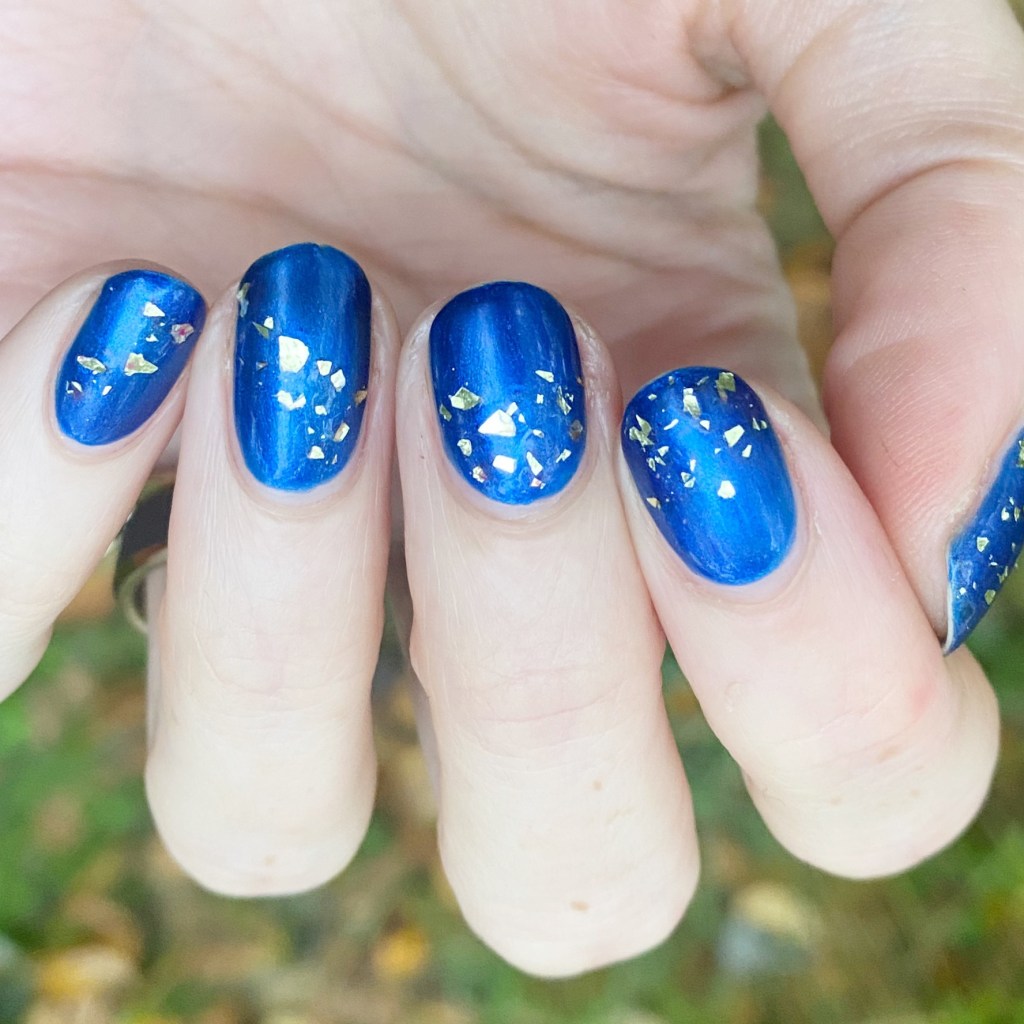
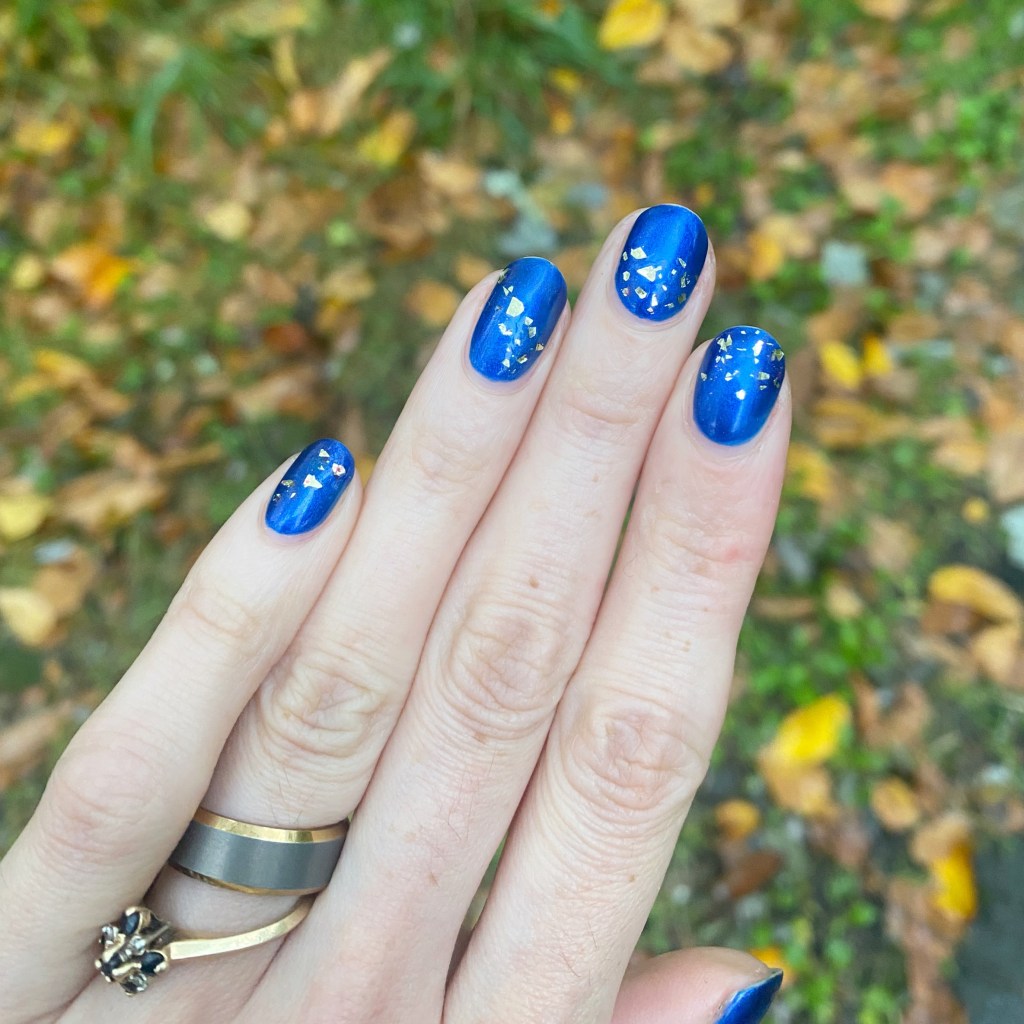
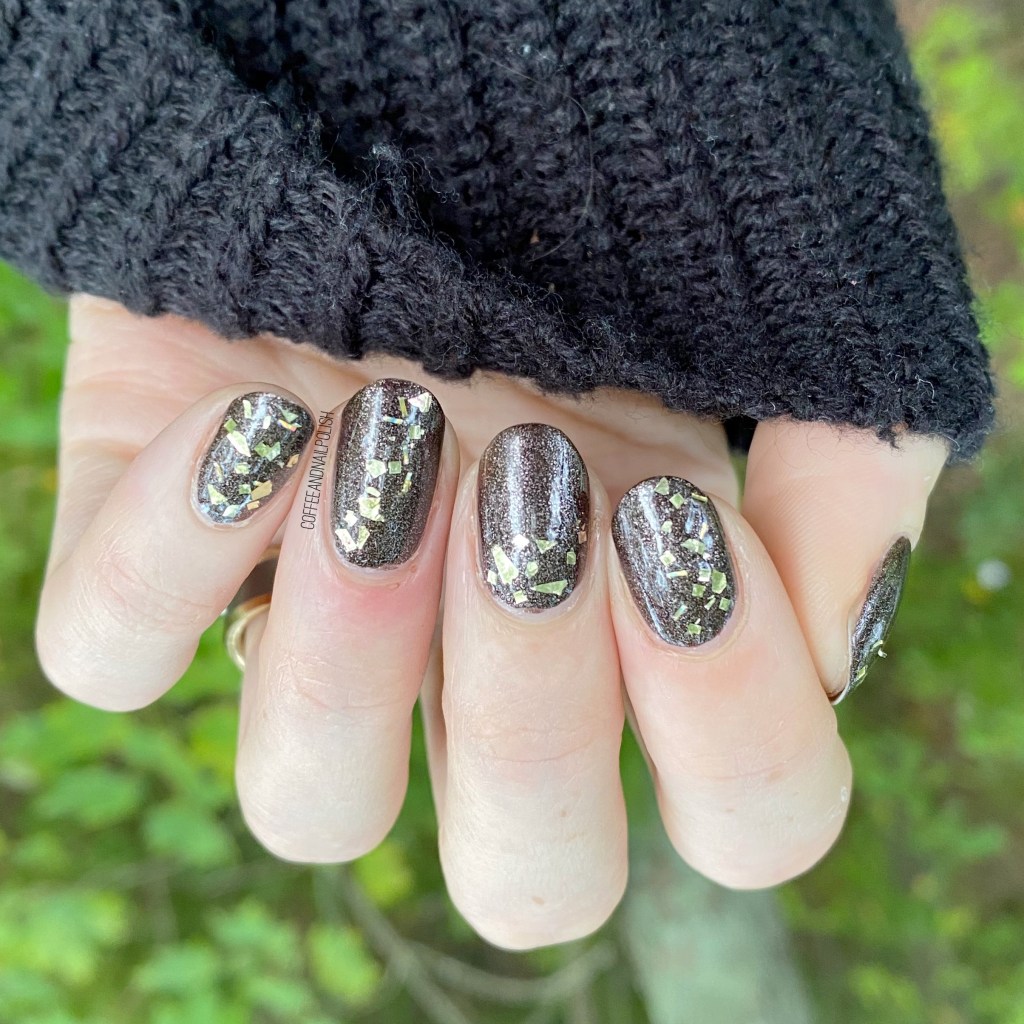
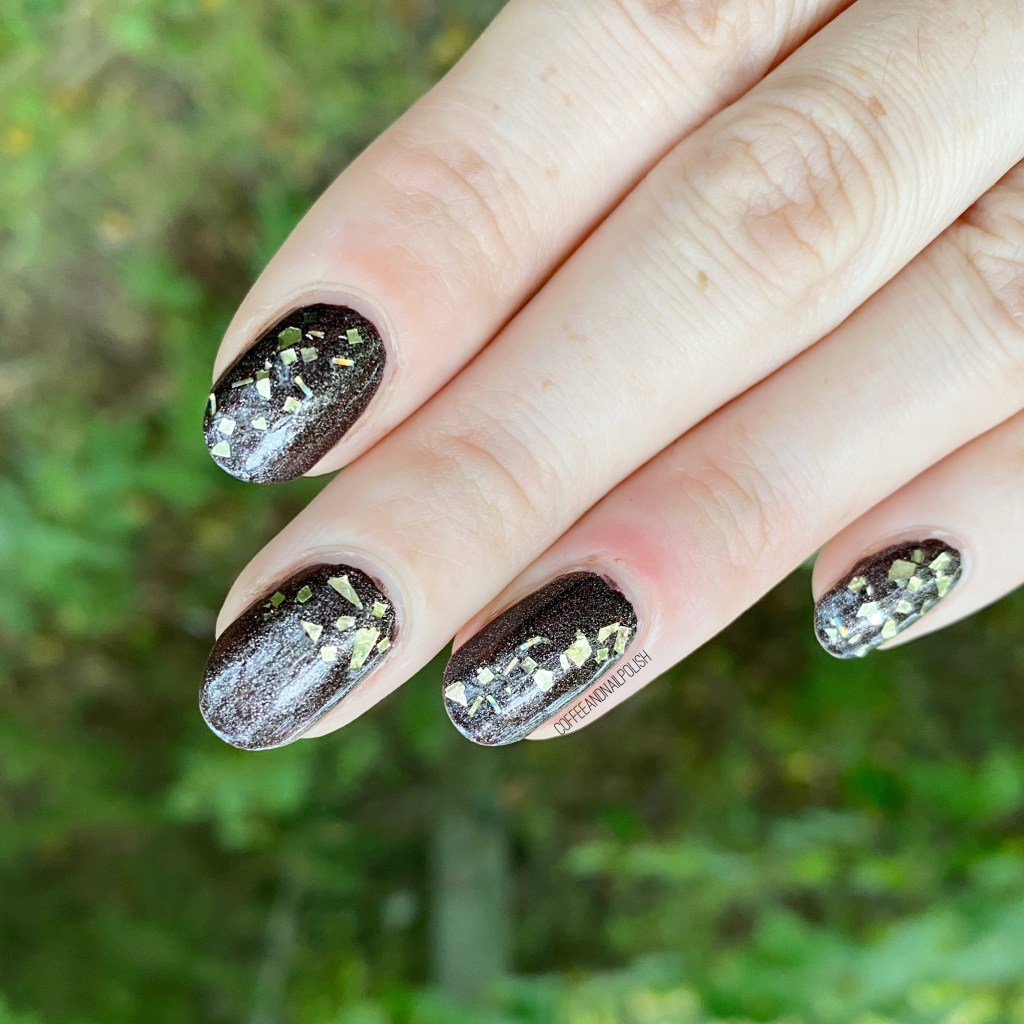
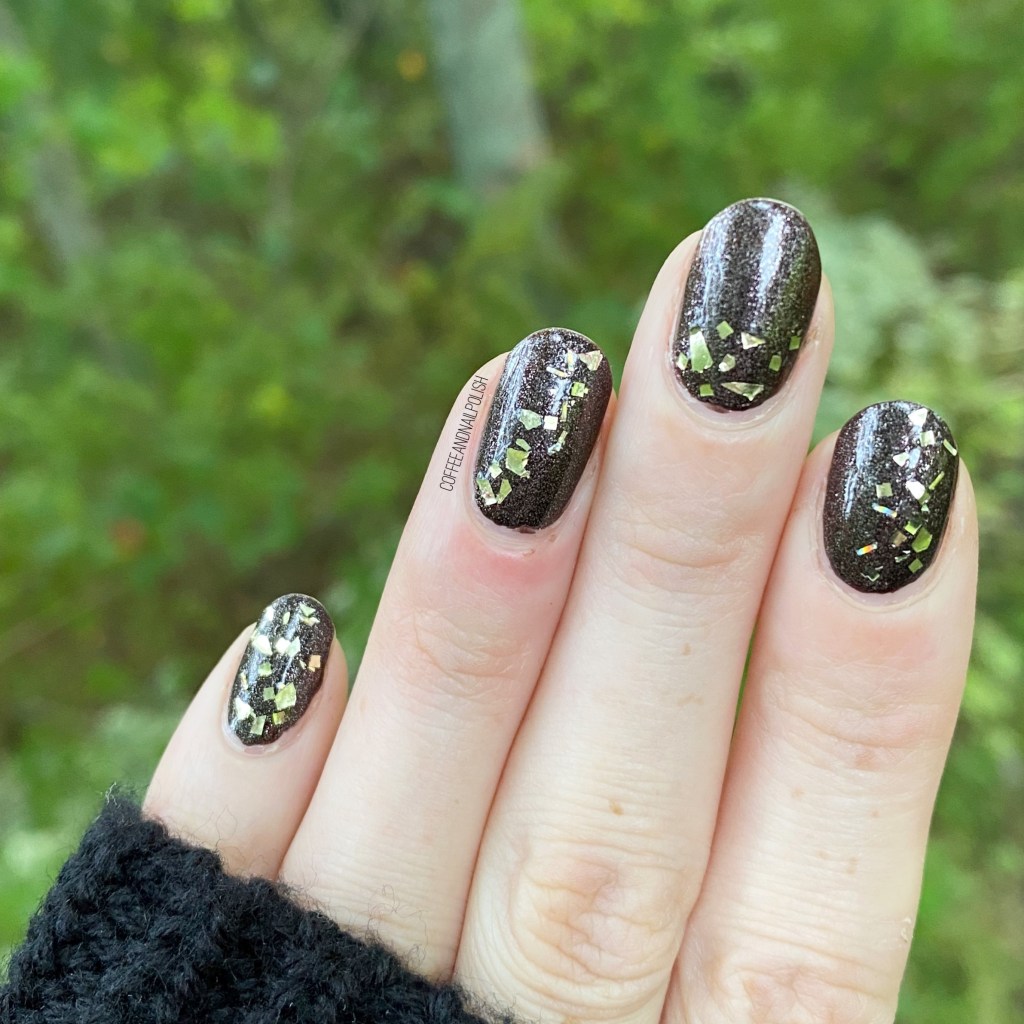
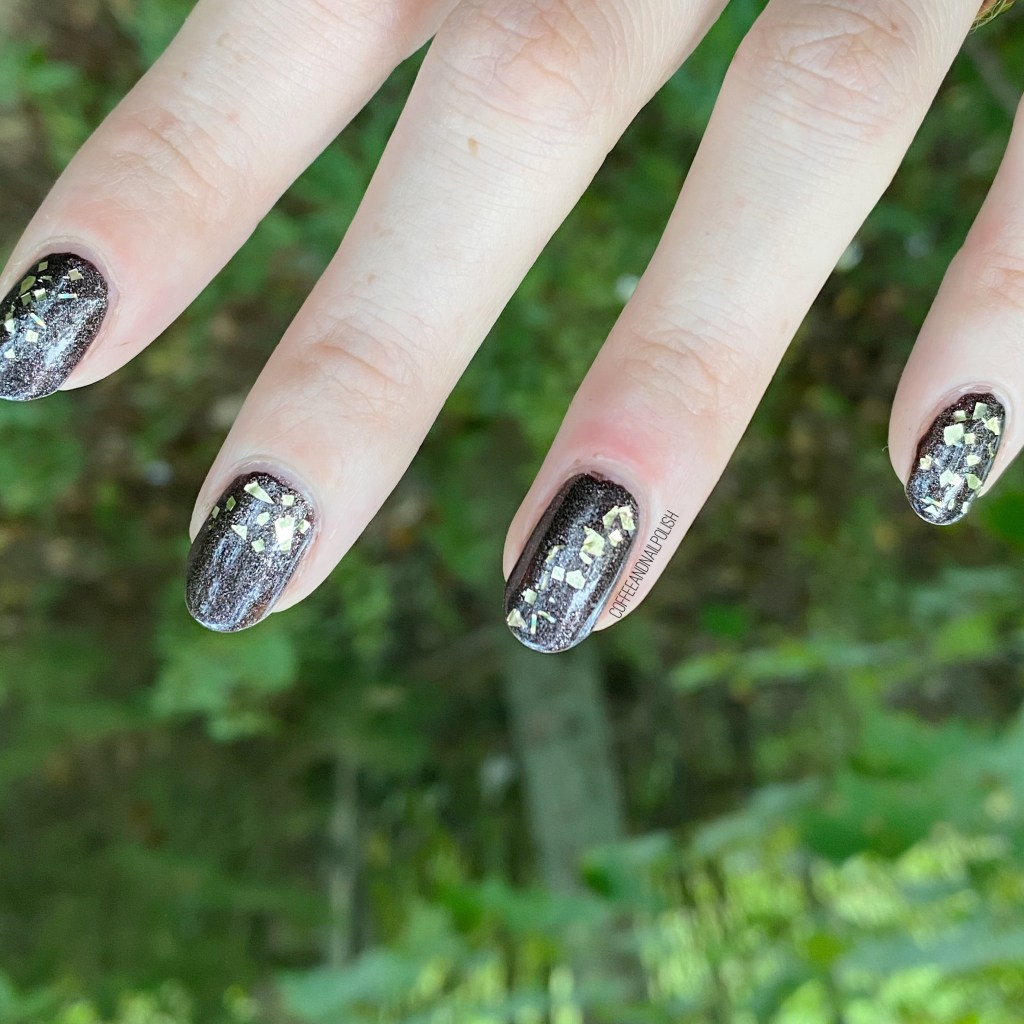
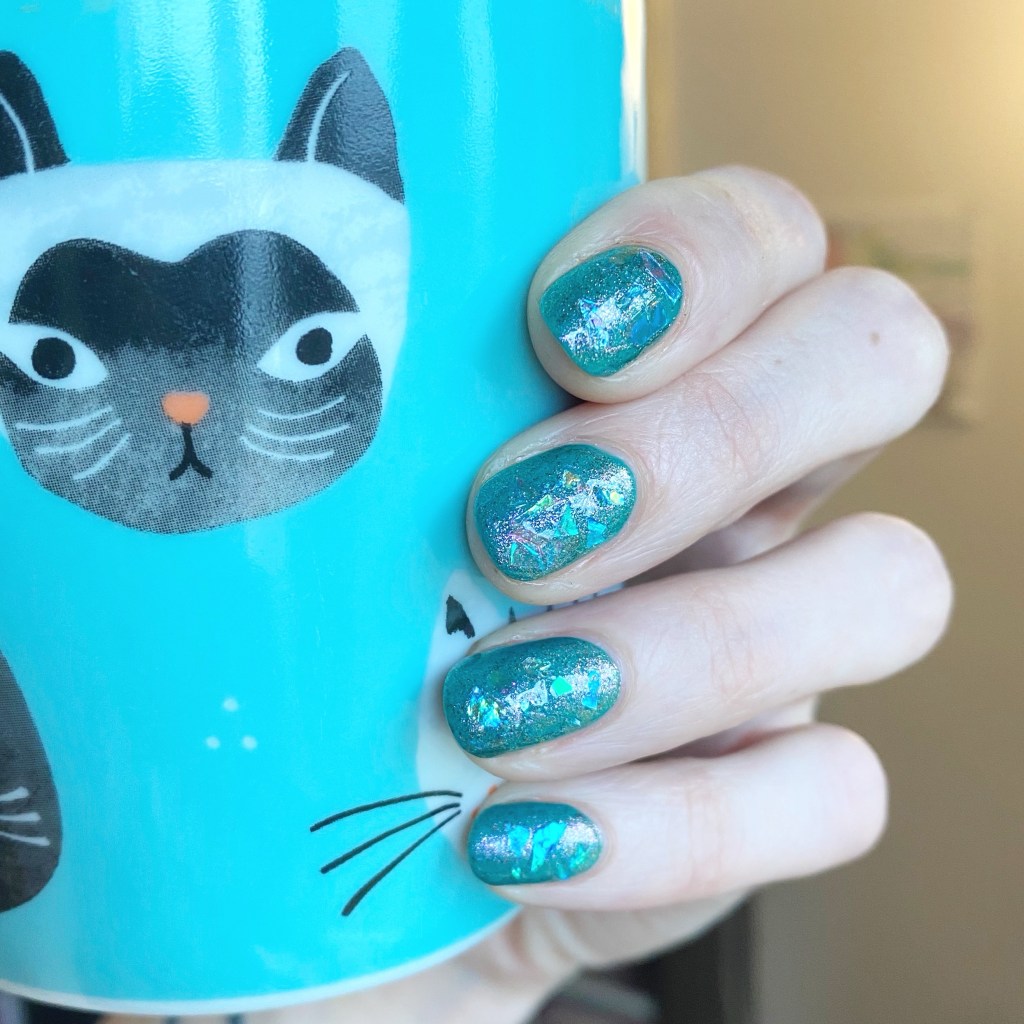
It’s a beautiful sunny day & it’s lovely. Definitely feeling like Spring more & more, & I’m just soaking it up. Today I’m sharing a really pretty manicure with you that I did recently, which was actually super easy to do! A while ago — probably sometime last year—I picked up these pretty iridescent glitters from Dollarama, & I’ve had yet to use them! So I was so excited to finally pull them out. 

The polishes I used for this manicure are: 

  • Base Coat: China Glaze Calcium Gel Fortifer
  • Top Coat: LA Girl Rapid Dry Top Coat
  • Nailtural Keep Palm, & Swim On
  • Icing Mermaid Oil Blue
  • Dollarama Nail Art Glitters iridescent shard glitters
  • Small nail art brush (to pick up glitters)

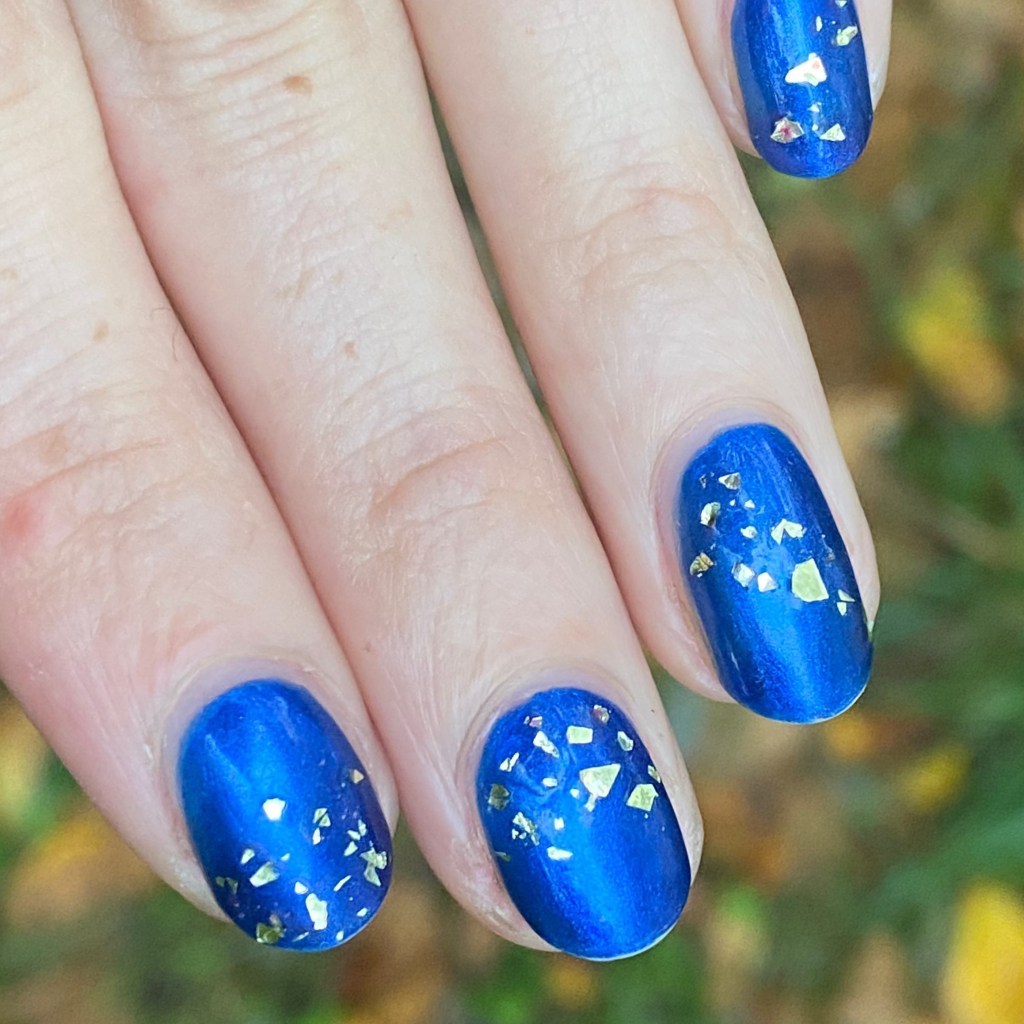
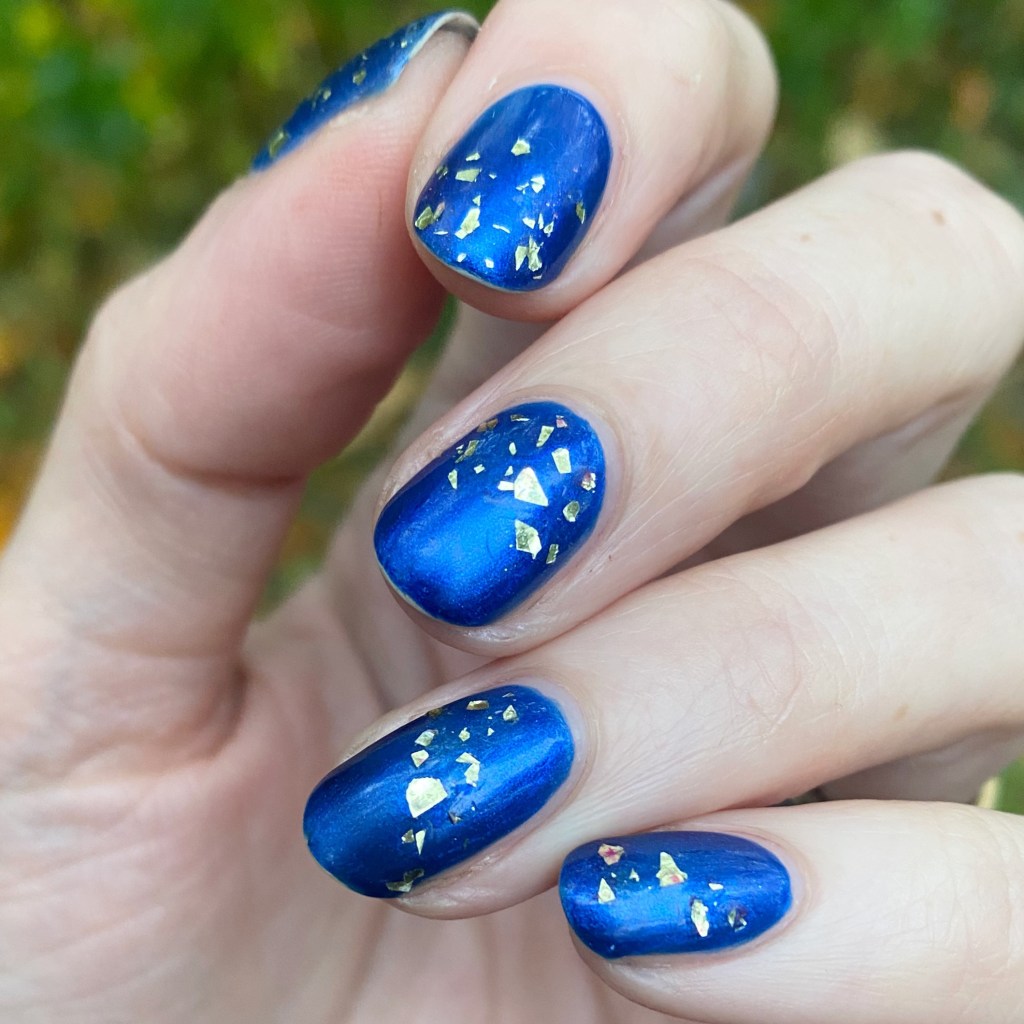
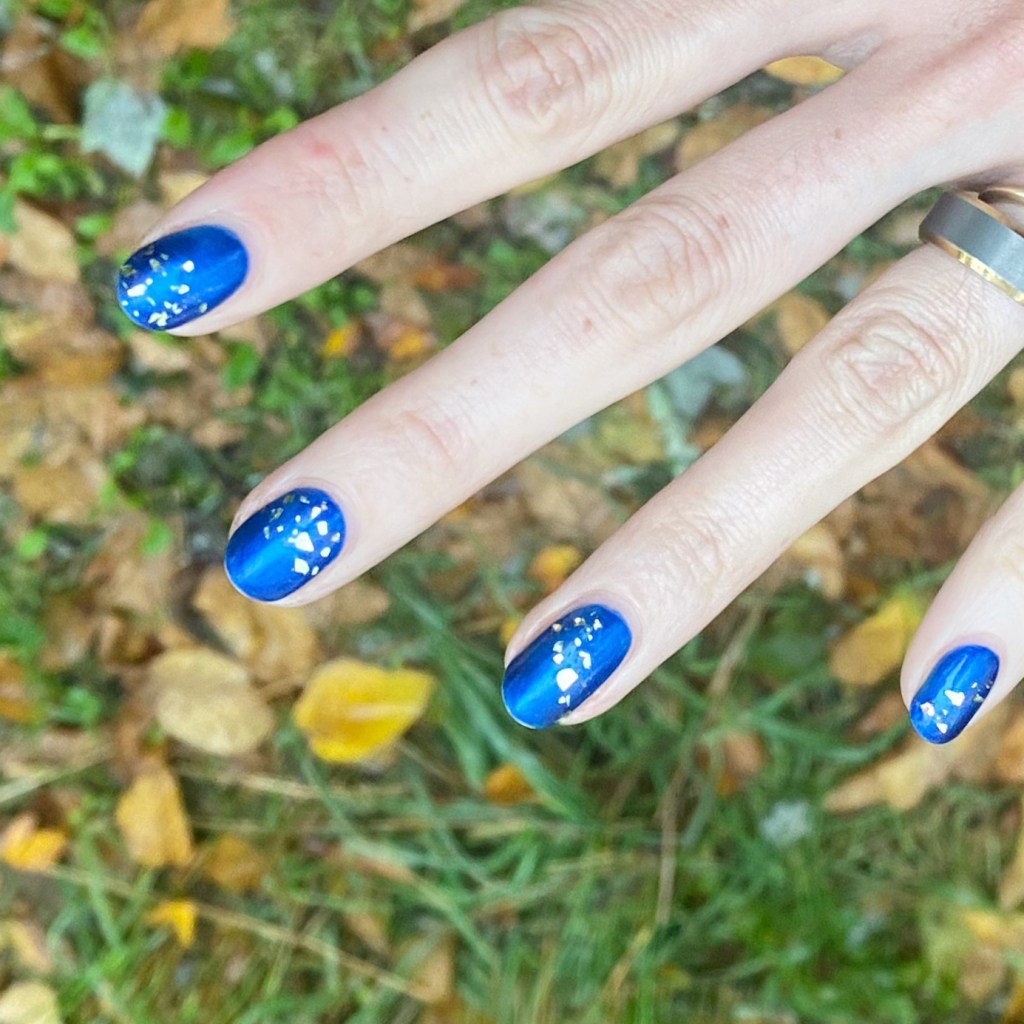
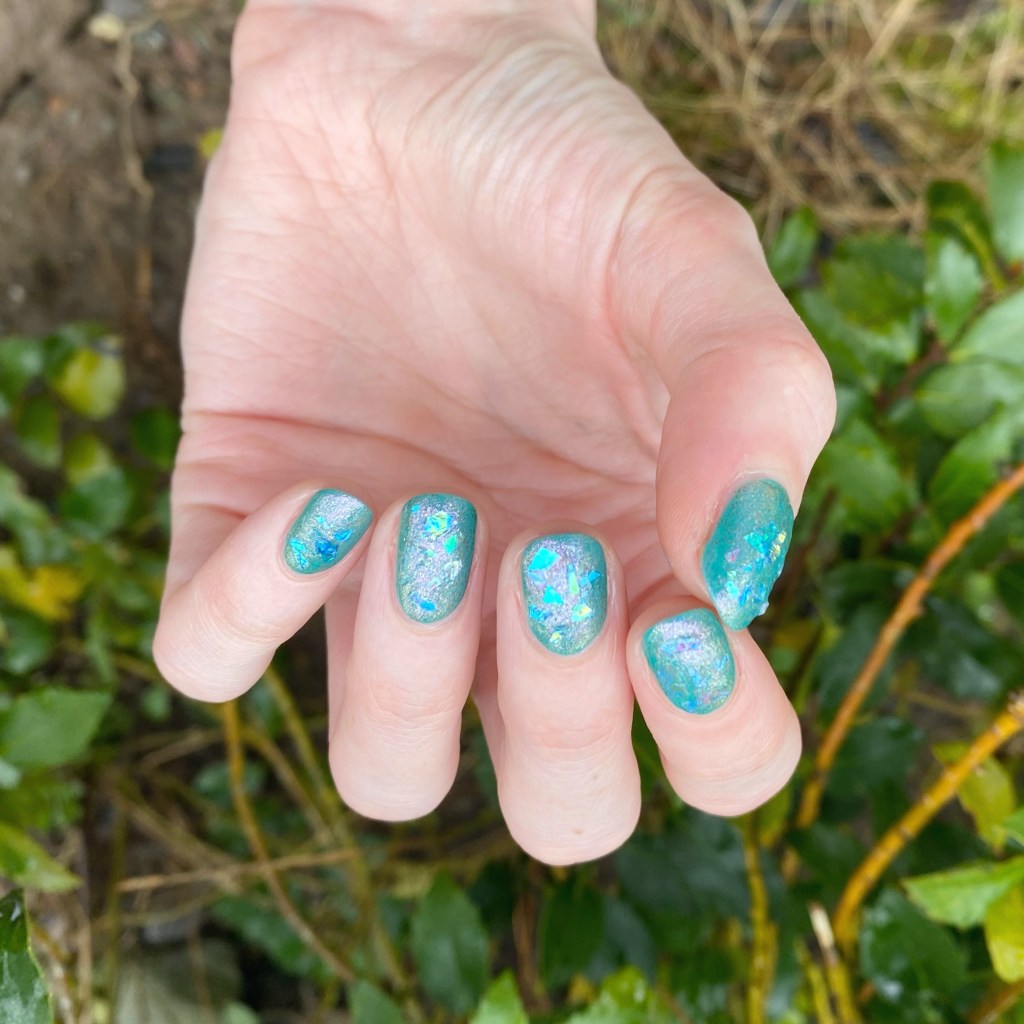
How pretty did these turned out?! I feel like with my new blue hair, I’m all about the mermaid vibes lately. Mermaid hair just needs mermaid nails.

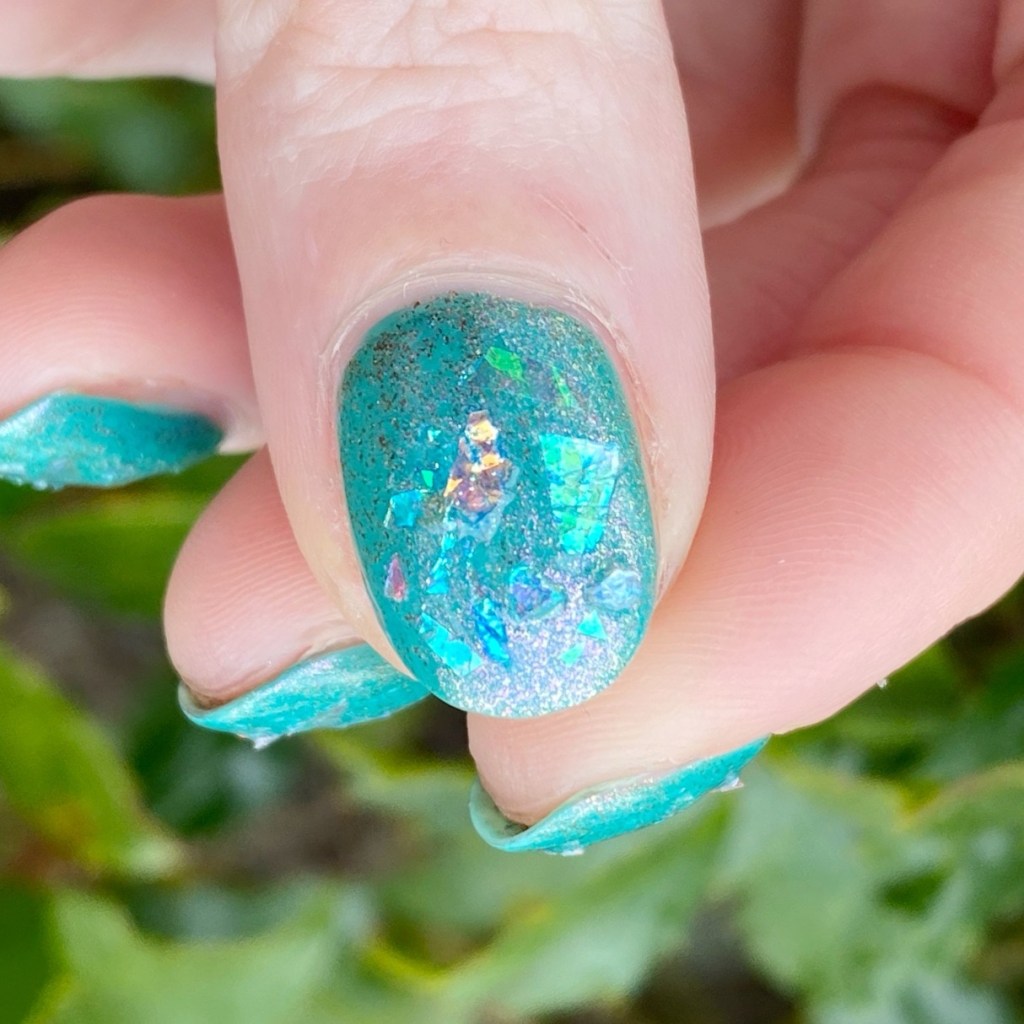
These were so easy to apply the glitters to my nails, & it turned out so beautiful. I really really love how they look. Of course, I did have some little peices sticking up on my nail, but I feel like a thicker top coat might help with that issue. Either way, I wore the heck out of this manicure!

What do you think about these mermaid glitter nails? Let me know your thoughts down in the comments below! I’d love to know all your thoughts on this design!

Happy Thursday 💙

Simple Pink & Holo Glitter Nails

Good morning lovelies & happy Monday! We’re still digging out from the snowpocalypse over the weekend but thankfully I have some manicures from last week (when I wasn’t posting) to share with you this week!

Today’s look is a super simple one, but I actually really love it. This would be a great Valentine’s Day look to wear for any fun date (or girls night!) you have planned. It’s also a super simple look to create.

The polishes I used for this manicure are: 

  • Base Coat: China Glaze Calcium Gel Fortifer
  • Top Coat: China Glaze Fast Forward Top Coat
  • Butter London Pistol Pink
  • OPI I Snow You Love Me
  • Dotting tool

I haven’t worn this pink in ages & I totally forgot how beautiful it was! I don’t often wear just pink nails on their own, so naturally I had to add a little extra sparkle. Originally, I wanted to use heart glitters — but my bottle is all dried up & needs some nail polish thinner — so I decided to go with the next best thing which is this glitter from OPI.

It gives the effect of rhinestones on your nails, without having to worry about hitting them against something & knocking them off! Just such a cute easy nail art look to wear!

What do you think about this simple chic pink nail art look? Would you wear this design on your nails? As always, I love to hear what you think in the comments so please share below!

Enjoy your Monday 🖤

Broken Mirror Glitter Placement

Hello lovelies & happy Wednesday! It’s already midweek, isn’t that crazy? I feel like it’s going to be New Year’s Eve before we even realize.

Today’s look is a favourite of mine, that I’ve repeated a few times over the years, but never gets old to me. I love a good shattered glass glitter look, & so naturally when I painted my nails with this beautiful dark purple, I knew I wanted to add something glitter placement. I decided to grab a glitter I haven’t used in forever, & I’m glad I did because they turned out perfect!

The polishes I used for this manicure are: 

  • Base Coat: Sally Hansen Miracle Gel Colour Grip Primer Base Coat 
  • Top Coat: Seche Vive
  • Essie Kimono Over
  • OPI Infrared-y to Glow
  • Medium sized dotting tool (NailStuff.ca Dotting Tool Trio)

I tried to capture the little holo glitters that accompany Infared-y To Party, but for whatever reason my phone & my nails were not cooperating to really show it off. I thought this glitter was a nice alternative to the usual gold glitters I create this look with, & gives off more of a shattered mirror design because the glitters are silver.

I definitely do miss my bottle of Color Club Diamond Drops as it was perfect for this kind of design thanks to the holographic shards of glitter. I anyone knows a similar glitter topper, let me know, because I really need to expand my glitter collection for these kinds of looks!

What do you think of this broken glass/mirror design? Have you ever tried one of these designs before? If not, I definitely recommend giving it a try! It’s a bit time consuming, obviously, but other than that it’s super easy to do & is such a fun effect! I guarantee you’ll get lots of comments & compliments on your nails too!

Happy Wednesday ♥︎

Icy Blue & Gold Glitter

Good morning lovelies & Happy Tuesday!

I can’t believe we’re a full week into November—& I’m not going to lie… it’s been quite the week. Post Halloween I ended up with the stomach virus my kids had, all while preparing for the last couple days at my jobs. Hence why it’s been extremely quit. But I’m feeling better, & have a crazy amount of free time on my hands, so how about some nail art!

Todays it’s an old favourite nail art technique: glitter placement. I’m also wearing a nail polish I haven’t ever worn — the new formula of Sally Hansen Pacific Blue.

The polishes I used for this manicure are: 

  • Base Coat: Essie Hard To Resist Glow & Shine 
  • Top Coat: Sally Hansen Insta-Dri Anti-chip Top Coat
  • Sally Hansen Xtreme Wear Pacific Blue (the new formula)
  • Essence Cosmetics Steeling the Scene
  • Small dotting tool (I always use mine from NailStuff.ca — Dotting Tool Trio)

Okay, so first off: I know I’ve talked a lot about how mad at Sally Hansen I am that they replaced the original amazing & flawless Pacific Blue, & I still am because they messed with perfection. BUT I won’t lie — this new version, as a separate polish on it’s own, is beautiful & frosty, & a great late Fall/Winter polish. It kind of reminds me of China Glaze Frostbite, which means I might have to do a comparison post soon!

Also this bottle of Essence Steel-ing The Scene has been in my stash since almost the beginning, & it still remains my go to for a nail art look like this. I’ve bought other shard glitters over the years, but I always seem to go back to this beauty. It’s a classic, in my opinion. But you can’t argue with how pretty the look is. & if you’re already thinking about those holiday party looks, this is an easy one you can do with minimal effort, in any colour scheme you need!

November is such a weird time for nail art — I feel like I struggle with it every year. But with some open days ahead of me, & time to fill, I’m hoping to get creative & show off some fun nail art looks in this pre-Christmas season. Let me know if they’re are any nail art looks you’re dying to see, & I’ll try my best to make wishes come through!

Have a lovely Tuesday.

Brown & Gold Shattered Glass Glitter Placement

Hello lovelies & happy Tuesday!

Can you believe we’re in the final days of September? It’s kind of crazy. Where has this month gone already? It’s certainly been a busy month at our house with school starting. I can’t believe that we’re already a month in… & Summer is already feeling like a distant memory. Although, I cannot lie — I’m super pumped for my favourite month: October!

Now that we’re officially deep into Autumn, & the late September weather is in full force, I’m really feeling the Fall nail art. I realized the other day I haven’t done a shattered glass nail art design in way, way too long. I was wearing this beautiful brown shade, & realized it would be the perfect base for some gold shatter glitters, so I decided that was just the nail art look I needed in my life.

The polishes I used for this manicure are: 

  • Base Coat: Essie First Base
  • Top Coat: Seche Vive
  • Sinful Colors Essen-chills Smoky Palo Santo
  • Sinful Colors Twilight Twinkles
  • NailStuff.ca Dotting Tool Trio

First of all, how absolutely beautiful is this brown shade? This is another one of the Sinful Colors Essen-chills scented shades that I picked up at Walmart earlier in the month. I really love the dense silver shimmer with the dark, dark brown base. & I know I keep saying this, but I’m just absolutely obsessed with brown nail polish, which is such a weird thing for me because I was not expecting to be a brown nail polish girl. But I totally am!

Second, this gold shard glitter goes so well over top. I used to be absolutely obsessed with these style of manicures a few years ago, & I think I need to bring them back again. It’s such an easy look to achieve, because it requires minimal tools. Sure, it does take a bit of time to do… but not nearly as much as you would expect! I think I’ll have to keep my eyes out for more of these style of glitter polishes

What do you think about this nail art look? Are you feeling these shattered glass nails? Have you ever tried a glitter placement look like this? Let me know all your thoughts down in the comments below — & get excited because Halloween designs are coming very soon!