Hello lovelies & happy Friday! It is Friday right? I feel like my days are blending into each other a bit. Winter maternity leave is like one never ending day haha. I miss the sunshine. BUT winter does mean one thing: Christmas is coming. & even better… it’s time for all my favourite Winter/Christmas/Holiday designs.
Today is a design I haven’t done for a long time–plaid. I used to do multiple plaid designs every year, but I kind of lost my momentum, so I feel like it’s about time to bring them back! However, I think I need some practice, or maybe a reference picture, because these turned out… interesting. However, I still loved them enough to post them!


For this manicure, the polishes I used were:
- Base Coat: Sally Hansen Green Tea & Bamboo Strengthener
- Top Coat: YSL Beauty Quick Dry Top Coat
- Quo by ORLY Breathable Stronger than Ever {PR sample}
- Jordana Cosmetics Pop Art Nail Design in Blue Abstract
- Rimmel London Camouflage
- Yellow gold metallic (no name)
- Black & White acrylic paint
- NailStuff.ca 16mm Liner Brush (use COFFEE10 to save 10%) {PR sample}
.


For this look, I started off with a base of Quo by ORLY Breathable in Stronger than Ever which is a really nice shimmery red that is great for Christmas. Next, I took my NailStuff liner brush & made base lines using my black & white acrylic paint. This is where a reference picture would have been useful, because I was a bit haphazard in my line placement. But even still, it does have that plaid-esque feel to it.

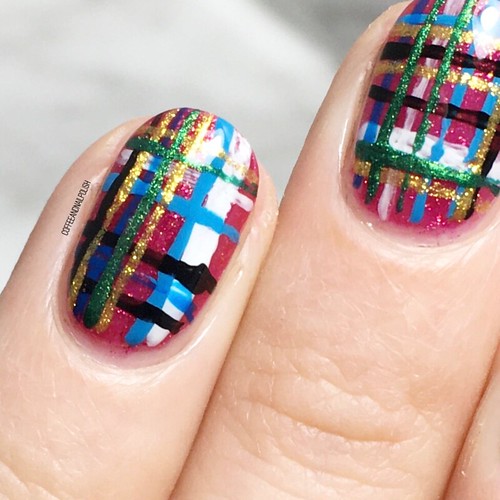
Even though I was a little disappointed with how these nails turned out at first, after applying top coat & staring at them, they really grew on me & I ended up loving how they turned out. They really make me excited to do some more plaid nails that are a little more Christmas-y — I have visions of an emerald green base with red & gold lines. Oooooh yes! Bring on all the plaid!

What do you think about these plaid nails? Would you rock a look like this? Share your thoughts down in the comments below! ♥️