Blue Matte Leopard Print

Hello lovelies & happy Wednesday! We are half way to the weekend, woo-hoo!

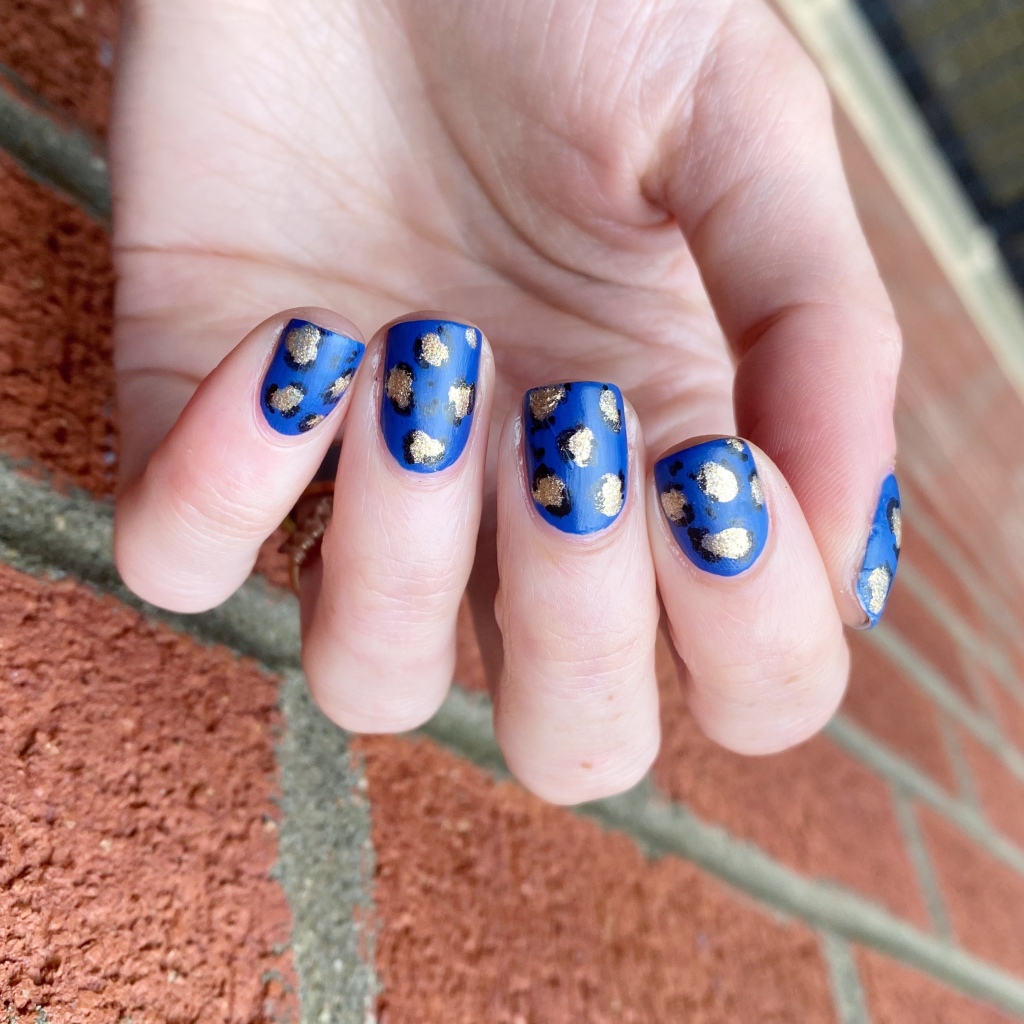
Today I’m sharing another fun look that I’m kind of obsessed with. I saw this manicure on Pinterest, & knew immediately I needed to recreate it! I love a good leopard print, & it’s been a while since I had done one, & the bright matte blue was just too good.

The polishes I used for this manicure are: 

  • Base Coat: Sally Hansen Miracle Gel Colour Grip Primer Base Coat 
  • Top Coat: Sally Hansen Miracle Gel Glossy Top Coat
  • Matte Top Coat: Sally Hansen Complete Salon Manicure Matte Top Coat
  • Essie All The Wave
  • Essie Mosaic On Down
  • Sally Hansen I ❤️ Nail Art Pen in Black (Round)
  • NailStuff.ca Dotting Tool Trio

I love the gold over the bright cobalt blue. It looks so good!

I’ve always been a fan of leopard print nails, even in the early days of this blog. I don’t do them nearly as often as I should, but they’re definitely in my top five favourite nail art styles. There are endless colour options, pattern options — plus it’s an easy nail art style I feel like even the most beginner nail artist can do.

What do you think about this funky bright blue leopard print? Are you a fan of leopard designs? Let me know all your thoughts down in the comments below!

Purple Glitter Sparkle Gradient

Hello lovelies & happy Monday! A brand new week to enjoy. Today, I’m sharing a little bit of sparkle with you to start off this week. I recently was feeling stuck for inspiration, so I decided to grab one of my favourite purple OPIs Dutch You Just Love OPI?, & a pretty glitter OPI, & create a quick, easy glitter gradient!

The polishes I used for this manicure are: 

  • Base Coat: Sally Hansen Miracle Gel Colour Grip Primer Base Coat 
  • Top Coat: Sally Hansen Miracle Gel Glossy Top Coat
  • OPI Dutch You Just Love OPI?
  • OPI Charmmy & Sugar
  • Latex free make up sponge (mine are from Dollarama)

Check out that sparkle! I love it. I don’t know if I’ve ever worn this pretty sparkle before (it’s from the 2016 OPI x Hello Kitty collaboration) but I think it looks incredible over this purple. I love a good glitter gradient, & sometimes you find two polishes that just go together so perfectly. I love that moment.

What do you think of this quick & simple nail art look to start off your Monday? I know it’s not the most exciting of manicures, but sometimes you just want a little bit of sparkle.

Let me know what you think down in the comments below.

Vacation Neon Ruffian Nails 💛💜

Hello lovelies & happy Wednesday! I’m back from vacation, & very refreshed from my weekend away. We had a great time, & enjoyed a ton of time visiting family. Now it’s back to the real world, & I’m excited to show off the nails I chose to wear for our vacation. I had done an Instagram questionnaire wondering what nails I should wear for my vacation, & the biggest winner was neon yellow.

So I thought I would do a fun neon yellow ruffian for my vacation nails, & I’m just obsessed with how they turned out.

The polishes I used for this manicure are: 

  • Base Coat: Sally Hansen Miracle Gel Colour Grip Primer Base Coat 
  • Top Coat: Sally Hansen Miracle Gel Glossy Top Coat
  • Sally Hansen Miracle Gel 90s Toadally Buggin’ •pr/gifted•
  • Color Club Art Club Striper Passion Flower

Please excuse my dry cuticles, haha, as I took these photos after reaching our destination & hadn’t had a chance to reach for my cuticle pen. Even still, I think this look is such cute for a vacation mani! The purple of Color Club Passion Flower kind of went a bit grey against Toadally Buggin’ but that’s okay. I really like my little ruffian outlines, & this was the perfect nail art look for vacation.

Bright & colourful, which is just what I wanted!

Are you enjoying your Summer so far? I can’t believe how quickly September is approaching, & back to school. Crazy. & I can’t lie — I have definitely felt myself grabbing a few darker polishes lately without really thinking. I think the Autumn vibes are starting to seep in!

But I promise… I won’t go full Pumpkin Spice quite yet. I’ll still slip in a few Summery shades & manicures before then!

Have a fantastic Wednesday!

Red Sideways Swoop Nails

•contains pr/gifted product•

Hello lovelies & happy Monday! & happy last day of July!

How was everyone’s weekend? I actually had an amazing weekend, catching up with my teenage best friend — she’s visiting for a few weeks, & it was just what my heart needed.

Today’s look is feeling kind of Autumn-esque, but I swear that was not intentional! Usually by this time in the year, I start feeling the call of pumpkin spice, but I’m making a point not to jump too quickly into Fall vibes too soon. Spooky season is my favourite season, but I still want to enjoy August, & what’s left of Summer.

The polishes I used for this manicure are: 

  • Base Coat: Sally Hansen Miracle Gel Colour Grip Primer Base Coat 
  • Top Coat: Sally Hansen Miracle Gel Glossy Top Coat
  • Essie Spice It Up
  • Sally Hansen Miracle Gel Moonlit Top Coat
  • Sally Hansen Complete Salon Manicure Red It Online

I wasn’t sure exactly what to call these nails. I know people used to refer to these as sideway French nails, but I feel like sideways swoop nails feels like a better descriptor. Either way, I really like how these turned out — & I got a few compliments at work too!

I was originally just wearing the base of Essie Spice It Up & Sally Hansen Miracle Gel Moonlit Top Coat, but it was looking a little rough. However, I didn’t have quite enough time to completely redo my nails, so I decided a little last minute nail art over my base was the perfect solution. & there is nothing better than red nails, in my opinion. We all know red nails are my favourite, no matter what time of the year.

What do you think of this subtle nail art look with sparkle? Do you have do some second/third day nail art to extend the life of your manicure? Let me know all your thoughts down in the comments below.

Neon Stained Glass (featuring Sally Hansen Miracle Gel 90s Collection)

•contains pr/gifted product•

Hello lovelies & happy Friday! It’s a fantastic Friday here… especially since the countdown to our family vacation has officially hit one week, & I could not be more excited! It’s also been hot & beautiful this week, meaning I’m all about the neon. Good thing I reverently received a fun package from Sally Hansen, huh? I wanted to create a beautiful stained glass inspired look since the formula on the shades I received would be perfect for it… & I was not disappointed.

The polishes I used for this manicure are: 

  • Base Coat: Sally Hansen Miracle Gel Colour Grip Primer Base Coat 
  • Top Coat: Sally Hansen Miracle Gel Glossy Top Coat
  • Sally Hansen Miracle Gel Get Mod
  • Sally Hansen MG Toadally Buggin’
  • Sally Hansen MG Did I Blue That?
  • Sally Hansen MG Nostalchick
  • Sally Hansen MG Beet Me At The Mall
  • Sally Hansen MG Mixtape
  • Sally Hansen Instadri Ghouls Night Out
  • NailStuff.ca 16mm Liner Brush

I’m not going to lie, I’m absolutely obsessed with this nail art look. I wore it from Tuesday to Thursday, & was actually sad to take it off! This is not my first version of this design, but it might be my most favourite I’ve done.. at least in a while! The colours blended so beautifully together, & I think my lines turned out really good. Anytime I freehand a clean line manicure, I always feel some crazy pride!

Especially since it doesn’t always happen, haha.

What do think of this fun stained glass look? Are you feeling the neon shades this weekend? Would you wear a bright & eye-catching look like this? Let me know all your thoughts down in the comments below!