Funky & Bright Drag Marble Nails

Hello lovelies & happy Wednesday! I hope your week has been going well so far. It’s a very wet, & grey, week here so far — & it’s supposed to last all the way into next week, so that’s less than ideal.

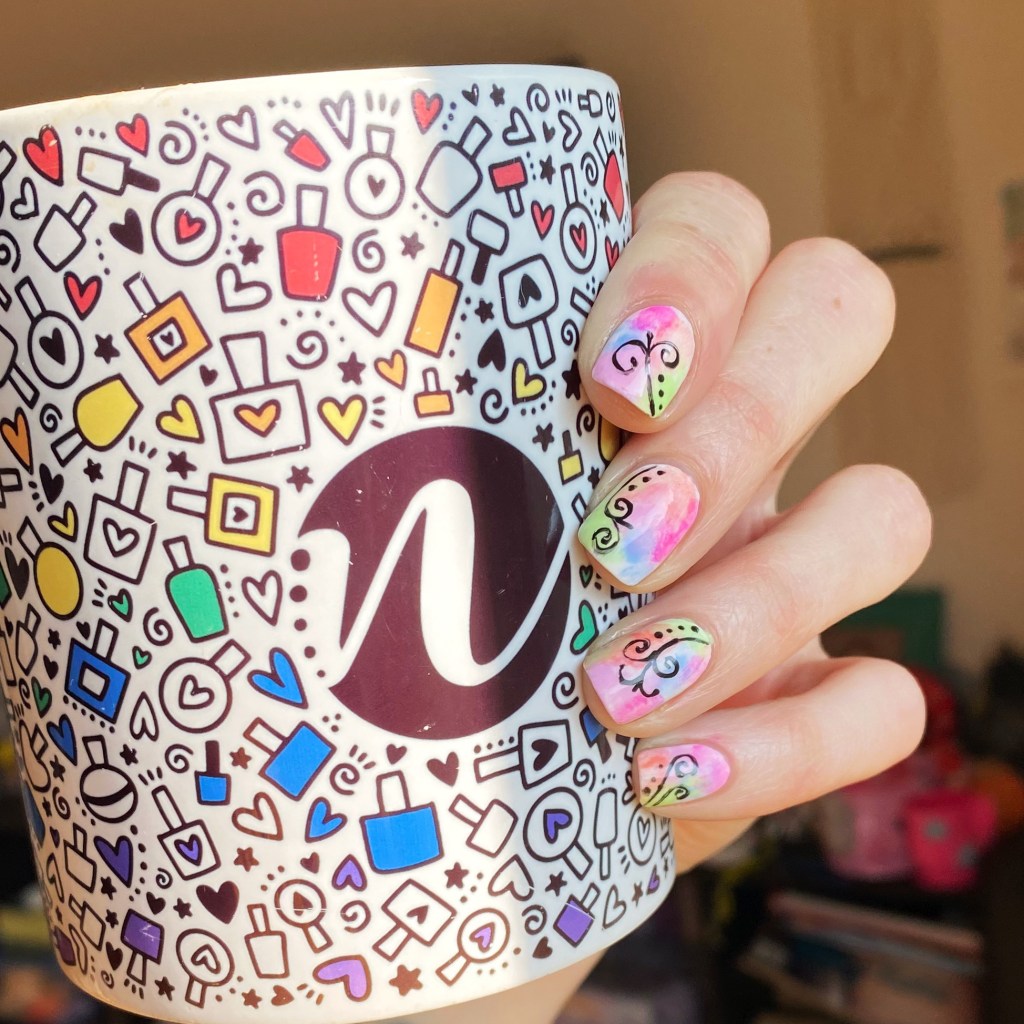
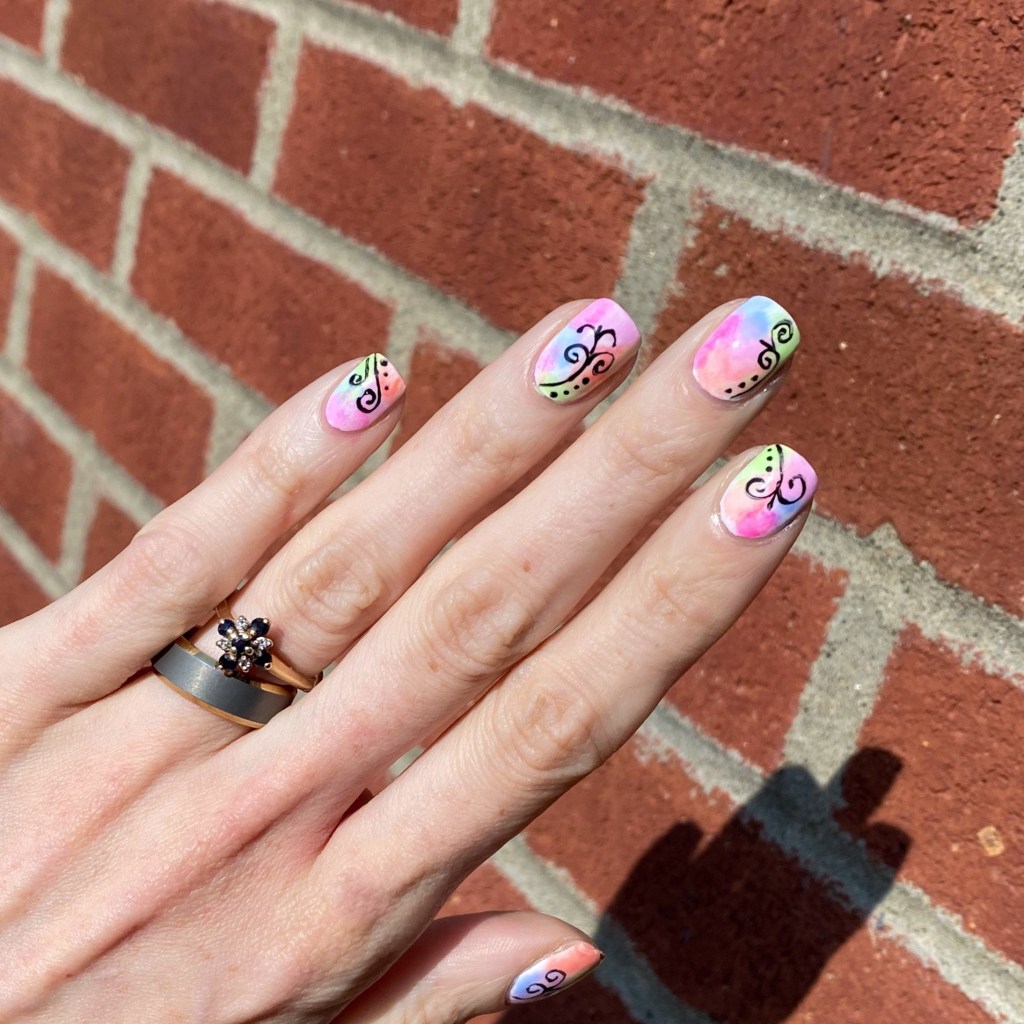
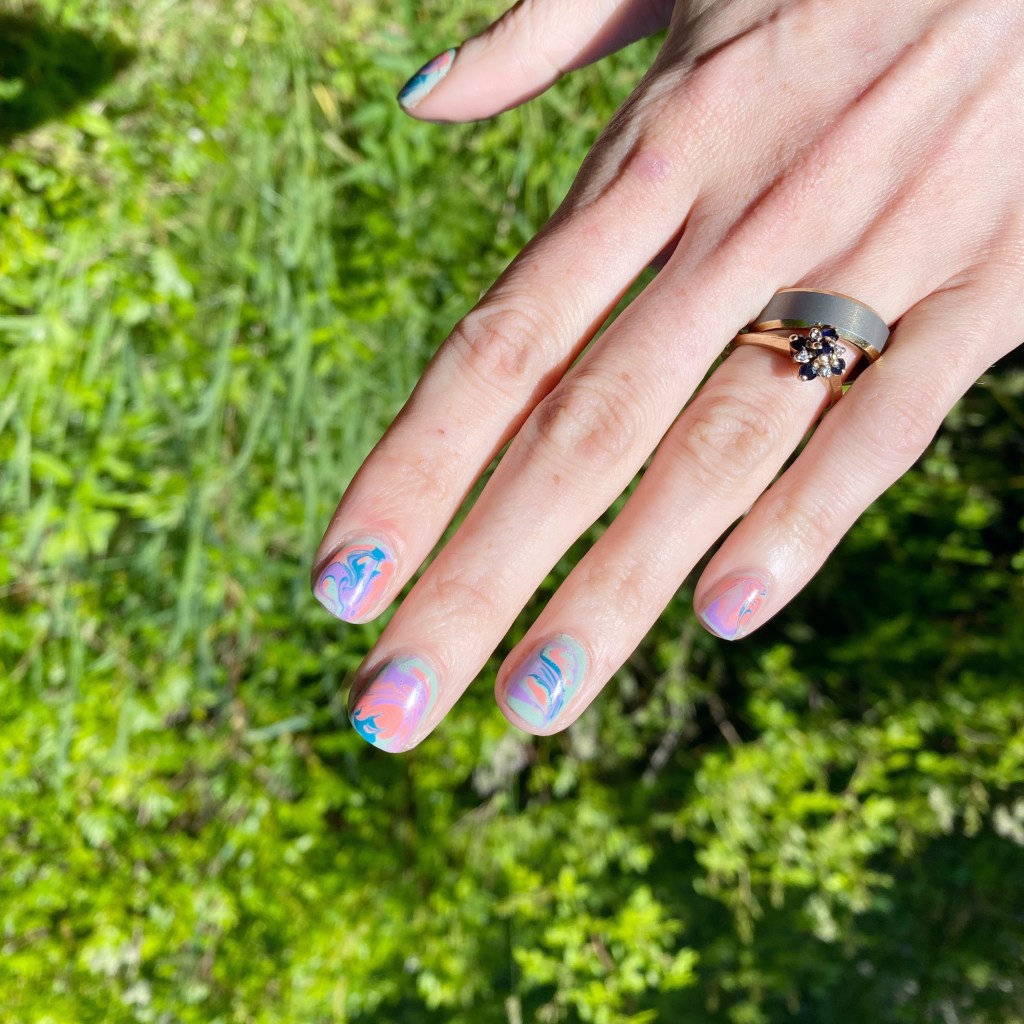
So let’s go back a few days when it was sunny, & warm, & I matched the weather with these colourful drag marble nails! These Essie shades were sitting on my nail desk, & I just had to combine them together. & I’m so glad I did because they look so good together.

The polishes I used for this manicure are: 

  • Base Coat: Londontown KUR Nail Hardener & Base Coat 
  • Top Coat: Seche Vive Fast Dry
  • Essie Turquoise & Caicos
  • Essie Worth the Tassel
  • Essie Revenge’s A Beach
  • Essie Peach Side Babe
  • Extra tiny dotting tool (NailStuff.ca Dotting Tool Trio)

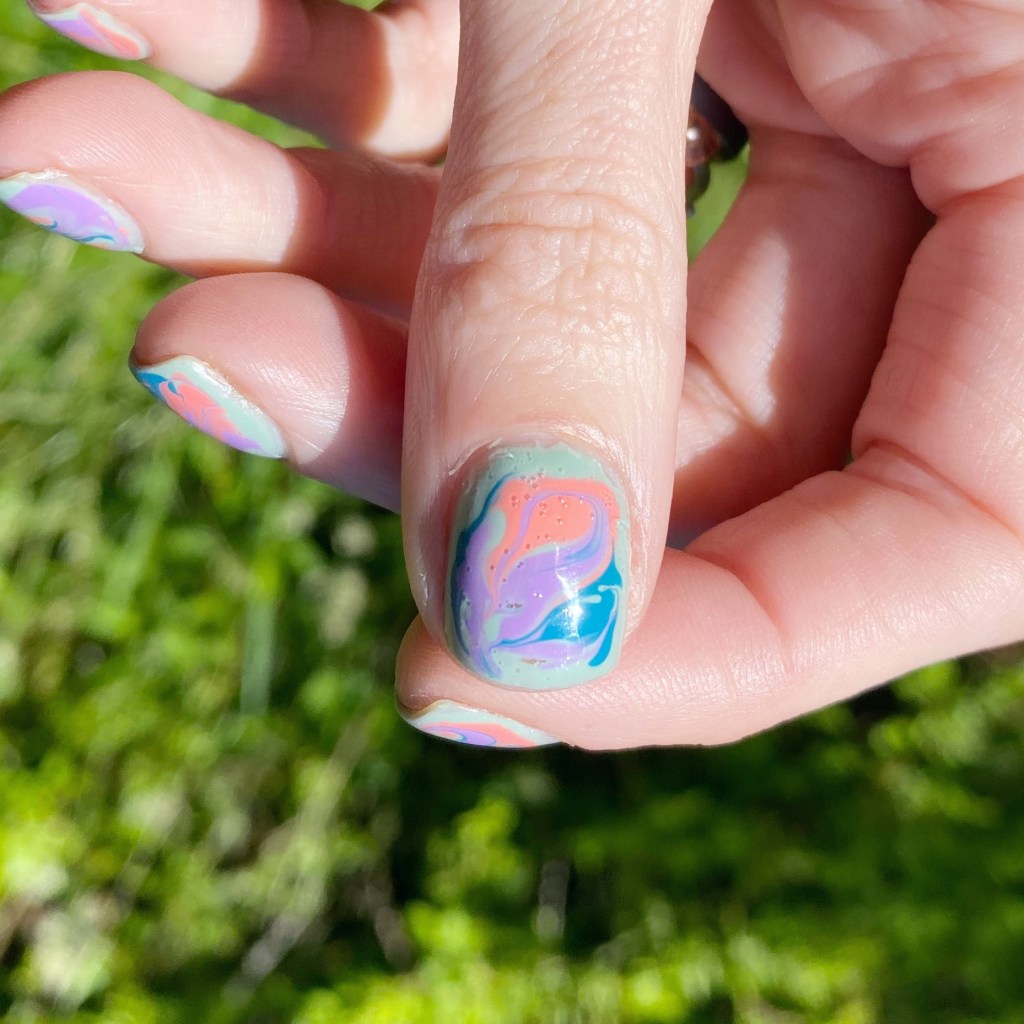
Please excuse the bubbles on my thumb — I added top coat a little too soon to this one. But I really love the swirling on this one!

Drag marbles are definitely time consuming to do — you have to go one finger at a time. But the end result is always awesome! This colour combination, especially, just looks so cool.

What do you think about this bright drag marble? Have you ever done a drag marble design before? I love the look of actual water-marble, but I’ve never been able to be successful at it, so this is my go-to alternative. Not quite the same idea, but just as fun!

Neon Squiggles ➰

Hello lovelies & happy Friday! I know, I skipped a day of posting this week — sometimes you just need a day to take a break & relax. But I’m back today & I have a manicure I’m really obsessed with. It has all the Summer vibes that I’ve been looking for.

I really loved a sponged neon base, & I just found my make up sponges the other day, so I knew it was time for another version of one of my favourite looks! & I couldn’t be happier with how it turned out.

The polishes I used for this manicure are: 

  • Base Coat: Londontown KUR Nail Hardener & Base Coat 
  • Top Coat: Seche Vive Fast Dry
  • Essie Blanc
  • Sally Hansen Miracle Gel Peach Please
  • Sally Hansen MG Sugar Crush
  • Sally Hansen MG Violet Voltage
  • Sally Hansen MG Electri-Lime
  • Sally Hansen MG Fuchsia Fever
  • OPI Who You Callin’ Bossy?!
  • NailStuff.ca 4mm Micro Detail Brush

Love this vibrant base, but obviously I needed to draw some kind of pattern overtop. It’s been a while since I tried one of these swirly looks, but I think it turned out really fun. I have no set plan going into it, I just tried to create something that looked unique… & I think I was successful! My ring finger is probably my least favourite of all my nails, but over all I love love love how it looks. I’m very happy with it!

What do you think about this neon swirl look? Are you busting out the neon now that the days are getting warmer? Let me know all your thoughts down in the comments below, & share what your favourite neon nail polish is down in the comments below!

Dainty Negative Space Floral 🌿🌸

Hello lovelies & happy Monday!

Today I’m starting off this week with another floral look. At this point, you can pretty much expect that I’ll be posting a floral design at least once a week for the foreseeable future. I’m kind of obsessed. Today’s look was another one of those random designs I kind of came up with in my head, & was beyond happy to bring to life on the nail. I really just wanted something dainty, & I think was successful in creating that.

The polishes I used for this manicure are: 

  • Base Coat: Londontown KUR Nail Hardener & Base Coat 
  • Top Coat: Seche Vive Fast Dry Top
  • Essie Gel Couture Princess Charming
  • Essie Blanc
  • Essie Check Your Baggage
  • Essie Off Tropic
  • NailStuff.ca Mermaid Tail Brush Trio
  • NailStuff.ca Dotting Tool Trio

I’m kind of obsessed with how this turned out. I decided to go minimal on my floral — I usually use multiple polishes for each flower & my leaves — & I love how it looks. It’s clean & simple, which is exactly the look I was craving. A nice palate cleanser for the nail. I also really like that Princess Charming is quite neutral, so it doesn’t stand out too much on the nail & keeps that naked look I was going for.

What do you think about this dainty negative space floral design? Do you like simpler cleaner looks like this, or more bright & colourful nail art designs? Let me know all your thoughts in the comments below!

You know you can count on me to do a nice mix of both.

Have a super amazing Monday. ♥︎

Instagram Floral Collab 🌸🌿

Hello lovelies & happy Friday!

I’m so super excited to share today’s manicure, because I was lucky enough to get to join in on a nail art collection via Instagram. You know me — I adore a good floral design, so I was excited to join in on this challenge.

These nails scream Spring, so I’m very excited to share this design!

The polishes I used for this manicure are: 

  • Base Coat: Essie Hard To Resist Glow & Shine 
  • Top Coat: Seche Vive Fast Dry Top
  • China Glaze Wanderlust
  • OPI One Heckla of A Color
  • OPI Gelato on my Mind
  • Essie All the Wave
  • Essie Off Tropic
  • Sally Hansen Good Kind Pure Peony Origins
  • Sally Hansen GKP Eco-Rose
  • Sally Hansen InstaDri Racing Rose
  • Aco by Ardene Sour Apple
  • Aco by Ardene Jungle Green
  • OPI My Geckos Does Tricks
  • Starrily Vantablack
  • NailStuff.ca Mermaid Tail Brush
  • Dotting tool (NailStuff.ca — Dotting Tool Trio)

This design took so many polishes to create, but it was absolutely worth it. & I think I remembered all the shades I used for this design. There was quite a few of them.

I was so excited to be a part of this collaboration & join so many talented nail artists. I really love challenging myself like this, because sometimes it’s hard to come up with designs all on my own.

Please don’t forget to check out #floralnailartmanicollab2023 on Instagram to see all the other stunning floral designs!

Happy Friday loves!

GLAM NAILS CHALLENGE APRIL — Daffodils

Good morning lovelies & happy Wednesday! I hope everyone’s week has been lovely so far. The weather has been seasonal so far, which I can’t complain about too much. & the flowers are beginning to bloom.

It’s time for the next prompt of Glam Nails Challenge April: daffodils. & I’ll be honest I was nervous, again, about this prompt. I love love love doing floral, but this was a type of flower I’d never painted before. But, you know, I think I nailed it!

The polishes I used for this manicure are: 

  • Base Coat: Essie Hard To Resist Glow & Shine
  • Top Coat: Seche Vive Fast Dry Top
  • Sally Hansen InstaDri Glos-Sea
  • OPI Nature Strong Make My Daisy
  • Essie Fall for NYC
  • Essie Check Your Baggage
  • Essie Cliffhanger
  • ACO by Ardene Jungle Green
  • Essence Bloom Me Up! Blow My Mint
  • Essie Off Tropic
  • NailStuff.ca Mermaid Tail Brush

First off, check out this blue! I recently picked it up at Shoppers when I had some optimum points, & I’m really in love with it. It’s kind of hard to see in this lighting, but it has the prettiest pink-y shimmer in it. A fantastic colour for Spring. Also the perfect base for these beautiful yellow flowers.

Second I’m so, so proud of how these daffodils turned out. Sometimes I get self conscious when it comes to nail art I’ve never done before, but I really do love them. & it’s inspired me to do more floral again. I feel like I stopped doing florals for a while, & now that Spring is here, it’s time to pick up doing them again. Because, they really do make me so happy.

What do you think of my daffodils for Glam Nails Challenge April? Did you miss all the floral? Let me know all your thoughts down in the comments below.