Holographic Swirls (with the Ella + Mila Enchanted collection)

*contains PR

Good morning lovelies & happy Tuesday. Sorry for the unannounced hiatus — after my busy week last week, I woke up Sunday morning feeling like I got hit by a bus thanks to the cold from Hell. Thankfully, I’m finally feeling better today (thank you DayQuil) but I am behind on posting!

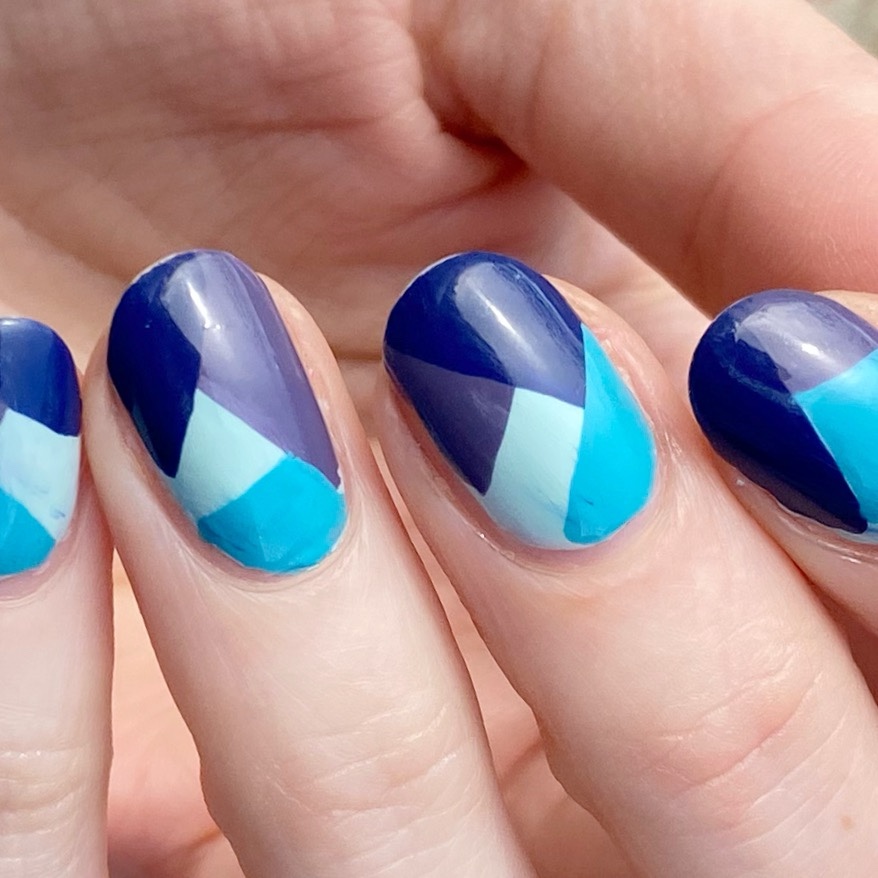
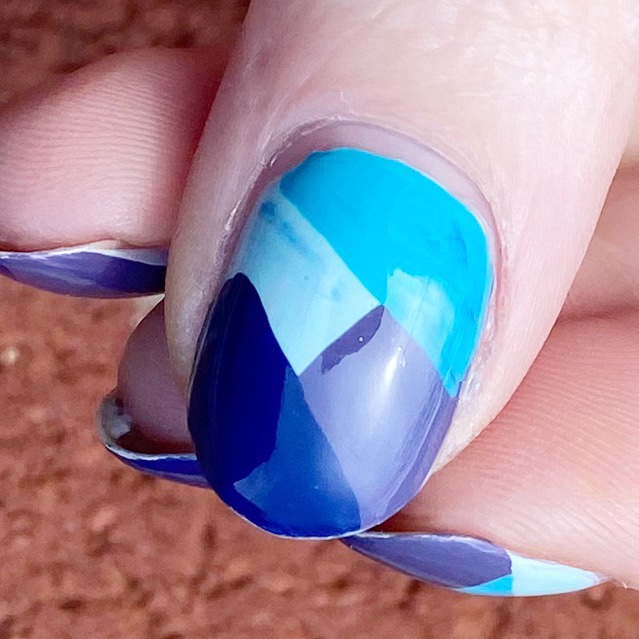
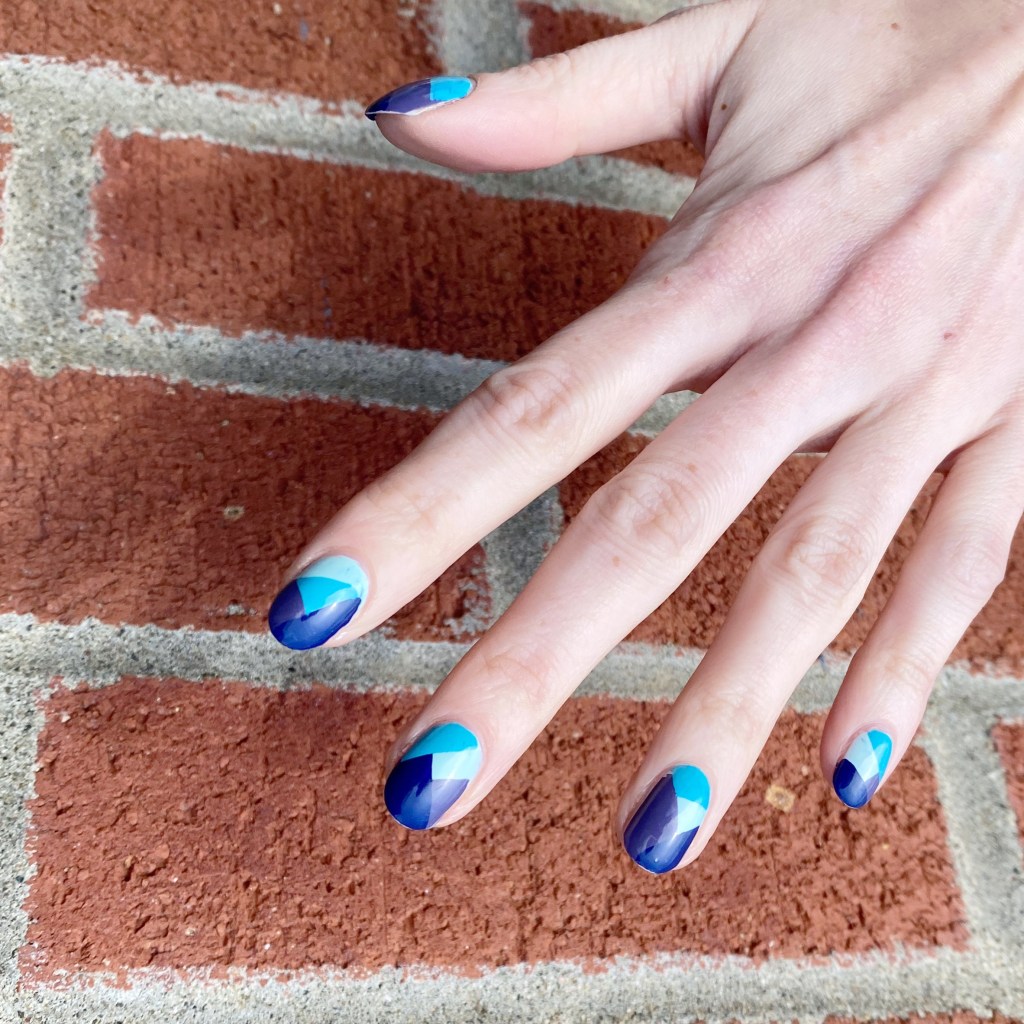
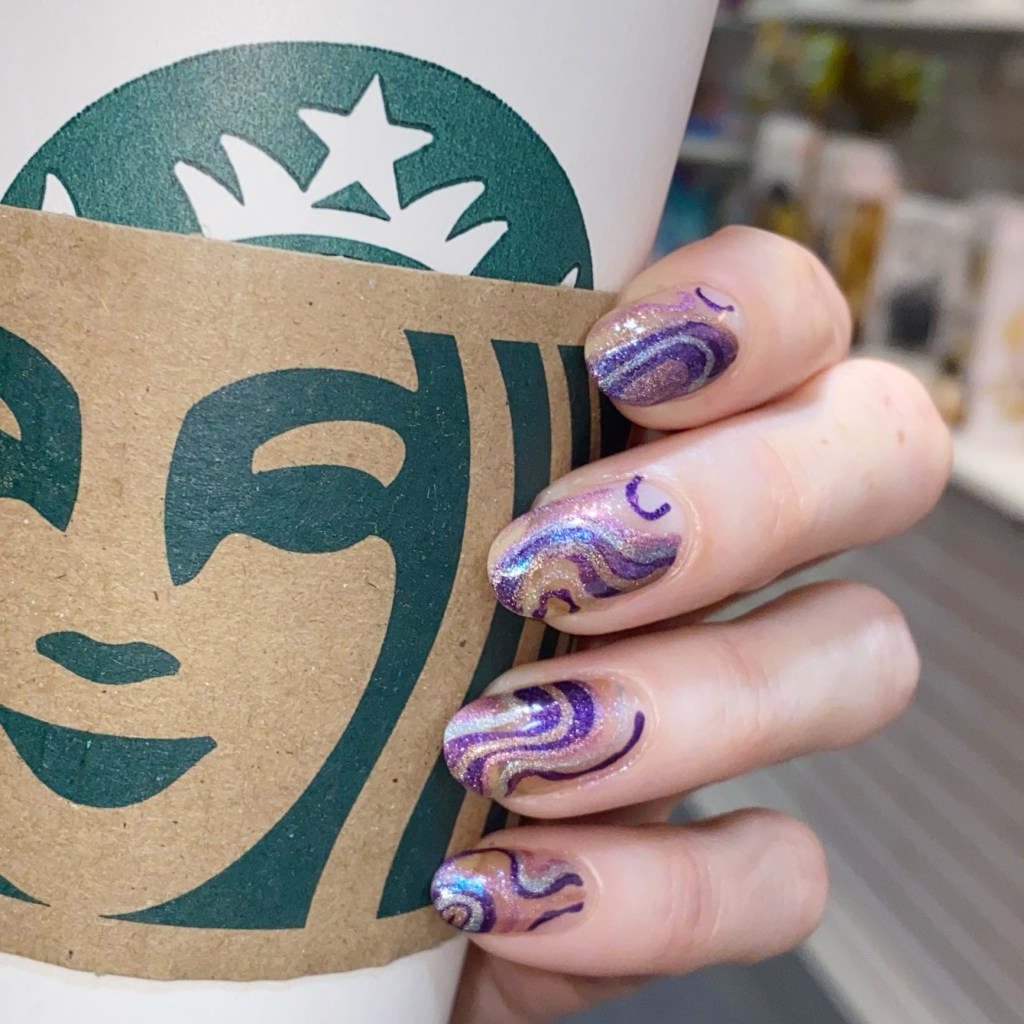
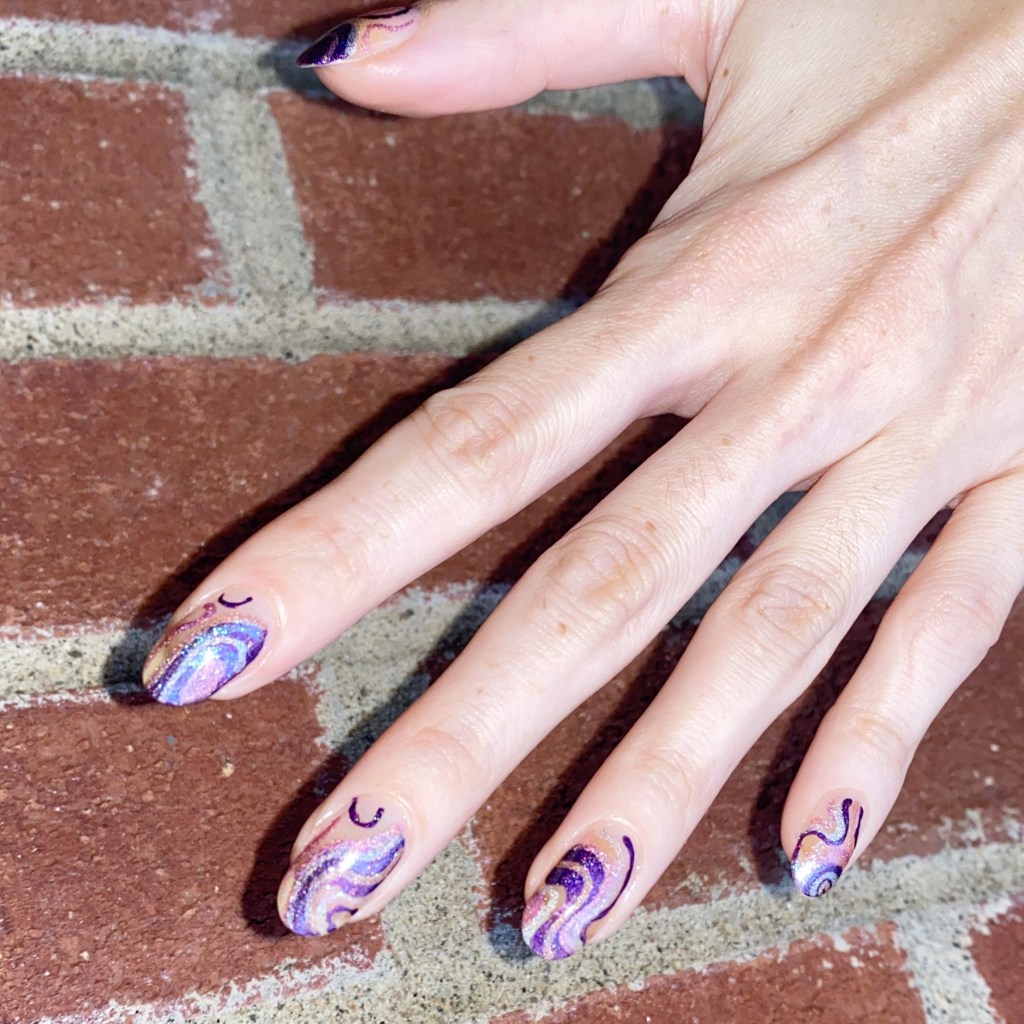
Today I’m sharing a fun sparkly design that I think is perfect as we approach Holiday Party Season. & I accomplished this look using the entire Ella + Mila Enchanted (B) collection. I feel like November (& into December) is why my craving for glitter really skyrockets, so expect lots of glitter in the next few weeks as we get into Christmas/Holiday mode!

The polishes I used for this manicure are: 

  • Base Coat: Ella + Mila All About The Base (Base Coat) *
  • Top Coat: Ella + Mila In A Rush (Top Coat) *
  • Ella + Mila Everglow *
  • Ella + Mila Oasis *
  • Ella + Mila Dragonfly *
  • Ella + Mila Violet Skies
  • Ella + Mila Zephyr *
  • Ella + Mila Aurora Lights *
  • Nailstuff.ca Mermaid Tail 7mm liner brush

*gifted

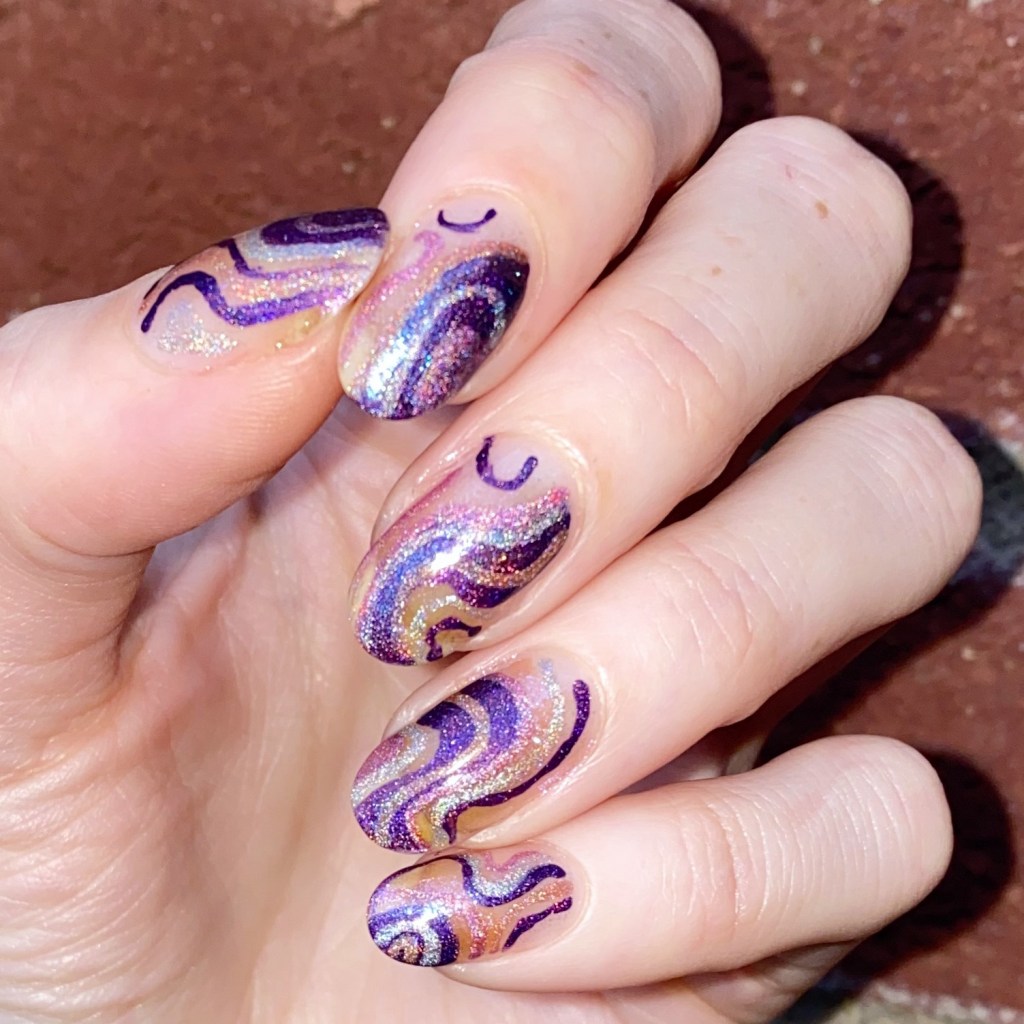
Love the negative space base (with some added shimmer thanks to Everglow) & then the stripes of holographic. The sparkle is unbelievable & definitely perfect for any shindig you have coming up to celebrate. Ella + Mila have also just launched some great nail art stripers, so if you’re looking to try out a nail art look like this, I definitely recommend checking them out!

You can use THIS LINK to check out their site — it is an affiliate link so thank you if you use it!

What do you think of these sparkly abstract stripes? Do you think this is a nail art look you could see yourself trying & wearing, especially as we get into party season?

Let me know all your thoughts down in the comments below, & what holiday looks you want to see me try this year!

🖤

SWATCH SUNDAY — Sally Hansen Xtreme Wear With The Beet

Hello lovelies & happy Sunday! I hope you all survived your week okay. Can you believe that February is almost over? This year is speeding by quickly, which is kind of insane — but I’m definitely looking forward to Spring.

Today though, I’m sharing a shade that has been in my stash for ages but I’ve never swatched. This is Sally Hansen Xtreme Wear in With The Beet.

2 coats + top coat

I wish I knew when this shade was originally released (I know I’ve had it for a few years) but it is still in current rotation as part of the Xtreme Wear core collection.

This beautiful berry shade has a great glossy formula that builds to full opacity in 2 coats. This dark shade is a nice mix between a purple & a burgundy, which is kind of the best of both worlds in terms of shades I love.

Look at that colour! It’s just beautiful! I don’t know why, but when my nails are extra short like this I tend to feel more drawn towards darker shades as I just feel like they look more classy, or something. I did end up painting some really pretty floral over this base that I can’t wait to share with you, so stay tuned for that!

What do you think about this beautiful shade from Sally Hansen? Are you a fan of the Sally Hansen Xtreme Wear line? What is your favourite shade? Let me know all your thoughts down in the comments below!

Have a beautiful Sunday 🖤

Blue Geometric Colour Block

Hello lovelies & happy Wednesday! Sorry for my absence on Monday — this has been a rough month, creatively speaking. I’ve really had to push myself to want to do nail art, which isn’t like me at all. But today I have a fun nail art look I did on the weekend. This was actually the last nail art look I did before an epic nail break, so expect super short nails in upcoming posts!

The polishes I used for this manicure are: 

  • Base Coat: China Glaze Calcium Gel Fortifer
  • Top Coat: China Glaze Fast Forward Top 
  • Essie Mint Candy Apple
  • Essie In My Cab-ana
  • Essie License to Thrill
  • Essie No Ex-pectations
  • Nailstuff.ca Mermaid Tail 7mm liner brush

This is such a fun look, & it was so easy to do. Like I said, I’ve been dealing with a lack of creativity when it comes to my nails, but a colour block look never disappoints. Usually I only stick to 3 colours, but I decided to do four for this one & I think it looks awesome!

What do you think about this colour block look? Are you a fan of this design? What is your favourite go to nail art look when you’re packing in inspiration— let me know in the comments below!

Enjoy your Wednesday loves!

🖤

Valentine’s Day Hearts ❤️

Hello lovelies & happy Valentine’s Day! 💗 I know today is not a day everyone enjoys, especially if you’re not currently in love, but it is a great day for nail art, & naturally I needed to do something themed for today. I really, really wanted something red & pink to wear, & this was the look I decided on!

The polishes I used for this manicure are: 

  • Base Coat: China Glaze Calcium Gel Fortifer
  • Top Coat: China Glaze Fast Forward Top Coat
  • Butter London Saucy Jack
  • Sally Hansen 90s Nostalchick
  • Ardene Glitter Me Pink
  • NailStuff.ca Dotting Tool Trio
  • Nailstuff.ca Mermaid Tail 7mm liner brush

How cute are these little cuticle hearts? This is definitely a simpler Valentine’s Day nail art look, but I think that’s why I love it so much. It gets the point across, but isn’t over the top. Simple & chic, which is what I feel like my nail art has really been leaning towards lately! I think I’m due for some fun over the top nails soon.

What do you think about these Valentine’s Day nails? Do you like the simplicity of these single hearts? Let me know all your thoughts in the comments below!

& happy February 14th!

Matte Black Roses

Hello lovelies & happy Friday! Still trying to get back into the routine of blogging & posting, but this weekend has been a bit crazy.

Today, though, I have another design to share from last week. I had mentioned I really, really wanted to try a black rose design so this was the result of that attempt. This was actually harder than I had anticipated, mostly because creating roses involves layering different shades of the same colour, but black is black, so I had to see what shades of grey I could find for highlights. I think, though, in the end it turned out beautifully!

The polishes I used for this manicure are: 

  • Base Coat: China Glaze Calcium Gel Fortifer
  • Top Coat: China Glaze Fast Forward Top Coat
  • Matte Top Coat: Sally Hansen Miracle Gel Matte Top Coat
  • OPI My Address is Hollywood
  • Sally Hansen InstaDri Ghouls Night Out
  • Sally Hansen Xtreme Wear Grey Area
  • Sally Hansen Xtreme Wear Gunmetal
  • Sally Hansen InstaDri Jumpin’ Jade
  • Sally Hansen InstaDri SCRAM!
  • NailStuff.ca Dotting Tool Trio
  • Nailstuff.ca Mermaid Tail 7mm liner brush

When I first started painting these, I wasn’t sure if the black rose idea was going to work out for me, but once I layered a few shades of grey, my vision came to life. & I just love them! We all know my love affair with floral nails, so it’s fun to switch up what I usually do. Plus, I think this look is a great alternative for Valentine’s Day.

Red roses are lovely, but black roses just have a fun vibe. Plus I’ve been feeling my Emo roots lately, & this would fit in with that whole vibe.

What do you think about this black rose look? Do you think I captured the vibe that I was going for? Let me know all your thoughts down in the comments below.

♥︎