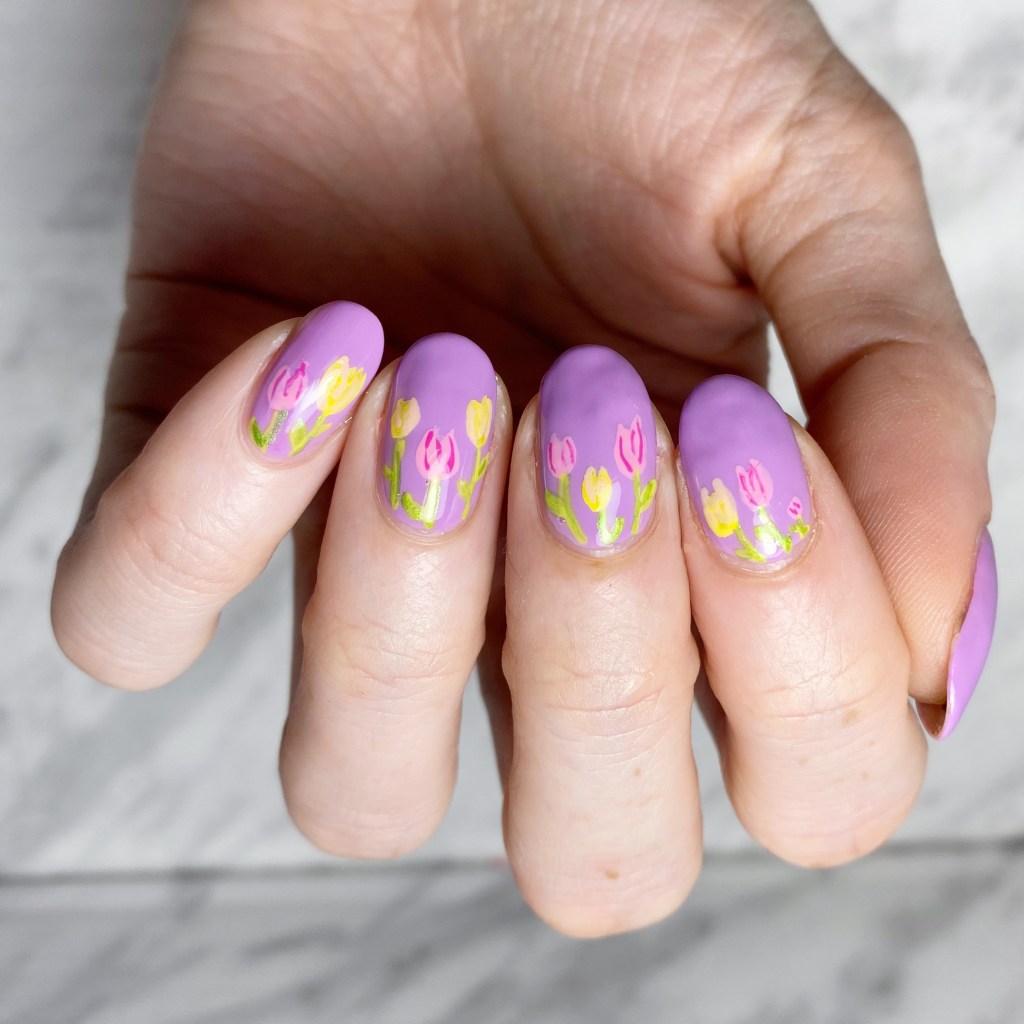
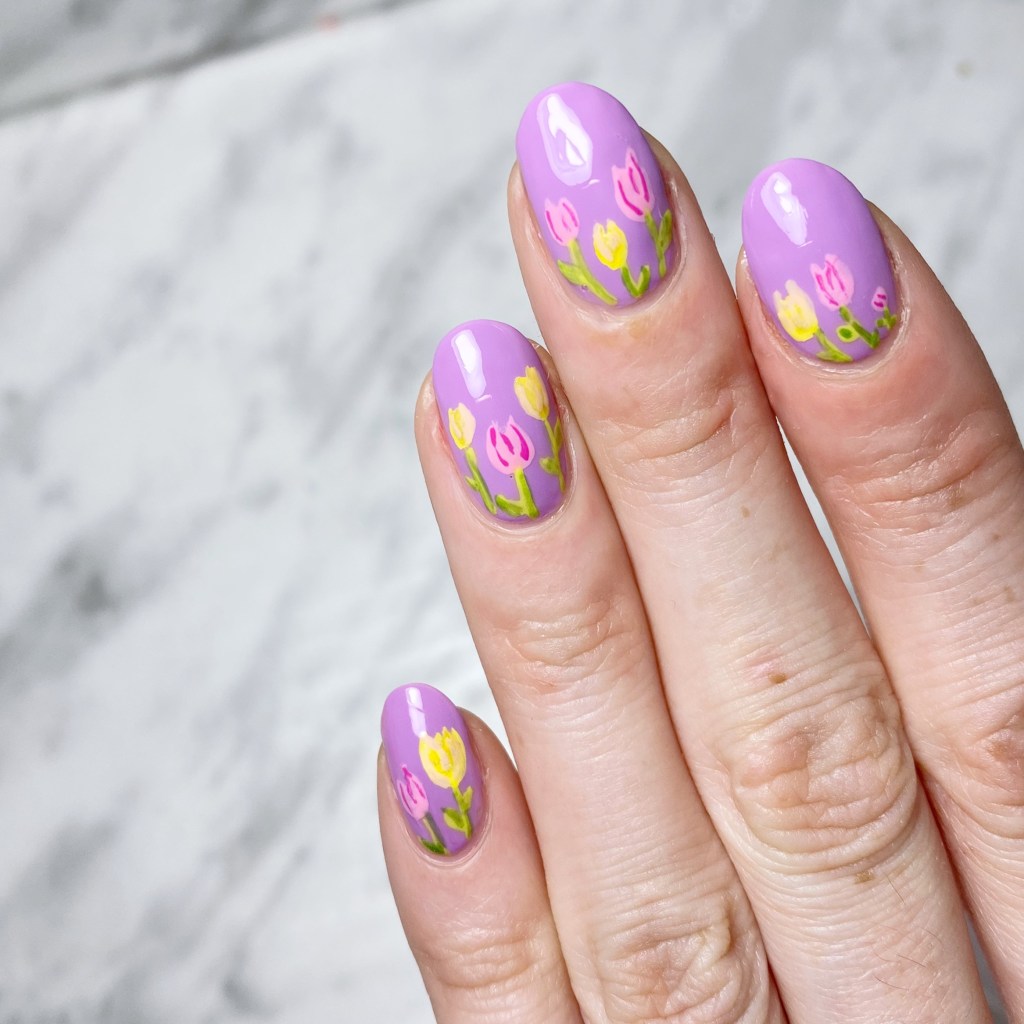
Hello lovelies & happy Monday! Another week is upon us, although this one isn’t looking nearly as Summer-y as the last. Today, though, I’m sharing the next prompt for Glam Nails Challenge April — tulips.
It’s kind of funny — in all the time I’ve been doing floral, I don’t think I’ve ever done a tulip design. So this was definitely a bit of a challenge for me. While it’s not my most perfect floral ever, I’m super happy with how adorable they turned out.
How cute do these flowers look? I would have loved to have taken a picture of them in front of my own garden, but no tulips quite yet. A few more weeks. I think this is such a perfect Springtime look. I love how colourful these are with the purple base & the yellow & pink tulips. Yes yes yes.
What do you think about this tulip design? Do you love a good bright & vibrant Spring-y design, or do you prefer things more subtle?
Let me know all your thoughts in the comments below & what you’re wearing on your nails this week.
Hello lovelies & happy Wednesday! Is Spring sprung for you (well.. for those in the northern hemisphere). It’s been a beautiful week here so far, & very warm! I even wore bare legs yesterday with a dress. It was a very exciting moment.
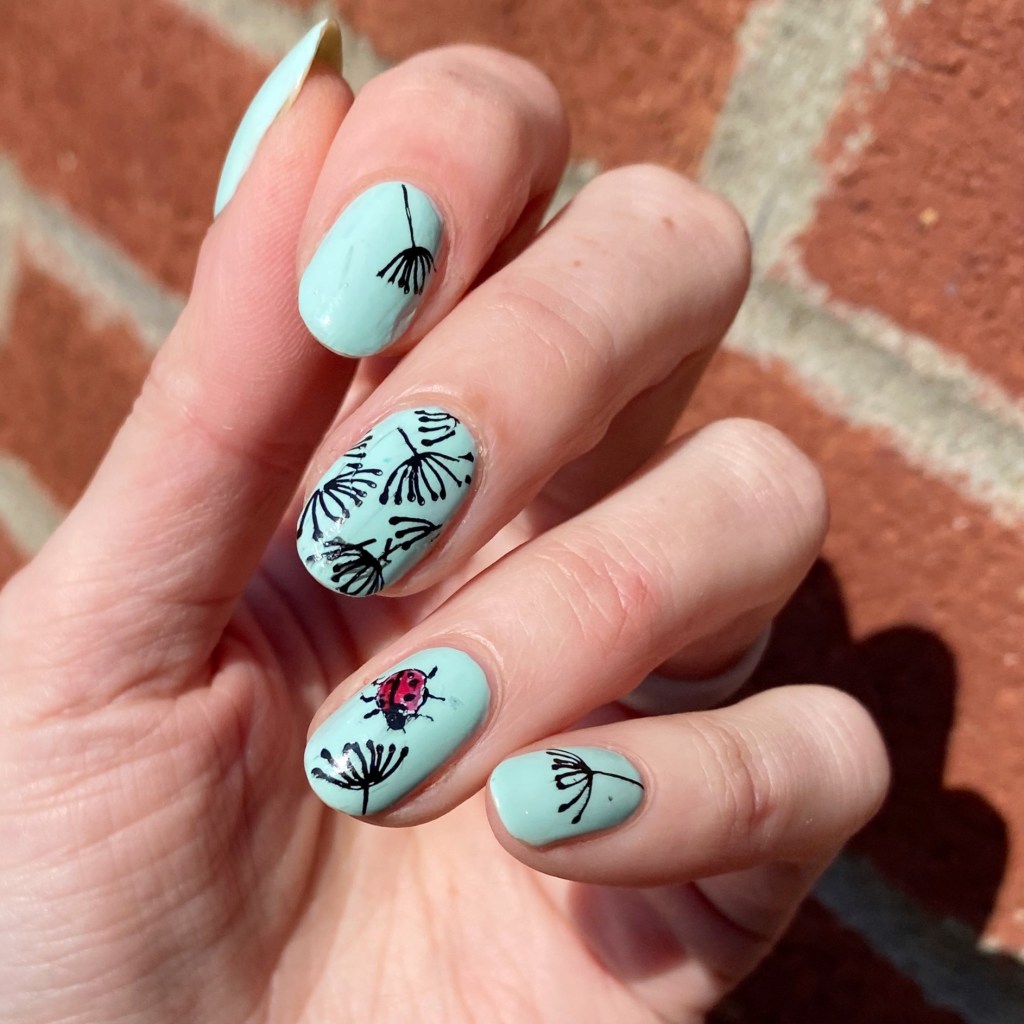
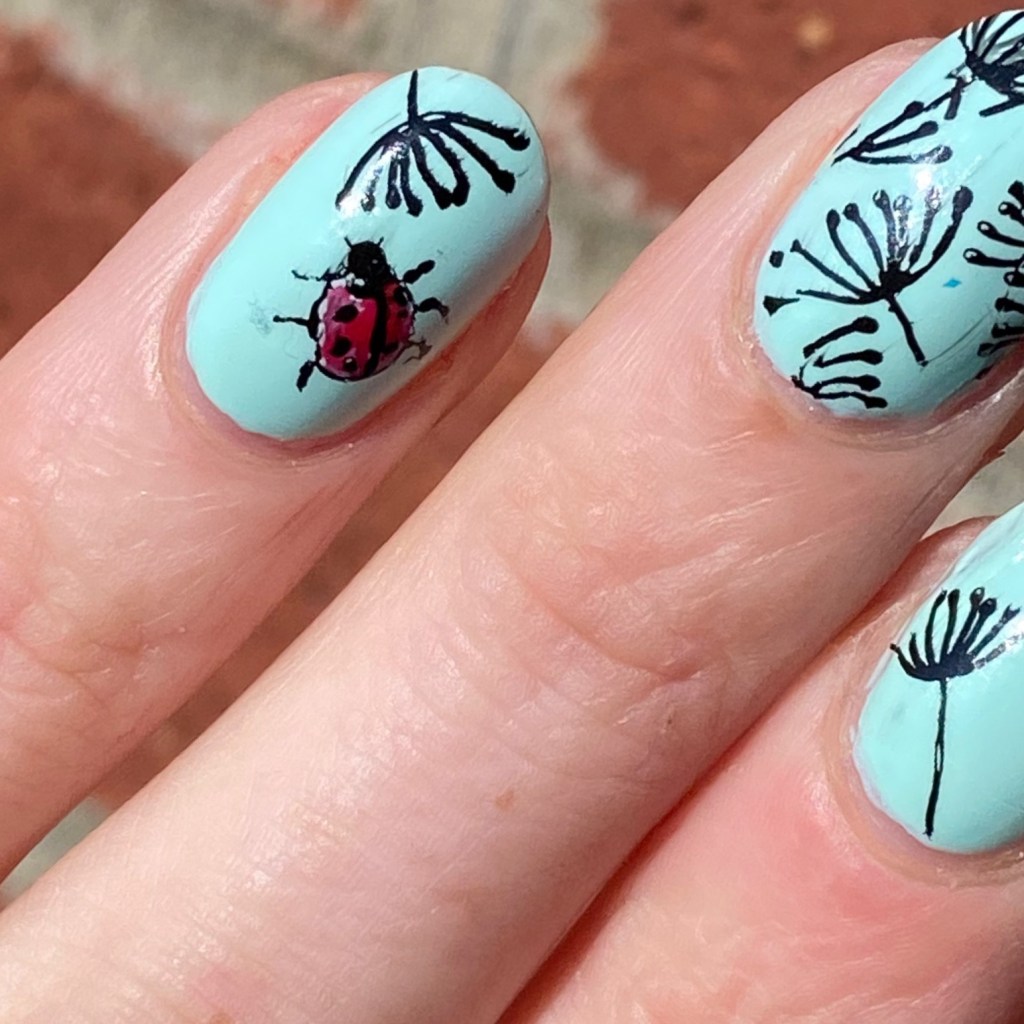
Today I’m all about the next prompt of Glam Nails Challenge April. This is #4, I think. & the prompt is ladybug, which is actually a design I don’t think I’ve ever done on my nails. & naturally, I decided to break out my stamping tools for this particular look.
First off, yes to this beautiful blue! I always forget how good Mint Candy Apple looks on the nail! I own both the old version & the new version & I adore both.
Secondly, how freaking cute is this lady bug?! I totally forgot, however, how impossible it is the pick images up off that stamping plate. This took a few tries to actually get on my nails, & I had to do some freehand touch ups, but I’m super happy with the end result! It’s the perfect little pop of colour. 🐞 & it’s lovely Spring vibes.
What do you think of these pretty lady bug nails? Do they scream Spring to you? Let me know all your comments & thoughts down below!
Happy Wednesday lovelies — it’s almost the weekend!
Good morning lovelies & happy Monday? Anyone else rocking a post Easter sugar hangover? I was pretty reserved in my treat eating yesterday, but my two kids definitely are feeling the post Sugar Rush crash.
Today is also the last kind of Easter-y prompt for Glam Nails Challenge April — the rest of the month is more Spring inspired. I’m going to kind of miss the Easter designs, but I’m also excited to focus on Spring too… especially since we’re expected to have very nice Spring temperatures coming up this week!
Today’s prompt: Easter Eggs.
The polishes I used for this manicure are:
Base Coat: Essie Hard To Resist Glow & Shine
Top Coat: Seche Vive Fast Dry Top Coat
Matte Top Coat: Sally Hansen Miracle Gel Matte Top Coat
Sally Hansen InstaDri Racing Rose
Sally Hansen Miracle Gel Crying Out Cloud
Sally Hansen MG Sweet Pea
Sally Hansen MG Sun-Shower
Crinkled Saran Wrap
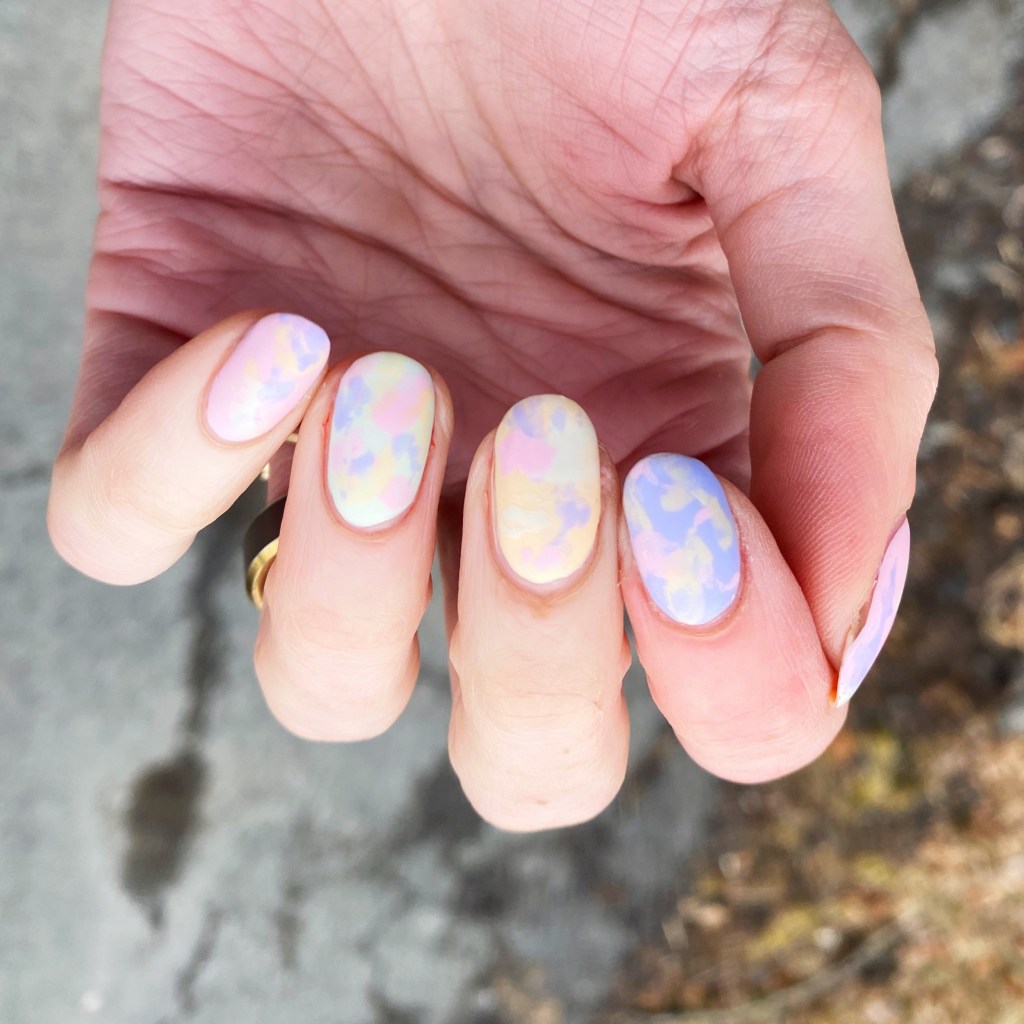
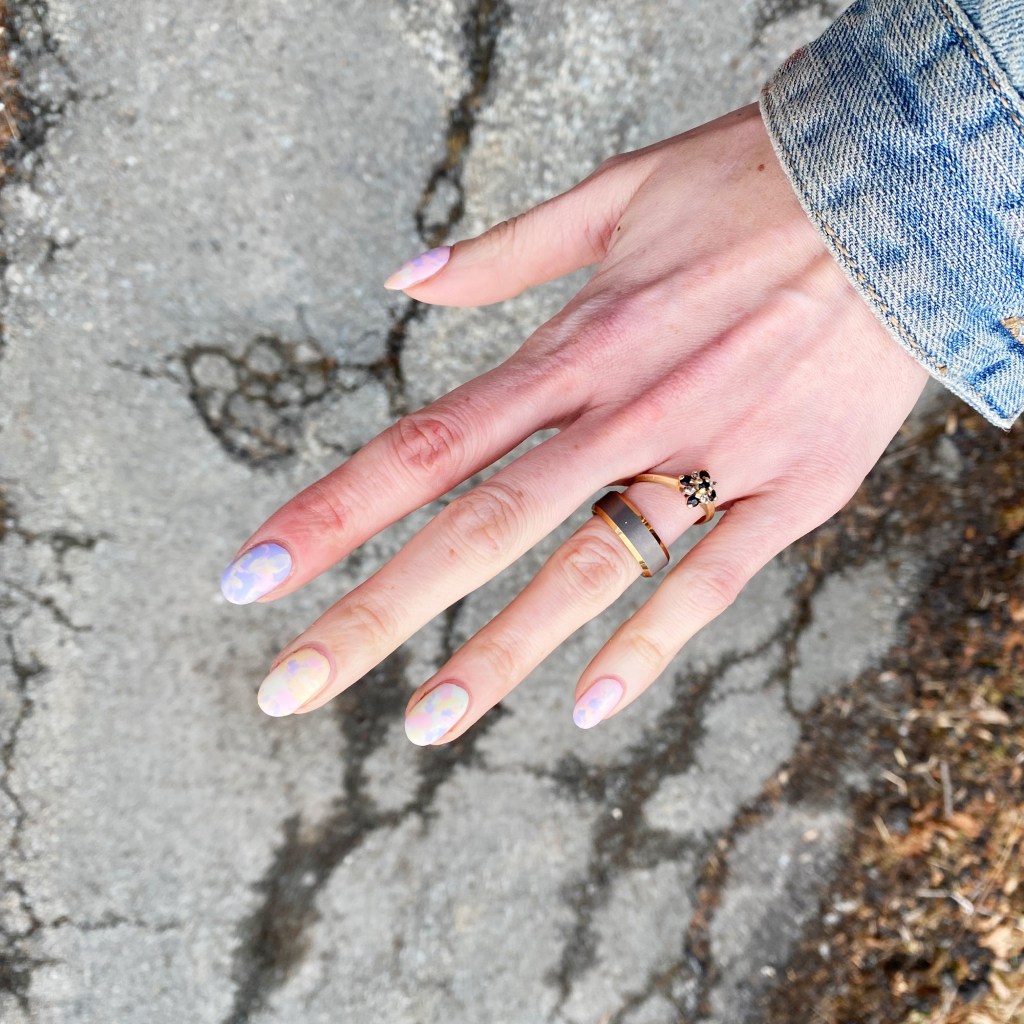
This look was inspired by those dip dyed eggs people do for Easter. This look, in particular, was my inspiration for this look — although I decided to go more pastel. I’ve never done them, mostly because I do like getting my hands dirty, but I do think they look so cool! So why not attempt the look on my nails! & I have to say, I really like how they turned out.
I used my go to Saran Wrap splatter technique to achieve these. I switched up my base colour on each nail, too, which I thought gave a fun effect.
What do you think about these Easter Egg inspired nails? Are you following around with #glamnailschallengeApril on Instagram to see all the fun designs for this month (so far)? Are you excited to see what the rest of the month brings? Let me know down in the comments below, & have a lovely Monday!
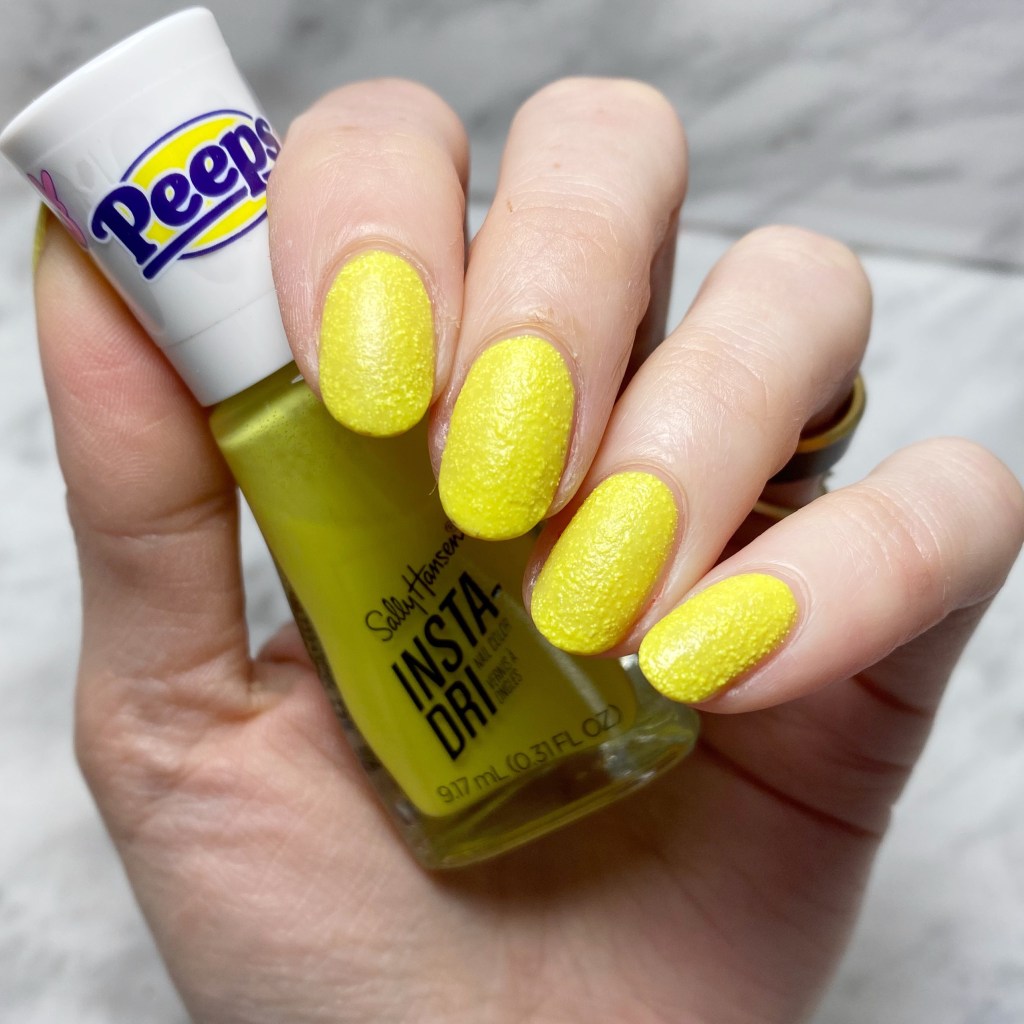
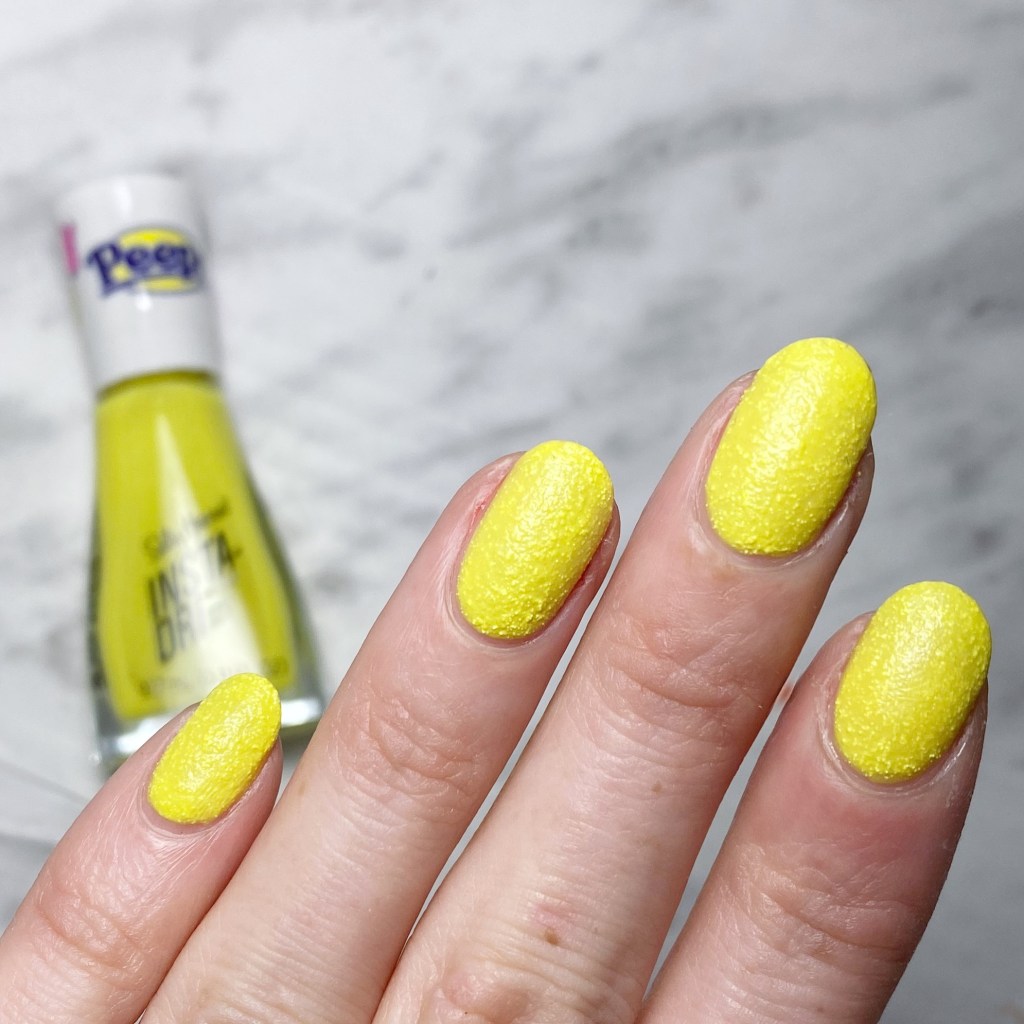
Hello lovelies & HAPPY EASTER! I hope the Easter bunny found you okay, & that you’re getting to enjoy some family time on this lovely Sunday. Today, I’m keeping the Easter vibes going with a nail polish I have been searching for, ever since I saw the swatches of it: The Peeps x Sally Hansen InstaDri collaboration for 2023.
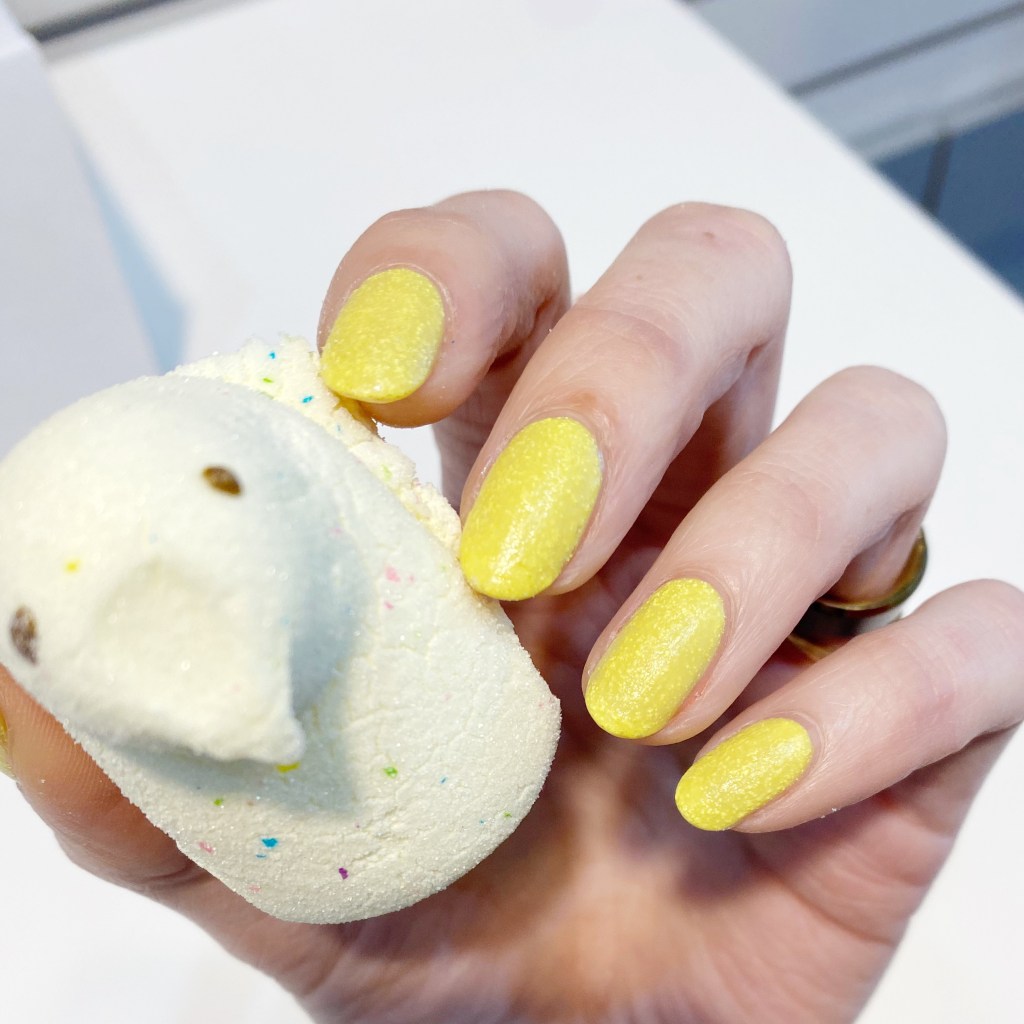
If you didn’t know — Sally Hansen has once again teamed up with everyone’s favourite Easter candy for some fun nail polish vibes. & even more fun; they’re textured. I’ve been on the hunt for these polishes for weeks, but they kept seeming to allude me. I finally tracked down a display at my local Shoppers Drug Mart, but sadly it was very picked over so I was limited in my choices. I decided finally on a classic Peeps look: 717 PEEPS Classic Chick.
4 coats, no top coat.
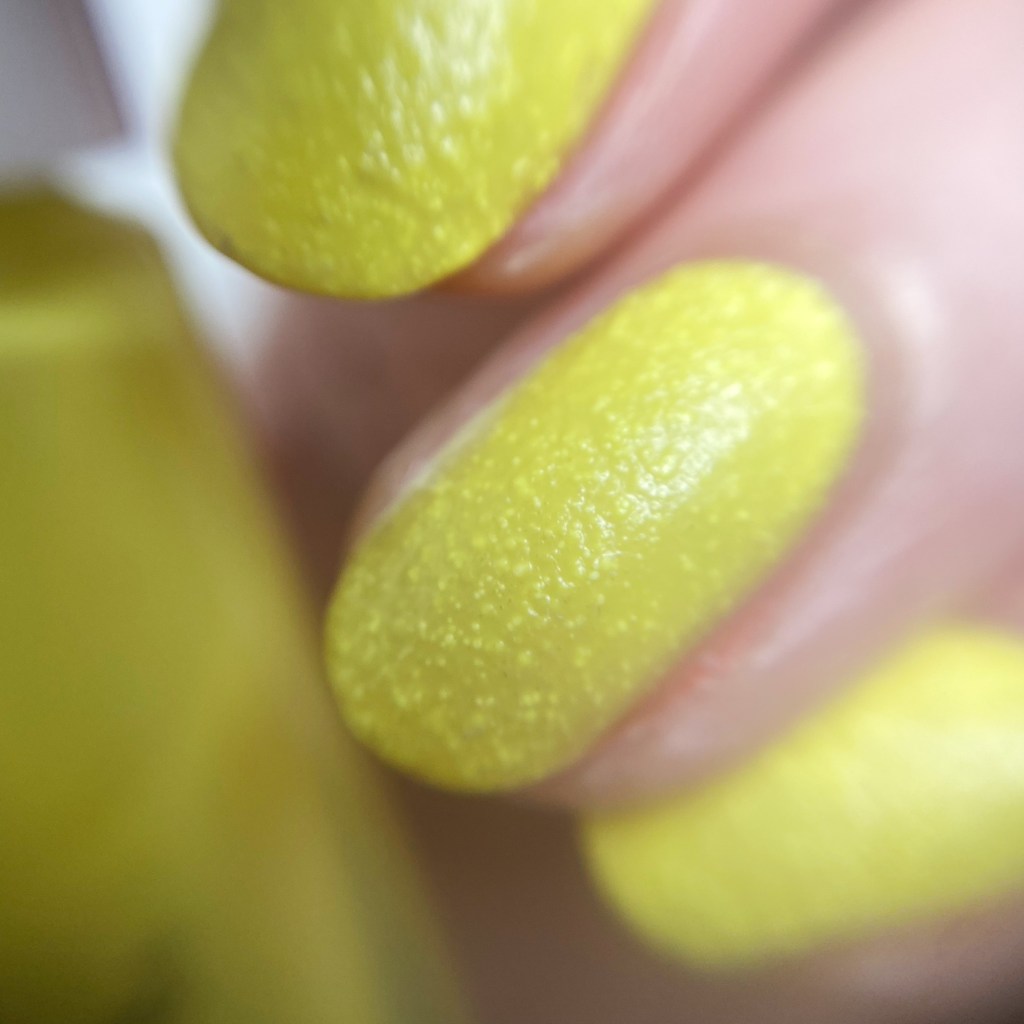
These brand new Peeps polishes are textured, so the formula is very, very thin. Normally I would say no to any polish that requires FOUR coats of polish, but because of the thin form, it dries down very quickly, leaving you with a fun textured finish that is designed to mimic your classic Peeps marshmallow. The yellow, too, is spot on to the yellow of those Peeps chicks & bunnies, which made me super happy. The finish is also kind of semi-matte, which adds to the Peeps effect.
I was very impressed, too, by how quickly these dried. Obviously, I’m used to applying a quick dry top coat to my polish before wearing it, but where I wanted to let the textured finish show, I needed to let it dry on its own. But I had no issues with sheet marks, or smudging, even though I did these about an hour before I went to bed.
A close up of the textured finish. This is giving me 2012 textured polish vibes, & I’m not mad about it. In fact, it’s reminding me of a LA Girl Sand Blast polish I used to be obsessed with (Green Sand) & it kind of makes me wish this nail polish trend could make a resurgence.
I’m not usually a yellow kind of girl, but I actually really enjoyed wearing this polish. I don’t know if I’ve mentioned this, but I started working in a candy store before Christmas, & so with Easter we’ve been selling a ton of Peeps! So it was fun comparing my nails to those classic yellow Peeps.
I think I might be a yellow girl now. At the very least, this will not be the last time I rock this yellow polish in the coming weeks.
& for fun, my nails & the freeze dried birthday cake Peep I enjoyed while at work.
Have you seen these Sally Hansen Peeps x InstaDri shades in store? Were there any you were desperate to get your hands on. I’m still kind of bummed my store was out of the pink, blue & purple shades but they did have Cotton Candy so I might have to go back & grab that one too just because I forgot how much I love textured shades!
Happy Easter loves ♥︎ I hope you have the most beautiful Sunday.
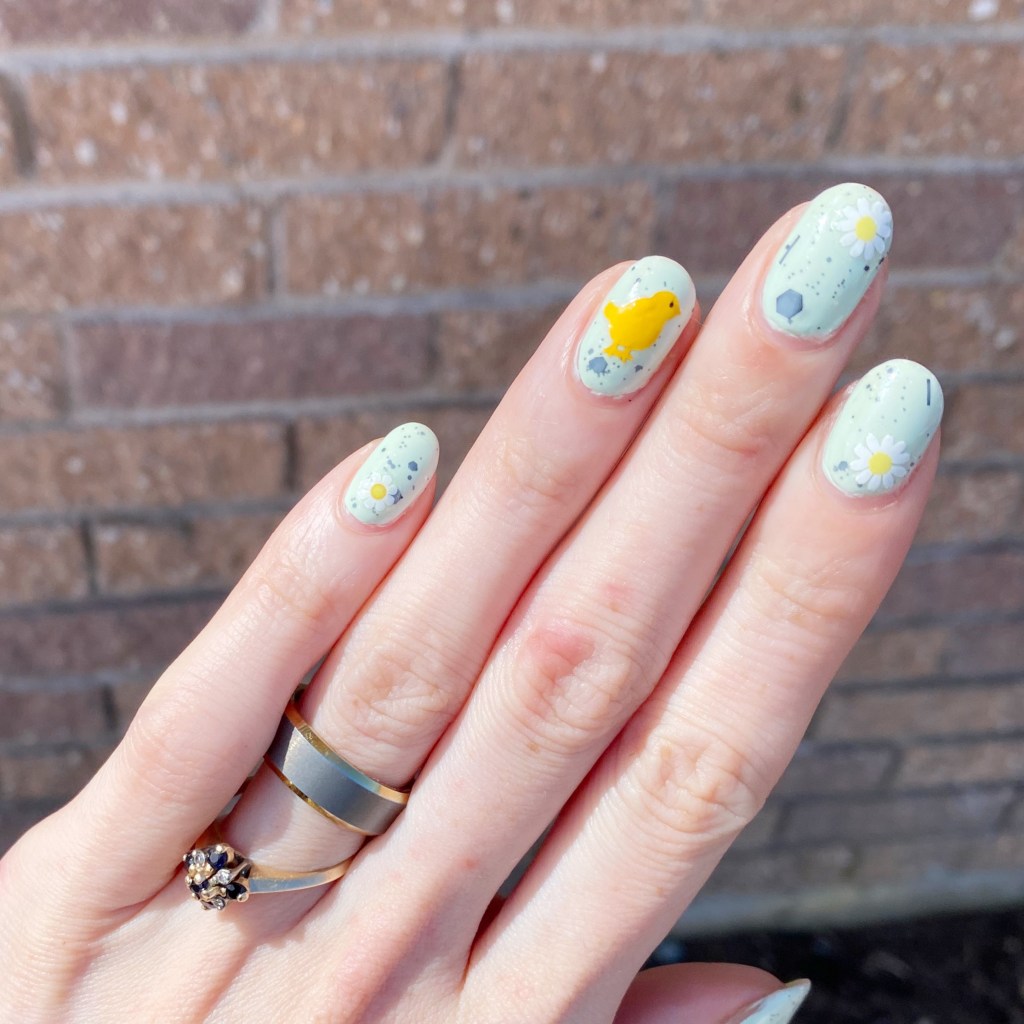
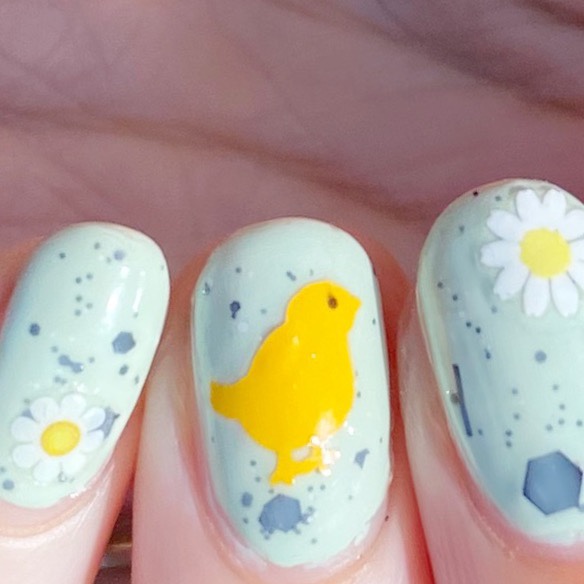
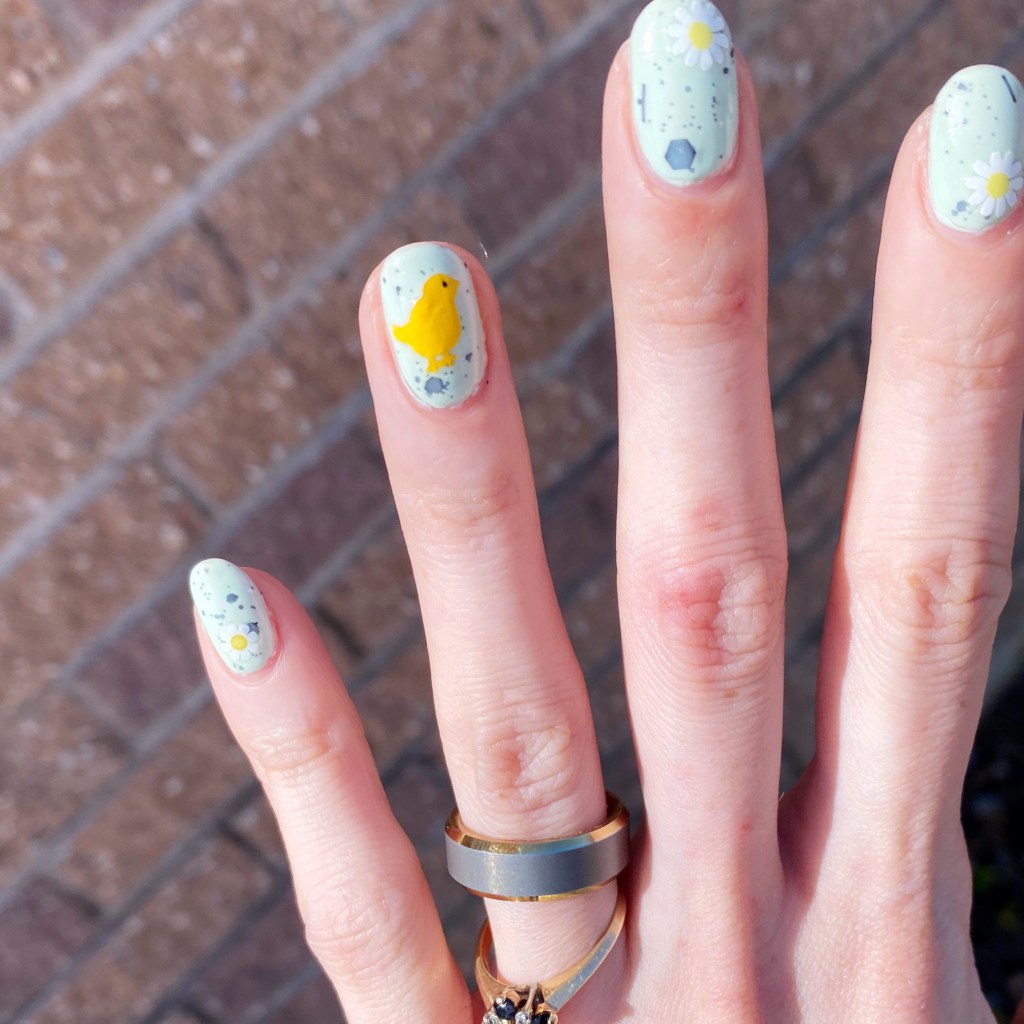
It’s also the second prompt of Glam Nails Challenge April! & we’re keeping with our Easter trend with Easter Chicks! 🐥
Now when I think of Easter chicks, my mind immediately goes to Peeps — you know, those squishy marshmallow chicks that I feel like are a VERY controversial Easter candy. But since I wasn’t confident in my ability to freehand some peeps, I decided to go with these cute chick Easter decals I got a few years ago.
The polishes I used for this manicure are:
Base Coat: Essie Hard To Resist Glow & Shine
Top Coat: Seche Vite Fast Dry Top Coat
Essence Blow My Mint (Bloom Me Up Collection)
Formula X for Sephora Chaotic
Essence Nail Art Pastel Ombré
Chick nail art decals
Daisy nail art decals
How cute are these little chick decals & daisy nail art stickers? I added the little black dots for eyes myself. Definitely Spring/Easter vibes. & yes I’m not done with speckled nail vibes yet — maybe in a few days. Haha. But for right now, I’m just going to stare at cute speckled nails & obsess over them.
Also just have to do a cute shout out because today is my 9th Blog-aversary! I swear, I always forgot that it’s coming haha so once again I forgot to do a special blog post. But I still want to celebrate because an almost decade of anything is reason to celebrate.
So happy birthday Coffee & Nail Polish. 🎂
What do you think about this quick Easter Chicks nail art look? Would you wear this quick & easy nail art design? Let me know all your thoughts down in the comments below!