31 Day Nail Art Challenge — Day 11: Polka Dots!

I love polka dots.

Maybe it’s the girlie girl in me, but I’m all about the polka dots.

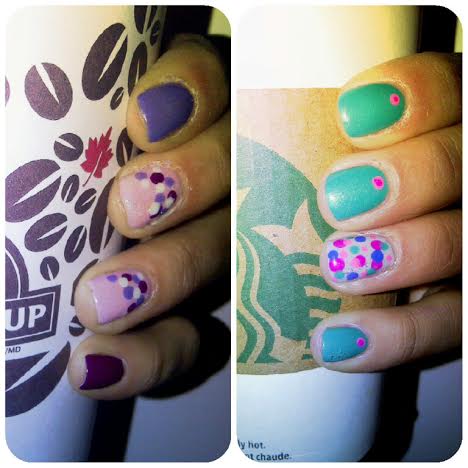
I actually ended up doing two polka dot manicures. I started one the day before, and my manicure idea ended up being cut short. Because I didn’t really feel like I gave Day 11 a fair shot, so I decided to the prompt over again. I figured I would feature both manicures, just because I do love the colors I used for attempt #1 (purple, yey!), and it wasn’t a BAD manicure, just a little simple.

allpolkadots

Dot nail art is a really easy way to spice up an otherwise bland manicure. I got my first dotting tool almost a year ago, and it was one of the best $3 purchases I ever made. Over the years, I’d tried doing polka dot manis with tooth picks, and bobby pins, but never found they would turn out how I wanted. However, buying a dotting tool changed all of that–I could finally attempt the manicures I never could before! Flowers! Roses! Leopard Print! And Polka dots.

purplepolkadots

The polishes I used for polka dot manicure #1 were:

  • Essie’s We’re in this Together — the pink base on my accent nails.
  • China Glaze Flying Dragon — dark purple thumb and pinky finger, and some polka dots.
  • China Glaze What a Pansy — lighter purple on index finger, and some polka dots.
  • OPI My Boyfriend Scales Walls — white dots.
  • Sally Hansen Diamond Flash Top Coat.

I did like this manicure, even if it wasn’t what I had intended to do when I started. However, even though it was fairly simple, I can’t help but love purple nails. Flying Dragon has to be one of my all time favorite polishes–I just wish it wouldn’t chip so bad at work (even with base coat, and regardless how many coats of top coat I apply.)


polkadots

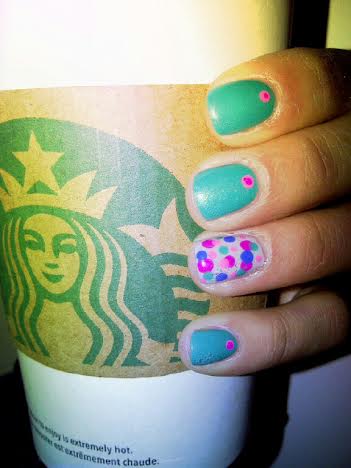
The polishes I used for polka dot manicure #2 were:

  • Mariposa nail polish mini — the teal (my base color), dark pink, and light pink polish (dots on accent finger.)
  • Maybelline Color Show Nail Lacquer in Audacious Asphalt — base color of my accent finger.
  • Sally Hansen Xtreme Wear in Pacific Blue — polka dots on accent finger.
  • Sally Hansen Diamond Flash Top Coat.

I tried to go somewhere different with this second manicure. I grabbed the most spring-like colors I could find and just started dotting. I also put some dots on the base of each of my non-accent fingers. I’ve been seeing that look around a bit from different nail bloggers, so I wanted to give it a try. I’m not sure if I like the color combinations I chose, but besides that I like the look of the single dot. It’s almost like a jewel resting on your nail.

Also how gorgeous is that teal color!? It’s from one of the mini sets my roommate gave me for Christmas. None of the polishes have names, but it has a really awesome formula that makes painting your nails so easy.

So which manicure do you like better–the more simple purple dotticure, or the bright and colorful and crazy dotticure?

31 Day Nail Art Challenge — Day 10: Gradient nails.

So you’ll recognize the base of my gradient from my swatch post of Rimmel Salon Pro in Reggae Splash.

I’ve just started doing gradients in the last little while. I got discouraged because I’ve never been the best at getting my colors to blend the way that I want. But I’ve been working on getting better at the technique, and my blend between colors seems to be getting more seamless.

gradient

gradient3

gradient2

The polishes used were:

  • Rimmel Salon Pro in Reggae Splash — my lighter peach base color.
  • Relvon Nail Enamel in Siren — the darker orange gradient.
  • Layla Soft Touch Collection in Golden Touch — gold polish layered on accent nails.
  • Sally Hansen Diamond Flash top coat.

Not only am I really impressed with how my gradient turned out, but the colors totally remind me of a sunset–especially with the added gold on my accent nails. I thought about adding the gold to all the nails, but the boyfriend told me I should just leave it as accent nails. (He may, or may not, have just said it so I would come to bed haha.)

These were the perfect burst of color on what was a dreadful, grey day. It may have been raining like heck outside, but I just had to look at my nails and I was instantly somewhere warm and sunny. It makes me even more excited for what will (hopefully) be a gorgeous summer, full of bright colorful manis! Plus I love wearing orange–it brings out my Olive under tones, and instantly makes me look SO tanned.

So what’s your technique for getting gradients just right? I’m always looking for tips and tricks, so I’d appreciate any wisdom the internet has to offer.


31 Day Nail Art Challenge — Day 9: Rainbow nails.

I’ll start by saying this nail art was inspired by my three year old nephew.

I was babysitting the other night, trying to decide what I was going to do for my rainbow nail art challenge. I thought about doing just rainbows, but as you might have noticed, I don’t always going typical with my challenge prompts. My little nephew was looking at my stash the other night–he is adorable when it comes to my nails. He always asks to look at my nails, and is very vocal when he doesn’t like them haha–and asked him what colors I should do on my nails. And he listed them off–blue, yellow, pink, red, green. He might have just been listing off the colors he knew, but never the less I did what he told me!

rainbow nails

The polishes used were:

  • OPI’s My Boyfriend Scales Walls — the white base.
  • Sally Hansen Xtreme Wear in Mellow Yellow— the yellow.
  • ACO by Ardene in Techno Green — the green
  • ACO by Ardene in Lagoon –the blue
  • ACO by Ardene in Sunkissed –the orange.
  • ACO by Ardene in Strawberry Blush — the red
  • ACO by Ardene in Ardene’s Secret — the pink.
  • Stripe Rite striping brush in Black — the black outline.
  • Sally Hansen Diamond Flash top coat.

I love these nails because it looks like a coloring book to me.

This manicure was not as difficult as you’d think. After applying my base coat, I started with a blank canvas of My Boyfriend Scales Walls, then added top coat. After that had dried, I started with my black striping polish, creating a different pattern on each nail (you could also do the same pattern on each nail, but I like to shake things up a bit.

mosaic

After my outline was created, I then went with a small nail art brush (from Icing), and colored in some of the shapes with my variety of chosen colors. I did have to go back with my black, and touch up some of the lines were the colors had bled a little bit. When that was all finished, I topped with my trusty top coat and tada! Rainbow coloring book nails!

I think my nephew would be proud.


31 Day Nail Art Challenge — Day 5: Blue Nails.

My whole goal for starting this challenge was that I wanted to be able to branch out of my typical nail art go-to, and try new techniques I never have before. The truth is, I’m a bit of a perfectionist–I get scared doing things I’ve never done before because I don’t want to fail at it. The unfortunate part of that is that I miss out on some awesome manicures because I’m too fearful they won’t turn out.

I’ve always wanted to try a ruffian manicure. I love the look of half moon manicures, and this is similar except you leave a sliver of color near the cuticle. This is a good tutorial for how to do it. For mine, I went with blues as that was the prompt for that day. They’re not perfect, but I’m okay with that. With a little more practice, I could see this as an easy nail art option on those nights when I just don’t feel like doing a full mani.

bluenails

The Polishes used for this manicure were:

  • Sally Hansen Sugar Shimmer in Sugar Cloud –the light blue shimmer base. (I had to layer it over another light blue polish just because of the fact it was so sheer, it would have taken way too many coats to make it opaque.)
  • ACO by Ardene in Lagoon –the top color of my ruffian.
  • Stripe Rite Striping polish in black — the outline of my ruffian.
  • Sally Hansen Diamond Flash top coat.

Sorry for the dryness near my cuticles. Unfortunately, the extremely spaztastic weather of Nova Scotia is killing them, even with a ton of moisturizing and cuticle cream. I can’t wait for warmer days. My cuticles will be very happy.

Also featured: another Soy Latte from Second Cup. My coffee addition is only second to my nail polish addiction, and I don’t think I could live without either!

31 Day Nail Art Challenge — Day 4: Green Nails.

I own a lot of green nail polish.

For some reason, I always seem to be drawn to either orange colors, or green colors, when browsing nail polish. So it means my stash has an abundance of these two colors even though–when it comes to green at least–I don’t wear it as a straight manicure often. When it came to the green prompt for the challenge, I couldn’t figure out what I should do! With St. Patrick’s Day over, I needed to come out with something that wouldn’t look like I was a couple weeks late.

So I grabbed my favorite green (which happens to actually be a LA Girl sand blast polish I got on an amazing clearance sale last summer) and tried to think of something pretty. I’m kind of in love with chevrons. I wish I could do them freehand near my cuticles, but I find I can only draw them nicely on my nail tips. I do love how these turned out–my freehand line drawing seems to be getting smoother which makes me a very happy girl! Even my roommate’s boyfriend commented on these, asking “Did you do those yourself!” I actually left them on for almost three days, just because I couldn’t stop looking at them.

greennails

The polishes I used were:

  • LA Girl Sand Blast polish in Green Island — my green base.
  • Stripe Rite striping polish in white.
  • Stripe Rite striping polish in black.
  • Sally Hansen Diamond Flash top coat.

Also featured: my favorite soy latte from Second Cup. I’m a Canadian girl, so I love me some Second Cup. Plus, the baristas at the one by where I work are just the friendliest. My boyfriend thinks I should get a job there, if only because I’m there pretty much everyday and with my love of coffee, it would be easy to sell it to others.