Bright and Colorful nails!

I have a fun manicure to share with you today.

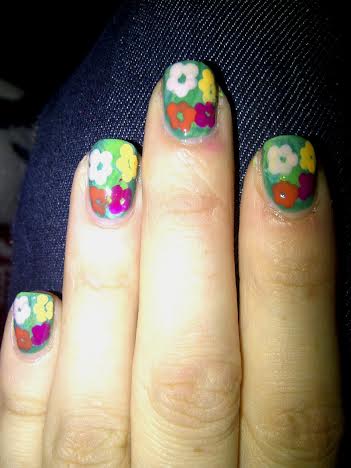
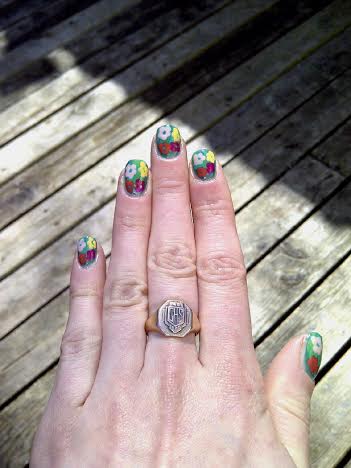
With the Summer quickly approaching, I’ve been feeling the bright colorful polishes lately, and I really wanted to do a color blocking manicure. I came up with this random pattern while I was painting my nails–I started with the triangles, and then went from there. I’m not sure what to actually call this pattern, but they’re bright and colorful which was what I wanted.

four

five

one

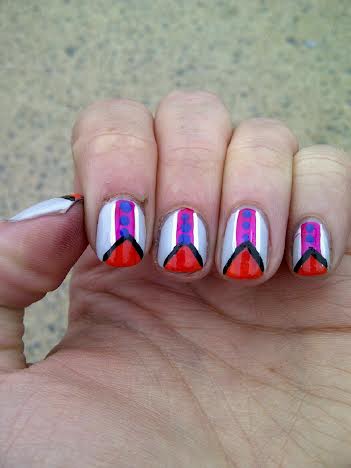
For this manicure the polishes I used were:

  • Essence I’ve Got a Crush on Blue! (from their love letters collection) — blue grey base color.
  • Revlon Siren — orange triangles.
  • ACO by Ardene Lollipop Queen — Pink stripes.
  • ACO by Ardene Lagoon — blue polka dots.
  • Stripe Rite Striping Polish in back
  • Stripe Rite Striping Polish in white

Even though I had no plan going in with this manicure, I love how they turned out. Sometimes it’s nice to just start something, without knowing what you’re doing, and have them turn into something neat. Also I managed to create those triangles with just my regular polish brush (before I added the black stripe outline). Sure, they’re not exactly perfect but they ARE triangles, so I couldn’t be happier! =)

Nail Art Fail.

The other night, I painted my nails with an old favorite — Hard Candy’s Piece of Papaya.

2

1

Such a pretty polish, and so sparkly. Since we’re finally getting Spring now in Nova Scotia, I’ve been embracing the sunshine with polishes that shine better in it.

I painted these before bed. When I woke up in the morning I had an idea for some cool nail art. Unfortunately, I decided to paint them about ten minutes before I had to leave for work. It was a bad idea. I should have just left my nails as they were because–even with my quick dry top coat, and drying drops–I didn’t have enough time for them to dry before I had to leave. And that’s where the nail art fail happened.

3

This picture is from right after I painted them. I used Revlon’s I’m Electro for the Blue, and Quo by Orly in Purple Passion (which I got from my boyfriend in the Quo by Orly Holiday Mini pack.)

4

Hadn’t even left yet, and already bumped them and got dents. Also because I was short on time I was just going to wait until I got to work for clean up. I didn’t even have time to take it off because I now had about two minutes before I had to leave. So I hoped for the best.

5

By the time I got to work they were just a full on hot mess. =( I had to go through my day with gashes like this in my nails & both my thumbs had half the polish just peel off. So depressing because I liked the color blocking look of them.

Have you ever had a major nail art fail? I think I’ve learned my lesson about painting my nails without adequate time for them to dry before I have to do anything. Now I know why I paint them before bed. =(

“You’re the boss, applesauce.” Andy Warhol inspired nails.

I’ve been all about the floral lately. I found these Andy Warhol inspired nails on Pinterest, and knew I had to recreate them. A few years ago, I was completely obsessed with everything Warhol related–I even had a pair of Levi’s from their Warhol collection. So I knew I had to create my own version of those flower nails.

Surprisingly, they were really easy to create.

andywarhol

First, I painted my nails with a base color of green. I used Sinful Colors Strapped. It’s a dark Forrest green, which dries to a Matte finish.

andywarhol2

Next, I created my “grass” using the dry brush technique with a collection of other green colors: ACO by Ardene in Sour Apple, ACO by Ardene in Green Peace and Sally Hansen Xtreme Wear in Kiwi Bikini.

andywarhol3

After my grass was complete, I created my floral using a medium sized dotting tool and my four colors: Essence Love Letter’s collection in Rosy in Love (light pink flowers), China Glaze in Metro Pollen-tin (yellow flowers), ACO by Ardene in Lollipop Queen (purple flowers), and Revlon in Siren (orange flowers).

andywarhol4

Finally, I finished off with a layer of Sally Hansen Diamond Flash (yey! I finally have a new bottle and am so happy) and tada! Andy Warhol inspired floral nail art.

andywarhol5

And in the sunshine. =)

andywarhol6

So what do you think of these Andy Warhol nails? Did I do justice to my original inspiration?

Spiderman… Spiderman… Nail Art!

So I don’t know if you knew this, but The Amazing Spiderman 2 comes out this weekend. I’m a total superhero girl–although I am more of a DC girl than Marvel. That being said, I wanted to mark my excitement over the new movie in the best way I know how–nail art.

webs

This manicure was inspired by the Nailasaurus, and her amazing Spiderman nails. For my version, however, I started with a gradient. I painted my nails first with Revlon’s Spidey Sense, which is from their limited edition The Amazing Spiderman 2 Electric Chrome collection. Then, using a make up sponge, I created a gradient with Super-Powered, also from the Electric Chrome collection.

gradient

Next, I went through with my Stripe Rite Striping Polish in Black, and created my web on each nail.

webs2 webs3

Tada! Amazing Spiderman nails. And probably the only time you will ever see anything related to Spiders on my nails… ever. I am not a big Spider fan, but for Spiderman I will make an exception. =) I topped it with a layer of Essence Gel-look top coat, followed by Essence Nail Art Express Dry drops, to speed up the process. They definitely seem to help with the drying process, thank god. No more sheet marks for this girl.

So what do you think of these Spiderman nails? Did I do justice to The Nailasaurus’ original design?

Who is your favorite Superhero? I think you can tell by my PJ pants who mine is. And one of these days I’m going to have to make an attempt at Batman nails too!

31 Day Nail Art Challenge — Day 20: Water Marble.

Okay, so I can’t water marble.

I can’t do it. I don’t know how people can create such beautiful water marble manicures, but I am not one of them. However, I didn’t want to not have anything to show for day 20–except a whole bunch of failure–so I looked up “water marble without water” in google, and what did it lead me to? A dry “water marble” technique. Score! So it’s not your typical water marbled nails, but it was something I could actually accomplish so I figured that was better than nothing!

(If you’re interested, I used this youtube tutorial by cutepolish.)

drywatermarble

The polishes I used for this manicure were:

  • Revlon polish in Minted–mint green polish.
  • China Glaze in What a Pansy!–purple polish.
  • OPI in My Boyfriend Scales Walls–white polish.
  • ACO by Ardene in Sea of Beauty–baby blue polish.
  • ACO by Ardene in Kiss from a Rose–pink polish.
  • Sally Hansen Diamond Flash Top Coat.

Even though I couldn’t do a proper water marble, I LOVE these. They spring color combination pops on the nail, and I just love the swirls. Even though I only did it on two accent nails for this manicure, I think it would love amazing all on my nails, and I will definitely be trying it again so I can play with it more (and with more color combinations).


Also, I’ve been thinking about this challenge, and I have to admit I’ve started to feel a little confined by it. I started it so I would have inspiration, but lately I feel like it’s restricting the manicures I want to do. There is SO much inspiration out there, and so many manicures I really want to try! I still want to finish the challenge, and not be a quitter, but I think I will be spreading it out with some other manicure ideas. Especially as my brand new dotting tool set just arrived, and I’ve yet to be able to really play with it, and it’s begging me to do some awesome floral nail art!