31 Day Nail Art Challenge — Day 15: Delicate Print

Easter kind of slowed me down on the nail art challenge. But I’m back at it and making sure I keep going, and don’t give up even though I’m finding my nail art skills being a little more tested with each new design.

For Day 15, the prompt was a delicate print. I had to kind of rack my brain on what I was going to do. In the end, I decided on a lace-like print. When I started, I wasn’t sure what to do but I just kept going until my nails resembled something of a lace print, even though I’ve never tried to do a lace print before.

delicateprint

The polishes I used for this manicure were:

  • Bourjois Paris Nail Polish in 1995 Grains de beauté –pale pink base of my nails.
  • Stripe Rite Striping Brush in white — The design near my nail tips, and the polka dot design.
  • Sally Hansen Diamond Flash top coat.

I really like how these turned out. They are very girlie. Also the pale pink color is perfect for spring! My mother gave me a collection of these Bourjois polishes for my birthday, all in pink, and the colors are so beautiful.

31 Day Nail Art Challenge — Day 14: Floral.

floralnailart

A few weeks ago, I picked up the new OPI sheer tints minis that have been floating around on nail art blogs. I was super excited when I found them, and so there was no question I needed them. The only thing I wasn’t sure was what I should use them for! After some serious consideration I realized they would be perfect for a water-color floral print for day 14 of the challenge.

floral

floral2

floral3

For this manicure, the polishes that I used were:

  • Revlon Nail Polish in Minted — the mint green polish on my thumb, pointed and middle finger.
  • China Glaze’s White on White — white base color on my ring and pinky finger, and dots on my mint base color on other fingers.
  • OPI Sheer Tints in Be Magentale With Me — pink-ish colored flowers.
  • OPI Sheer Tints in I Can Teal you Like Me — blue-ish colored flowers.
  • OPI Sheer Tints in Don’t Violet Me Down — Purple-ish colored flowers.
  • Sally Hansen Diamond Flash Top Coat.

These turned out so perfect. The OPI sheer tints are a little weird to work with, because they dry quickly on the nail art brush. I also found myself having to grab more polish more often than when drawing with regular polish. However the outcome is gorgeous. I’m such a fan of floral print in general, and this manicure just screams spring to me. It makes me want to wear pretty floral dresses, and flats, and not have to worry about freezing to death. Hopefully the weather starts to agree soon. Summer is my favorite season, and I’ve been longing to break out my maxi dresses again. Every time I walk past my closet I see them hanging there… and I just want to wear them SO bad.

So what’s your favorite go-to nail art for Spring?


Happy Easter!

Taking another pause to share some Easter nail art. I wore these the other night for an Easter shindig we had. I really wanted to do something festive with my nails as I had taken my speckled egg polish off. Looking at them now I kind of wish I had done each one a little bit different, just to switch them up slightly, but I do think they turned out well (especially for something I’ve never tried to do before!)

bunnynails

The polishes I used for the manicure were:

  • Sally Hansen Hard As Nails Xtreme wear in Twisted Pink — Pink base on thumb, and pinky. Inside of the bunny ears and nose.
  • Essence’s Dive with Me to the Island (from the Ticket to Paradise  collection) — Turquoise base on pointer, middle and ring fingers. It showed up more green on the finger, but it is more turquoise in the bottle.
  • Stripe Rite Striping Polish in White & China Glaze White on White — Bunnies.
  • Flaunt Beauty in Jet Black — The eye’s of the bunnies.

Hope your Easter is going well, and involves lots of chocolate (if you’re into that kind of thing) and time spent with your family. I’m looking forward to an Easter Egg hunt at my parent’s house, and competing with my nephew on who can get the most eggs!

The 31 Day Challenge –Day 12: Stripes.

I have to say I’m actually pretty impressed with myself, and the fact I’ve been able to keep this challenge going without giving up. It’s actually been so easy for nail art because I know what I have to do, it just means figuring out the details of how.

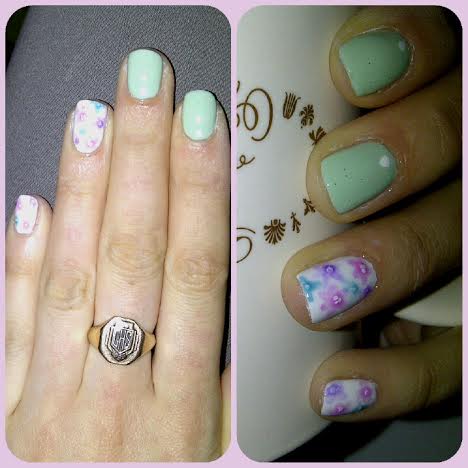
For Day 12, my prompt was stripes. I was inspired by this manicure I found on pinterest, a combination of stripes and flowers. Mine are a little different, obviously–and I’m still working on perfecting my roses. I can’t wait until the new nail art brushes arrive so I can do much smaller details. These are a little messy, but I still think they’re very pretty. And perfect for spring weather. The days are finally getting warmer, and so I will be wearing my darker manicure less often, and concentrating on spring colors.

stripes

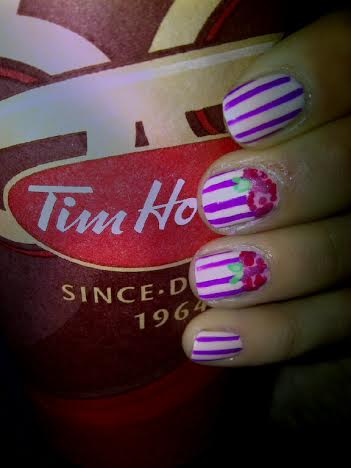
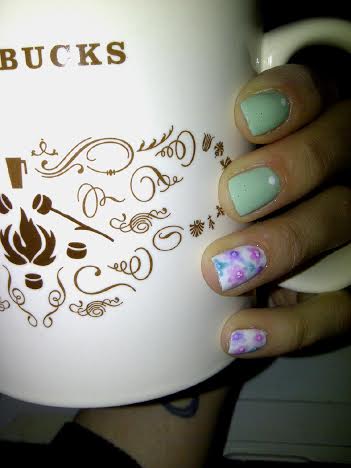
As you can see, I went with purple stripes instead of the black ones in the picture, and only concentrated on the flowers on a few accent nails (my thumb, middle, and ring finger). My flowers are definitely not perfect, but I think I just didn’t choose the right combination of colors–I started these pretty late the night previous, when I was already tired.

nailpolish

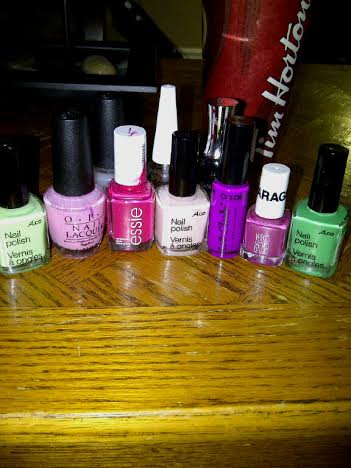
The polishes I used for this manicure were (from left to right):

  • ACO by Ardene in Sour Apple — light green polish in the middle of the leaves.
  • OPI’s Pinking of You — the light pink base of the roses (although they kind of got hidden by my other polishes).
  • Essie Watermelon — Accent dots of pink on the roses.
  • ACO by Ardene in Bridezilla — light ivory base of my nails.
  • Color Club Art Club striping polish in Paisley Paradise — stripes on my nails.
  • Garage Nail polish (No Name) — pink outline of my roses.
  • ACO by Ardene in Techno Green — darker green of my leaves.

All topped off with my favorite Sally Hansen Diamond Flash top coat (which you can see peeking out from the back row, behind my the Art Club striper.)

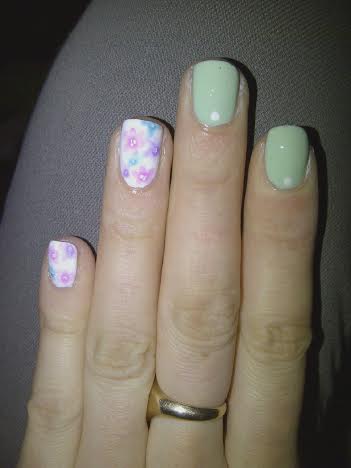
These are not my most impressive roses, but I think my stripes turned out awesome. I’m not very good at tape manicures, even with a lot of practice, so I rely on striping polishes to get them done! I’ve been working pretty hard on practicing my line work, and trying to get a steadier hand, and I really think it’s paying off. A year ago I would not have been able to draw such even lines on my nails!

Also I have to say how much I LOVE Bridezilla by ACO. I’ve been looking for a new off-white polish for wearing as a base, as I’m scared if I use my beloved My Boyfriend Scales Walls too much, it’s going to run out way quicker than I want. Bridezilla is somewhere between an off-white or cream, and a very very light nude, and I just adore it. The application was awesome (2 coats on most nails for opacity, with only one or two nails needing another coat thin coat for hiding some bald spots.) And it was the perfect base color for my stripes.

Also my best friend is getting married in August, and I’m not sure what nail art I’m going to be able to do, but Bridezilla could be a lovely color to wear just as is. (Our brides maid dresses are blue and cream stripes, and I’m pretty sure that is almost exactly the same color as the stripes on our dresses.)


So what do you think of this stripe and rose combination?


31 Day Nail Art Challenge — Day 11: Polka Dots!

I love polka dots.

Maybe it’s the girlie girl in me, but I’m all about the polka dots.

I actually ended up doing two polka dot manicures. I started one the day before, and my manicure idea ended up being cut short. Because I didn’t really feel like I gave Day 11 a fair shot, so I decided to the prompt over again. I figured I would feature both manicures, just because I do love the colors I used for attempt #1 (purple, yey!), and it wasn’t a BAD manicure, just a little simple.

allpolkadots

Dot nail art is a really easy way to spice up an otherwise bland manicure. I got my first dotting tool almost a year ago, and it was one of the best $3 purchases I ever made. Over the years, I’d tried doing polka dot manis with tooth picks, and bobby pins, but never found they would turn out how I wanted. However, buying a dotting tool changed all of that–I could finally attempt the manicures I never could before! Flowers! Roses! Leopard Print! And Polka dots.

purplepolkadots

The polishes I used for polka dot manicure #1 were:

  • Essie’s We’re in this Together — the pink base on my accent nails.
  • China Glaze Flying Dragon — dark purple thumb and pinky finger, and some polka dots.
  • China Glaze What a Pansy — lighter purple on index finger, and some polka dots.
  • OPI My Boyfriend Scales Walls — white dots.
  • Sally Hansen Diamond Flash Top Coat.

I did like this manicure, even if it wasn’t what I had intended to do when I started. However, even though it was fairly simple, I can’t help but love purple nails. Flying Dragon has to be one of my all time favorite polishes–I just wish it wouldn’t chip so bad at work (even with base coat, and regardless how many coats of top coat I apply.)


polkadots

The polishes I used for polka dot manicure #2 were:

  • Mariposa nail polish mini — the teal (my base color), dark pink, and light pink polish (dots on accent finger.)
  • Maybelline Color Show Nail Lacquer in Audacious Asphalt — base color of my accent finger.
  • Sally Hansen Xtreme Wear in Pacific Blue — polka dots on accent finger.
  • Sally Hansen Diamond Flash Top Coat.

I tried to go somewhere different with this second manicure. I grabbed the most spring-like colors I could find and just started dotting. I also put some dots on the base of each of my non-accent fingers. I’ve been seeing that look around a bit from different nail bloggers, so I wanted to give it a try. I’m not sure if I like the color combinations I chose, but besides that I like the look of the single dot. It’s almost like a jewel resting on your nail.

Also how gorgeous is that teal color!? It’s from one of the mini sets my roommate gave me for Christmas. None of the polishes have names, but it has a really awesome formula that makes painting your nails so easy.

So which manicure do you like better–the more simple purple dotticure, or the bright and colorful and crazy dotticure?