A Perfect Combo — Icing Love Boat and Layla Bubbly Effect Black Forrest.

IMG-20140914-02442_1410699871581_n


Today I’m showing of a NOTD featuring Icing Love Boat and Layla Bubbly Effect Nail Polish in Black Forrest. Love Boat is a red quick sand polish from my latest Icing haul. They had all their clearance on for an extra 50% off which means I picked up six gorgeous polishes–including Love Boat here–for just $1 a piece! How can you go wrong with that?!


IMG-20140914-02441_1410700022991_n

IMG-20140914-02440_1410699975031_n

These nails are feeling very Halloween-y to me, even though we’re about a month and a half early on that. I was already rocking Love Boat, and wanted to jazz up my manicure a little bit somehow. I haven’t worn Black Forrest since last year when I first picked it up on clearance at Lawton’s for an awesome $2 (can you tell I like a deal?) and I thought it would look awesome over the rich and sparkly red of Love Boat. It certainly does! And it’s definitely a combination I’m going to have to tie into my Halloween manicures next month. =)

Dark and Metallic Sponge Manicure.


IMG-20140910-02373_1410774249378_n

Oh man, I wish I had better pictures of this NOTD to share with you, but unfortunately I took these while at work in the late afternoon, so the beautifulness of this manicure was kind of lost. (Side note–I just got a brand new phone with an awesome camera so expect upcoming posts to have MUCH better picture quality.) However, regardless of the lack of pretty pictures, I still had to share this gorgeous manicure because I was super in love with the outcome.


The polishes I used for this manicure were:

  • Mary Kay Blue Knight (base color)
  • ACO by Ardene Golden Luxury (middle finger & sponging)
  • Layla Soft Touch Golden Touch (middle finger)
  • Essence Color and Go Mister Rusty (sponging)
  • Claire’s Poison Apple (sponging)
  • Claire’s Venomous (sponging)
  • Claire’s Evil Queen (sponging)
  • Nutra Nail Quick Dry Top Coat.


IMG-20140910-02367_1410774087978_n

IMG-20140910-02368_1410774148441_n

Oh man, this manicure just was perfect for fall. I wanted something reminiscent of the color changing of the leaves, and I think I succeed with this multicolored metallic sponge manicure. Even one of my co-workers noticed how cool my nails looked, and commented on how neat it looked, which always makes me feel good about my nails. =) Next time I wanted to try this with a super dark green Essence polish I picked up not too long ago–I think it will look even more perfect for the fall weather.


So what do you think of this manicure?

Swatch Post: Layla Thermo Effect Polish N. 4

laylathermo3


Today’s post is a polish I am so excited about. As I’ve mentioned before, I absolutely LOVE thermal effect polishes, ever since my days working at Claire’s when they released their Mood Changing Polishes. So when I saw a post about the new Layla Thermo Effect Nail polishes by Sparkled Beauty (who is a local Halifax beauty blogger) I knew I had to track down these polishes at Lawtons. Two stores later, I found the display of these beauties. Sadly, there were only a couple colors left. =( I went with No. 4 which is described as a Dark to Light pink.

laylathermo

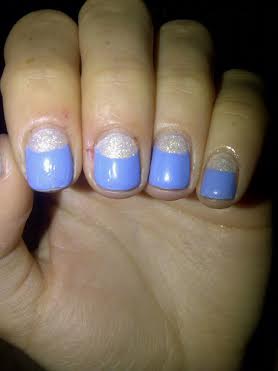
When cold, the polish is a dark pink (almost light plum) color. It’s not a creme polish,  but rather scattered with an almost frosty shimmer. I was nervous at first when I saw this, as I know sometimes frosty polishes can leave brush strokes like crazy, but this one was pretty good at leveling out. I’m really digging the color of this polish while cool.

laylathermo4changing

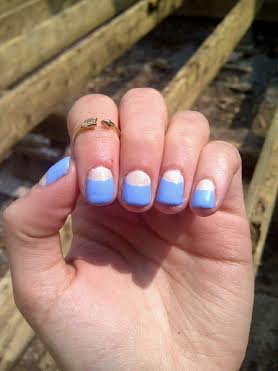
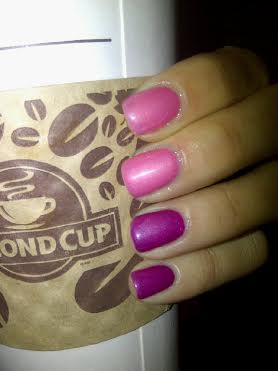
The polish mid-change (pointer and middle finger) and cold (ring and pinky finger). A lot of the time my nails would resemble my pointer and middle fingers here. Lighter pink down towards the cuticle, to darker purple towards the end of the nail. It’s like having a gradient on your nails, without any of the work!

laylathermo2cold

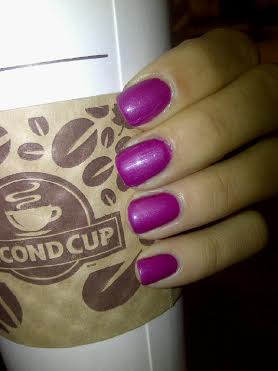
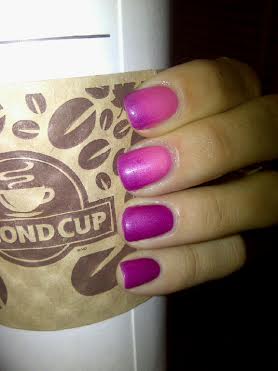
And finally, the polish while hot (pointer and middle fingers). The change between the warm and cold is awesome! You can really see a difference between the two, which I like. The day I wore this polish it was raining, so every time I went outside and my nails were warm, I would have these cool drops of purple on my nails from where the cold rain had hit them. I like how easily this polish can change from temperature. (I wish I had gotten pictures!)

The application of this polish wasn’t too bad. The polish is sheer, but thick at the same time–it was actually kind of strange. It took three coats to reach full opacity, and took a bit of time to dry (even with Seche Vite as my top coat.) When dry though, it lasted well. I wore these through a full, busy, day of work and ended up with very minimal tip wear.

I’m quite impressed with Layla’s Thermal Effect Polish, and I’m thinking I will have to go back to Lawton’s and pick up some more colors (depending on what is left).

Embracing my new shorties… and pretty half moons.

Oopsie.

Sorry for disappearing for a little while. After I posted my Keira Knightley inspired nails I had a nail tragedy breaking THREE nails super duper short (and, all on the same hand of course) so I was really disappointed. Curse working in retail… it ruins everything. =( But nails grow… so I’m trying my best to embrace my new super nubs while they grow out… which is hopefully quickly!


shorties

For this manicure, the polishes I used were:

  • ACO by Ardene Bridezilla
  • Layla Soft Touch Effect Golden Touch.
  • Sinful Colors Hip to be Square.
  • Essence Gel Look Top Coat.
  • Essie Good to Go Top Coat.

First off, Hip to be Square might be one of my favorite new polishes. It’s so pretty! It looks fairly sky blue in my pictures, but honestly it’s more of a cornflower blue in person, with a barely noticeable silver shimmer. (I love it so much!) I also think it might be very close to ACO by Ardene’s Sea of Beauty, so I’m going to have to do a comparison between the two.

Can you tell how much I love a half moon manicure. I especially love them with shorties, as I feel like the blocking of colors works to give the illusion of longer nails.

shorties2 shorties3

Also, I think I’ve found the perfect new top coat combination for my nail art. As you might remember, I was less than thrilled with my experiences with Essence Gel Look Top Coat the first go around, but top coating it with Essie’s Good to Go squashes the wait for it to dry. The one thing I was impressed with about Essence’s Top Coat was it’s durability and from the look of this manicure now three days later….

shorties4

Whoa! Color me impressed! This is my nail art on day three… with no major chips and just minimal tip wear on my index finger. Considering I worked all weekend, that’s a feat. Usually my nails look like this after day one.. and by day two major chips will start so even if I love a manicure I have to change it! I’ll have to test out this top coat combination a little bit more with a few more manicures, but I have a good feeling about it.

So how do you deal with big nail breaks? Any tips on helping my nails grow out without any more tragedy? I’m going to be doing a post later on my own little routine, but I was just wondering what everyone else does… unless I’m the only one who has this kind of awful luck? In which case, tell me how you avoid big breaks because obviously, I need some advice!

A Peek into My Stash — Part Two.

Today I have for you the second part of my stash posts. After this, I’ll only have one more drawer of my five to photograph. Even though it’s been a bit of work taking pictures of everything, and writing them down, I’m really glad that I have. Now, whenever I’m feeling nail art, I’ll know exactly what polishes I have to work with!
And now onto the polishes…

Continue reading “A Peek into My Stash — Part Two.”