Drip Marble decals inspired by @SimplyNailogical 


I’ve tried water marbling, & it was… not my thing. I’ve tried drag marbling, & it’s usually hit or miss. But I really love marbled nails, so naturally when I picked up a silicone craft mat I knew I needed to try drip marbling recently done by @simplynailogical.


For this mani I used:

  • ORLY Decades of Dysfunction 
  • Sally Hansen Pretty Piggy
  • Nicole by OPI We Got Beiber Fever
  • Finger Paints Wanna Gogh Dance?
  • ACO by Ardene Base Coat
  • Cutex Quick Dry Top Coat

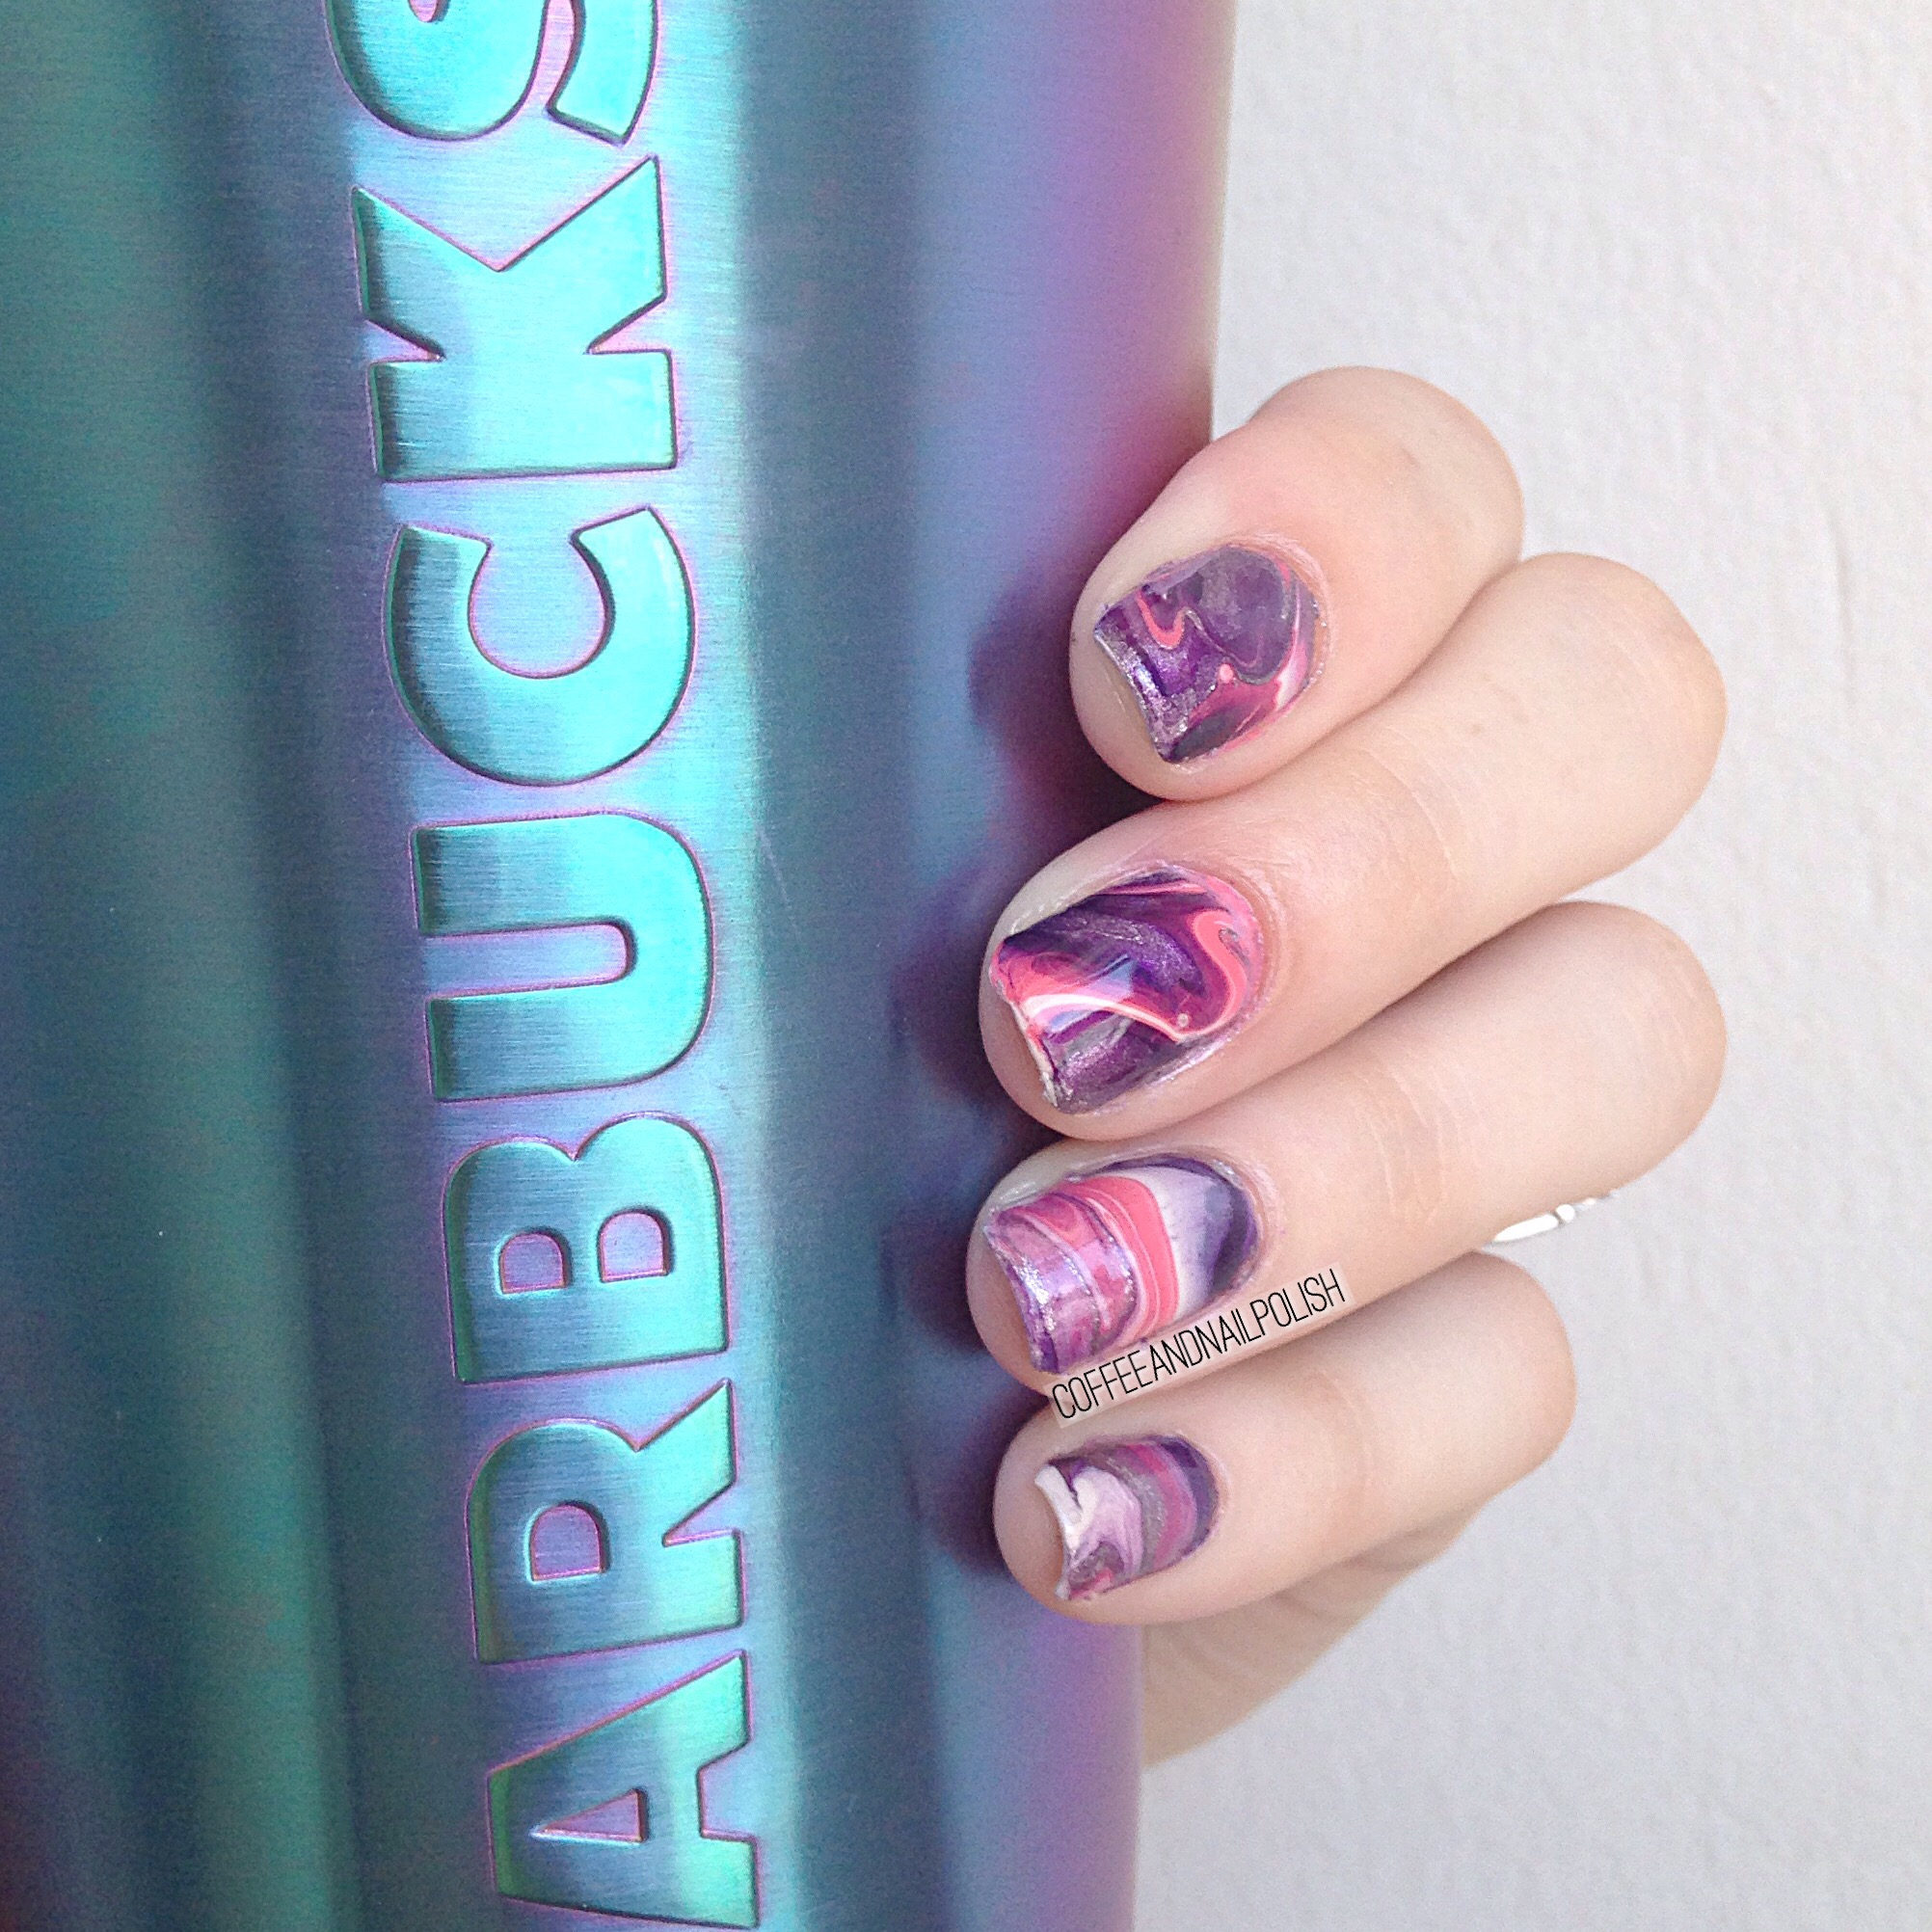
To create my decals, I started off by dropping my polished of choice onto the mat, starting with my lightest colour (ORLY Decades of Dysfunction) as my base, then continued with my darker colours, & finished with my metallic shade (Finger Paints Wanna Gogh Dance?). Once all my colours were down, I moved my mat around to create my marbled effect. Once I was happy with one decal, I’d let it sit & dry for a few minutes before starting on the next one. When I was happy with the amount of decals I’d made, I left them to Dry for a few hours (around 2 hours).

I’m not going to lie, trying to apply these wasn’t the easiest. I started off by painting my accent nails with a base colour (again I used ORLY Decades of Dysfunction) and let dry. I then peeled off my decal & figured out which part I wanted on my nail, trimming it down to a more manageable size. When I was ready, I applied a coat of my ACO by Ardene base coat & immediately stuck my decal onto the nail. Using a brush dipped in acetone, I cleaned up around the cuticle. This was probably the least fun part–I wish I had better nail art scissors to trim off the access instead! When the decal was fully cleaned up & my cuticles were clean I sealed everything in with top coat to finish. I also surrounded my cuticles in oil to help after all that remover. No one likes wrecked cuticles.

And how does the final result look?

Continue reading “Drip Marble decals inspired by @SimplyNailogical “

Happy 3rd Birthday Coffee & Nail Polish


Today is a very special day… it’s Coffee & Nail Polish’s 3rd blog birthday! 🎈 So in honour of the occasion, I decided to celebrate with a gluten-free cupcake & a recreation of one of my favourite early manicures–chevron tips.

Three years, how crazy is that?! When I first started my nail blogging adventure I was still learning about nail care, nail art & taking pictures. Back then I was still using my Blackberry for less than stellar pictures, & hadn’t yet learned the magic powers of cuticle oil. I was just a girl who liked painting her nails & decided to share pictures with the whole internet instead of just her Facebook friends. 3 years, a bit better phone, & countless bottles of cuticle oil later here we are! 11.2k followers on Instagram, featured in Nail It magazine 3 times, & the occasional chance to swatch & review polish brands I love. It’s been an awesome amazing journey.
I cannot even begin to explain how much it means to me that you out there read and follow this blog. So to anyone who had ever read this blog, commented on my posts, or decided to follow: thank you.  You helped make my nail art dreams come true. I used to joke that the goal was for someone to want to send me free nail polish. But honestly, having people love my designs enough to recreate them? That’s how I know I’ve made it. 💜

So enough mushy stuff! In honour of this special anniversary, I wanted to go back to the beginnings & recreate one of my favourite manicures from  the early days: Green Chevron Tips. This was my first foray into chevrons, way before my obsession with chevron moons exploded. I remember creating them (freehand!) & being so excited about how well they turned out. For my recreation, I obviously still had to free hand these… & still feeling pretty proud of how these turned out! 

For this manicure I used:

  • ORLY Gumdrop
  • Kiss Products Nail Art Striper in White
  • Kiss Products Nail Art Striper in Black
  • Cutex Quick Dry Top Coat

What do you think of my special recreation? Do you think it lived up to the original?  As always, let me know what you think in the comments below!

Thank you so much for 3 awesome years, & here is many more manicures to come! 💜

Spring Stripe Inspiration. 

Oh yes, I’m all about the Spring colours.

 I was looking to do a manicure different from my usual colour scheme, and I was inspired by a stuffed Giraffe belonging to my son that I yellow with blue and white striped feet. I thought the colours looked so lovely together, I wanted to recreate the look on my nails!

 It took me a couple tries to find the right shades, but I really like how well these colours compliment each other. If you threw an anchor into the mix, you would have a great nautical themed design! I also love how bright and Spring-y these are! It’s time to push the winter shades away, and embrace all things sunny and bright. 

For this manicure, I used:

  • China Glaze Sun Upon My Skin
  • OPI Angel With A Lead Foot
  • Essie Bikini So Teeny
  • Essie Gel Setter 
  • Born Pretty Store thick striping tape. 

What do you think of this mani? Funny the places you can find inspiration! This has kind of made me think about each week (or every couple weeks) doing a manicure inspired by something baby related! I’ve already got a few ideas brewing, so stay tuned. 

Red Cup inspired red nails. 

So here is what I topped Claire’s Red Carpet with from yesterday’s post! I’m sure you’ve come across one of the adorable cups from Starbucks red cup collection. As my husband and I are both avid Starbucks drinkers (incase you’ve never noticed before) I just had to recreate one of the designs on my nails. So I went with my favourite–the Christmas lights! 

The polishes used for this mani are:

  • Claire’s Red Carpet 
  • Sally Hansen I Love Nail Art pen in black. 
  • OPI I Cannoli Wear OPI
  • Essie Gel Setter. 
  • Small sized dotting tool. 


What do you think of this mani? My light bulbs turned out slightly wonky, but I feel like it channels the inspiration well enough! Plus there is nothing that says Christmas is coming (for the coffee addict at least) than when Starbucks brings out their red cups… and Gingerbread latte of course! 

31DC2016 Day 1-5

Happy Labour Day loves! 

 I decided for the month of September to take on the   31 Day Nail Art Challenge created by Chalkboard Nails. You might remember I made a stab at this challenge early in this blogs life, but never finished. So I decided that it was about time I gave it another go! Instead of blogging my manicures lately, I decided to break it down to groups of four manis to make it easier to post. You can however always check out my daily nail art posts on my Instagram

Day 1: Red Nails 


Products used for this mani: 

  • China Glaze Seduce Me
  • Fingers Paints Surreal Sunset 
  • My Nails Did nail vinyls 
  • Essie Gel Setter 

Day 2: Orange Nails


Products used for this mani:

  • Essie Haute As Hello
  • Essie Sunshine State of Mind
  • Essie Gel Setter 

Day 3: Yellow Nails 


Products used for this mani:

  • Cosmetics Arts unnamed grey 
  • China Glaze Metro Pollen-ton
  • China Glaze Sun Upon My Skin
  • OPI Good Greif 
  • Essie Gel Setter 
  • Bundle Monster dotting large and smaller dotting tool. 

Day 4: Green Nails 


Inspired by @ameliasaccount and @polishpeach

Products used for this mani: 

  • ORLY Decades of Dysfunction 
  • Sally Hansen I ♥️ Nail Art pen  in green. 
  • Sally Hansen Xtreme Wear in Kiwi Bikini. 
  • OPI Who You Callin’ Bossy?!
  • Essie Gel Setter. 
  • Small nail art brush from Bundle Monster. 

Day 5: Blue Nails 


The products I used for this mani:

  • Zoya Blu 
  • Revlon Plunge Pool 
  • Essie Gel Setter 
  • Born Pretty Store Clear Jelly Stamper 
  • Born Pretty stamping plate  
  • Born Pretty liquid nail tape. 

So what do you think of my manis so far for the 31 Day challenge? Are you currently participating? I’m definitely enjoying the challenge of coming up with new and different designs!