Halloween Glitter Gradient with Sally Hansen x Sour Patch Kids InstaDri

PR Sample/Gifted

Hello lovelies & happy Friday.

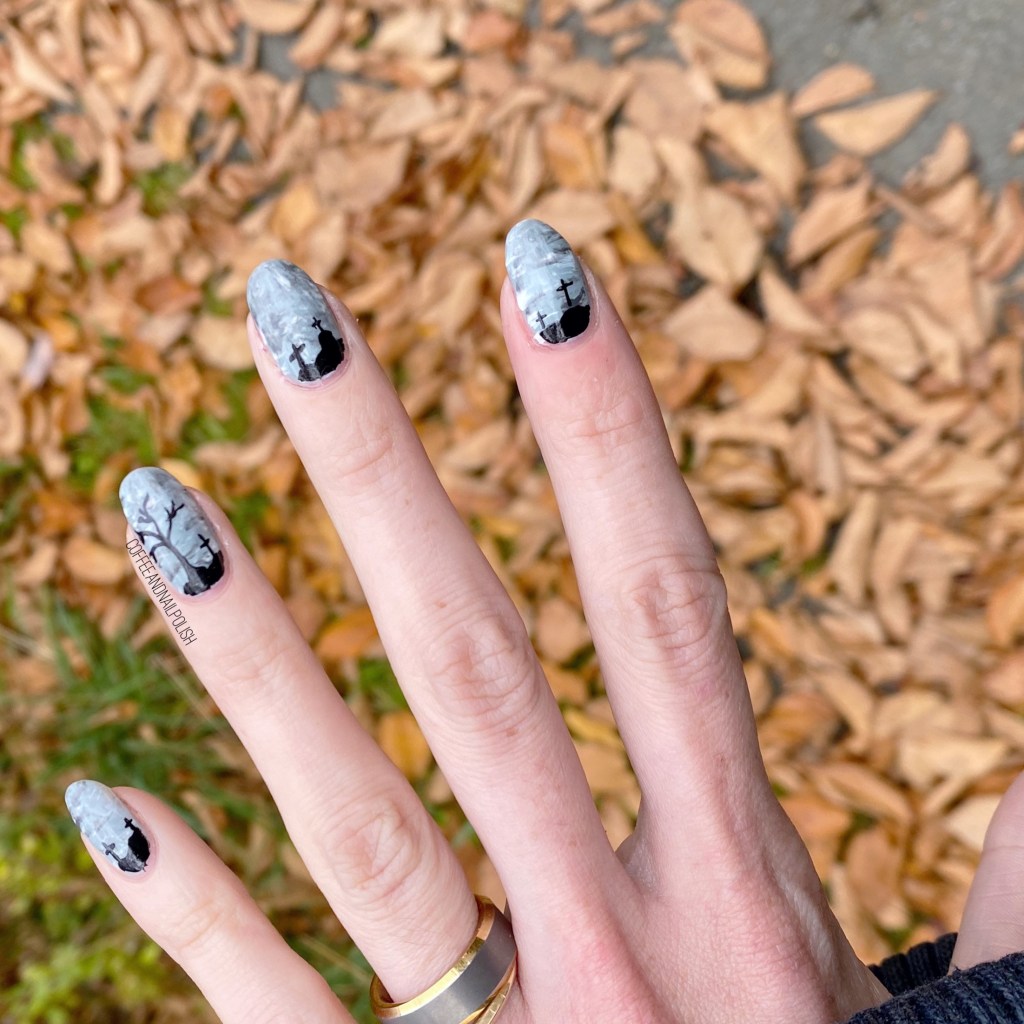
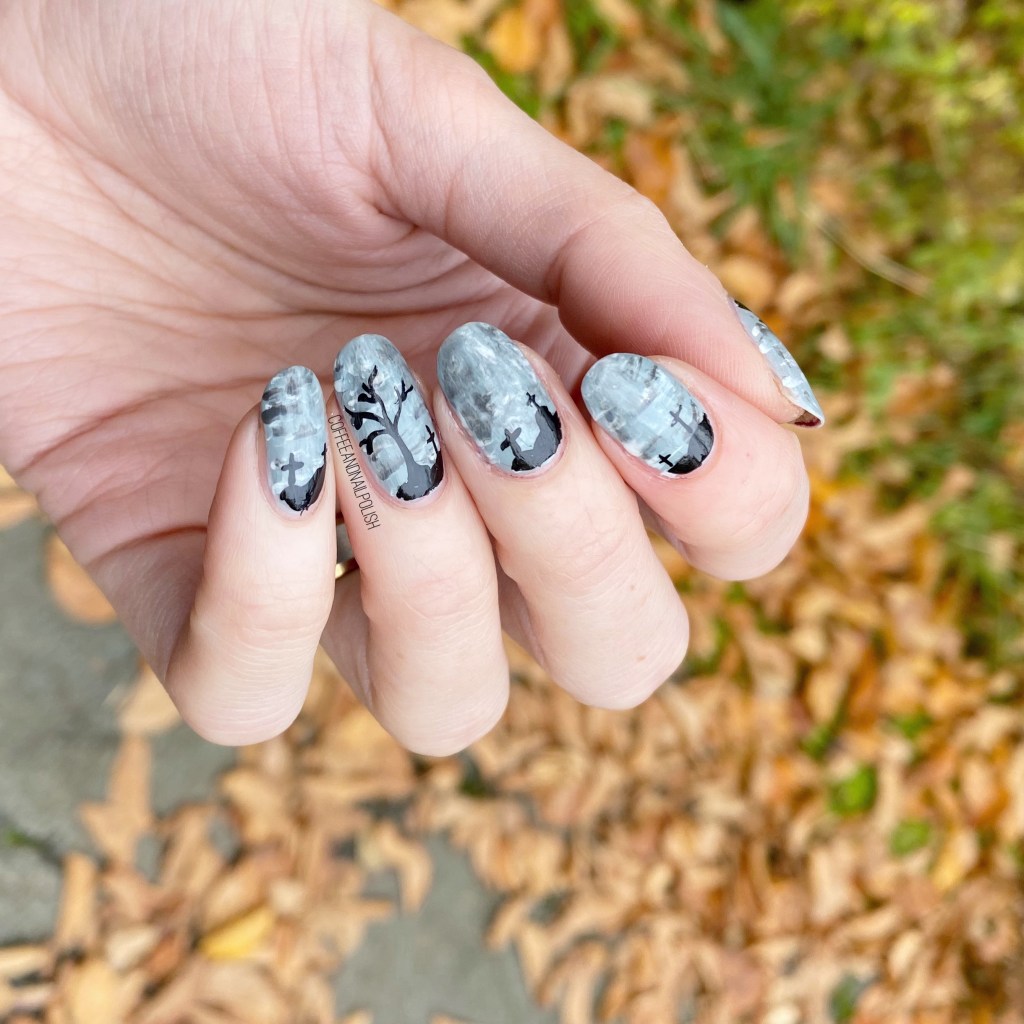
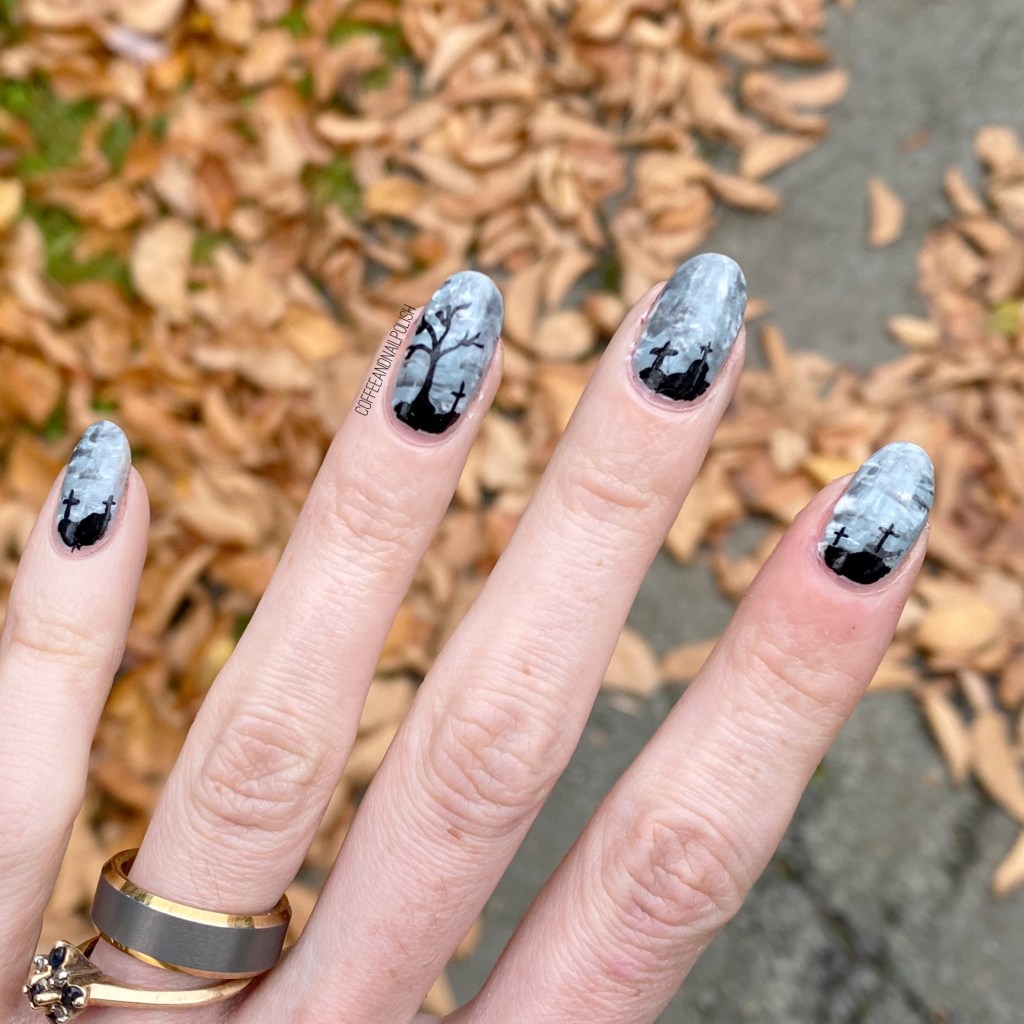
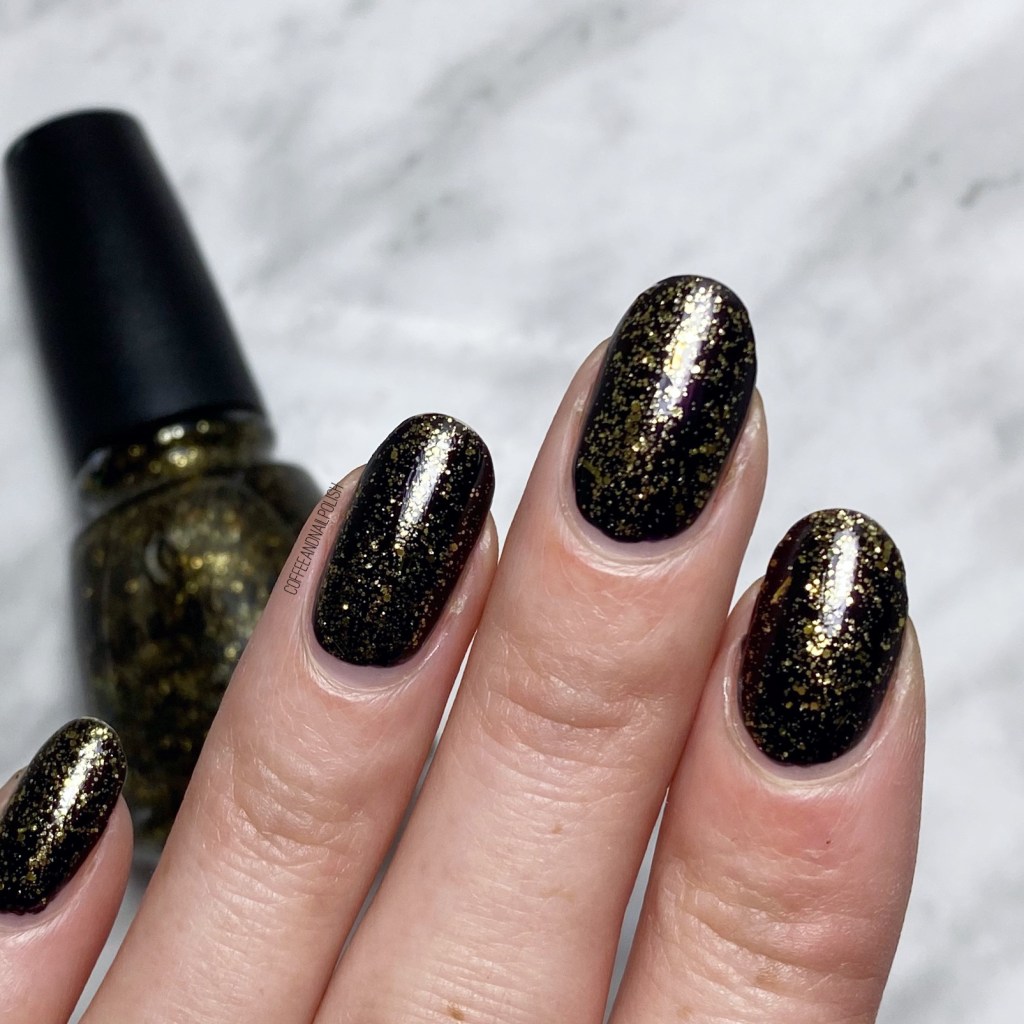
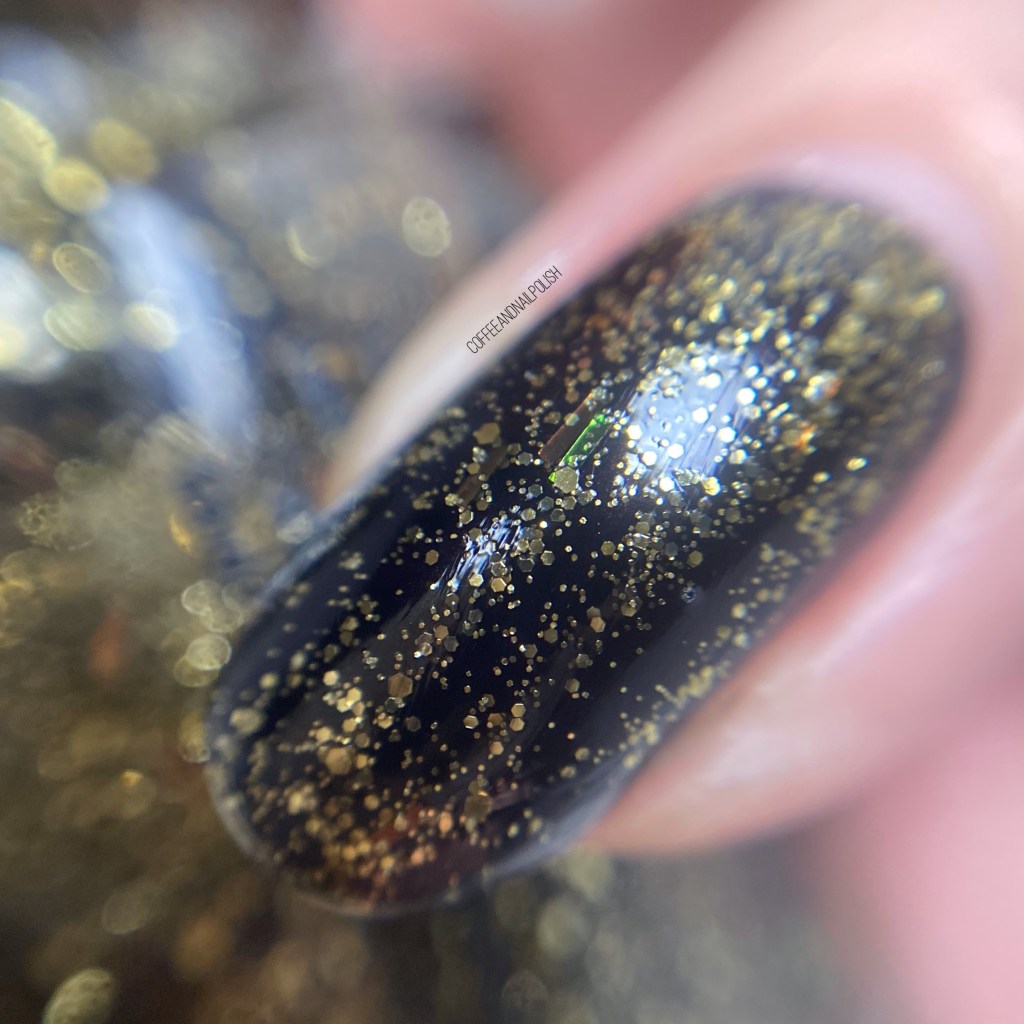
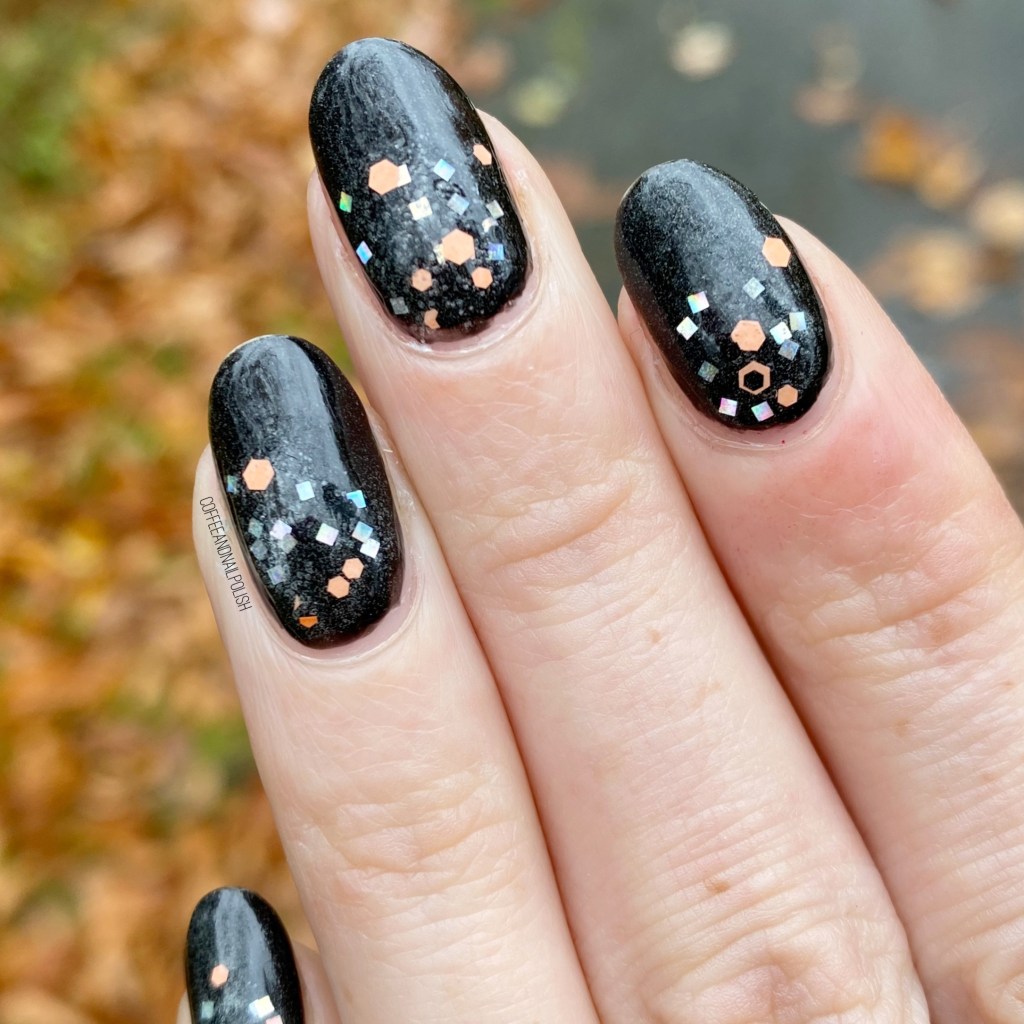
It’s officially 2 days until Halloween, & I’m super pumped. I’m really feeling the spooky Halloween spirit. & I just recently received the most amazing PR package from Sally Hansen this week featuring their amazing Sally Hansen x Sour Patch Kids InstaDri line (& about 2 pounds of Sour Patch Kids… my favourite sour candy!) I will have Swatches on Sunday, but I. The meantime I created this fun & witchy glitter gradient featuring a few of the shades.

The polishes I used for this manicure are: 

  • Base Coat: Essie First Base
  • Top Coat: Seche Vive
  • Sally Hansen InstaDri Ghouls Night Out
  • Sally Hansen InstaDri Hallo-Queen
  • Sally Hansen InstaDri Fab-BOO-lous
  • Latex Free Make Up Sponge

I know I already said it, but I absolutely love how witchy these feel. I will have full swatches coming soon, but this glitter topper — Hallo-Queen — is so pretty. I love the combination of the multi coloured black, orange & holo glitters. It makes for such a perfect gradient. I also used a bit of the glow-in-the-dark polish overtop, although I haven’t really had the time to test it out properly. It’ll be fun for Halloween night though!

What do you think about this witchy gradient? Is this a Halloween nail art look that you were the rock for the big night? Let me know down below all your thoughts on this combination!

Glam Nails Challenge October— Mummy

Good morning lovelies & happy Thursday! Yes… it’s Thursday already! & Halloween is only 3 days away.

Is everyone ready?

I don’t know about where you are, but stores around here are almost cleared out for Halloween & it’s like Christmas exploded in every store. But I’m still here for Halloween & have a few more Halloween looks to share! First up, the next prompt for GlamNailsChallenge October: Mummy.

The polishes I used for this manicure are: 

  • Base Coat: Essie First Base
  • Top Coat: Seche Vive
  • Sally Hansen CSM Off The Shoulder
  • Sally Hansen Miracle Gel Get Mod
  • Essence Dare It Nude
  • China Glaze The Snuggle is Real
  • OPI Chiffon My Mind
  • NailStuff.ca 7mm detail brush

Please excuse the cruddy lighting — it was a rainy miserable day when I was attempting to take these pictures. The joys of late October in Nova Scotia, haha.

For my mummy look, I wanted to go with a more subtle mummy look — like if an Egyptian princess was being mummified & wanted her nails to be featured. Haha. My look definitely ended up a bit more subtle than I had originally wanted, but that was a lot to do with my base shade. I feel like I might have wanted a bit more of a contrasting colour. But I’m still really happy with how they turned out.

What do you think about this “mummy” look? Can you believe that Halloween is almost here (& over!) What is your favourite Halloween candy? L

et me know in the comments below!

Glam Nails Challenge October— Spooky Sky

Hello lovelies & happy Tuesday!

Can you believe it is the last week of October already? Halloween is 5 days away! That’s just…. crazy. But today I have another fun prompt for GlamNailsChallengeOct: spooky sky.

I’ll admit — initially stumped me a bit on what I should do. Spooky sky is a prompt that could encapsulate so many different ideas, but I finally I decided on a grey toned sky, with some creepy trees & graves.

The polishes I used for this manicure are: 

  • Base Coat: Essie First Base
  • Top Coat: Seche Vive
  • Sally Hansen Miracle Gel Get Mod
  • Essence Rock My World
  • China Glaze Intelligence, Integrity & Courage
  • Starrily Vantablack
  • Fan Brush (I think mine is just a cheap one I bought from Icing years ago…)
  • NailStuff.ca 7mm detail brush

I really had this vision in my head of this decrepit tree against a spooky, grey toned sky — so that was the look I went for. I wanted something that you would see before the big killer was revealed in a horror film. & I think I managed to achieve what I was going for. I think my thumb turned out my favourite of all my nails too — between the layered polishes which really mimicked clouds, to the tree, it might be my favourite of all my nails.

& I got so many compliments on my nails at work, which always make me happy. Especially when people ask me where I got them done, or are shocked when I say I did them myself. That always makes me feel awesome!

What do you think about this look? Do these spooky sky nails gives you all the Halloween feels? Are you celebrating Halloween this year — a party, trick or treating, eating an entire box of Halloween bars to yourself? What are your Halloween plans… let me know down in the comments below!

& Stay tuned, because we have just two more prompts for GlamNailsChallengeOctober to come before this month is over!

SWATCH SUNDAY — China Glaze Bat My Eyes (Halloween 2013)

Hello lovelies & happy Sunday!

This is my first Swatch Sunday in a while — this month has been a bit crazy, & I let my swatches get away from me in favour of other nails. But I’m back, & I’m ready to share a fun Halloween polish from a few years ago — China Glaze Bat My Eyes from the 2013 Monster’s Ball collection.

This shade has been in my stash a very, very long time (I do believe my Mum gifted me if for my birthday in 2013) & I don’t think I’ve actually wore this polish more than once. So I was happy to break it out for today’s post!

1 coat over China Glaze Glamcore + top coat

I made the decision to too Bat My Eyes over a dark base to avoid a lot of coats of polish. The base is darkened, but I feel like I remember needing a few coats of polish last time I wore it, & I wasn’t really feeling this.

For one coat, though, the glitter is very densely distributed. You have multi-sized bronze-y hex glitters, with the occasional bar glitter.

You can really, really see all the different sizes of glitters in my macro shot, including the bar glitters.

I also really love the combination of the gold with the dark — it is a very nice Halloween-y type shades. But China Glaze has always done amazing Halloween shades, & I love this one held up all these years (my bottle of Howl You Doing? from the same collection sadly did not fair as well.)

What do you think about this Halloween shade? Would you wear Bat My Eyes for your next October manicure? What is your favourite Halloween polish? Let me know in the comments below!

Glam Nails Challenge October — Ghost 👻

Good morning lovelies & happy Wednesday!

We are officially half way through our week, & that means it’s time for another prompt for GlamNailsChallegeOctober! I’m really loving all these Halloween themed looks. This month is just such a fun month to get creative when it comes to your nails — & I’ve been loving all the looks I have shared so far.

Today’s prompt is: ghost! & I was especially excited for this prompt because I really wanted to try out the negative space peek-a-boo ghost design I’ve been seeing all over Instagram lately. I think its such a cute look, so I had to take a stab at my own version!

The polishes I used for this manicure are: 

  • Base Coat: Essie First Base
  • Top Coat: Seche Vive
  • Sally Hansen Complete Salon Manicure Blush Around the World
  • Sally Hansen Miracle Gel Get Mod
  • Starrily Vantablack
  • Sally Hansen CSM So Much Fawn
  • NailStuff.ca Dotting Tool Trio
  • NailStuff.ca 7mm detail brush

How cute did these little ghosties turn out? I love how adorable my little happy ghosts are. Like I said, I’ve been really loving seeing other versions of this design, & just had to give it my own try. Also, I feel like this is a really good look for someone who wants to try out some Halloween designs, but doesn’t want to go. to crazy.

This is definitely more of a subtle design, versus some of the Halloween designs I’ve done recently. You could even make your ghosts more subtle, if you want a Halloween nail art look that isn’t as obvious that it’s Halloween-y. This is also a super easy look to do for someone on the beginner side of nail art.

What do you think about this nail art look? Would you wear these little ghosts on your nails?

Let me know what you think about this design, & all the designs I’ve been sharing this month!