“You’re the boss, applesauce.” Andy Warhol inspired nails.

I’ve been all about the floral lately. I found these Andy Warhol inspired nails on Pinterest, and knew I had to recreate them. A few years ago, I was completely obsessed with everything Warhol related–I even had a pair of Levi’s from their Warhol collection. So I knew I had to create my own version of those flower nails.

Surprisingly, they were really easy to create.

andywarhol

First, I painted my nails with a base color of green. I used Sinful Colors Strapped. It’s a dark Forrest green, which dries to a Matte finish.

andywarhol2

Next, I created my “grass” using the dry brush technique with a collection of other green colors: ACO by Ardene in Sour Apple, ACO by Ardene in Green Peace and Sally Hansen Xtreme Wear in Kiwi Bikini.

andywarhol3

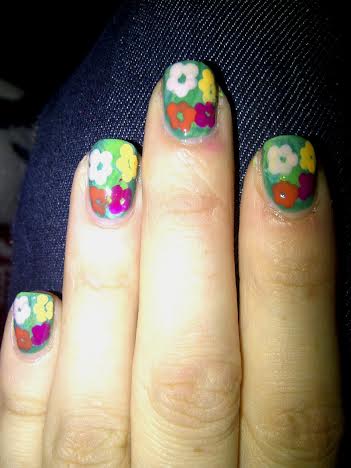
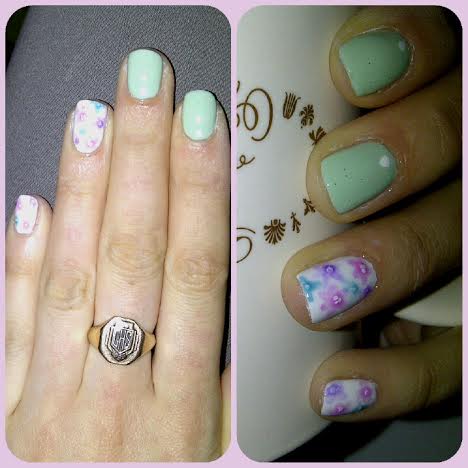
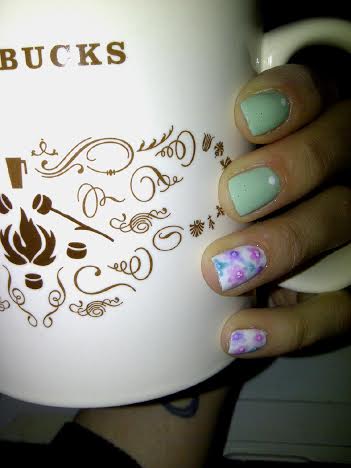
After my grass was complete, I created my floral using a medium sized dotting tool and my four colors: Essence Love Letter’s collection in Rosy in Love (light pink flowers), China Glaze in Metro Pollen-tin (yellow flowers), ACO by Ardene in Lollipop Queen (purple flowers), and Revlon in Siren (orange flowers).

andywarhol4

Finally, I finished off with a layer of Sally Hansen Diamond Flash (yey! I finally have a new bottle and am so happy) and tada! Andy Warhol inspired floral nail art.

andywarhol5

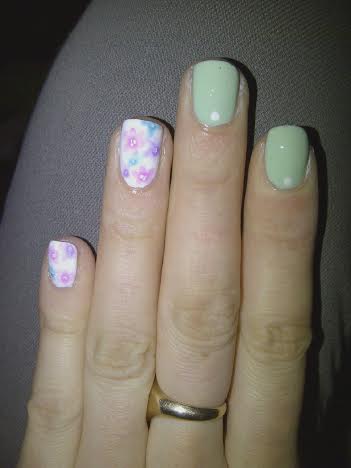
And in the sunshine. =)

andywarhol6

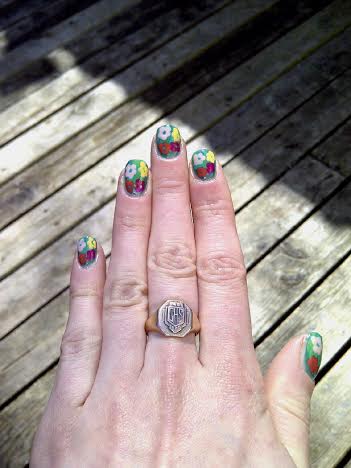
So what do you think of these Andy Warhol nails? Did I do justice to my original inspiration?

31 Day Nail Art Challenge — Day 20: Water Marble.

Okay, so I can’t water marble.

I can’t do it. I don’t know how people can create such beautiful water marble manicures, but I am not one of them. However, I didn’t want to not have anything to show for day 20–except a whole bunch of failure–so I looked up “water marble without water” in google, and what did it lead me to? A dry “water marble” technique. Score! So it’s not your typical water marbled nails, but it was something I could actually accomplish so I figured that was better than nothing!

(If you’re interested, I used this youtube tutorial by cutepolish.)

drywatermarble

The polishes I used for this manicure were:

  • Revlon polish in Minted–mint green polish.
  • China Glaze in What a Pansy!–purple polish.
  • OPI in My Boyfriend Scales Walls–white polish.
  • ACO by Ardene in Sea of Beauty–baby blue polish.
  • ACO by Ardene in Kiss from a Rose–pink polish.
  • Sally Hansen Diamond Flash Top Coat.

Even though I couldn’t do a proper water marble, I LOVE these. They spring color combination pops on the nail, and I just love the swirls. Even though I only did it on two accent nails for this manicure, I think it would love amazing all on my nails, and I will definitely be trying it again so I can play with it more (and with more color combinations).


Also, I’ve been thinking about this challenge, and I have to admit I’ve started to feel a little confined by it. I started it so I would have inspiration, but lately I feel like it’s restricting the manicures I want to do. There is SO much inspiration out there, and so many manicures I really want to try! I still want to finish the challenge, and not be a quitter, but I think I will be spreading it out with some other manicure ideas. Especially as my brand new dotting tool set just arrived, and I’ve yet to be able to really play with it, and it’s begging me to do some awesome floral nail art!


31 Day Nail Art Challenge — Day 14: Floral.

floralnailart

A few weeks ago, I picked up the new OPI sheer tints minis that have been floating around on nail art blogs. I was super excited when I found them, and so there was no question I needed them. The only thing I wasn’t sure was what I should use them for! After some serious consideration I realized they would be perfect for a water-color floral print for day 14 of the challenge.

floral

floral2

floral3

For this manicure, the polishes that I used were:

  • Revlon Nail Polish in Minted — the mint green polish on my thumb, pointed and middle finger.
  • China Glaze’s White on White — white base color on my ring and pinky finger, and dots on my mint base color on other fingers.
  • OPI Sheer Tints in Be Magentale With Me — pink-ish colored flowers.
  • OPI Sheer Tints in I Can Teal you Like Me — blue-ish colored flowers.
  • OPI Sheer Tints in Don’t Violet Me Down — Purple-ish colored flowers.
  • Sally Hansen Diamond Flash Top Coat.

These turned out so perfect. The OPI sheer tints are a little weird to work with, because they dry quickly on the nail art brush. I also found myself having to grab more polish more often than when drawing with regular polish. However the outcome is gorgeous. I’m such a fan of floral print in general, and this manicure just screams spring to me. It makes me want to wear pretty floral dresses, and flats, and not have to worry about freezing to death. Hopefully the weather starts to agree soon. Summer is my favorite season, and I’ve been longing to break out my maxi dresses again. Every time I walk past my closet I see them hanging there… and I just want to wear them SO bad.

So what’s your favorite go-to nail art for Spring?


Happy Easter!

Taking another pause to share some Easter nail art. I wore these the other night for an Easter shindig we had. I really wanted to do something festive with my nails as I had taken my speckled egg polish off. Looking at them now I kind of wish I had done each one a little bit different, just to switch them up slightly, but I do think they turned out well (especially for something I’ve never tried to do before!)

bunnynails

The polishes I used for the manicure were:

  • Sally Hansen Hard As Nails Xtreme wear in Twisted Pink — Pink base on thumb, and pinky. Inside of the bunny ears and nose.
  • Essence’s Dive with Me to the Island (from the Ticket to Paradise  collection) — Turquoise base on pointer, middle and ring fingers. It showed up more green on the finger, but it is more turquoise in the bottle.
  • Stripe Rite Striping Polish in White & China Glaze White on White — Bunnies.
  • Flaunt Beauty in Jet Black — The eye’s of the bunnies.

Hope your Easter is going well, and involves lots of chocolate (if you’re into that kind of thing) and time spent with your family. I’m looking forward to an Easter Egg hunt at my parent’s house, and competing with my nephew on who can get the most eggs!

31 Day Nail Art Challenge — Day 13: Animal Print?

I went in a different direction for the animal print prompt of this challenge. I’ve already done leopard print, and I wasn’t feeling zebra print, so I tried to think of something I could do that would be different. I’ve been wanting to do feather nails for a while. I’m a huge bird lover, and so I thought why not try doing feather nails. Okay, it’s not technically an animal print, but it’s pretty close!


I was trying to figure out how I want to do about doing feather nails. I considered doing a real feather manicure, but in the end decided to try out some new polishes I picked up, and draw on my own feathers. These didn’t end up exactly how I pictured them in my head. I think my main problem was that the colors I chose for my feathers were too close to the base color I used.

feathers

feathers3

The polishes I used for this manicure were:

  • Color Club’s Silver Lake (from the Girl About Town collection) — the base color on my nails.
  • Nicole by OPI’s My Jay or The Highway — the brown outline of the feathers, and accent dots on the feathers.
  • Art Club Nail Art Duo in Baby Blue — Light blue strokes in the feathers.
  • Revlon’s Minted — Mint colored strokes in the feathers (which kind of got hidden within the other colors.)
  • Nicole by OPI’s Oy Oy Oyster — Sheer shimmer layered over feathers (which didn’t show up in the pictures I took, but are much more visible in person.)

This is not my favorite–nor best–nail art. I’m actually pretty disappointed with how these turned out, if only because I imagined them looking a little different in my head when I started. I was especially disappointed when the boyfriend told me they looked more like branches than feathers. However, I’m still showing them off because if anything, it just means more practice will make perfect. I think a different color combination would make a world of difference. I’m definitely going to try these again now that I know what I needed to avoid–and that, to me, is the whole point of this challenge! To try new things, and work at improving my nail art skills.


What do you think of these “animal print” nails? What tips would you suggest for better feather nails next time?