GlamnailschallengeOct—Skull

673395C9-DDCC-4272-BC89-930C1C5D6DAA

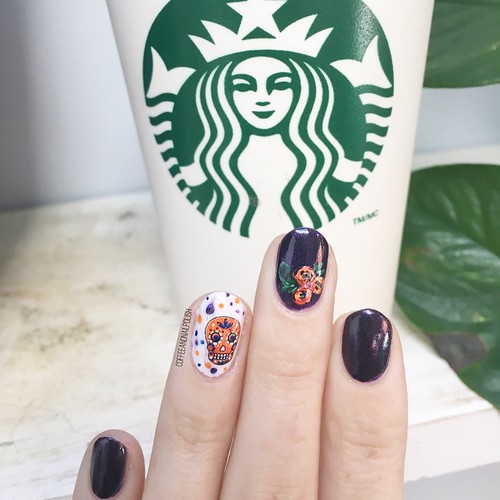
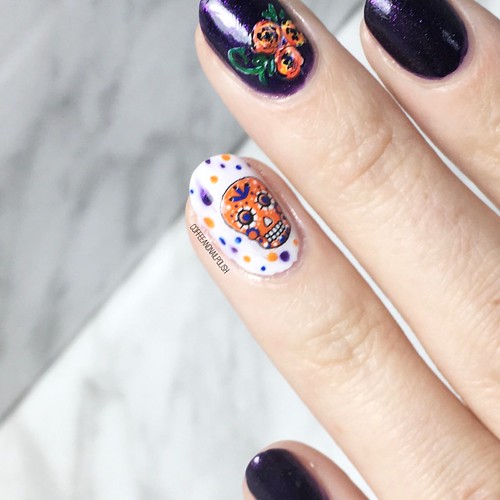
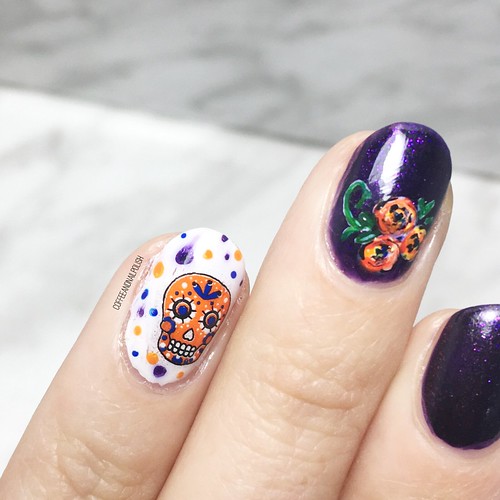
Good morning lovelies & Happy Monday! Can you believe this month is almost over? The countdown to Halloween is officially on & I’m both excited to celebrate, & sad for my favourite month to be over! But since we have a few more Halloween looks to go, I’m going to keep the excitement rolling with our second last #glamnailschallengeOct prompt which is Skull. A similar idea to skeleton, so I wanted to try & do something way different from my skeleton design.

& it was the perfect opportunity to use some nail tattoos by Maybelline that I recently purchased on extreme clearance at my local pharmacy (& favourite place for nail polish deals!) These nail tattoos were pretty cool, & I couldn’t think of a better opportunity to use them.

0840CA9C-45C1-46F2-BA50-014DB280969C

24BFF24E-3B11-48E5-A03E-2CCF4DECE8F9

For this manicure, the polishes I used were:

  • Base Coat: Sally Hansen Green Tea Bamboo Strengthener
  • Base Coat: Duri Rejuvocate
  • Top coat: YSL Beauty Quick Dry Top Coat
  • Sally Hansen Color Therapy Slicks & Stones
  • Acrylic Paint
  • NailStuff.ca 7mm detail brush
  • NailStuff.ca dotting tool trio

.

324E0048-EC0F-41F3-9186-ACB3BFD4DD4C

860C1A90-01C7-4DF1-B761-ED9E5D9BA7B8

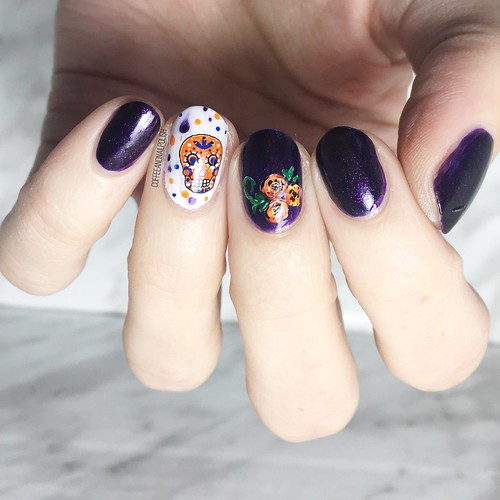
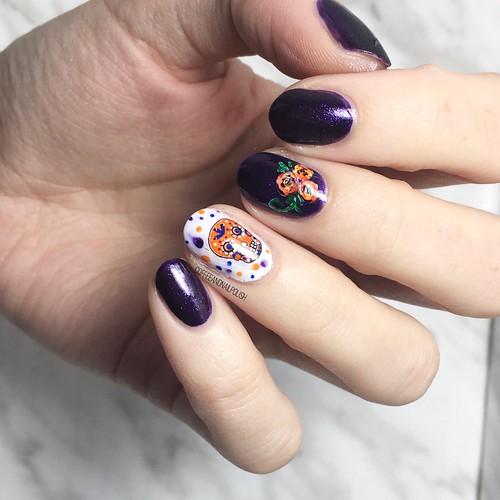
How much fun! This was also my first time in a long time wearing Sally Hansen Slicks & Stones which is just such a pretty shade for Autumn. It also goes really well with the orange & blues of my skull tattoo. It turned out more celebratory than scary, which is fun for this time of year as well. I’m digging it! & I added roses to add to the sugar skull feel.

F27C0626-8B02-4581-9E45-04551F158FC9

6835FFC3-A62F-4DAF-810C-23E36AEC59CF

Close up look at that nail tattoo. This makes me excited to use a few more of the designs that came in the packs I got. Definitely fun for fancy nails when you’re on a time limit… I definitely couldn’t draw that skull design in the 60 seconds it took me to apply that tattoo & add my top coat.

09659B8E-B7AF-4D82-8382-CF32A306D232

What do you think about these sugar skull nails?  Remember you can check out the other  #glamnailschallengeOct looks on Instagram. There is just one more prompt to go!

GlamnailschallengeOct—Eyeballs

45E86584-C2A4-43FF-9846-30586D4F3276

Hello lovelies! It’s time for another prompt for #glamnailschallengeOct: Eyeballs! This look was actually inspired by an old design by Chalkboard Nails, that I found via Pinterest. I thought her look was equal parts cool & creepy, so it would be the perfect look for today’s prompt. 👁

0302440D-DA17-4825-A591-602A797D3EA3

92801428-0BDA-40CE-95DC-31F220E5C65D

For this manicure, the polishes I used were:

  • Base Coat: Sally Hansen Green Tea Bamboo Strengthener
  • Base Coat: Duri Rejuvocate
  • Top Coat: YSL Beauty Quick Dry Top Coat
  • Sinful Colors Leather Loose
  • Sally Hansen MG Get Mod
  • Sally Hansen Xtreme Wear Pacific Blue
  • Essie First Timer
  • OPI How Great Is Your Dane?
  • Sally Hansen Insta-Dri. Jelly Belly Bubble Gum
  • NailStuff.ca dotting tool trio
  • NailStuff.ca 7mm detail brush

.

9F293366-C481-40AF-AAC1-7BC6FA2AD15F

29EA31EF-D27A-4A56-BC48-2887E0E034FA

This look was a little time consuming but still a super easy look to achieve. I went through a few different ideas on what I wanted my eyeball design to look like, & this one seemed the most fun (& creepy!) I also was super pumped to pull out Sinful Colors Leather Loose again, because it is such a fantastic Fall shade that I had kind of forgotten about a little bit. That brown with the shimmer–oh boy is it beautiful! & my eyeballs really popped against it.

CDD62548-C564-41DB-9165-33C0F45D1762

4130E624-CECB-4A97-84DC-3171E8BCB04E

Totally creepy, am I right? I probably could have done a few more eyeballs on my design, but I was painting against the clock & wanted to make sure I got this look done!

521B4523-B15B-4551-8D8E-881E74801BD4

What do you think of this look for today’s prompt? Would you wear this creepy eyeball look? Can you believe we only have TWO more prompts left before the end of #glamnailschallengeOct?

 Keep following along with #glamnailschallengeOct on Instagram & don’t forget to check out all the other awesome (& creepy!) eyeball looks!

GlamnailschallengeOct—Skeletons 💀

3C23D45B-1949-42AD-B0B2-056244275611

07A90D34-AA19-404F-BEF8-3D87E72BA16F

Hello lovelies & Happy Monday! The Halloween countdown is officially on, & I have another spooky design created for GlamnailschallengeOct! The next prompt on our list is skeletons, which is not an image I’ve ever attempted on my nails before, so I was really excited to give it a shot! & honestly, I think this is my favourite manicure of the challenge so far!

4BCD3F7B-E43C-4788-8B5D-9F9004289667

73ED538D-3350-4D24-9500-19E3046F2944

For this manicure, the polishes I used were:

  • Base Coat: Duri Rejuvocate
  • Top Coat: YSL Beauty Quick Dry Top Coat
  • Essie Leggy Legend
  • China Glaze Pathological Liar Liar
  • Sally Hansen Miracle Gel Get Mod
  • Black Acrylic Paint
  • NailStuff.ca 7mm liner brush (from Mermaid Brush Trio)
  • Born Pretty Store Classic Patterns stamping plate BP-L006 (item #17924)

.

F4B008B7-52FE-4698-A1FB-D04F6DBFAD81

DC6AAB54-3553-4271-AD65-AC96387A5B2C

This nail art look was built in layers. First I started off with my base, which is Pathological Liar Liar layered over Leggy Legend — I definitely need to do two coats of PLL next time, but I definitely love it a lot more when it has some undies.

Next I decided to use this skull & cross bones image from my classic patterns stamping plate from Born Pretty Store, mostly because I was unsure about free handing skeletons. On its own, the image was a little meh, so I took a risk & outlined the stamp with black acrylic paint & my mermaid tail brush from NailStuff. & that’s when this mani came to life! The outlining made the image pop on my nail & I am absolutely OBSESSED with it. I also did a few polka dots around it to fill in the space. It almost looks like nail art stickers, which is super cool. I literally didn’t even want to take these off after I put them on.

8D66BC93-B1AB-4344-90CC-13694BD29928

178C7866-7FF7-4CB6-8CDF-9C5B0F311D60

I really like how the stamping & outlining almost looks slightly cartoon-y. Going with black & white over the coppery orange base was definitely the way to go.

I feel like if 17 year old me was into nail art like this back in the day, this is a design I would have rocked in a variety of background colours… while listening to the Ataris on repeat & writing angsty journal entries. Works for Halloween & non-Halloween alike.

9FE3B814-FB50-47EA-A715-006F445ECAAB

What do you think about my skeleton nails? Would you wear this design? What do you think about combining freehanding & stamping in the same manicure? Let me know all your thoughts down in the comments below! & don’t forget to keep following along with  #glamnailschallengeOct on Instagram for all the nail art looks!

SWATCH SUNDAY — OPI DS Extravagance

F7BBADF5-D27C-4297-8B16-09289C5D3B74

C8633C1B-B50A-402D-8A3B-1653B7FB724E

Hello lovelies & happy Sunday. This is my first swatch post since my disastrous nail break last week, so obviously I need to pick something stunning to share. & Today I’ve got one of the most beautiful polishes I own, & one I always pull out this time of year–OPI Designer Series Extravagance. This polish was a birthday gift given to me 5 years ago, & I love to wear it in October on or around my birthday.

The OPI Designer Series was a collection of polishes (that are now discontinued I do believe) that were a step above OPI’s regular polish line. A lot of them had holo glitter & flakies to give them a special touch. Extravagance was my first polish from this line, so it holds a special place in my heart. It was also one of the first holos I ever owned, & helped me fall in love with holographic nail polish.

B3F2CF27-3F7D-47CF-9571-FFA80135AE5B

44FCF879-8038-4EBF-B72B-BB05048B7A8F

For my swatches, I did base coat, 2 coats of polish & finished it off with YSL Beauty Quick Dry Top Coat. I’m planning on doing a full post on this top coat, but oh boy am I loving it so far. It dries SO QUICK you guys, like I almost can’t believe it. It might actually be the quickest quick dry top coat I’ve ever used.

The formula on this polish is pretty damn awesome. First coat goes on not quite opaque, & the second coat gives your nail a beautiful sparkly finish. It’s slightly jelly like, but not quite as much as say China Glaze Private Side-Eye. The glitters are so dense though, which is what makes this shade just so beautiful. Literally, it turns your actual nails into gemstones & I love it.

0B53773A-F34C-4DF4-AE15-5295A81CCB93

E123B330-10D4-4A34-9700-769AD14E07F1

Even though I do believe this collection has been discontinued, you can see find the polishes available in some places like nailpolishcanada.com & amazon, as well as a few other places they sell OPI I’m sure.

I must say, I don’t officially have a list of all time favourite polishes but if I were actually to sit down & compile one (which I’ve been thinking about doing), this shade would definitely be on it! There are only a few polishes I’ll ever truly wear on their own without even thinking about nail art, but Extravagance is definitely one. It’s just too perfect. 💗

C3574DF1-560D-4A97-AB45-985DEEA21E78

What do you think about OPI DS Extravagance? Do you own any shades from the Designer Series collection & which is your favourite? Let me know all your thoughts down in the comments below!

GlamnailschallengeOct—Spiders 🕸

1032A28E-F25B-407A-9C43-A5985EB9D7BE

We are almost halfway through the month, can you believe it? & Happy Thanksgiving to all my Fellow Canadians celebrating today with Turkey, Tofurky or whatever else you’re making for the occasion.

Today I have another look for GlamnailschallengeOct! Today’s prompt is Spiders, which is quite possibly my least favourite thing in the whole wide world, but a popular choice this time of year for nail art. & I do seem to do some kind of Spider web look each year, as it’s a time honoured Halloween classic.

8DC1903D-16E3-43A7-B5FD-8BA23026C05B

068B64C5-4AA8-4709-97B6-EB6B9881EBE5

For this manicure, the polishes I used were:

  • Base Coat: Quo by ORLY Bonder
  • Top Coat: Essie Gel Setter
  • Nicole by OPI Totally in the Dark
  • White Acrylic Paint
  • NailStuff.ca 16mm Striper Brush

.

B6A4DE71-B977-48D7-993B-97C6724DB7A4

8C3AEBA7-A8C3-4D0A-8110-D0E3CC82EEAA

Okay, so regardless of my phobia toward legit spiders (& their sticky webs), I am really loving how these turned out. These turned out much more delicate than some of my previous spider web attempts, which I’m very happy about. Turns out good nail art brushes really make a huge difference in how nail art turns out! My nail art brushes from NailStuff.ca has really improved how my nail art looks & has brought my freehanding to another level… even when I’m on a nap time time crunch. Also I fought it for a longtime, but using acrylic paint also really helps with upping the look, probably because it doesn’t dry as quickly as nail polish does.

B2509975-6E26-4850-8B3C-BB49D56608AB

018A9DC4-4CB3-4A77-9C39-615A4C416033

Halloween manicures make me so happy, even ones involving spiders (ick). This would definitely be a fun manicure to wear for a witchy Halloween costume, or something like Mortica. I have quite decided what I’m being for Halloween, although Kenneth tells me I’m being a princess, but if I go with a spooky look I may have to recreate this! I did end up wearing this manicure for a good 5 days.

712FCE00-9C74-4F92-8513-3011CDD4FEEB

B71AB842-BE47-4A44-83C0-B6E474C6932E

What do you think about this spider design? Are you already planning your spooky Halloween designs? Don’t forget to keep checking out #glamnailschallengeOct on Instagram for everyone else’s amazing designs this month!