SWATCH SUNDAY — OPI Black Cherry Chutney

BA39FAB2-00B3-4D33-ABE3-CF99FE9708A5

28E28C29-1EB7-4CAB-AF9C-C6556F4D9EBC

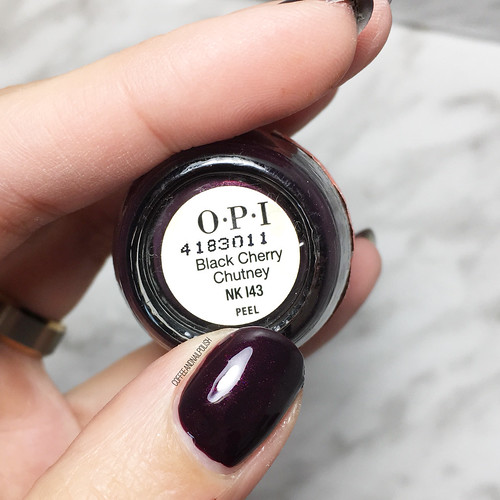
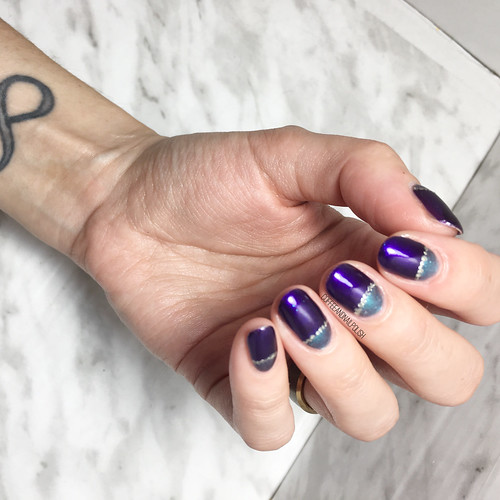
Hello lovelies! Today I’m keeping the Fall mood going with what could quite possibly be the most perfect dark maroon for Autumn: OPI Black Cherry Chutney.

I know everyone has their opinions on what colours & polishes call to them this time of year, but I don’t think anyone can deny that maroon is definitely an autumn shade. There are quite a few beautiful picks for this time of year (OPI Every Month is Oktoberfest is one that I see pop up a lot this time of year) & Black Cherry Chutney is one of my favourites.

64C97978-B1B5-4034-9EA7-EB4D5D627DBE

05672104-3DD2-4604-A925-3906433652AA

For my swatches I did a base coat, 2 coats of colour & finished with glossy top coat (Essie Gel Setter).

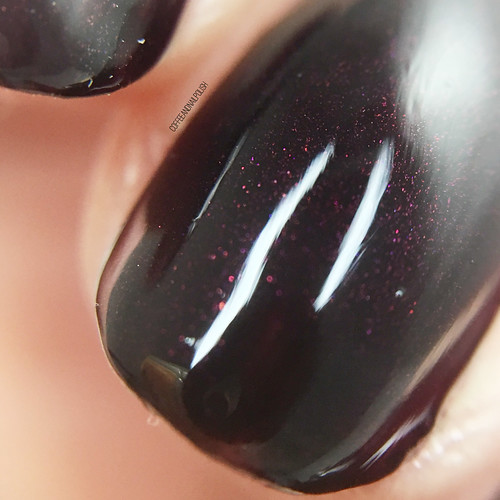
First coat was streaky & not full coverage at all, but with the second coat everything hit perfect opacity. The base is fairly dark, but it’s the shimmer that steals the show. Literally, this is just Fall in the bottle–you can’t deny that it is perfect for a cool October day, snuggled up in cosy socks, with a pumpkin spice latte or apple cider in hand.

2B977870-F0D5-4BDB-A4BB-E3EFF384E850

3E036C5C-E1C2-4E1A-8AD5-D7A8B738707A

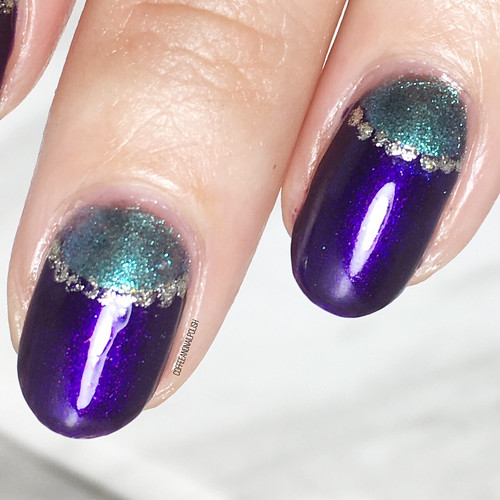
Down below, I have a macro shot of Black Cherry Chutney which shows off the raspberry shimmer.

8159D52F-1AC5-4295-ACDB-FB15999905FA

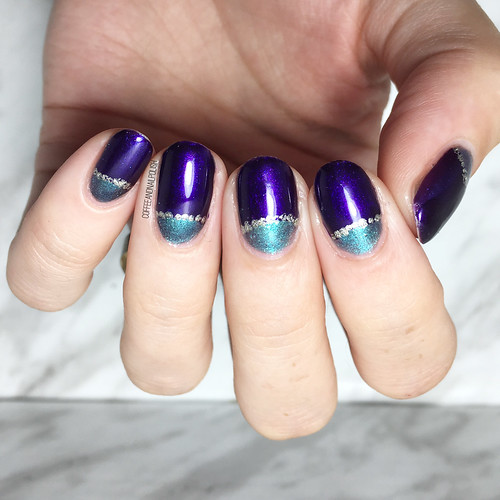
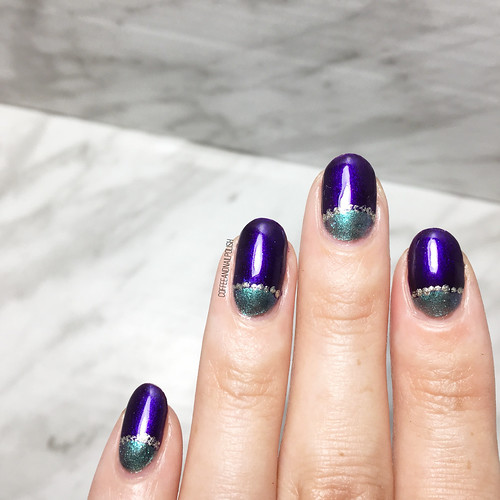
& for fun, a shot of this manicure in full sunshine, which is where I think it really transforms. You go from these deep vampy nails to BAM!

E078A103-C8FF-4E74-A679-F61F6CBF698E

What do you think about OPI Black Cherry Chutney? 🍂🍁 Do you have this polish in your stash? What shade is your “it’s Fall” polish pick? Let me know all your thoughts down in the comments below!

Shimmery Teal & Purple Half Moons

11D25747-F0D9-4E00-81D5-2627C3FA913E

07346D81-807B-4EA6-A8AF-4ACD5C74CE26

Good morning lovelies & happy Thursday! Hope everyone is having a lovely week so far. Today I’ve got some more Fall nail art to share with you, in a fun jewel toned colour scheme!

There is something I love SO MUCH about pairing purple & blue/teal together. I just find they compliment each other so well, which is probably why–regardless of the season–it is a go to combination for me. I was already wearing my Swatch Sunday pick for this week, & I wanted something to pair with it in a quick half moon, so naturally I had to reach for a purple to complete the look.

CFD458E9-CA10-4772-B3D1-08492950322A

66015A3D-F6FA-4F0A-B27A-FFE2CC510C4B

BD8E2F71-1B06-4B38-8D93-4D65D8DD1BCF

For this look, the polishes I used were:

  • Base Coat: Gel overlay
  • Top coat: Essie Gel Setter
  • Quo by ORLY Breathable Freudian Flip
  • Essence 25 Arabian Nights (new formula Shine Last & Go!)
  • Essie Jiggle Hi, Jiggle Lo
  • Paper hole reinforcements
  • small dotting tool (Mine are from NailStuff.ca)

.

5ADEE743-46BC-4DC7-96B2-9EF44AE3F1F4

5136D70C-383F-4BCF-8815-F70984BDB16F

EC2C5F96-F1AD-4F55-9C7F-B3CF682371B1

Trying out this new purple from the reformulated Essence line at Shoppers Drug Mart. I’m trying my best not to buy too many new polishes (since, you know, I have a million) but I can’t resist $2.99 nail polish so I picked up this pretty shimmery dark purple called Arabian Nights, & I really think it compliments my base of Freudian Flip really well! I decided to add in some gold as well, so keep it feel luxe, & I think the end result looks super fancy. (Also Arabian Nights applied over my base in only one coat, which made this manicure even quicker to do!)

Feeling like this has a bit of a Mardi Gras vibe as well, although a little bit early for that! But I really do love how fancy these feel, thanks to the jewel tones & gold accents. Of course, the fanciest place I’ll be wearing these is the grocery store, but that’s okay with me! I’ll have the best looking nails at Sobeys!

14BBD6F5-B306-4852-BB3B-B1BC8BB6E818

AA9CDACF-60D4-4208-BAFA-4976BD07F8A3

What do you think about this half moon look? What manicure are you planning on rocking this weekend? Let me know all your thoughts down in the comments below!

Fall Leaves 🍂 Nail Art Recreation

E8C7A357-B8D6-4ABB-A930-82C28D6396CC

B971C433-7837-4656-B6CB-069566BC4426

Hello lovelies & Happy Friday!

Today I have a fun nail art look to share with you that is a recreation of an old favourite: this Fall leaf design. This design was one of the first designs I ever posted on Instagram that I was the most proud of. So while browsing through my old designs, I decided it was definitely long overdue for me to recreate this design!

28294277-6B43-482E-B5C5-7FC301D46CBC

A3D30523-B31F-4289-AE5B-1365F27AC403

For this manicure, the polishes I used were:

  • Base Coat: Gel overlay
  • Top Coat: Essie Gel Setter
  • Top Coat: Sally Hansen Miracle Gel Matte Top Coat {PR sample}
  • Quo by ORLY Breathable Heaven Sent {PR sample}
  • Sally Hansen Miracle Gel Good Cheer-y {PR sample}
  • Wet N Wild Blazed
  • Rimmel 60 Seconds 830 Camouflage
  • Mariposa Nail Polish gold shimmer (no name)
  • Black Acrylic Paint
  • Nailstuff.ca Dotting Tool Trio

.

1CB0DB52-50FD-4AB3-AF60-E1DE237F0F5B

C2FB8302-EC8D-4DEE-9888-B9A9D49BB01E

So obviously with it being five years since I first painted this design, I wanted to change things up a little bit & play around with the look. Instead of black polish, I used acrylic paint because I knew it would make it easier to start over if there was any mistakes. I also used my 11mm mermaid tail brush from NailStuff.ca, but looking back I should probably should have went with a small size for thinner lines.

Also this time I decided to add some matte top coat over my design, & it really made the design & colours pop! I’ve been absolutely loving the Sally Hansen Miracle Gel matte top coat.

F9EE6409-C6A5-4715-AF2C-278ADDB1018B

857606B3-7283-43DD-942F-5358C79B6065

Just for fun, a couple shots of this design before I added my matte top coat.

Obviously I think both versions of this design are fabulous, but I’m just slightly more in love with the matte version. Something about this time of year just has me craving matte-ified nails more often, & honestly I feel like metallic nails (which I also craved more often during Autumn) pop so much more when they are matte.

53C032A2-95B1-49F6-9A59-1052AB010FD3

6180732B-733C-40E3-AAA6-2818016FF6F5

So what do you think about my updated version of this design? Which do you prefer: matte or glossy? Share your thoughts down in the comments below & let me know which version is your favourite!

Fall Inspired Abstract Nails

F5F811DF-87E7-434E-B1C1-9F1EA7A0F071

5DA51701-92E1-48E7-BB34-50836165986F

Good morning lovelies! Hope you’re enjoying the beginning to another beautiful week. Also how is it possible we’ve passed the middle of September & it’s creeping (quickly!) towards October?! It feels like just yesterday I was dreaming wistfully about pumpkin spice, & now it will be Halloween before we know it!

Today I have a really, really fun design to share with you that I had an extremely hard time figuring out what to call. It has a little bit of everything in it: negative space, polka dots, colour blocking, abstract lines. This look was partly inspired by a few of these looks I’ve seen popping up on Instagram & partly inspired by my daughters new soothers. But I am 100% in love with the end results!

26BDD1C6-1E10-45B3-9D38-29CB5BA62415

97DB8AC6-8E06-4661-AEA4-DB74F92D807E

For this manicure, the polishes I used were:

  • Base Coat: Gel overlay
  • Top Coat: Essie Gel Setter
  • Wet N Wild 2% Milk
  • Essie Fall For NYC
  • Essie Bobbing for Baubles
  • Sally Hansen Miracle Gel Get Mod!
  • NailStuff.ca Dotting Tool Trio

.

AD4035E0-806D-49BC-B973-47A0D9D6EF65

3426C284-975C-4370-844A-6A7927208C72

64678B2E-66C7-4667-B914-0E543C05F59A

This look is super easy to do, even though it comes across as more complicated & fancy. Basically the hardest part is figuring out how to layer your lines of colour, but because they’re “abstract” you don’t have to worry about making them perfectly straight. & then just go in with a small dotting tool for some extra dots, & you’re finished! I originally was going to add a few random lines as well, but was worried about kiddos waking up (I literally did these at 6am while everyone was asleep) so I went the safe route. Definitely want to try them again & see if I can get even closer to my inspiration! This was a fun first attempt though!

E3E487ED-8B2E-46AA-B7D1-5E36A09A5B6A

D78A3D3F-9AB7-419B-B036-5B754104D719

Love love loving this look! Seriously, it feels so good to paint my nails, & even if it means waking up earlier than I might want, it’s so worth it in the end. Painting my nails is what keeps me feeling like me, & it’s important to have that “thing” that makes you feel like you, especially when you’re a new Mom.

I know I get asked a lot how I have time, with two young kids, to keep doing my nails & the honest answer is: I just make the time when I can. It’s not always easy, & sometimes it takes into the next day to finish a manicure, but sometimes that’s what you have to do. We’ll see what happens when my maternity leave is up & I go back to work, but I will keep trying as much as possible to keep the routine going & finding my times to paint & create.

36F421BD-1D25-4295-B751-8C833289987A

What do you think of this nail art look? What kind of manicures would you like to see next? Share down below your favourite nail art look!

🧡

Bestie Twin Floral Nails

59BBE75C-0787-49C6-ABC0-D37D53F13050

B9CA451F-3CA4-4D3C-BE65-DF2D8780BD0D

Happy Saturday lovelies! Did everyone survive Full Moon Friday the 13th okay? Today I’m sharing a fun design that has been in planning for a while–bestie twin floral nails that I did with my girl Victoria over at @nailstuffca!

We’ve been talking about doing some twin floral nails for absolutely ages, so I was really excited that we finally managed to come together to create our matching looks! The inspiration for this floral comes from my favourite place for inspiration: Pinterest! I found this pattern while browsing for Fall floral & that was where we started for our manicures.

AC29FDE7-B841-4A6B-875A-2497F0DD97AA

7D66BF9B-C90E-491C-8D63-DF1049489BE9

The polishes used for this manicure were:

  • Base Coat: Gel overlay (trying to grow out some damage on my tips)
  • Top Coat: Essie Gel Setter
  • ORLY Plum Sugar
  • Essie Stop Drop & Shop
  • Acrylic Paints (set purchased from Dollarama)
  • Nailstuff.ca Dotting Tool Trio
  • Nailstuff.ca Mermaid Tail Brush Brush Trio (I used the 11mm liner brush)

.

01DF62D3-ABA7-404A-A18C-A1EE91030975

D9FEE90B-CC23-417E-BEEE-0881F20D680A

This was my first time using acrylic paints to create a look like this (floral) & I was a little nervous at first, but it was actually pretty easy to do! I still had to use polish for the pinky roses, as the set of paints I bought didn’t have any red. But other than that, I was pretty impressed that a $2 set of acrylic paint could create such beautiful art on such a teeny canvas. I don’t think I’ll use paints every time I go to do nail art, but for a design like this that is supposed to be a bit rustic, I think they worked perfectly!

B370BF18-AEB0-4AA6-8AE1-47A3DC1D23DE

8F298B00-4486-459F-A444-EB04D411B23B

Ahhhh, how pretty did these turn out? Considering I was definitely feeling rusty since I hadn’t created any floral since before our baby girl was born, I feel really good about the end result.

E6F7B2EF-3ACF-4861-BFD7-C342E4A76BA0

A4450C32-F712-4C62-A9A5-2BE44A259BEC

What do you think about these floral nails? Don’t forget to hop over to @NailStuff.ca & check out Victoria’s version of this design & give her some love!