SWATCH SUNDAY — L.A. Colors Color Craze Crackle Top Coat 🖤⚡️

Hello lovelies & happy Sunday! How is everyone enjoying these last few days of June? We’re currently gearing up for the last day of school (tomorrow) in our house, & the beginning of Summer vacation. It has come so quickly!

Today I’m sharing a throwback vibe — but a currently available polish. Any of my fellow millennials will probably remember the chokehold crackle nail polish had in the early 2010s — I had every colour. So I was super excited to see it is making a resurgence. I never stopped (unironically) loving it, so whenever I see it pop up again, I can’t help but buying a bottle.

& lucky for us, L.A. Colors is bringing back crackle for us to love & enjoy!

1 thick coat

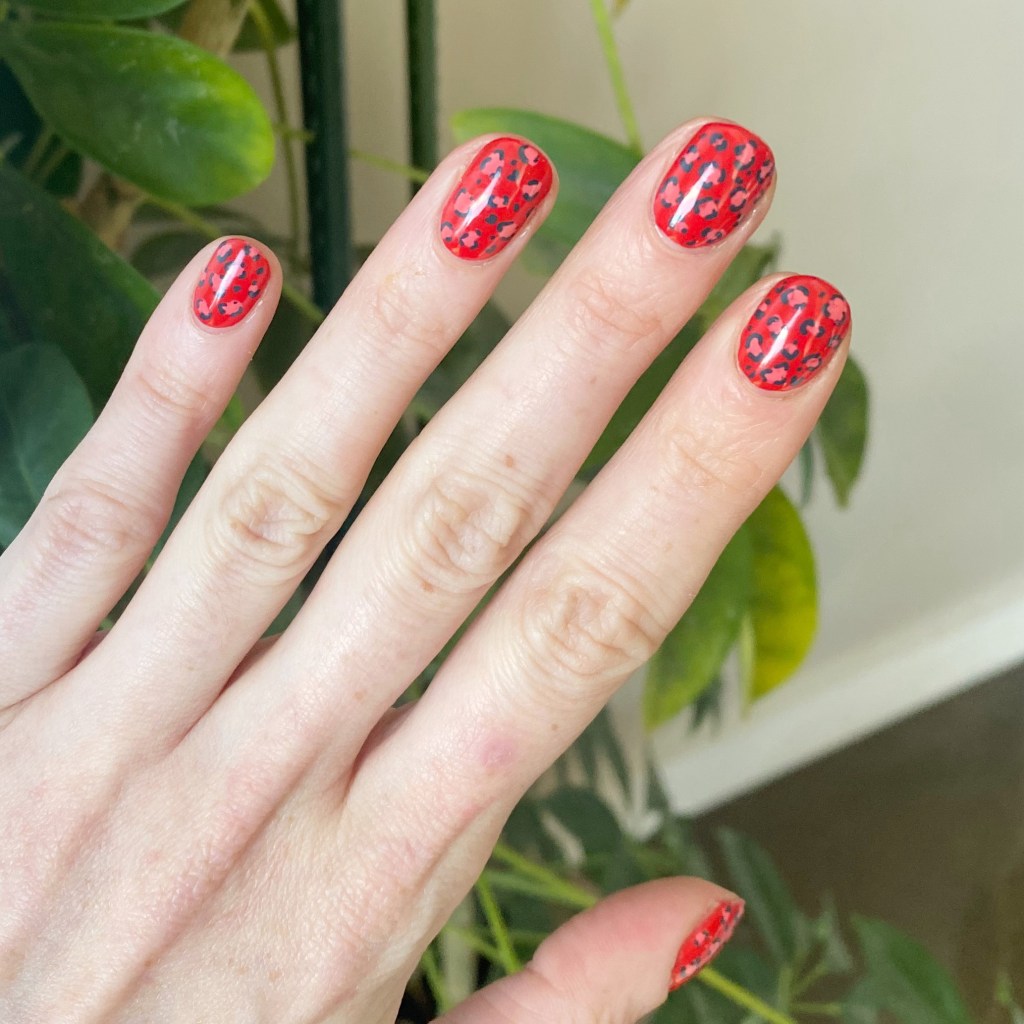
So for those who don’t remember the crackle faze of nail polish, it is a specially design nail polish that when applied over a base shade, dries down & creates a crack effect, showing the shade underneath. Lots of different brands have come out with their versions, from OPI (the first I remember) to Zoya, to Sally Hansen & Claire’s.

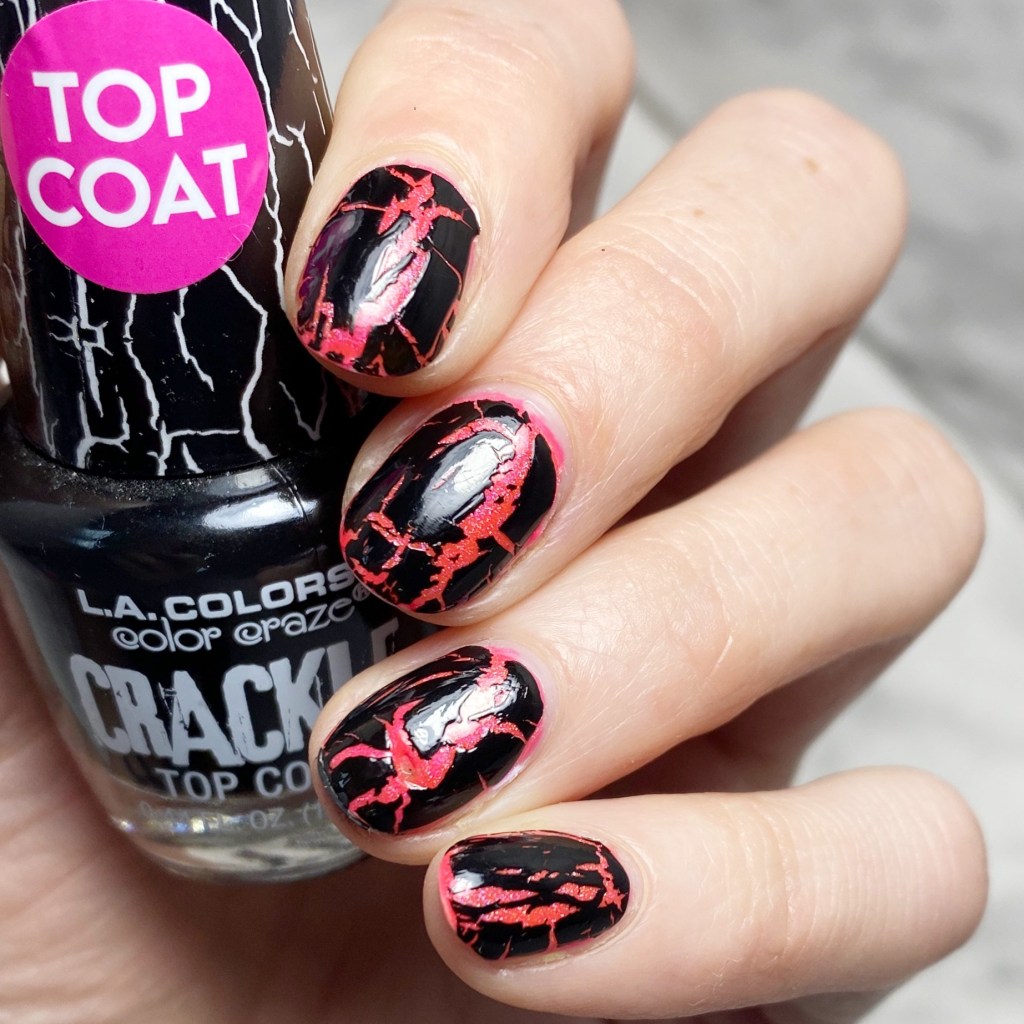
L.A. Colors is bring back the fun with their two Crackle Top Coats — available in black & white. I purchased mine at my local Walmart for $3.99 CAD.

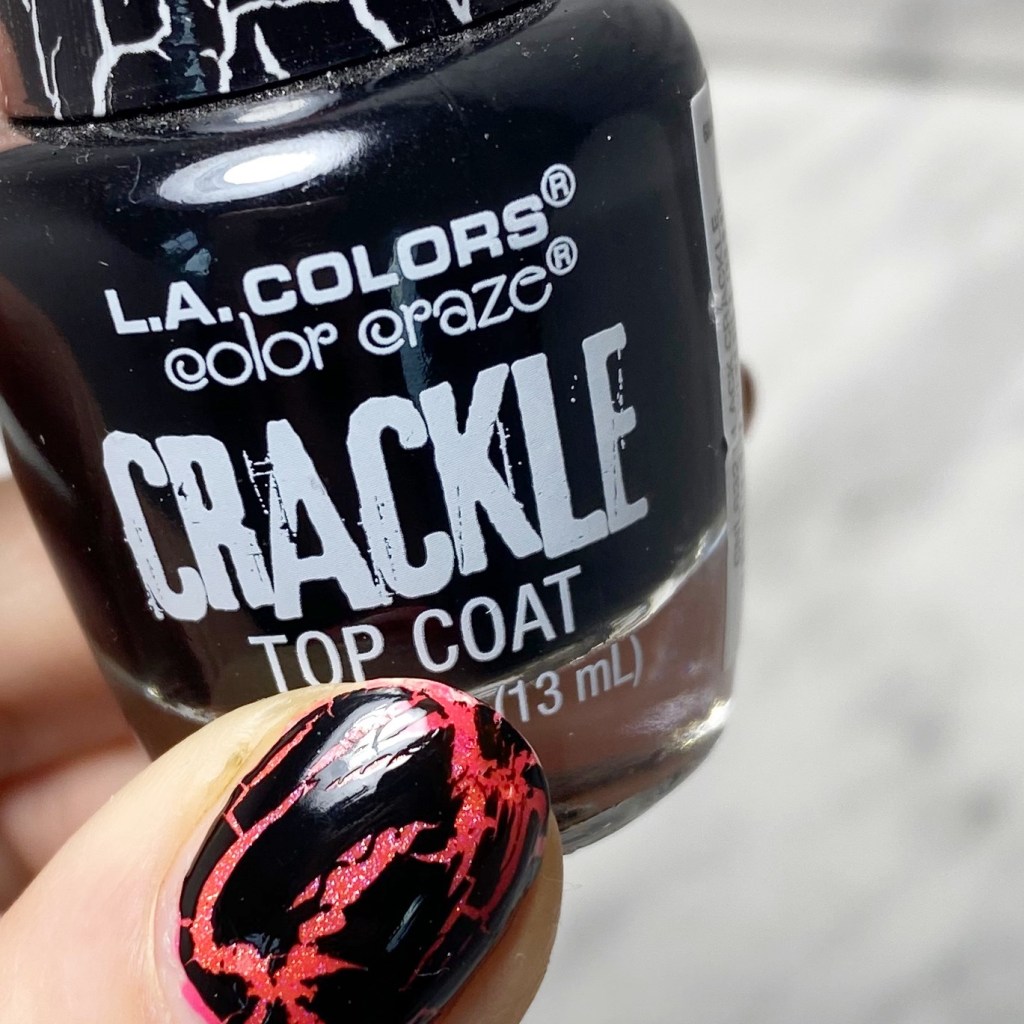
As you can see, the crack effect on this pretty thick & dramatic. Depending on how much polish you have on your brush, you can have bigger thick cracks (like this) or smaller thinner cracks like this. The black polish itself is opaque, which I like. It makes the effect even more dramatic. I haven’t picked up the bottle of white yet, but I’ve heard it also is pretty opaque— so I’m curious. I used the Sally Hansen which crackle years ago, but I found it very thin so it was kind of a disappointment.

Personally, I would love to see L.A. Colors release even more shades (& finishes — like shimmers) with this crackle line. For a very affordable mainstream brand, they have some out with some beautiful finishes & styles of nail polishes, & I hope they keep them coming!

What do you think of crackle nail polish returning as a trend in 2025? Are you a fan of this style?

Let me know all your thoughts down in the comments below, & if you would rock crackle again!

Happy Sunday

🖤

Lover Inspired Nails (in honour of my little birthday Swiftie)

Hello lovelies & happy Wednesday! Today is a very special Wednesday because it is my baby girls 6th birthday. 🎉 🎂

So crazy to believe that she’s 6 already!

I wanted to create some special nails in her honour, & since her favourite thing right now is Taylor Swift — well obviously taut is where my inspiration came from. She also told me I should do nails that were pink, blue & yellow with hearts — & as soon as she told me that, Taylor’s Lover era popped into my head. & since Cruel Summer has been playing on repeat at our house, it fit perfectly.

The polishes I used for this manicure are: 

  • Top Coat: Essie Gel Setter Top Coat
  • Base Coat: China Glaze Calcium Gel Fortifier
  • Essie Bikini So Teeny
  • Butter London Coming Up Roses *pr
  • Claire’s Scented Nail Polish Orange
  • Sally Hansen Miracle Gel Violet Voltage
  • Essie Gel Couture Gossamer Garments *pr
  • Nails INC Heartfelt Holidays
  • Claire’s Mini Glitter Shade (no name)
  • Nailstuff.ca Mermaid Tail 7mm liner brush

How pretty does this manicure look? I love the Lover vibes it’s giving. If this isn’t the perfect manicure to wear while belting out Cruel Summer, I don’t know what is.

& my little girl was so excited to see these nails! She’s having a Taylor Swift inspired birthday party with her friends next month, & she is already planning her nails for the occasion.

What do you think about these Taylor Swift inspired birthday nails? Do you love them as much as I do? Would you wear them? Let me know all your thoughts in the comments below!

Happy Wednesday lovelies — enjoy some cake today in honour of my little girl.

🖤

Funky Red Animal Print

Hello lovelies & happy Wednesday! A super sunny & beautiful Wednesday. I’m just loving this gorgeous Summer weather.

Today I’m excited to share some fun & funky nails — & something a little bit different from what I’ve been posting. It’s been absolute ages since the last time I did animal print, so it felt long overdue.

The polishes I used for this manicure are: 

  • Top Coat: Essie Gel Couture Top Coat 
  • Base Coat: China Glaze Calcium Gel Fortifier
  • Essie Gel Couture Electric Geometric *
  • Essie Gel Couture On the List
  • NailStuff.ca Dotting Tool 
  • Madam Glam Acrylic Nail Art pen in Black *

*pr/gifted

I got so many compliments on these nails when I wore them to work, which always gives me a little confidence boost. I wanted something vibrant & fun, & I feel like these nails really checked off all my needs.

Leopard print has always been one of my go to nail art looks — in fact, I think one of my first posts all those years ago was a red-toned leopard print. They’re easy, & eye catching, & always fun to wear. If these don’t say Summer vibes, I don’t know what else does! Plus this Essie shade — Electric Geometric — is such gorgeous coral red.

What do you think about these animal print nails? Do you love them as much as I do? Let me know all your thoughts down in the comments below, & tell me what Summer themed nail arts you want to see next!

♥︎

Pink Gel & Floral Nail Art 💖🌸

Hey lovelies! I totally meant to post this manicure last week, but I got knocked out by the cold from hell which left me ravaged & not in the mood to do any posting! But my sinuses are finally recovering, & now I can finally show this fun look I did last week!

I was super curious about doing nail art over my gel manicure base, so I wanted to give it a try. I plan on also doing some nail art using all gel, but I was curious what would happen if you painted some nail art over just gel. (Including topping it with a regular top coat.)

Products used for this manicure: 

  • Olive & June Peel Off Base Coat *
  • Olive & June Gel Polish Base Coat *
  • 2 coats Olive & June Gel Polish XOXO *
  • 1 coat Olive & June Gel Polish Pink Goldfish *
  • Olive & June Gel Polish Top Coat *
  • Sinful Colors Bold Color
  • Essie Mint Candy Apple *
  • Essie Satin Sister
  • Butter London Coming Up Roses *
  • Nailstuff.ca Mermaid Tail 7mm liner brush
  • NailStuff.ca Dotting Tool 
  • China Glaze Fast Forward Top Coat

**gifted/PR

I think these are so just so pretty! I will say, the quick dry top coat I used (China Glaze Fast Forward Top Coat) did dry down in a way that made the nail art flowers almost look like 3D stickers — which I thought I was very cool. I’m curious what would have happened if I had used the Olive & June Gel Top Coat — & I might have to experiment to see what happens!

As I mentioned, I’m still so new to the world of gel, so I’m enjoying playing around with it.

What do you think of this little bit of nail art? Would you like to see me do a series or feature on nail art using only gel nail polishes? Let me know all your thoughts down in the comments below!

Happy Wednesday

💖

SWATCH SUNDAY — Olive & June Gel Polish XOXO & Pink Goldfish

PR/Gifted

Hello my lovelies & happy Sunday! May is very quickly speeding along — can you believe it? Summer is almost here.

Today I’m excited to share some more polishes I was recently gifted from Olive & June. They reached out to me about trying their Gel Polish system, & I said yes! While I don’t use gel polishes a lot, I’m always curious. They sent me a beautiful PR package with everything I could need to create a beautiful gel manicure, & I’m excited to share two shades with you (& a little review) today!

Products used for this manicure:

  • Olive & June qPeel Off Base Coat
  • Olive & June Gel Polish Base Coat
  • 2 coats Olive & June Gel Polish XOXO
  • 1 coat Olive & June Gel Polish Pink Goldfish
  • Olive & June Gel Polish Top Coat

I’m not well versed with gel polishes — it’s not my usual medium — but I will say I found this system easy to use. I used the provided peel off base coat for easy removal, & then followed directions.

The gel polish itself is pretty opaque. 2 coats of the pink polish XOXO, curing for the 2 minutes between each coat, & then I topped it with the shimmer Pink Goldfish. & then I finished it off with one coat of the Gel top coat.

You have no idea how many compliments I got on this colour! I’ll probably do a quick tutorial video the next time I go to apply this polish just to show how easy the whole system is to use.

The most important steps are cleaning up your cuticles, remembering to remove any oils from your nails with acetone, & making sure not to floor the sides with gel polish. For a first try, with this system I think I did awesome! & I can’t wait to try out all the colours they sent me a— maybe I’ll do a skittle look next!

I’m also so glad for the peel off base coat, because I HATE removing gel polish, so I love an easy removal option.

What do you think of these polishes from Olive & June’s Gel Polish line? Have you tried out their new system yet? Tell me all your thoughts down in the comments below.

🖤