Graveyard Nail Stencils with NailPolishCanada (& how to score your own set of vinyls for free!)

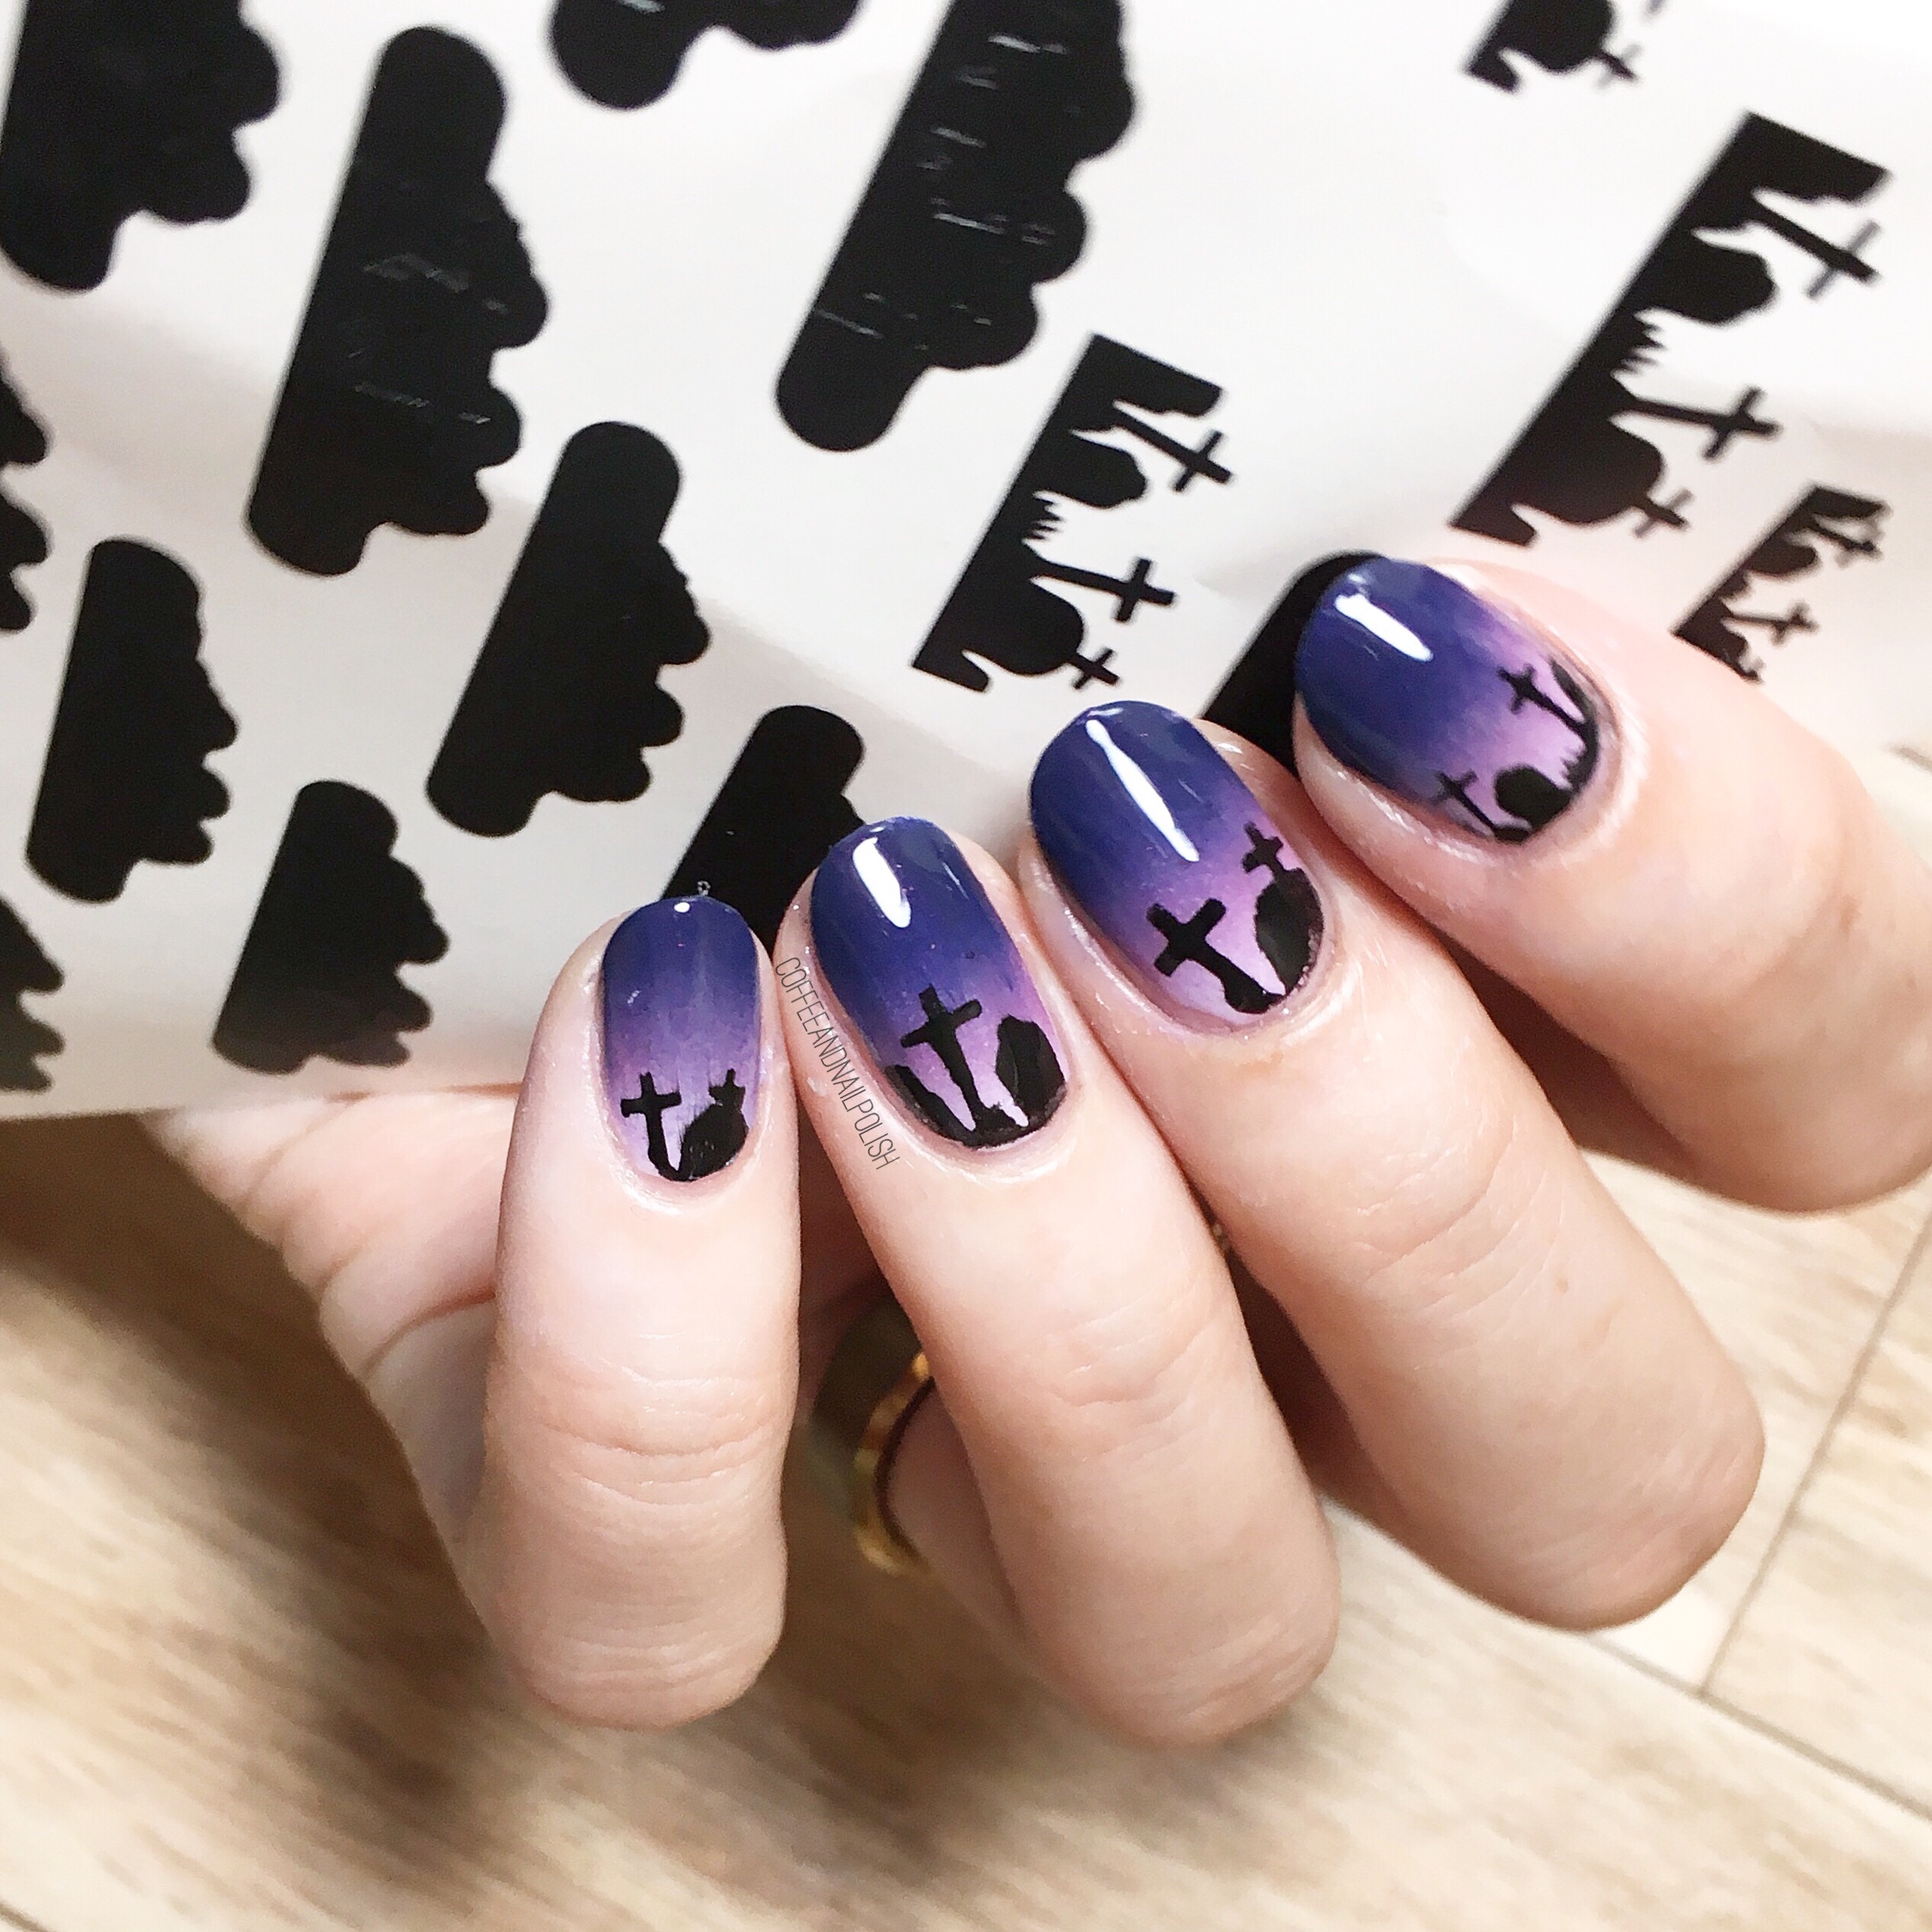
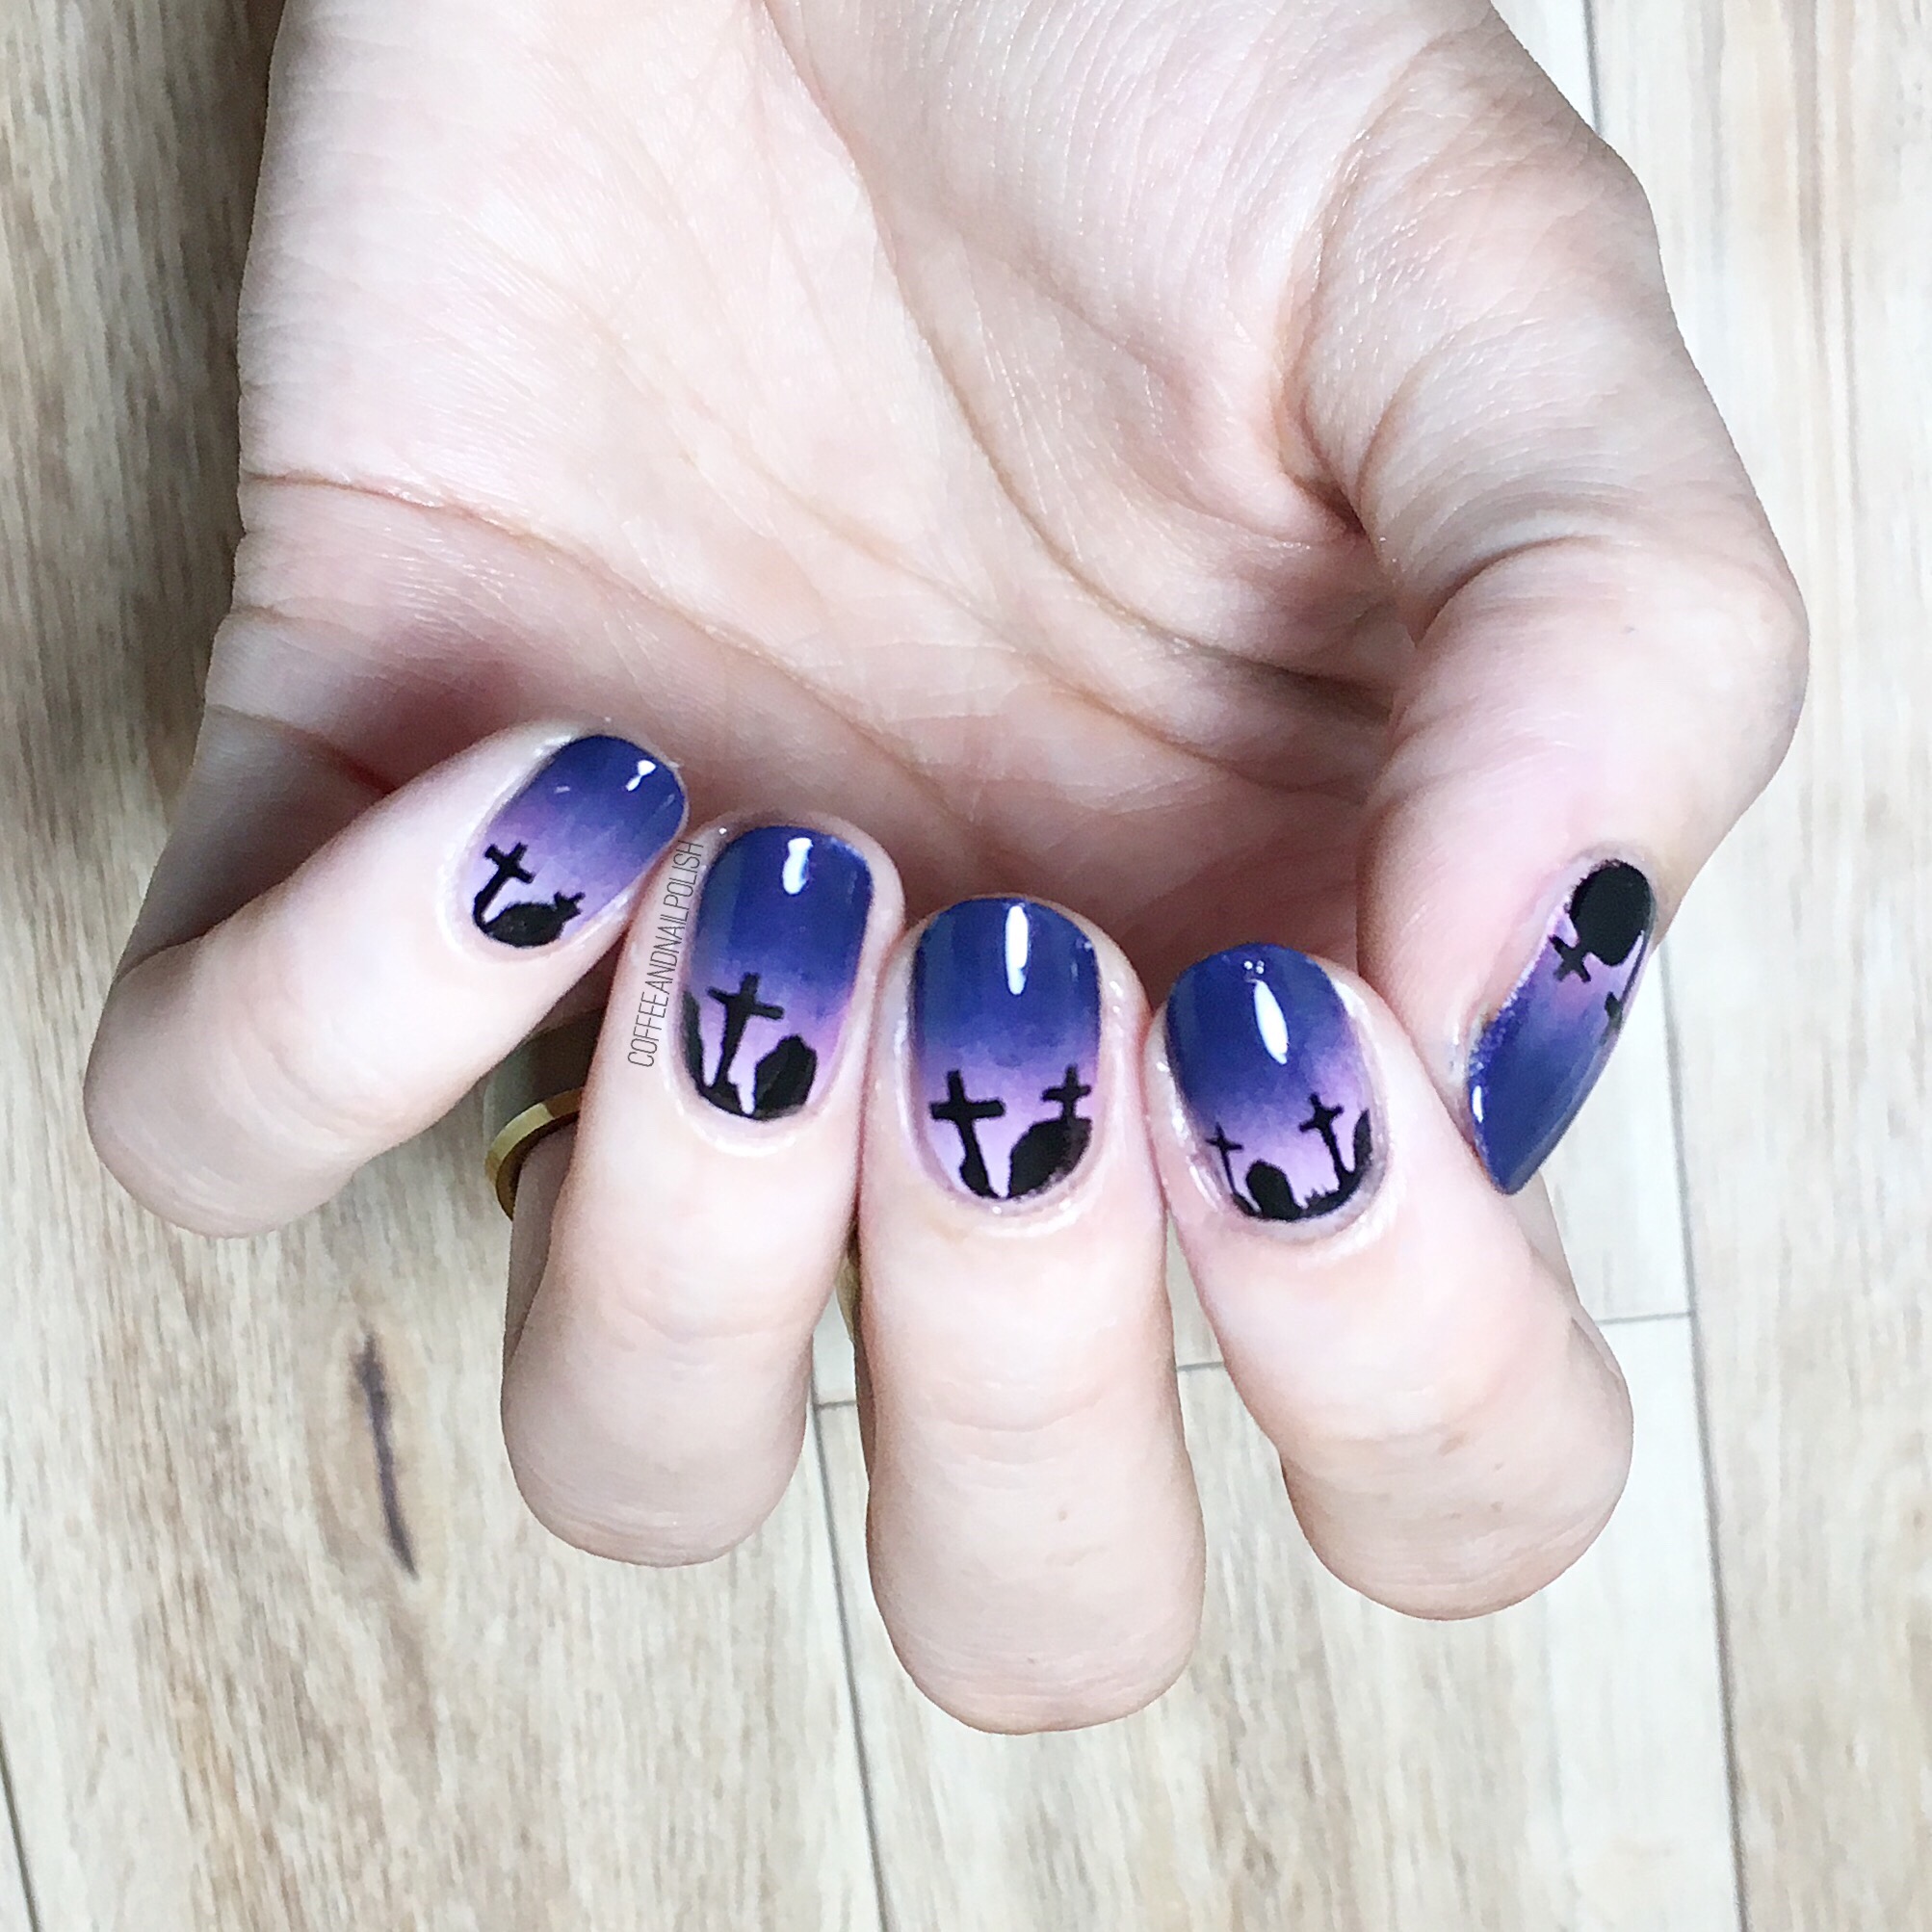
We’re over halfway to Halloween, which it’s time to get serious about Halloween nail designs! & what is more Halloween than spooky graveyard nails! Thanks to What’s Up Nails & Nail Polish Canada, I had a quick & easy time creating the spookiest of nails! 🎃 

The polishes used for this manicure were:

  • Base Coat: OPI Natural Nail Base Coat
  • Top Coat: Cutex Quick Dry Top Coat
  • Essie Go Ginza
  • OPI Auroa Berry-alis 
  • China Glaze Sleeping Under the Stars
  • Essence Back to Black 
  • What’s Up Nails Graveyard Stencils c/o: Nail Polish Canada 

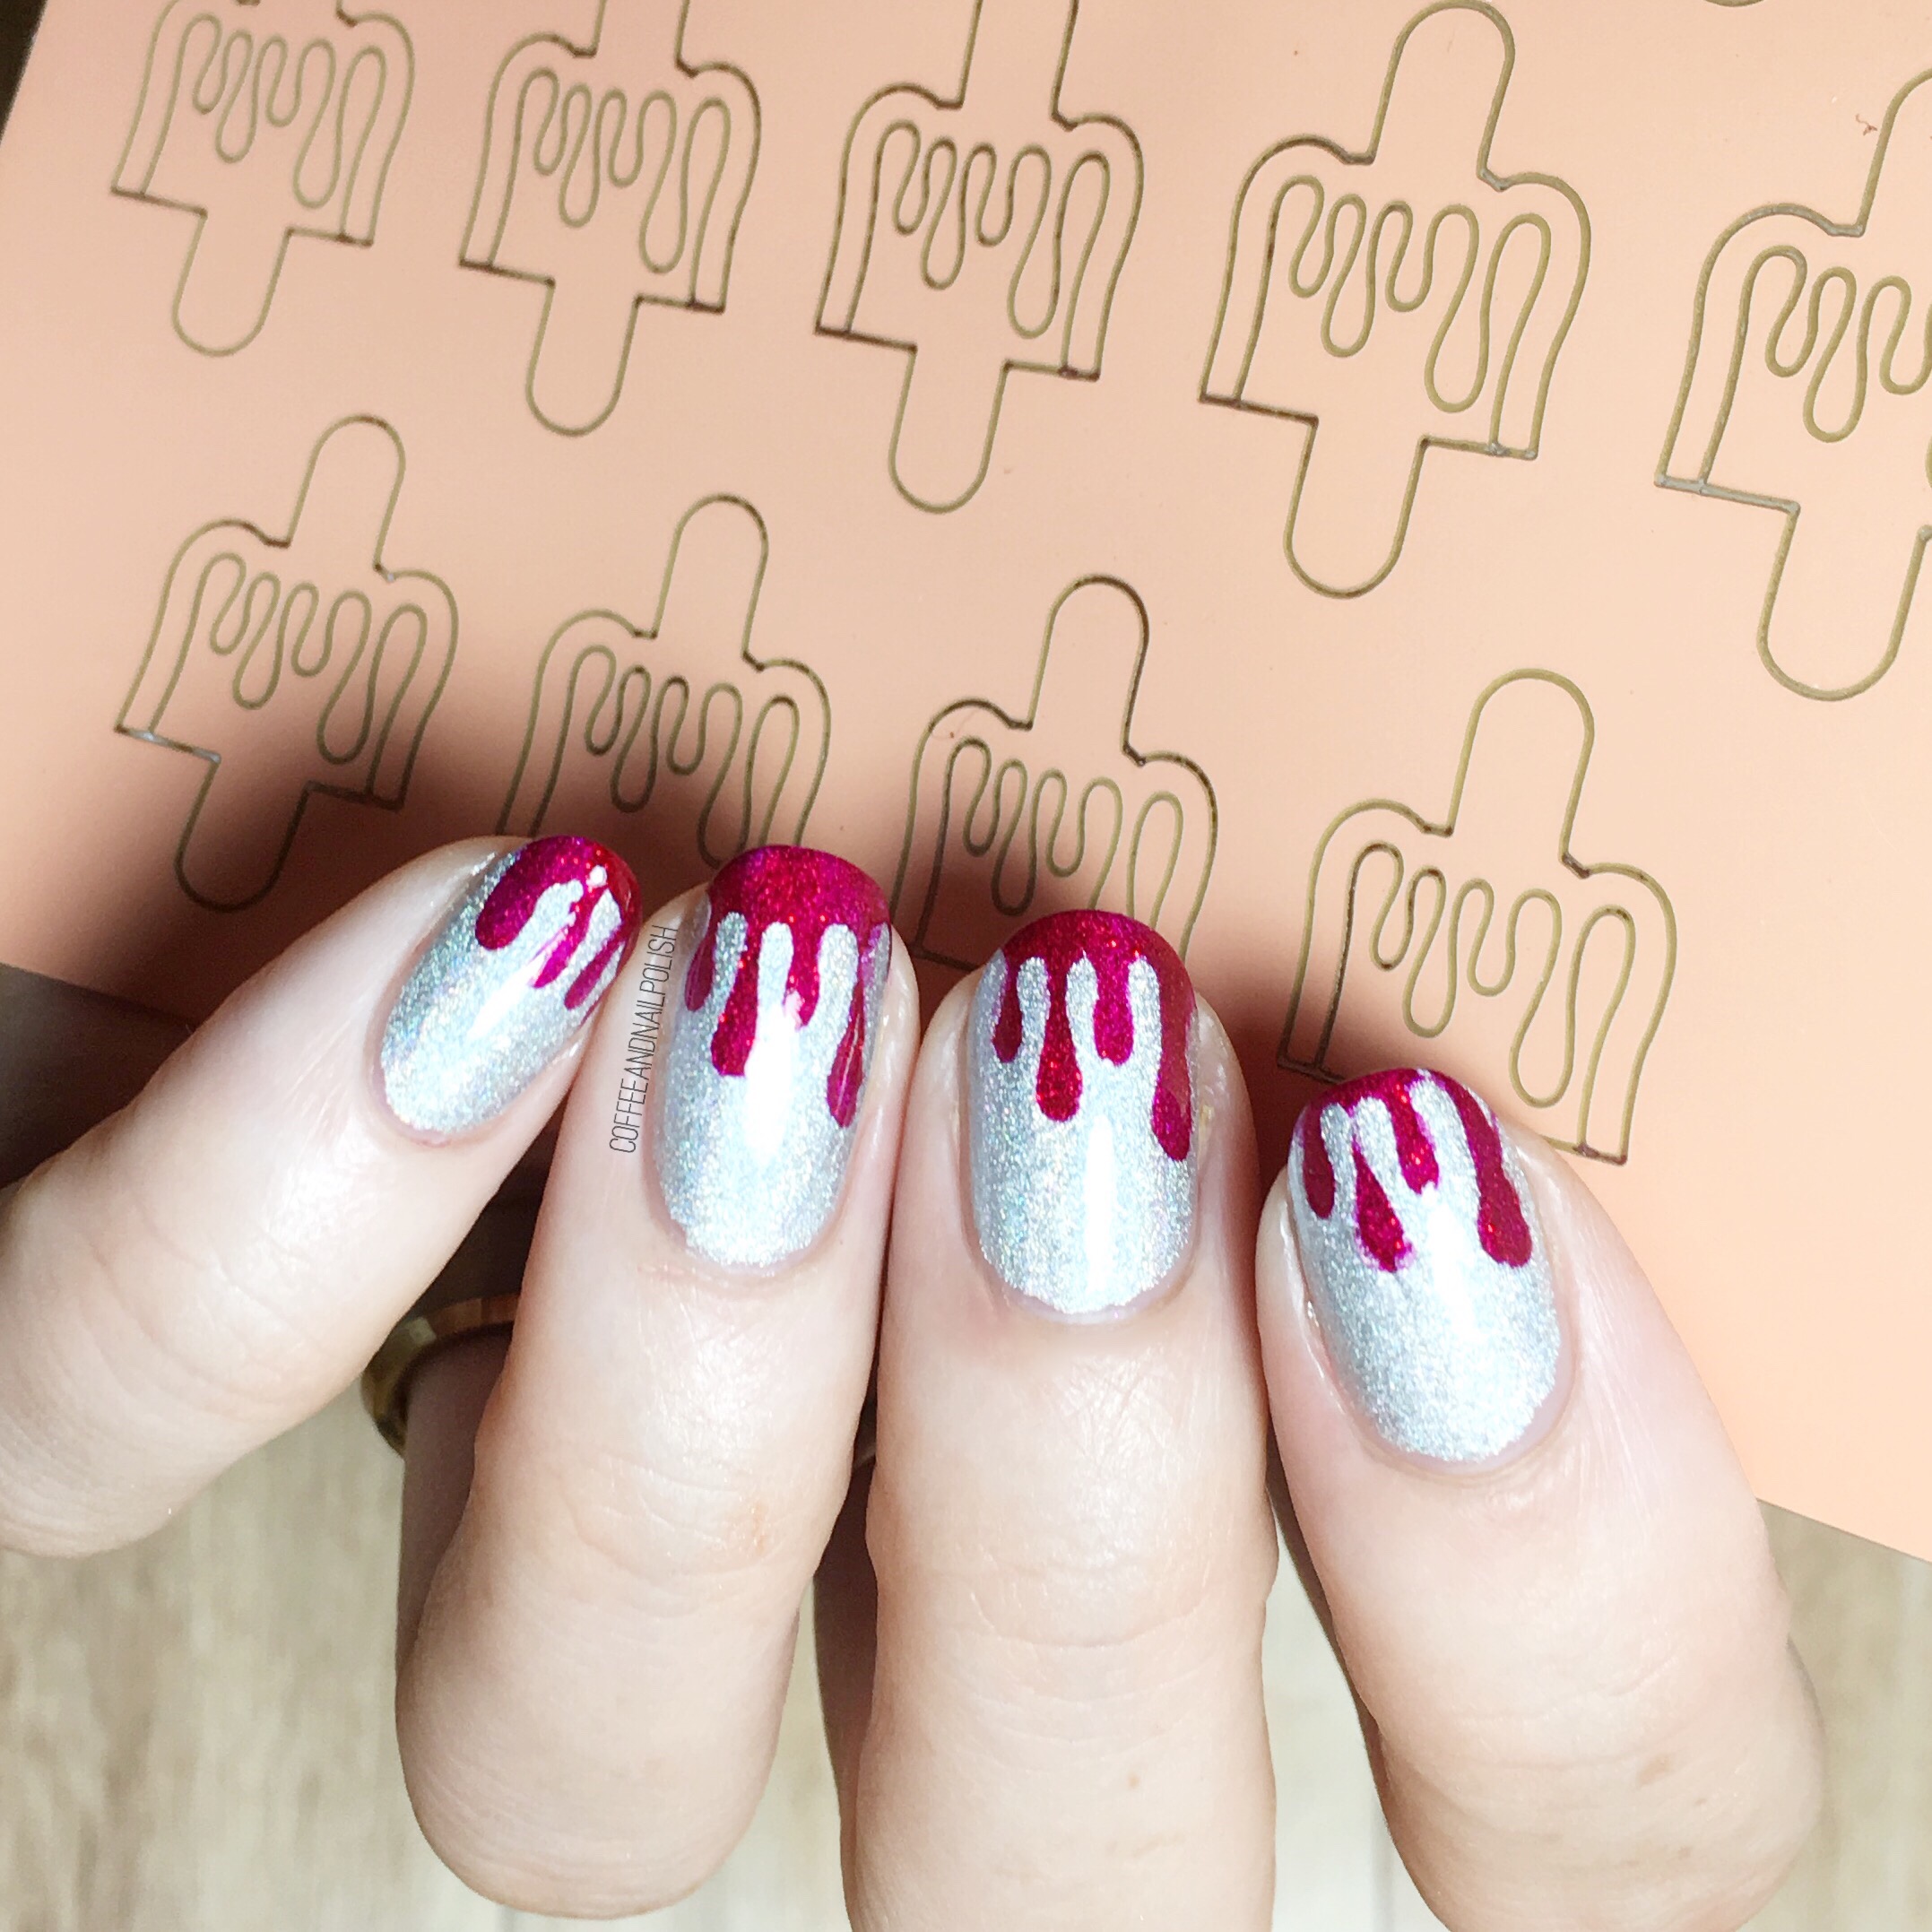
These graveyard vinyls are great because they have multiple ways you can use them—my favourite is to use them as a stencil & paint in the design. I found it worked best by sponging on the black using a tiny piece of make up sponge. You could also apply the stencil to your nail & paint over top or you could use the vinyl itself & seal it all in with top coat. Each sheet of Graveyard vinyls comes with 20 vinyls (inner & outer) in small & large size which means you have a ton of graveyard nails to do in the lead up to Halloween. 

I’ve been lucky enough to team up with Nail Polish Canada to share a code for TEN of my readers to score their very own graveyard vinyls just in time for Halloween! You can click here & enter the code E75337KJX9A1B in order to claim your own set of vinyls. 

What do you think of these graveyard nails? What Halloween design are you most excited to wear this year? Let me know in the comments below. 🖤

Happy Birthday Nails! 🎉🎈🎂 

I know, it’s Sunday which means normally I would be sharing a swatch with you. But today is not just any Sunday… it’s my birthday! So obviously I had to do something fun on my nails in honour of the occasion & I couldn’t think of anything more fun to put on my nails than a glittery purple cupcake nail (which are a few of my favourite things.) After perusing Pinterest searching “cupcake nails” I had an idea of how I wanted my design to look, & I’m so happy that they turned out exactly how I imagined! 

For this manicure, the polishes I used were:

  • Base Coat: OPI Natural Nail Base Coat
  • Top Coat: Cutex Quick Dry Top Coat
  • ORLY Plum Sugar
  • Nails INC Cherry Road
  • Sally Hansen Hard As Nails Hard To Get
  • Color Club Evolution
  • Cosmetic Arts Unnamed Baby Pink
  • Color Club A Warm Place
  • URSugar Zig Zag Nail Vinyls item #AUB39877 
  • Dotting Tool
  • Small Detail Brush


I really really love my birthday cupcake nails. I feel like it’s been ages since I freehanded anything & I was a little nervous about my cupcake but it turned out so cute! These are going to be fun to wear for my birthday celebrations with my family later this afternoon. Last year I spent my birthday in a dark room with an eye infection, so I’m determined to make up for that this year! 

Have a great Sunday everyone! 💜

Saran Wrap Smoosh Nails

I don’t do a lot of Saran Wrap smoosh nails, mostly because I find them fairly messy (& I ran out of liquid latex & I’m being lazy in replacing it). But every time I see one pop up on my Instagram feed I tell myself I need this technique in my life again. They just always look so cool! I’ve been struggling with inspiration lately, so I decided to risk the messy clean up & do a smoosh. 

For this manicure, the polishes I used were:

  • Base Coat: OPI Natural Nail Base Coat
  • Top Coat: Cutex Quick Dry Top Coat 
  • Essie Cocktails & Coconuts
  • China Glaze VII
  • Quo by ORLY Fairy Godmother
  • Saran Wrap, or plastic bag of some sort. 

If you’ve never done a Saran Wrap smoosh, there are lots of tutorials on the internet (this one from @snowglobenails is great). From my expirence, I find sometimes they can take a few tries before you figure out what works for you, but for me less is more.  I prefer to use maximum 3 shades together, otherwise I find my nails can end up looking kind of swampy. & I also try not to push blend colours too much when pressing down on my plastic. 

What’s your thoughts on smooshy nails? Do you have a favourite colour combination? Let me know your thoughts in the comments below! 

 Silver Chevron Claws 

I did not fall off the face of the planet, I swear. This weekend was busy with family Thanksgiving, trying to get our apartment ready for showing (we’re moving soon!) & dealing with a super upset stomach that left me with no energy for blogging. I decided to take a little break to recoup, wear some glitter on my nails. I’m finally feeling a little bit better, so I wanted to get a blog post up! & what’s better to blog about than chevron claws! 

For this manicure, the polishes used were:

  • Base Coat: OPI Natural Nail Base Coat 
  • Top Coat: Cutex Quick Dry Top Coat
  • Nails INC St Martian’s Lane
  • Nicole by OPI Phil’s Paradise 
  • Kiss Products Nail Art Striper in Black
  • Snail Vinyls Deep Single Chevron Nail Vinyls

This design is very reminiscent of my very first chevron moon design, colour wise. Comparing the two, I’ve definitely come a long way since those early days! Thank goodness for nail vinyls—I no longer have to create my own triangles in order to get the design right! But hey… it worked. & those first chevron moons are what started my all out obsession with the design, which has obviously lasted all this time! 

I’m feeling like I’m in a bit of a nail art lull right now. Even with Halloween approaching, I’m just struggling to be in the mood to paint my nails anything other than a solid colour (&, even then, I can barely make up my mind on what to wear.) My birthday is coming up on Sunday, so I’m dedicated to doing a fun design in celebration—maybe birthday cupcakes? Good thing I have 5 days to make up my mind! Off to Pinterest I go. 


What do you think of these chevron claws? Let me know your thoughts in the comments below! & if you have any birthday nail suggestions for me, please share! 💜

Dripping Blood French Featuring URSugar Vinyls


Ready for some more Halloween inspired nails? Today I have what I’m calling a dripping blood “French” Manicure that has just the right amount of scary & sparkles—which is just how I like my Halloween designs! 

The few times I’ve tried to do a dripping design, I’ve always done it using a dotting tool (which isn’t always easy to accomplish the right look.) These drippy nails were made much easier by using URSugar Vinyls which were kindly sent to me for review. 

For this manicure, the polishes used were:

  • Base Coat: OPI Natural Nail Base Coat
  • Top Coat: Cutex Quick Dry Top Coat
  • Gosh Holographic Hero
  • China Glaze Ruby Pumps
  • URSugar Drip Nail Vinyls item #AUB39877 —click to buy

These URSugar vinyls are great for a design like this. You have two options—you can paint your nails a base shade & apply the stencils & paint over with a second shade, pull off & reveal or you can use the other half to paint inside (like a stencil). I find the second option works best for a design like this, done at the tip of your nails. 

What do you think of this Halloween-y take on a French manicure? Would you wear this design? Let me know your thoughts in the comments below! 

*PR SAMPLE* Some of these items were sent to me for review. However, all opinions are my own.