Polka Dots and Roses and Pink… oh my!

It’s official.

I am on vacation.

Today’s nail art is some fun floral. Originally when I started these I was just thinking of doing some pretty simple floral accent nails, and then I pulled out my dotting tools and ending up getting a little dot happy. But then end result I think is fun.

floral

The polishes I used for this manicure were:

  • Mary Kay Signature Hot Pink Fuchsia.
  • ACO by Ardene Bridezilla.
  • Sinful Colors Island Coral.
  • Bourjois Paris  in 1995 Grains de beauté.
  • Bourjois Paris in 1913 Cendres ds Roses.
  • OPI Pinking of You.
  • ACO by Ardene Green Peace.
  • Sally Hansen Xtreme Wear Kiwi Bikini.
  • Essence Gel Look Top Coat.
  • Essie Good to Go Top Coat.

Aren’t they pretty? Even though purple is my favorite color, I am partial to pink nail polish… especially when it involves a floral. (And polka dots!)

 floral3

floral2

floral4

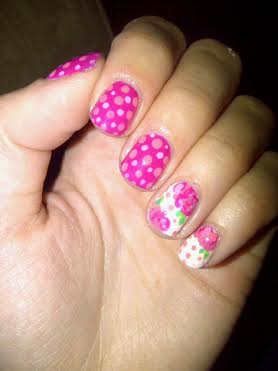
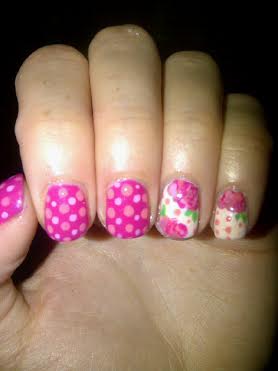
So what do you think of this NOTD? I ended up muddling my roses on my pinkies, which was a little disappointing, but other than that they look great. =)

And now that I’m on vacation, I’m going to go through and start thinking up some fun wedding nail art to share with you guys. I haven’t quite figured out what I’m doing for my friend’s wedding on Friday, but I’ve got a couple days to figure it out. I have a bridal shower to go to tonight, so I’m going to figure out something pretty to wear on my nails for that.

Coral stripes & my first real striping tape manicure.

When I first read about the OMD Nail Art Challenge for this month I got excited. Even though my first attempt at the 30 Day Nail Art challenge kind of crashed and burned, I wanted another attempt at accomplishing a challenge. What I like about this challenge is you don’t have to do it every day. That makes it easier when I want to be able to do something other than the prompt.


Today’s prompt was Coral. As you have seen, I love coral. And I own a lot of coral nail polishes. I also really wanted to attempt something with the striping tape I received for my birthday last year. I’ve played around with it a little bit, but never accomplished a full manicure. So this was my first real attempt using it.

coralstripes

The polishes I used for this manicure were:

  • Sinful Colors Easy Going — creambase color.
  • Quo by ORLY Sugar Cookie — cream base color.
  • Sally Hansen Xtreme Wear Coral Reef — stripes.
  • Sinful Colors Island Coral — stripes.
  • Rimmel Salon Pro Reggae Splash — stripes.
  • Essie Go to Go Top Coat.

coralstripes2 coralstripes3 coralstripes4

For a first attempt with striping tape, I’m really happy with the outcome. The lines are definitely cleaner than when I freehand my lines, and I like that I could create thicker lines easier. Of course, it did take much longer to do my nails than it usually does, but that was mostly cutting and applying the tape, and then taking the time to pull it off. But I can definitely see myself using it again.

So what do you think of these coral stripes? I think it’s a great Summer manicure, even though I’m going to spend the majority of my day cleaning and organizing my closet and purging old clothing I never wear. Not the most glamorous way to spend my day off, but it is a great excuse to play dress up! =)

Outline Gradient Nails.

I’m kind of a little obsessed with gradients lately.

It’s only been the last little while that I’ve actually been able to get them right–after many fail nail manicures. After the gradients I did for my Bestie Twin Tropical Nails turned out so well, I really wanted to give a full gradient manicure another try.

outlinegradient3

The polishes I used for this manicure were:

  • OPI My Boyfriend Scales Walls — white base color.
  • Sinful Colors Island Coral.
  • ACO by Ardene Forever Young.
  • LA Colors In A Flash.
  • Cherimoya Black.
  • Essie Go to Go Top Coat.

outlinegradient2 outlinegradient4

outlinegradient5

This manicure reminds me of something, but I can’t quite figure it out. I ended up creating a black outline around the nails as I didn’t quite get my sponging of the different colors to the ends of the nails, so there was some white edges. This seemed like the perfect solution for hiding that. =)

‘Tis the season… for prom nails.

Tis the season for Prom. I’m long past my prom years, but my old neighbour I used to babysit is attending her grade 9 grad this year, which is pretty much a mini prom for those graduating to high school. It’s also a very big deal to them, almost as much as prom is to high school seniors. So when she asked me to do her nails for the big dance, I was more than honored. Her dress was lime green with sparkles, so I went with that theme.

abby5

I did a glitter gradient at the bottom of her nails, with an accent nail of pure sparkle. (I also did her toes to match with a glitter gradient.) Her dress has a whole lot of glitter and sparkle going on, so we wanted to do something that would match. These are going to look awesome when the lights at the dance hit them! Just like a disco ball!

The polishes I used for her nails were:

  • Pure Ice Wild Thing
  • Sally Hansen Xtreme Wear Celeb City
  • Sally Hansen Xtreme Wear Ice Pop
  • NOPI Inner Sparkle.
  • Color Club Platinum Record.
  • OPI I Snow You Love Me.
  • Essie Good to Go Top Coat.

Continue reading “‘Tis the season… for prom nails.”

Leopard Print Day Two–changing things up a bit.

So technically this isn’t new nail art. I was so in love with my leopard print nails from yesterday, I couldn’t take them off. However, my purple color chipped badly at work so I needed to change them up somewhat to pull off day 2 nails. I don’t often wear my manicures for more than a day, mostly because I chip them so badly at work on a regular basis. But I just couldn’t take off the leopard print–I am so proud of how great they look, I had to give them at least another day of work. So what could I do to chance this manicure up a little bit?

day2

After grabbing my blue Kosmic Colours nail polish, and painting on the color I still wanted to do something fun. I picked up OPI’s I Snow You Love Me at Chatters for a sweet deal a couple weeks ago, and read online about how awesome it was for a glitter placement manicure. I’ve never done glitter placement on my nails, but I really wanted to try.

day2b day2c

It really wasn’t as hard as I thought it would be. All it took was a steady hand and my dotting tool. The blue wasn’t completely dry when I started so the glitters kind of sunk into the color a little bit, but it still turned out neat. Like little diamonds on my nails. I’ve been really wanted to try out studs and such on my nails as I see them on so many awesome manicures on my favorite nail art blogs, but I haven’t had a chance yet. These little glitters definitely gave me a taste of how pretty it can look though!

day2d

day2e

So how do you save a manicure you really love? How long do you tend to keep your manicures on your nails?